According to my observations, few of those who could independently connect wifi router, if there is wired Internet knew how to do it RIGHT. That is, set up a wireless network with it and combine it into different devices. As a result, they subsequently face difficulties that could be solved at the design stage of the local network.
How to connect wifi router?
Before proceeding to step by step description on connecting a Wi-Fi router, I want to focus your attention on one point.
To create a full-fledged local wireless network, you need to buy exactly such a device as a ROUTER, or it is also called a ROUTER.
The fact is that there are a lot of devices similar in appearance and functionality for various purposes. For example, out of ignorance, it is easy to confuse it with a wired router without WiFi, which also distributes the Internet signal to devices. But only with the help of cables - it does not have an antenna.
Another device similar to appearance- access point. She generally has slightly different tasks from ours. A characteristic difference between a router and an access point is that it has several sockets for network cables. While at the point he is usually alone.
The point of connecting a router is that it is now, and not your PC, that will connect to the Internet via a cable. To do this, all the necessary parameters required to connect to the provider, which were once applied in your desktop computer, will now be registered in the router settings. And all other devices will already receive the Internet via wifi from it and according to the rules that will be set in it.
For clarity, look at the diagram:

In order to connect a router at home and set up a Wi-Fi network, I used a dozen models from absolutely different manufacturers. I can say with confidence that in terms of the actual configuration of the WiFi router and connection to the provider, the difference between them lies only in the details of the graphical design of the administrator panel. Therefore, having learned the principle once on one model, you can apply them to others. Today, as an example, I will illustrate with screenshots from two routers - TrendNet TEW-632BRP and ASUS WL-520GC.

How to connect router to internet via DHCP?
The first setting we will look at is the DHCP server setting.
If earlier the computer was alone and it alone received an IP address from the provider, then we can hook up many computers and gadgets to the router. And this means that it is the router, instead of the computer, that will “communicate” with the provider’s equipment. And already within the framework of our home network between these devices, it will itself assign an internal IP address to each computer, laptop, phone, TV and everything else.
Procedure:
- After connecting to the power supply, first of all, you need to configure the router to communicate with the computer. To do this, insert the Internet cable into the WAN slot on the device. And the other cable, with two plugs, which most likely came with the device, is connected at one end to the computer's network card. Where there used to be an Internet cable. Others - in any of the slots LAN1, LAN2, LAN3 or LAN4 of the router.

I also want to note that it is better to connect the router to the network through a source uninterruptible power supply. I had a bad experience when good device from Netgear sank due to a power surge in the network. It just began to broadcast wifi not at 100, but at 2 meters. Of course, I had to buy a new one.

- Next, take the installation disk that came with the router. And start installing the drivers and software.
- After that, we need to configure the computer to work with the router. Now we have a network card configured to go directly to the Internet through a provider. So, perhaps, some data is registered in the control panel that it is important for us to save and use after that when working with the router. To do this, go to the TCP / IP v.4 protocol settings as shown in the diagram:
For Windows XP: Start > Control Panel > Switch to classic look> Network connections.
In Windows 7: "Start > Control Panel > Network and Internet > Network and Sharing Center > Manage network connections > Change adapter settings".
In the screenshot, I go to the “Wireless Connection” settings, but you don’t have it yet, and since we connected the computer to the router with a cable, you need to select the “Local Area Connection” item:

If you have something indicated here, then write down these data on a piece of paper. This is especially true for those who have lost their service agreement and do not know the data for connecting to the World Wide Web. With a certain type of connection, which will be discussed below, this may come in handy. After that, here, in the network connection settings on the computer, you need to set the IP, gateway and DNS to automatic. We will already enter these parameters in the wireless router itself.
- After that, go to the address "http://192.168.1.1". Typically, configurations with the router occur here, if they did not have to be done at the software installation stage. But you can look in the instructions for the device on which path to enter the router control panel. Since the default IPs on different models may differ. Also another popular placement brief instructions— a sticker on the bottom of the device. Look there too. If there are no instructions in the instructions, or it is lost, then go to the Control Panel, as I described above. Only after right-clicking on "Local Area Connection" in the window that appears, click the "Details" button. In the window that opens, look for IPv4 Default gateway - this is the IP address of the router.

- Now, finally, we go to the address indicated there through the browser (http://IP ADDRESS OF YOUR ROUTER). And we find the DHCP Server item in the menu (in Trendnet it is combined with WAN) and set the range of values for possible IP addresses of devices within your local network. For me it was like this: Start IP - 192.168.10.101, End IP 192.168.10.200. And of course, opposite the DHCP Server item should be the Enabled parameter. Domain Name or Host Name is the name of the future home wifi network. I’ll make a reservation right away that the screenshots below are taken from my devices that are already working or have been working for several years. Their interface is in English, so it would not be easy for a domestic beginner to figure out what's what without help right away - I hope these pictures will help you. Most modern firmware and software are already in Russified form, so it will be even easier to figure it out.
This is how it looked in Trendnet (highlighted in red):

And like this in ASUS:

Setting up a connection between a computer and a router via LAN
Now we will set the parameters for our wifi network at home - IP and router mask. For Trendnet, this is the same item (see Figure 1, highlighted in green), for Asus, the WAN & LAN section is at the very bottom of the settings page. In the first case, I set the IP 192.168.10.1, in the second - 192.168.1.1. This is the address within the local network at which we can access the admin panel through the browser. And through which computers will access the Internet. Mask - default, 255.255.255.0
Connecting a WiFi router to the Internet through the WAN port
These were all flowers, now the most interesting thing is setting up an external connection of the router to the Internet.
There are several types depending on the settings of the provider. This happens in the WAN menu.

There are several more options for connecting to the provider's equipment, but I did not come across them. So I won't talk about them for now.
How to encrypt a WiFi connection
If you did everything right and saved all the settings, then all devices that support wifi should now see a new network with the name you specified. However, this question, how to connect wifi at home, is not yet closed. The home wifi network turned out to be open, that is, anyone can use your Internet access for free. In order to break everyone off and make the wifi network at home available only to its owner, you need to protect the wireless network.
There are several ways, I used two WPE (or Shared Key) AND WPA in my practice. The latter is more reliable, so I will consider it. We go into the security settings. In Trendnet, this is the "Security" menu item, in Asus - "Wireless > Interface".
We select WPE or WPA Personal (PSK, TKIP) in the menu, set a password for authorization - from 7 to 64 characters. And we save. I show how it was for me:


Well, now to enter the Internet through your router, you need to enter a password. The final touch remains - so that there are no problems connecting all kinds of devices to the router and with the operation of programs, we will manually set the DNS servers. The setting of this parameter is located in the same place where the parameters for connecting to the Internet were entered. We activate the function of manually assigning DNS servers and write the IP from Google there:
- DNS Primary (or DNS Server 1): 8.8.8.8
- DNS-Secondary (or DNS Server 2): 8.8.4.4
You can also specify one of the Yandex servers (for example, 77.88.8.8).

As you can see, connecting wifi through a router and making a wifi network at home is quite easy. Hope everything works out for you too!
Now the traditional video for dessert on connecting a router, which will tell you even more clearly about the typical settings for working with the network.
Now generations of computers are changing at an incredible speed: technical solutions, which only yesterday predicted a bright future, today are on the sidelines of progress, safely forgotten by everyone.
And some new items, the expediency of which was questioned by the entire computer community, after a short period of time become incredibly popular, moving into the category must have(should be for everyone, irreplaceable). The former include Rambus memory, which was once unsuccessfully promoted by Intel, as well as a slot for expansion cards installed on motherboards and intended, in fact, for software and hardware modems. An example of solutions from the second group is the Wi-Fi wireless communication standard.
Now you can find information about this very easily, but how to install WiFi at home is often silent. Apparently it is considered that automatic configuration reduces the need for user intervention to a minimum. In part, this is true. On the other hand, not knowing how to install WiFi at home, you may well encounter a number of problems. Nuances are always important. Especially if you need to choose a router for your home.
Global network with problematic access

Everyone understands that the absence of the Internet drastically limits the capabilities of a computer in terms of searching and issuing information, so now it is difficult to find a person whose home computer would not be connected to the Internet. Moreover, providers offer more and more attractive offers in terms of cost. As a result, a scheme is most often implemented when a twisted-pair cable is directly brought into the house and connected to the computer's Ethernet port. Everything works fine until there is a need to provide access from another computer system (two computers in the house is no longer news). How can I do that?
Options
There are several options for accessing the Web from multiple computers:

How to set up WiFi at home
A router is a device that manages data packets. Can communicate with computers via twisted pair or radio waves (WiFi). The second allows not only to refuse wires in the house, but also to provide access from all mobile devices within a radius of several hundred meters (according to the passport), which is very convenient.
So, how to install WiFi at home? First of all, you need to make sure that all devices that need to be granted access to the Network have a WiFi radio module. It is present in modern laptops and mobile phones, but for a personal computer you will have to purchase an expansion card. Then you need to decide if you want to share the popular IPTV solution. If yes, then Dual PPPoe and Multicast should be present in the WAN settings of the router. When linking a provider to MAC address there must be a MAC clone function. It is pointless to recommend any manufacturer - this is a personal choice of the user. It is also worth paying attention to the support of IEEE standards - they must match or be compatible. The type of radio module used can be found in the passport for the device or on the manufacturer's website.
Connection
So, bought. The twisted pair from the ISP is connected to the WAN connector. On all other machines, the radio modules are turned on (you need to install the driver and enable the device). After that, you may need to open the configuration window (usually appears by itself) of the network on each computer and confirm the use of the discovered access point. That's all. If the DHCP mode is enabled on the router (most often this is the case), then you can start browsing the Internet resources. If problems arise, then you need to use the auto-installation disk that comes with the router.
The Internet without wires is gaining more and more popularity and this process cannot be stopped. To have wireless Internet at home, or a point WiFi access. I have tried to describe in detail the connection process WiFi router with photos and videos.
In fact, there is nothing complicated here, but it will take a little care and, possibly, the phone of your Internet provider. The whole process can be divided into three stages: physical connection, setting up a router, and setting up a computer or laptop.
Connecting the router to a computer
After you have taken the router out of the box, you need to connect it to your computer. By default, I will mean that you have a regular wired Internet.


Entering the router settings
After turning on the router, it needs time to boot up and clean up. At this time, the lights on the front panel may turn on and off, wait 1 minute. We need to go to the administrative interface of the router and configure it. This is done through any browser, such as Internet Explorer, Google Chrome or Opera. To enter the "admin panel" of the router, you need to write in the address bar:
192.168.1.1
login: admin
password: admin

A small note: the address 192.168.1.1 is used in most routers. If you get a "Page Not Found" or "Page Not Opening" error, then try using a different address, for example: 192.168.0.1
If there is an ambush here, then you need to find out the correct address, for example, from a sticker on reverse side devices:

If it is not there, then you need to look at the instructions, which may be on the bundled disk, or search the Internet from your phone. The same applies to the login (username) and password (password), i.e. not all of them are admin/admin. If the device is used, then maybe someone changed the default settings. In this case, you need. To do this, you need to find the “Reset” hole on the router and press the button inside with a match.
Network cable not connected
Let's say the login address and login / password are known, but still you can't enter the admin panel due to a network error. Then you need to check the network card settings in Windows 7/10. We go "Start -> Control Panel -> Network and Internet -> Network and Sharing Center". There on the left we find "Change adapter settings". The "Local Area Connection" connection should NOT be in the "Network cable not connected" status:

If so, then most likely this is the case, i.e. The cable is not connected, is not connected in the right place, or is defective.
Also, the status should not be "Disabled". If so, then right-click on the icon and select "Enable".
Incorrect TCP/IP settings
If it still does not enter the admin panel, then right-click on the connection icon and select "Properties", and there we find "Internet Protocol version 4 (TCP / IPv4)" and double-click on it. In the protocol properties, you need to check that the checkboxes are on "Obtain an IP address automatically" and "Obtain DNS server address automatically". Click "OK" twice. Now wait 10 seconds and you can check.

I hope we figured it out and got into the admin panel of the router without any problems.
Quick Wi-Fi connection setup on the router
Here it is more difficult, because All routers are different and the interface can be very different. Yes, and Internet settings for providers can also differ dramatically. If you have a TP-Link router or another with the ability to quickly configure, then you are lucky, everything can end very quickly. We find the “Quick Setup” item in the menu on the left or top and follow the instructions of the wizard:
On the first screen, just click "Next"

I have a 3G router, so I'm prompted to select my preferred connection type: 3G or cable. I don't have a 3G modem so I choose "WAN only"


If you do not know what to choose, then try the automatic mode. The router itself will try to determine the type of connection. If he succeeds, then the wizard will proceed to the next step of the setup. But you may need to enter a username and password (in the case of a PPPoE connection)

or network settings (in the case of a Static IP connection)

All this information should have been given to you by the provider, carefully look at the contract. If the wizard fails to determine the connection automatically, then you will have to call the provider and ask, or try at random, there are, as it were, not many options
At the next step, the wizard prompts us to enable the Wi-Fi module:

- "Wireless Radio" - this is Wi-Fi, should be in the "Enabled" position
- In the "Wireless Network Name" field, enter any name of the point on English language
- Parameters: "Channel", "Mode", "Channel Width", "Max Tx Rate" set as in the screenshot or leave by default.
- , safety. Don't leave Wi-Fi without a password! Not only will everyone around you use your Internet and download the channel, it will be such a huge, huge hole in your security! In fact, anyone will be able to access all of your personal data. We put the switch in the WPA / WPA2 position and enter a complex password.
A small digression: when everything works, if it turns out that the Internet is too slow or if there are, then try choosing “Channel” not “Auto”, but some number from 1 to 13 and save the settings. You can go through all the numbers in search of a suitable one. The fact is that now there is a lot of wifi equipment around, and each device needs its own channel to work. As a result, devices operating on the same channel interfere with each other.
It’s good if you don’t have the cheapest router and it can operate at a frequency of 5 MHz. In this case, there will be a corresponding option to select a frequency of 2.4 or 5 MHz. Much fewer devices operate at this frequency, and therefore the likelihood that someone will interfere is reduced significantly.
Manual setting
Well, if auto tuning nebylo, then you have to go through the points with pens. We find a section something like "Network" and there is an item with the word "WAN":

There should be similar settings items. Everything here is the same as for automatic configuration, only we ourselves must select the type of Internet connection and enter the login / password.
- "Secondary Connection" leave "Disabled" or "Dynamic IP", this is only needed to access the provider's internal network.
- "Connection Mode" set to "Connect Automatically" so that the router connects to the Internet automatically after each reboot.
If the provider requires you to specify the IP address and DNS servers, then this can be done in the Advanced settings, but usually this is not necessary:

But, for example, I have a provider with problematic DNS servers and I register the Google server: 8.8.4.4 which always works! How does a problematic DNS server manifest itself? This is when no site or, but Skype or torrents work without problems! However, if you install the server on Google, then some providers' internal sites may not open, for example, such as account replenishment and statistics.
It is here in manual settings, you can specify the type of connection - VPN, if you have one. To do this, select "L2TP", enter the name / password and address of the VPN server (provided by the provider). If an IP address, mask, gateway and DNS are provided, then select "Static IP" and enter all the data. At the bottom, do not forget to check the box for automatic connection.

That's it, save the settings and look for the menu section "Wireless Settings" (wireless connection):

All settings have been described above. For Wi-Fi to work, there must be a checkmark "Enable Wireless Router Radio".
Next item, here we turn on encryption, that is, we set up security as already mentioned above:
Router setup completed! I advise you to save all the parameters from the menu "System Tools -> Backup & Restore". Button "Backup" - saves, "Restore" - restores from the saved file. This will come in handy in case everything suddenly goes to hell and all settings are lost. You can easily restore them from a file
Oh yeah, I almost forgot, change the default password for logging into the admin panel. This is done in the section "System tools -> Password".
How to connect a laptop to WiFi
In Windows 8/10, you need to click on the icon at the bottom of the screen:

A panel will pop up on the right where you need to select the desired wireless network. Remember, we gave the name of the network in English? Here it is to be found. If this is a public institution and you do not know which network to connect to, then choose any with a higher signal level. When hovering over a network, a hint is displayed whether a password is required or not. If you see something like WPA / WPA2 on hover, it means that you need a password to connect to WiFi networks.

You can leave the "Connect automatically" box checked. Next, the system will connect to the router and ask for the Wi-Fi password that we set earlier. If your device supports QSS technology, then you can not enter a password, but simply press a button on the router signed as “QSS”. In this case, the password will be filled without our participation!

When the system asks about file sharing, I advise you to select "No, do not turn on sharing" if you do not know why it is needed:

I made a short video tutorial on how it's all done:
In Windows 7, everything is the same, only the icon and the window with the found networks look like Semyorovsky

Here also find desired connection, click on it and voila.
No wifi icon or not connecting
First, check if the wireless module is turned on using the switch on the laptop case. Many Asus, Toshiba, Sony and Acer models have this switch. On some laptops, wifi can be activated using hotkeys, such as "Fn + F2" (look for the antenna icon on the F1-F12 buttons). In any case, the method works through the "Network Control Center", just as when we "turned on" the network interface to connect to the router via wire.
In more severe cases, please study.
Hope everything worked out for you! Most likely, questions will arise on setting up the router, tk. interface and parameter names are different for everyone. To get an answer in the comments, send immediately a link to a screenshot of the window.
Wi-Fi provides a fast wireless Internet access without being tied to wires and a modem. All you need is a device with a Wi-Fi module - using it, several devices can connect to the network at once.
For correct setting router does not require special education
Buying and setting up a router will take a little time and does not require special knowledge. To consider in detail all the stages of connection, we will use the settings for TP-Link brand models, the most popular among a large number of users.
Before moving on to installing Wi-Fi, you need to figure out how to set up the router and make sure it works properly.
How to connect a Wi-Fi router? First, we choose a place for it - the main thing is that it does not stand on the table where the computer is located or on the system unit, since in such cases interference in work often occurs. Therefore, we move it a little away from other equipment and place it closer to the center of the house so that the waves cover as much of the area as possible.
To find out how much the router covers the room, download special applications after installation - they will make the device work as productively as possible.
On the back of the router there are the following connectors (in the basic version):
- 4 Lan - port for connecting to a PC. A maximum of 4 computers can be connected to one device at the same time. We insert the cable into one of the ports, connect the other part to the connector on the back of the system unit.
- A cable with an Internet connection is installed in the WAN cable socket.
- Plug the power cable into a socket.

You will also see a reset button and an on/off button here - their functions are clear. When you figured out the wires and inserted them where necessary, an icon about the new connection will appear on the bottom of the desktop. Now we need to find out if your PC has installed the router correctly.
Device Manager - setting up a computer with a router
How to enter the router settings and check if the computer correctly recognized the equipment. We use the Control Panel, stop at the Network Connections chapter - if you have Windows XP, in Windows Vista / 7/8 this section is designated as "Network and Control", "Network and Sharing Center".
Current connections will appear here - select "Local Area Connection", look at the properties. You will now see a list of components where you stop at "Internet Protocol TCP/IP". Here we check how the checkboxes are marked:
- Usually, lines are highlighted that talk about automatically obtaining an IP address and DNS server.
- For some providers, the information is entered manually, so you will see the completed lines. Check them with the data in the contract or instructions for the device, enter the correct numbers if they do not match.
The next step is to go to how to enter the router settings.
Browser and login options
The router is configured using a browser.
Enter your IP address in the address bar. In most cases, this combination is 192.168.1.1 - the standard version of the address, which, however, differs with some Internet service providers. After pressing Enter, you will see the Wi-Fi router settings. If this does not happen, then the IP address is not suitable and you need to enter other numbers.

How to find out the IP address:
- In documents or on the back of the router.
- If, when entering the properties of “Local Area Connections”, the IP address field was previously filled in, and there was no automatic detection, copy it.
- Try checking other addresses - the last two values might look like 0.1, 0.2, or 1.2.
- Enter in the command line (it opens through the "Start") the action cmd, and then - ping 168.x.1, and you will be shown all the parameters of the device.
After entering the IP, a form for entering a login and password appeared in front of you. We fill both lines here with the word admin, after which the parameters of the router itself will appear directly.
Hardware flashing
First of all, setting up the router begins with flashing it to the current version - after the release of each model, a lot of time passes, during which improvements are made, errors are corrected. Therefore, installing the most up-to-date version will help to avoid malfunctions.
You can get it on the manufacturer's website. Download the file and go to the parameters again (you know how to enter the router settings through the browser) in System Tools, subsection Firmware Upgrade. Here we select "Browse ...", upload the file and after clicking Upgrade, the update will begin.
Clarification: firmware is optional, so you can do without it - this will not interfere with the operation of the device.
Internet connection setup
After rebooting the Wi-Fi equipment (it will happen automatically), we proceed to setting the parameters for accessing the World Wide Web. In the System Tools section, select the Password tab and enter, at your discretion, new data to enter the settings.
Now, in the Network section, we stop at the WAN column, where we select the type of connection provided by the provider. Mostly this is a dynamic IP (Dynamic), but in some cases this option is not correct.
How to find out your connection type?
It is listed in the documents along with the rest of the data for setting up a Wi-Fi router. If they are not available, find them on the Internet service provider's website or contact a specialist by phone.
Note: if you need a different type of connection (not dynamic), add it yourself Additional information to the fields located in this form after selecting the desired option.
The rest of the fields will be filled in automatically if you select the Dynamic IP option.

Let's move on to the Wireless section. We put a tick in front of Enable (if there is such a line), in the Wireless Network Name or SSID we come up with a name for the connection, which will be seen by everyone who wants to use Wi-Fi. Below there may be a tab for selecting your country - specify it, save the changes made and proceed to the next step of our setup.
Wireless Security - filling in this part of the parameters should be taken seriously, because here you can secure your network from unauthorized access. We select WPA / WPA2 and set a password in the PSK Password field - no one will be able to establish a connection with your Wi-Fi without it.
Optional: MAC Address and copying it
Sometimes providers bind a Wi-Fi access point to a PC network card. This equipment has a personal MAC code, which we copy to the router settings - for this you need to click the "Clone MAC - Code" button.

Where to find it? Depending on the manufacturer, the address can be located in different sections, mainly in Wireless. In the most common TP-Link models, the MAC address is located in the Network folder; to copy it, you need to select a special column.
Wi-Fi router setup completed successfully. Confirm the reboot - the router will prompt you to do it, then all the changes made will take effect.
Wireless access is convenient, practical, setting up such an Internet connection is simple, it takes a little time and a little effort. Now you know how to go to the router settings and fill in all the necessary fields to get quick access, no matter where you are in the room, and use the Internet on any device that supports this technology.
Good day!
Many users are afraid of setting up a Wi-Fi router on their own, and when buying it, they also order a service for connecting and configuring it.
Purely in my opinion, the price for this service in many stores is too high (sometimes it reaches half the cost of the router) - especially since many people can handle this operation on their own (you just need to figure it out a little).
I also want to add right away that if you later need to change your password, parameters for accessing the Internet (or something else) - you still have to go into the router settings and figure it out yourself ...
That is why I sketched out this small article-instruction, with pictures and explanations of each step. I hope the step-by-step presentation of the material will help you figure out how and what to do.
And so, let's go in order ☺ ...
Addition! You can also read another article of mine on how to connect and configure the Tenda FH456 (N301, F3) router from scratch. -
Step-by-step instructions: connecting and setting up a Wi-Fi router
Site selection and placement of the router
Many users make one mistake - namely, they put the router next to the computer (for example, on the system unit). No, for testing and initial setup - this is acceptable, but for the permanent operation of the device - this is not good in all cases.
The fact is that depending on where you will have a Wi-Fi router, the level of network reception in different parts of your house will greatly depend. Significantly reduce the Wi-Fi signal: load-bearing thick walls, mirrors, metal doors etc.
Therefore, you need to position the router so that it is approximately equidistant from all devices that will connect to its network (and also so that there are a minimum of obstacles to the network signal). An example of unsuccessful and successful placement of the router to 2 room apartment shown in the layout below.

To the question of the choice and location of the router in the apartment
An article on how to boost your Wi-Fi signal -
In general, I think that the message is clear: depending on the location of the router, the quality of the network signal, speed, errors, etc. will depend.
Connecting the router to a computer
A typical delivery of a router consists of (example in the picture below):
- the router itself;
- power supply;
- network cable (usually 1-2 m long). Used to connect the router to a PC (laptop) and configure;
- operating instructions;
- antennas (there may not be an antenna - in some routers it is built into the device case).
Those. has everything you need to start connecting and setting up the device.

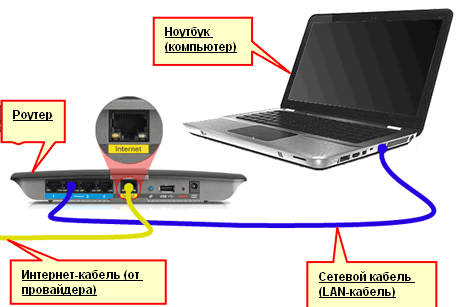
Direct connection is as follows:
- connect the router with a network cable (which comes with the router) to a computer or laptop. By the way, please note that on the router, as a rule, there are 4 LAN ports for this (they are marked, most often, yellow). On some routers, the marking instead of LAN may be Ethernet;
- disconnect the Internet cable (coming from the provider) from the system unit of the computer and connect it to the router: to the WAN or Internet port (usually marked in blue);
- connect power to the router and turn on the device;
- if everything is done correctly, various LEDs will start flashing on the device...

If you show it schematically, then the Wi-Fi router becomes, as it were, an intermediary between your computer and the Internet cable from the provider (see the picture below).
Important! Connecting the router to a PC (laptop) using a network cable is necessary for the initial configuration of the device. Later, the cable can be disconnected and the router placed in a more convenient place.

Configuring Network Card Settings
Before entering the Wi-Fi router settings, you need to correctly configure network card(especially if you had different settings from default before).
First you need to open a tab in the control panel - Control Panel\Network and Internet\Network Connections . The easiest way to do this is to press the Win + R key combination, enter the ncpa.cpl command and click OK.

How to open network connections || ncpa.cpl

Then you need to open select "Internet Protocol Version 4 (TCP/IPv4)" and open its properties.

In the "General" tab, set the receipt of the IP address and DNS server automatically. Save settings.

Get IP address and DNS server automatically
Such settings are suitable in 99.9% of cases, because. at your Wi-Fi router local network looks at an active DHCP server - which will give a free IP address to your computer / laptop.
Entering the router settings (device IP address)
To enter the Wi-Fi router settings, you need to know its IP address (which you just need to enter into the address bar of your browser and follow it).
Each router has its own settings IP address. In most cases, he 192.168.1.1 , but there are exceptions:
- address for D-Link and NetGear routers: 192.168.0.1 ;
- address for TrendNet routers: 192.168.10.1
Important! Also pay attention to the stickers on the body of your Wi-Fi router - these stickers almost always contain an IP address. By the way, on the same stickers you can find the login password for accessing the web interface.

After you enter correct IP address to enter the router settings and press Enter - you will see a window prompting you to enter your login and password (example in the figure below).

As a rule, in most cases both login and password will be admin. If you can't log in, try leaving the password field blank.
For more information on how to enter the router settings, what passwords and logins, IP addresses, and what to do if you can’t log in, I reviewed in this article:
Setting up a router (router)
If the password and login were entered correctly, then you should get into the web interface (with a bunch of various settings, links, etc.). Each manufacturer and different models routers - the interface is different.
But there is one thing in common: the menu is usually located on the side or top. The main settings in the menu are also identical, and are set in a similar way. So, after looking at how one router is configured, you can, by analogy, configure another ...
As an example, I will take such a popular brand of routers as TP-LINK (with "green" firmware in Russian).
Cloning the MAC address of an old network card
The fact is that many providers have an extra. security that checks the MAC address. And if the MAC address does not match (or has been replaced) - access to the network is blocked.
To clone a MAC address, in TP-LINK routers, you need to open the "Clone MAC address" link (in the "Network" section). If you have an English version of the firmware - then look for a link like "MAC Clone".
Addition! Not so long ago, I posted a separate instruction on cloning a MAC address on my blog. -

MAC address cloning
Setting up Internet access
Setting up Internet access mainly depends on the network design of your ISP. The necessary parameters for accessing the network, you must be given in the contract for the provision of Internet connection services. Most often, PPPoE is used in Russia (note: a dynamic IP address is issued when connecting. To access, you must enter a login and password).
In the router, it is impassable to open the WAN (Internet) tab and first specify the connection type (for example, PPPoE, see "2" in the figure below). It is also necessary to specify username and password (see "3" in the figure below, the data can be taken from the contract with the Internet provider).
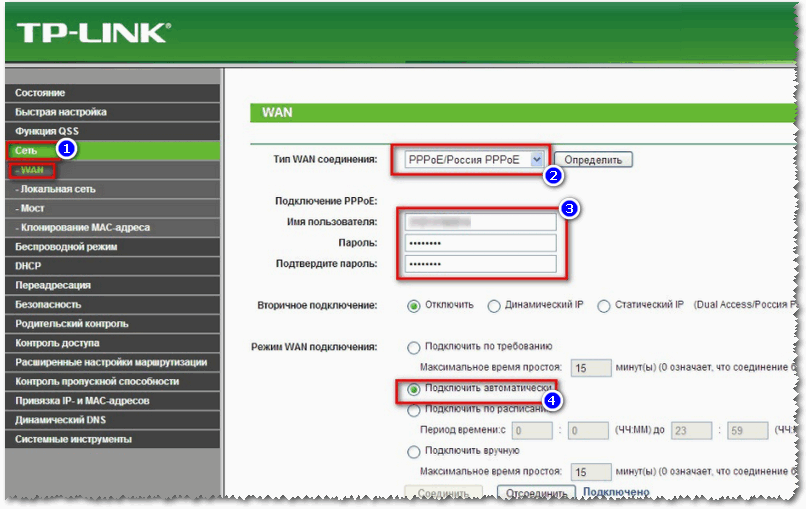
It remains only to save the settings. In most cases, nothing else needs to be entered. Now the router can access the Internet - and on the computer that is connected to it with a network cable, the Internet should now appear.
It remains only to configure the wireless network ...
Setting up a Wi-Fi network
To set up a Wi-Fi network, first you need to open the "Wireless Settings" tab (or in English "Wireless Settings"). In this tab, you need to set the network name - i.e. the name of the network that you will look for to connect on your gadgets: tablets, phones, etc. (In some cases, if there is a bad signal, it makes sense to select a channel. ).

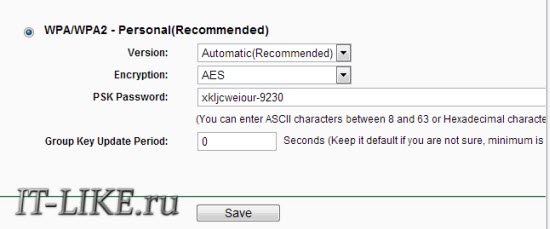
Then you need to open the "Wireless Network Security" tab (or in English "Wireless Security") and select the type of protection. To date, one of best types encryption is WPA2-PSK, which is the first in the list (we select it).
The PSK password is the password that you will need to enter when connecting to a Wi-Fi network.

Actually, after saving the settings, the router will go to reboot, and then you can connect to a Wi-Fi network and use the Internet.
That's the whole setup...
I understand that in this article I did not consider many subtleties that, in particular cases, can have a great impact on the operation of the network. But, probably, all of them cannot be foreseen within the framework of one article.
As I work on the site, I will touch on this issue again, and more than once ...