A new autumn has come, and our golden autumn bouquet of roses made from leaves is becoming relevant again. This is just some kind of miracle! The reality of unreality - fold rose petals from a maple leaf!
The author of the idea of making roses from autumn leaves is my colleague, teacher elementary school Natalya Yakubova. Unfortunately, her lesson is how to make a rose out of maple leaves- was copied from us by many sites without indicating the authorship of these materials ...
We are happy to share this art with the readers of the site site.
So, a virtual lesson from Natalia: the sequence of making such a wonderful bouquet of roses from leaves, with my photos and comments.
At the end of the article - advice from our readers who have learned how to make a bouquet of roses from leaves.
How to make a maple leaf rose step by step
We collect suitable leaves (too small, dry, diseased, torn leaves are NOT suitable for us) of various colors. For the manufacture of one flower, it is better to choose leaves of the same color.
We fold the first sheet in half, across the central vein - so that the front side of the sheet is outside.
And now we turn this folded sheet into a tight roll. This roll will be the "core" of the rose.

Now, around this "core" of the flower, we begin to lay the "petals". To begin with, we take a sheet, and in its center we place a “core” (note that the front side of the sheet is inside the future flower!).
Fold this sheet in half. The edge of the inflection of the "petal" is located above the "core" by a centimeter and a half. Smooth out the fold of the sheet.
And now this protruding edge of the sheet is also bent outward, but the fold is no longer smoothed ...

We wrap the side edges of this double-folded sheet on both sides around the “core”.
We pinch the lower edges of the leaf at the very base of the flower.
We take a new sheet for the next "petal" and repeat the operation just performed. Only this petal is now located on the opposite side of the first sheet.

Next, we perform several similar operations, adding new leaves - now the petals are going into a bud. Add leaves until you feel it is enough to complete the flower.
When the bud is ready, we tie its base with threads to secure the flower.
How many flowers will be in your bouquet - you decide. For this "photo shoot" we had three ...

Making a bouquet
Now let's deal with the "greenery" of the bouquet framing our roses. The most beautiful and colorful leaves are suitable here.
So that these leaves do not curl up into a tube the next day when they dry, it is better to iron them beforehand between sheets of newspaper. After this procedure, they will become more fragile, but with careful handling they will not be damaged.
We evenly arrange the prepared leaves in a circle, placing them under the buds in the hand. Then we fix the now ready-made bouquet at its base with the same threads.
By the way, on top of the threads, it will be possible to wrap this knot with yellow paper teip tape ( masking tape). The tape will hide the threads and make the bouquet look neater and more complete.
Here is our autumn bouquet of maple leaf roses and ready!
I'll tell you a secret that I folded one of the three roses of this bouquet :)

But what advice did we get from the users of the forum site www.eva.ru:
“In order for a bouquet of roses from leaves to stand longer, it is necessary to smear the already twisted roses with vegetable oil (with a brush). The oil is absorbed in two days. The leaves become soft, do not dry out, do not lose color and do not shrink.
Tips from our readers:
“Indeed, flowers from the leaves lubricated with sunflower oil last much longer. Checked: our rosette has been standing for a year, and still the same beauty :)
By the way, in sunflower oil you can add a couple of drops essential oil. I added pine - I really liked the result. And you can take orange - it has been proven that it improves mood. Experiment!".
“Sunflower oil will eventually dry out and turn into a sticky drying oil.
Florists for use.
If you put twigs or leaves in a mixture of glycerin with water (3: 1, hot water), they will not dry out, but remain soft. The only thing is that an unpredictable change in the color of the leaves is possible.
Probably, you can grease the autumn leaves with pure glycerin for softness. Or liquid silicone.
“You can go to the flower department and ask to douse all this beauty with a special varnish, which cut flowers are treated when necessary and when not necessary.”
“You can process a ready-made bouquet of roses with ordinary hairspray :)))
I watched how they make a passe-partout from autumn leaves - they are covered with some kind of special glue that makes the entire texture of the leaf clear. Then all his veins become very distinct, and the color of the sheet plays.
“At home I have a can of varnish for flowers (well, for glossy leaves indoor plants shine better). So we covered our bouquet of 11 roses with this varnish, and it turned out really cool!
“I was able to secure such a stunning bouquet of autumn leaves with melted wax. Roses and individual leaves have not lost their color after such treatment and have been delighting us for the second year!”.
“We also sprinkled our roses with sparkles, and it turned out generally gorgeous!”.
“Last fall, I painted roses made from rose leaves with gold paint, and in winter I decorated the Christmas tree with them.”
Here's what happened:

“And we in Israel made roses from plane tree leaves.”
“We don’t have red-leafed maples in the area. I had to use wonderful crimson-red leaves and to perform miniature roses, and to frame the bouquet.
“Maple leaves for making roses must be large. Moreover, if the size of the leaves is different, then you need to start with smaller ones, because. for the growing volume of the rose, each time a larger leaf is needed.
Yuri Raud, labor teacher (Narva, Estonia)
www.lobzik.pri.ee
On site site
on site site
|
|
Weekly Free Website Digest website
Every week, for 10 years, for our 100,000 subscribers, an excellent selection of relevant materials about flowers and gardens, as well as other useful information.
Subscribe and receive!
Well, here comes the new autumn. And that means our golden autumn bouquet becomes relevant again. Well, another retrospective. But for some, it will surely be a revelation.
Just a miracle! The reality of unreality! Make a maple leaf rose!
Virtual lesson from Natalia. The whole sequence of making such a wonderful bouquet is in the photos and comments.
Naturally, first things first, we collect the leaves. Too small, dry, diseased, torn leaves are NOT suitable for us. We will use different colors.

For one flower, it is better to choose leaves of the same color.
We fold the first sheet in half across the central vein so that the front side is outside.


And now we turn this folded sheet into a tight roll.


This roll will be the core of the future rose.

Now around this core we begin to lay the "petals.
To begin with, we take a sheet and place a core in its center. Note that the front side of the leaf is inside the flower!

Fold this sheet in half. The edge of the inflection is located above the core by a centimeter and a half.


And now we also bend this protruding edge outward. But the fold is no longer smoothed ...

And we wrap the side edges of this double-folded sheet on both sides around the core.


We pinch the lower edges of the leaf at the very base of the flower.

We take a new sheet for the next "petal" and repeat the operation just performed, only this petal is located on the opposite side of the first sheet.


Here, several stages of the same type, shown above, are skipped, when the petals are collected in a bud. Add them until you feel enough.

When the bud is ready, we tie its base with threads to secure the flower.


How many flowers will be in your bouquet - you decide. For this "photo shoot" we had three.

Now let's go green. The most colorful leaves will do here.
To ensure that these leaves do not curl up into a tube the next day when dried, it is better to iron them beforehand between sheets of newspaper. They will become more fragile, but careful handling will not damage them.
We evenly put these leaves in a circle under the buds and fix the now ready-made bouquet at the base with the same threads.
On top of the threads, by the way, it will be possible to wrap this knot with yellow paper tape (painting tape), this will hide the threads and make it look neater and more finished (there is no paper tape in the photographs).


Here is the autumn bouquet and ready.

I'll tell you a secret, I folded one of these three roses. I think it's easy to recognize.
P.S. And here is some advice received from users of the forum on www.EVA.RU:
“In order to stand longer, it is necessary to smear the already twisted roses with vegetable oil (with a brush). It is absorbed in two days, the leaves become soft, do not dry out, do not lose color and do not shrink. "
In autumn, many feel depressed and discouraged. However, at this wonderful time, you can do something interesting, for example, create a bouquet using flowers from leaves. There is no need to purchase fabrics, translate a huge amount of paper, because the street is full of free and unique working material. One has only to collect a few maple leaves, read the master class - and you can get to work. This simple activity will allow you to spend your free time with the benefit of the whole family, as well as to interest children.
Preparation of natural material
To make flowers from leaves with your own hands, you should choose even, clean specimens without spots. The color of the herbarium does not matter, the main thing is that they be monophonic. For example, a rose can be made from red maple leaves.
To make it easier to create flowers from leaves with your own hands, and at the same time the buds come out uniform and do not crumble, you should take the material different size. Then ready product it will hold on better, and fixing it to the branch will be much easier. Broad maple leaves the best option for bouquets.
If you make a flower from raw natural material, such a product will last only a few months.
To prolong its life, the source material should be treated with a solution of glycerin.
To do this, you need to dilute 300 ml. pure glycerin in 600 ml. water, pour the resulting liquid into a tight bag and evenly spread the herbarium in it. Be sure to ensure that the maple leaves are not wrinkled or torn. Next, you should tightly close the bag and leave for several days in a dark, cool place. Glycerin will make the leaves more elastic, resistant to tearing, shiny. After 3-4 days, the workpiece is removed from the bag and allowed to dry. The material for work is ready. Do-it-yourself products made from processed tree leaves can be stored for years and retain its original appearance.

Making a rose
Many people admire such products, but not everyone knows how to make flowers from leaves on their own. To do this, follow the instructions step by step, and in an hour a beautiful rose will decorate the apartment.
A master class on making a flower includes several stages. First of all, you need to take a small processed leaf, put it face down on the table. Fold in half so that the top covers the spine. Then roll the workpiece into a small tube. This will be the center of the future flower.
Next, you need to take the next sheet, do the same manipulation with it. Attach the resulting tube to the middle of the future rose and carefully wrap it around it. Using this technology, prepare all the leaves and also wrap around the middle of the flower. It should not be forgotten that blanks must be taken, given their size: first small leaves, then large ones.
For a voluminous rose, you will need approximately 7-10 leaves. Each subsequent rose petal must be shifted slightly lower than the previous one. Then the maple leaf rose will come out open and big.
When the product is ready, the roots of the blanks must be tied with threads or wrapped with tape. Then the master needs to attach the flower to the previously prepared branch, decorate it with a green cloth. You can prepare 5 such roses from maple leaves, and then place them in a beautiful vase; Decorate the overall composition with dried birch buds.

How to make a bud?
You can make rosebuds from leftover maple leaves. So, a master class on making a bud.
The method of work is not much different from the previous one, the only secret is that the workpiece needs to be rolled up a little differently. Fold the processed material in half, then make a triangle out of it, tucking the edges to the center. Then fold all subsequent blanks in the same way. Attach the triangles one by one so that you get a rosebud that has not had time to open. Secure the lower part with tape or tape. Buds can be made from multi-colored maple leaves, their appearance will be much more original.
The next master class will reveal the secret of how to make flowers from tree leaves with your own hands. To do this, take 12 maple leaves. Make the middle of the flower in the same way as in the first case (fold in half and twist into a loose tube). Attach the next blank with the front side to the middle, spine down. Bend the upper edge back, while slightly pressing on it. Using this technology, you can get large and bulky workpieces. Each petal must be secured with 1 turn of thread. The master must receive excellent and lush flowers from autumn leaves.
The most extraordinary products
Original flowers are obtained from corn. Ask how to make a flower? We offer the simplest and most affordable master class:
- First you need to find and dry 15-20 corn leaves. This can be done with an iron (ironed several times through a cloth) or in the oven.
- Make the center of the flower. Take a small piece of corn leaf and fold it into several balls.
- Prepare the base - a circle with a diameter of 15-20 cm. Next, cut out the layout of the future petal from cardboard. Transfer it to the corn blank and cut out 25 pieces.
- Lay the core on the base, spread the petals around it. Gently glue the resulting product, lifting the edges with your fingers. As a result, a beautiful lily will come out, which can be used to decorate New Year's gifts.
So, having studied the master class on making products, you can learn how to make chic bouquets and crafts. Autumn leaf flowers will be even more beautiful if you cover them with glitter hairspray. No one will guess that these flowers are made from maple or corn leaves.

Such crafts will not emit toxic substances, so even Small child can play them. And they can also decorate a family photo, creating a wonderful autumn composition - such a gift will be accepted with pleasure by relatives and friends.
You can make a chic bouquet from such natural material as maple leaves. They have a beautiful soft color and are able to easily take a given shape.
For those who love roses and crafts from natural materials useful tips on creating artificial maple leaf bouquets. Their shape and structure lend themselves perfectly to work. In addition, the leaves are completely free of charge. collect in the park together with children is interesting and useful for spending time together.
Suitable for work, as fallen yellowed, and still green leaves. Of these, you can twist so beautiful bouquet that with its beauty it can outshine the real roses. Besides, a bouquet of leaves is durable. We can safely say that such a craft breathes a "second life" into dry foliage.
maple leaves - perfect material to create bouquets
Work step by step:
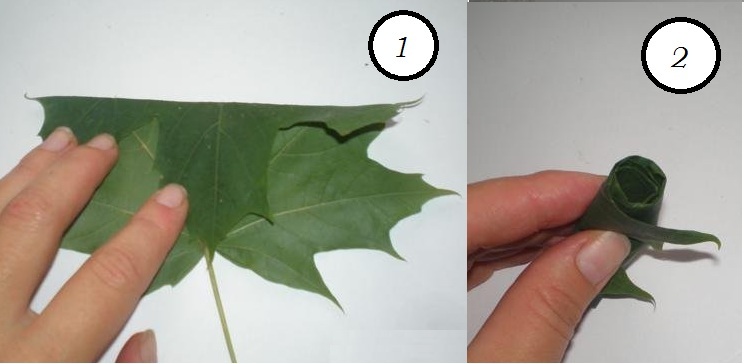
- Take a beautiful, even and clean sheet of paper, put it in front of you and fold it in half. (see photo #1)
- Roll half of the sheet into a tube. This should not be done too tightly, because the flower needs to be lush and voluminous. (see photo #2)
After the core of the flower is ready, you need to start creating petals from other leaves.
Work step by step:
- Take the second maple leaf
- Put the core inside the sheet
- Alternately wrap the sharp edges of the leaf so that when folded, petals are obtained (see photo No. 1)
- After you completely fold the sheet, you can secure it with a thread. (see photo #2)
- In order for you to get a voluminous and lush rose, you will need to roll about five or six maple leaves into one flower. (see photo #3)
- Fasten each new rolled sheet with a regular sewing thread, make a few flowers for the bouquet. (see photo #4)
 Step by step folding roses from maple leaves
 To make flower wrapping, wrap the bouquet in a few maple leaves so that their sharp edges stick out in a circle.

 Tube (wrapper) for a bouquet of roses from maple leaves
  Bouquet with three maple leaf roses
 How to make a bouquet of roses from maple leaves with your own hands?
Maple leaves in the autumn season are distinguished by a variety of rich color shades:
- green
- yellow
- orange
- brick
- burgundy
- red
- brown
- brown
The more multi-colored foliage you use in creating a bouquet, the brighter and more beautiful your bouquet will turn out.
You can stick with one shade of foliage to get. For example, only yellow or red roses. But, it is much more interesting to work with absolutely different leaves marble color.
Yellow roses from maple leaves:
- Take a small piece of paper and fold it in half
- Gently roll the sheet into a tight tube
- Take a large maple leaf, put a twisted leaf in its center.
- Turn the big sheet back
- Start folding the sheet so that voluminous petals grow around the core.
- Fasten the product with a thread
- Roll up a large number of roses into a bouquet
- Wrap wedge foliage around the entire bouquet for splendor.
 Step 1: Folding the Center of the Bud
 Step 2: Folding the sheets around the core
  Step 3: Folding the Petals
 Step 4: Add Volume to the Flower
  Step 5: Stringing the Rose
 Step 6: Making Roses for the Bouquet
  Step 7: Making the bouquet pop
 How to make flowers from maple leaves with your own hands?
Soft maple leaf lends itself perfectly to folding. It can be made from lush rose or thin bud.
Ideas for creativity, folding flowers from maple leaves:

 Roses from maple leaves, option number 1
 Large round roses from maple leaves, option number 2
  Red roses with a green stem made of maple leaves, option number 3
 Multicolored roses from colorful maple leaves
 How to make a bouquet of flowers from maple leaves with your own hands?
The secret of the resilient maple leaf flower is soft sheets , which have not yet dried so much to break and burst. The fresh green leaf also rolls up very well.
For crafts, those maple leaves that are collected in November are good - high humidity air and frequent precipitation do not allow the leaf to dry out.
Each leaf you roll to make rose petals should be fix. This is done with the usual thin sewing thread or tape. Just pull tight without tying a knot. How to save maple leaves for crafts?
The well-known way to preserve the maple leaf by putting it in a book, unfortunately, is not suitable for preparing material for creating flowers. In this way, the sheet dries out and makes it quite brittle.
There are other ways to save maple leaves:
- Leaves can wax. To do this, melt the wax of one candle on the stove or in the microwave. After that, the sheet is alternately dipped into hot wax from both sides.
- The paraffin sheet should be left on newsprint to dry and absorb excess wax.
- The sheet may darken, but retain its softness, which is very useful for crafts.
- The sheet can also "bathe" in a solution of glycerin. To do this, dissolve half a glass of glycerin in a glass of water.
- The leaves are completely dipped and then tied and hung to dry. Dry the sheet should be about four days.
Video: "Master class: roses from leaves"
Today we will tell you and show you how to make “live” roses from maple leaves with your own hands. Maple leaves are quite durable, and roses from them do not always come out beautiful: more often they look like a tight winding of layers, only remotely resembling the grace of the queen of flowers. But with our master class, you can step by step make a rose that looks exactly like a flower. We suggest using both important qualities maple leaves: their strength and large area, which we will dispose of to form volumetric wrapped petals.

To make a rose from maple leaves with your own hands, you will need:
fresh autumn maple leaves (quite a lot);
sewing thread on a spool of any suitable color - beige, yellow, orange.

How to make roses from maple leaves with your own hands: step by step and affordable

First we take a leaf thin and small. We bend it in half, bending upper part sheet back. The fold should form on its own, it is not necessary to crush it, otherwise the sheet may tear at the fold, and if it survives, the bud will not turn out to be voluminous.

Now we turn this sheet into a tube. Soft and tidy.

We take the next sheet about the same size or slightly larger. In our work, we were more guided not by the size of the sheet, but by its color. I wanted the leaves in the finished rose to blend well with each other, but at the same time I really wanted to add colors to the monotonous yellow.

We combine the stems of both leaves, bend the second leaf back, as we did with the first leaf.

We bend the right edge from the center of the sheet down at an angle of 45 degrees to the fold, also without sealing the fold, everything should be natural.


We also bend down the left edge of the same leaflet.

So we formed a petal. We take another sheet, apply it so that the center of the fold falls on the second sheet, but with an offset. It is advisable to lay rose petals from maple leaves in a spiral relative to each other. For this third leaf, we also gently bend the right and left edges, forming a voluminous petal.


If you feel that it is difficult to hold the petals with one hand, remember that we have a thread and wrap the rosebud tightly at the bottom with the transition to the leaf stalks. We do not cut the thread, we do not break it, but we fix it so that it is convenient to work further.

As you can see, a small rose has already turned out.

But we do not give up and turn it into a full-fledged rose, adding and adding leaves-petals. It is important that the bent edges on the right and left do not converge at an angle in the center of the sheet, and there is free space between them. Besides, large leaves I had to tuck around the edges not once, but two or even three. In the process, the hands will “catch” the style of twisting maple leaf roses and everything will fall into place, even if the description seems not entirely clear.


The rose can be completed with a bed of leaves. You can arrange a bouquet around the perimeter, or you can frame each rose like this. Or leave the roses as they are.

A handmade maple leaf rose is ready. We hope our step-by-step master class was both understandable and useful.


This is what our roses look like two weeks after production - the leaves, of course, are already completely dry.

Eva Casio especially for the site Master classes in needlework