Glue for linoleum - not everyone uses it when laying, however, according to technology, the use of adhesives is mandatory. Adhesives are used both for fixing linoleum on the floor and for gluing seams, which cannot be avoided in any case.
In this article you will find detailed information on how to choose the right adhesive, information on prices, on how to glue linoleum and seal joints.
Indeed, not everyone understands the need to use it. However, this element is quite important.
Bonding linoleum in the first place will prevent it from displacement and "waviness", which is often the case with the active use of such a flooring. And if the glue is not used, in case of displacement of the canvas or the appearance of "waves", you will have to take out all the furniture from the room, dismantle the slabs and re-lay the covering. Agree, not a very pleasant procedure that could have been prevented by simply using a special glue.
Note, however, that glue is needed for large rooms, more than 4 meters wide. If your rooms are smaller, then using glue is not necessary. Also, glue is required for commercial coating technology (Tarkett).
Also, adhesives are used to seal the seams of linoleum. This gives the floor more aesthetics and also saves money. Savings are achieved because in the case of cold welding of linoleum with glue, you do not have to buy metal thresholds, which cost at least 100 rubles each.
Watch the video below for an example.
What glue is used to glue linoleum to the floor?
 The main question in this article is which glue to use for gluing linoleum to the floor.
First of all, it is worth noting that the glue should be correctly selected depending on the type of coating, i.e. for a concrete floor, one type is suitable, for a wooden floor (plywood, boards,) another.
The most common PVA is great as a glue for linoleum on a wooden floor. After all, the task of gluing linoleum is not to glue it "forever". PVA glue will perfectly cope with its task on plywood, OSB, chipboard, fiberboard, etc.
With a concrete floor, everything is a little more complicated, but even for this case there are special compounds that can be easily found on the shelves of hardware stores.
What glue to choose in this case? - It is better to read the packaging, because different manufacturers can make adhesives for different types surfaces or universal compounds.
 In particular, the most popular are: Homakol, Forbo, Bustilat, Tomzit, Sintex, etc. Having met these names on the construction market, read the purpose on the packaging and what materials they glue, well, then we pay attention to the price, because you don't always want to overpay for such a trifle. As the reviews show, these formulations have worked well.
The consumption of glue for linoleum is on average 0.4 kilograms per 1 square meter... Consumption strongly depends on the type of coating (wood or concrete) and on the size of the room. in small rooms, there is no need to glue the new coating hard.
Glue prices
Because we consider adhesives for two different activities (gluing and sealing), then we will study the prices for both types.
Universal dispersion adhesive for linoleum, in a can weighing 3 kg, will cost from 500 to 1000 rubles. In general, this should be enough for an average apartment.
The cost of adhesives for welding seams of both types sold in small tubes is about 170 rubles.
How to glue linoleum to the floor
 According to the technology, moisture-resistant dispersion glue must be applied in a thin layer to linoleum. However, it is not at all necessary to apply the composition to the entire surface. It is enough to make "strokes" in places over the entire area, in the corners and joints.
When laying linoleum, the adhesive is usually applied to the floor.
After applying the glue, it will “give in” for a while, so you can flatten the linoleum sheet before the glue starts to harden. Each quick-drying adhesive has its own characteristics, so read the instructions before use.
Watch a video with an example of work on gluing linoleum. If the work is carried out in an apartment or small house, then you can use liquid nails, gluing the linoleum in places, after completely leveling its surface.
What adhesives to use for seams
 Adhesive for gluing linoleum end-to-end is of different types. First of all, some differ according to the principle of "naturalness" of your coating. After all, there are natural linoleums, and there are synthetic ones. Depending on this, you need to select the glue.
Also, there are several types of adhesives for seams: A and C types.
A-type glue used if the seams of linoleum turned out to be even, and the gap between them is minimal. In this case, such glue will fill the gap and glue the linoleum together securely and invisibly.
C-type adhesive used if the slots are not even and rather wide (from 1 to 3 millimeters). This compound is more viscous and will completely fill the gap.
How to glue the seams of linoleum
In order to glue the joints of linoleum, special compounds are used, sold in tubes. We wrote about them a little higher. So, in order to glue the seams, according to the instructions, a strip of scotch tape (usually paper masking tape) is glued onto them and a cut is made on it with a clerical knife at the junction.

After that, carefully pour the glue into the gap. The tape will keep excess glue from getting onto the linoleum. After the glue is applied to the entire joint, you need to wait for the time indicated on the tube (usually 10-15 minutes). Then you can remove the tape and enjoy the result.
In our time, a large number of different floor coverings have appeared. But still linoleum remains the most demanded. Therefore, the question of gluing its parts with your own hands remains relevant. Before proceeding with the laying of the coating, everyone asks questions: how to glue linoleum back to back? Which is better: cold welding for linoleum or hot? Is welding of linoleum necessary at all? In addition to these, there is also whole line questions. Let's figure it out.
Cold welding for linoleum
The meaning of cold welding technology is that soldering is carried out due to chemical reaction between the fixing compound and the coating itself. Before joining linoleum at home, the material, if new, must lie down. The choice of one of three types of cold welding depends on the "age" of the coating. In any case, you will need the following set of tools:
- Long iron ruler;
- A piece of plywood or fiberboard;
- Plain and double-sided adhesive tape (useful when trimming the cover);
- Adhesive for linoleum joints.

Most often, cold welding type A is used to join pieces of a new soft or commercial product. Since the adhesive is quite liquid, and the coating is new and its parts are well joined, the seams are practically invisible.
The second method is with type C glue. It is suitable for gluing existing linoleum. In this case, the width of the seams that have diverged should not exceed 4 mm. Type C glue is thick, it fills the joint, and therefore parts of the canvas do not "part" for a long time.
Cold welding type T is designed for bonding polyester-based PVC coatings. Adhesives of this type are toxic, so you need to have sufficient experience to work with them.
When working with glue, you should take care of the funds individual protection(gloves, respirator). We watch the master class in the video:
Double sided tape
How to glue linoleum yet? One of the most simple ways – double sided tape.
When the coating takes its final shape on the floor, the joints are thoroughly cleaned of dirt and dust. If necessary, they can be primed for better adhesion. Next, you need to check the coincidence of the joints. If there is no exact match, the edges are trimmed with a knife or scissors, after which you can start gluing the tape, removing the protective tape.
This method has certain advantages:
- Ease of implementation;
- Low cost item.

This technology also has quite significant drawbacks:
- Unreliable connection, and hence fragility;
- Unaesthetic appearance... The joints will be visible.
Installation of a nut
The strap is usually used for docking flooring in the transition from one room to another. It is also suitable for docking various materials: it can be linoleum and laminate, laminate and floor tiles and other options.
Before joining the linoleum, its edges are leveled, and the length of the sill is measured. The nut is cut to the required size with an electric jigsaw. Then it is fixed with self-tapping screws. This is done simply, since there are already holes in the nut. But if necessary, additional holes are made in the floor for plastic dowels.
As with any docking method, the nut has positive and negative sides... The pluses include:
- Good connection. This docking is very durable;
- Low cost of materials;
- Lack of special tools;
- Absence harmful substances, which cannot be said about modern adhesives.

And of the minuses, the following stand out:
- The need for color matching. The gutter is already distinguished by its structure, so you should choose a color that is closest to the color of the flooring.
- Gender inhomogeneity. As good as the nut is, it will stand out anyway. And when walking, stepping on it, it is always felt, even if it was installed by a professional.
There is one more nuance of gluing the seams of the coating on felt base... In this case, glue will not work, so here the use of a nut will be indispensable.
And now a small video review on the installation of different types of sills:
Hot welding of linoleum
This connection method has been used for a long time, but it is a rather laborious process, and besides, you cannot do without special tool... You will need an apparatus for welding linoleum (soldering iron), a set of nozzles, a cord for welding linoleum, special knives etc.

Before joining the linoleum, the surface of the floor covering is properly attached to the floor. Depressions are made along the entire length of the joint, which are thoroughly cleaned. Welding gun it is necessary to warm up to the right temperature(melting the cord), usually about 350 ° C. A nozzle is put on the hairdryer, the linoleum cord is inserted and the joints can already be processed. After the seam has cooled, it is cut with a knife.
Soldering linoleum has significant advantages:
- The seam is almost invisible;
- The most reliable connection, as soldering takes place.
 1 - Form a seam, 2 - Fill with a heated cord, 3 - Cut off the excess roughly, 4 - After the cord dries, adjust the seam
 The disadvantages of this method are no less noticeable:
- Expensive equipment (special soldering iron);
- The inability to do-it-yourself installation for beginners, certain skills are required;
- Difficult to use at home.
We looked at several ways how to dock linoleum. As you can see, it is quite simple to glue its parts at home so that no seams are visible. The main thing is to choose the most suitable method and Consumables... Leave comments, share your docking methods!
What to do if the linoleum is torn? It is too troublesome to change the coating, and it is expensive, but you cannot leave it damaged either: not only does such a floor look sloppy, it will also get dirty. Repairing the coating will help to solve the problem, and it does not require special costs, and the result will be excellent. Tears, burns, holes in the canvas, loose seams - all this can be eliminated almost without leaving a trace, and the floor will look like new again.
Consider how to glue linoleum, and what is needed for this.
The main tool in working with linoleum is a knife. It should be strong, very sharp, with a comfortable grip. Although linoleum is a fairly thin and plastic material, certain efforts will be required to cut it, and it will not be possible to cut quickly and accurately with a blunt knife. Now on sale there are special knives for linoleum, which are very convenient to work with.
| Knife type | Description |
|---|---|
| This knife is intended for cutting the blade in a straight line. With its help, it is easy to cut off frayed edges, cut out patches of the correct shape for large holes. Replaceable blades are highly durable and do not bend or break. A special screw holds the blade firmly, preventing it from slipping. Such a knife is perfect for multi-layer blades and gives an absolutely even cut. |
| The knife is equipped with a strong blade that resists bending and a durable ergonomic handle. The tool easily cuts thick multi-layer linoleum, not only straight, but also at an angle. Well suited for trimming the canvas in hard-to-reach places, for example, under a heating radiator and around the outlet of utility pipes |
| A very practical tool with a round sharpened blade. Allows you to cut the blade straight and along curved markings. It is convenient for them to use when making patches. irregular shape, trimming coverage at thresholds, communication exits, around ledges and niches |
| The curved blade allows you to gently remove dried glue from the surface, correct cuts, and remove burrs on the edges of the blade. With the help of such a knife, it is convenient to repair minor damage and level loose seams on the old linoleum |


In addition to the knife, you will also need:
- spatula for applying glue;
- metal ruler or rail;
- marker;
- roller.
To seal large holes, you will need linoleum patches of the same type that are laid on the floor. That is why it is recommended to purchase a new coating with a margin: trimming the canvas does not take up a lot of space, and in case of damage, they will help to patch holes imperceptibly. It is difficult to find the exact same material separately: the assortment of linoleum is constantly changing, and even if it was possible to find a similar pattern, the samples may not match in color.

To fix the patches and join the dispersed canvases, you will need adhesive tape (double-sided and regular paint) and glue.

For such coatings there are special adhesives - water-dispersion, on acrylic base, two-component on epoxy resin as well as cold welding adhesives.
| Name of glue | The purpose |
|---|---|
| Used for fabric and felt PVC linoleum. Suitable for gluing panels to wood and concrete floors, plywood and other absorbent substrates |
| Used for PVC linoleum with or without a base, suitable for any absorbent base: plank floor, screed, chipboard or fiberboard |
| The composition is specially formulated for PVC coatings on different types bases - fabric, pile, foamed. Suitable for absorbent substrates: concrete screed and DSP, wood floor, plywood, fiberboard |
| It is a polyurethane reactive compound that is designed for bonding PVC coatings to absorbent and non-absorbent substrates. Suitable for rooms with high humidity |
| Transparent compound used to seal the fabrics PVC cover... Can be used to seal minor damages on linoleum - punctures, small cuts with smooth edges |


For elimination small scratches, burns and punctures use mastic either polymer putty... In order for the repair composition to match the color of the coating, small crumbs scraped off a piece of linoleum are added to it. Also, special repair kits are produced, consisting of mastic, solvent and colored pigment. With the help of these tools, you can carefully repair small defects on the linoleum so that there are no signs of damage left.
Prices for glue Bustilat
glue Bustilat

Repair of holes and tears in the canvas
This type of damage is the most serious, and therefore repairs will take longer. If the canvas formed big hole, fix it with a patch.
Step 1. Pick up a piece of linoleum for the patch. It should be perfectly matched in color and pattern so that the renovated area does not stand out on the floor. The piece is laid on top of the hole on the coating and the lines of the pattern are aligned with the main canvas.
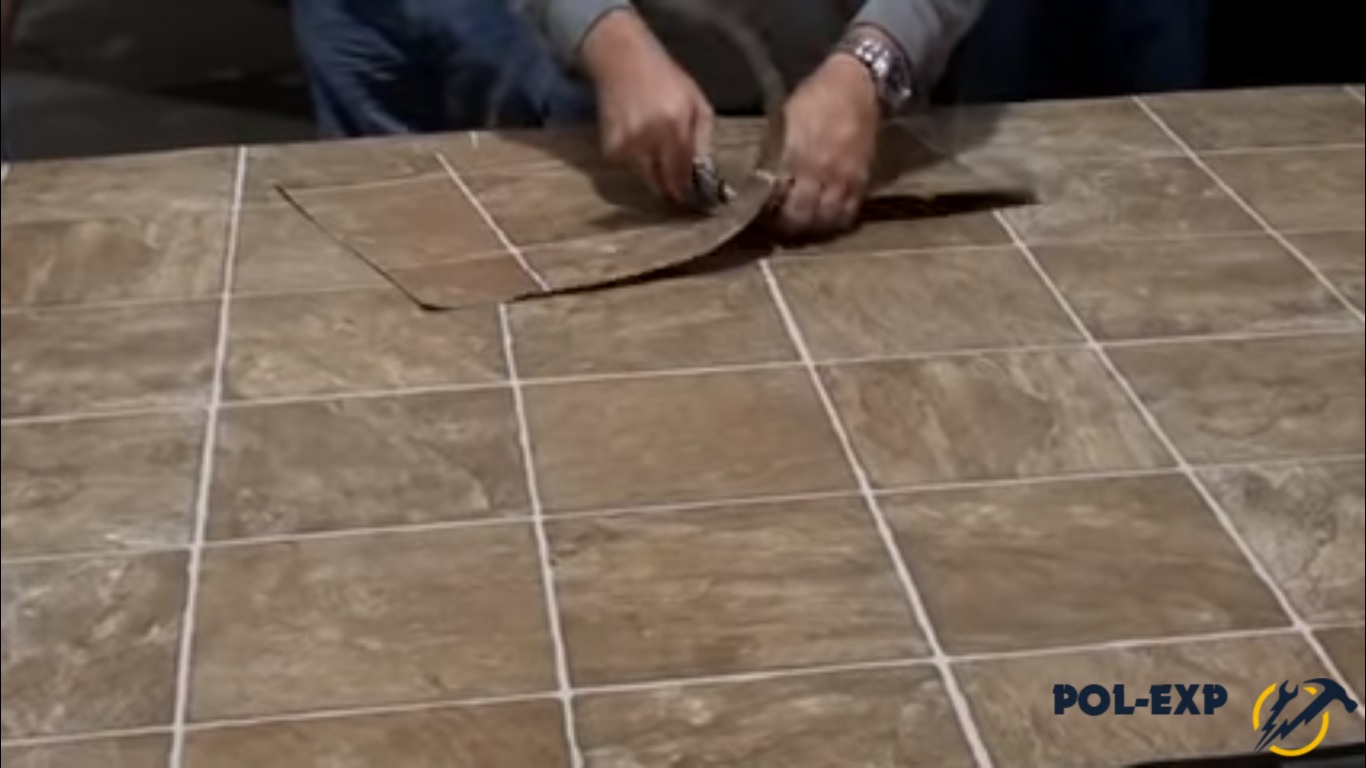

Step 2. The material is fixed with masking tape on all sides to avoid displacement. If the segment is small, it is enough to fix it with tape in the corners.


Step 3. They take a knife and very carefully cut through both layers of linoleum along the lines of the drawing. It is advisable to cut out the patch in the form of a square or rectangle - it is more convenient to fasten it this way and the joints will not be noticeable.

Step 4. Remove the scotch tape, remove the linoleum scraps, put the patch aside. Now you need to remove the damaged piece of linoleum: they pry it off with a knife and open it from the base over the entire area. The remnants of the adhesive layer are also cleaned so that they do not interfere with the adhesion of the canvas to the base.

Step 5. Next, take the glue and apply it in an even layer on the cleaned surface with a spatula. If the edges of the canvas around the cutout are not glued, it is also necessary to coat the surface with glue under them - this will allow you to more securely fix the edges.


Step 6. After waiting a few minutes, a patch is placed on the glue and thoroughly smoothed over the entire area so that there are no air bubbles left under the linoleum. Make sure the patch is placed correctly and all the lines are aligned.
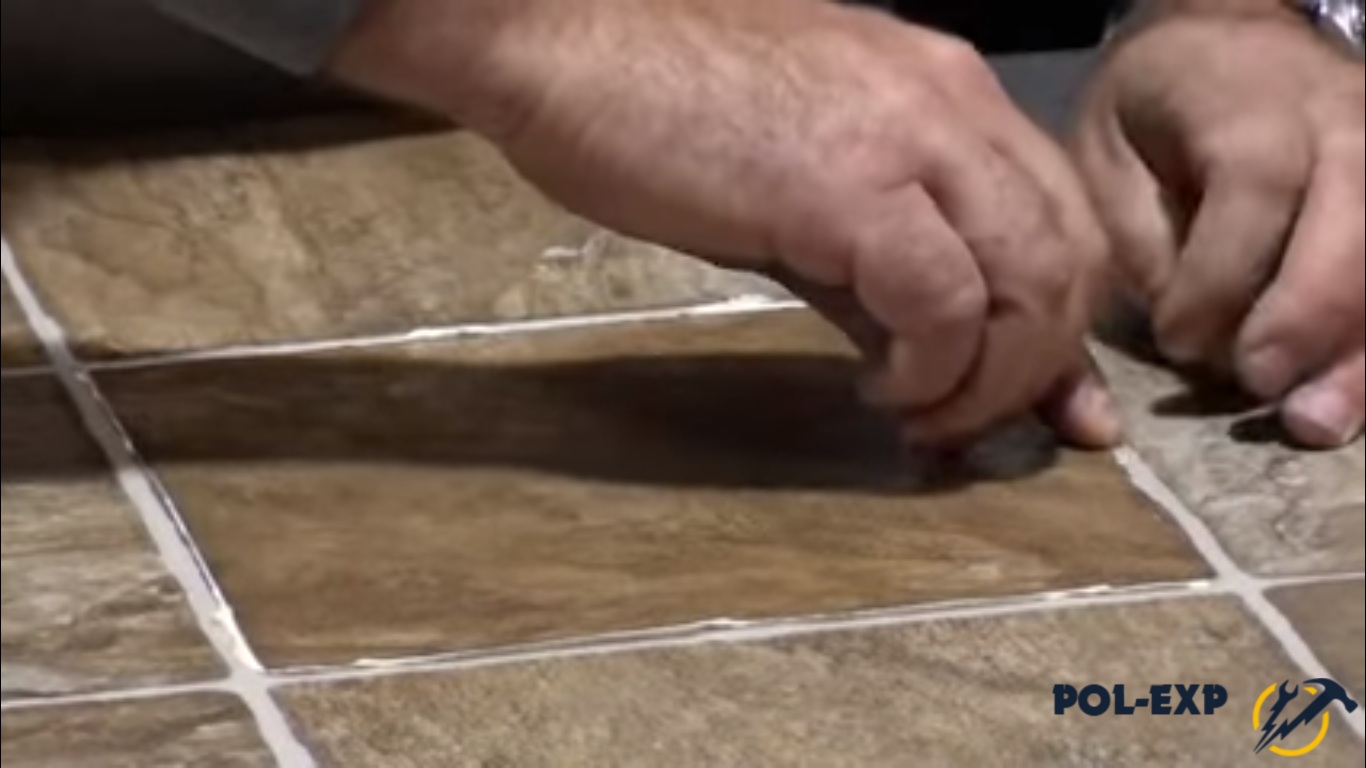
Step 7. The glued piece is rolled with a roller for reliability, and then wiped with a clean damp cloth, removing excess adhesive mixture.

Step 8. At the seams on each side of the patch, docking glue is applied with a thin strip, the excess is removed. After the glue has set, the joints are wiped with a thick cloth or sponge.


Advice. During the day, mechanical stress on the repaired area should be avoided until the glue is completely dry. After that, the coating is ready for full use.
If, instead of a hole on the linoleum, there is a partially torn flap, you can do without a patch. To do this, the flap is first straightened (you can iron it with an iron through thick fabric), clean out dirt and dust from under it, and then apply a layer of glue to the base. After that, it remains to lay the flap on the glue, align the edges and press with something heavy for a day.
Repair of joints
Broken joints are one of the most pressing problems for linoleum-covered floors.
Sometimes the edges of the canvases only slightly move away from the base, in other cases they noticeably swell and diverge to the sides, revealing the rough floor. You cannot start such a problem: debris accumulates in the seams, water gets there during cleaning, mold starts, and the protruding edges get disheveled and torn, making it difficult to walk around the room. Let's consider how to connect the joints with the greatest efficiency.
Quick way
Step 1. The edges of the canvases are folded outward and thoroughly clean all the dust from under the coating.
Step 2. Priming the floor with a small brush, leave to dry completely.
Step 3... Double-sided tape is placed in the gap between the canvases so that the middle of the tape is located exactly along the seam.
Step 4. remove the protective layer from the adhesive surface and press the edges to the floor.
Step 5. Carefully straighten the edges, press and smooth the seam with your hands. Further, it is advisable to roll this section with a roller in order to finally align the joint.
If the linoleum canvases have shifted during operation, and the joint has dispersed by a few millimeters, there is a simple and cheap way to eliminate the gap. To do this, it is necessary to clean the seam from dust, degrease, dry thoroughly. Next, you should take a wax candle, melt it and carefully pour the wax into the gap between the canvases. After that, the remaining wax is easily removed with a spatula blade or knife, and the seam surface is polished with a soft cloth.
Advice. This method is only suitable for dry rooms with low traffic, since under heavy load the wax will tear off the edge of the canvas and a gap will form again.
Cold welding of joints
It is best to use cold C-welding for good sealing of loose seams. This adhesive has a thick consistency and perfectly fills joints up to 3 mm wide. In addition, it melts the sections of the sheets and forms a monolithic surface that is impervious to moisture and dust. But for new linoleum, A-type glue is used, which is more liquid and reacts faster with PVC. We will consider in detail how to do this.
Step 1. Covering strips are laid on the prepared floor with an overlap of 5-6 cm.
Step 2. Mark the cut line exactly in the center of the overlap, measuring the desired distance with a ruler. A line is drawn with a pencil along the entire length of the joint.
Step 3. Apply a ruler to the markup or metal rail and sharp knife both canvases are cut through.
Step 4. The cut strips are removed to the side and the edges of the canvases are smoothed.
Step 5. Masking tape is glued to the joint along its entire length. This is necessary in order not to stain the front surface of the coating with glue.
Step 6... With the edge of a knife, carefully cut the tape along the seam line.
Step 7. They take glue, put a cap with a needle on the tube, screw it tightly. Next, insert the tip of the needle into the gap and lightly press the tube until a spot of glue up to 4 mm wide is formed on the scotch tape. After that, you need to smoothly move the needle along the seam, evenly filling it with adhesive.
Advice. The width of the adhesive strip during application should not exceed 3-4 mm. The excess glue will still have to be wiped off, and this will not make the seam stronger. But it is also not worth saving too much: the lack of glue will make the seam less tight and reliable.
Step 8. After 15 minutes, when the glue has set, the tape is carefully removed from the linoleum.
You can walk on the coating after the glue has completely hardened. The manufacturer indicates the exact drying time in the instructions on the tube, so carefully read all the information on the composition before use.
Removing blisters on linoleum
Often, swellings appear on the coating, which increase over time, interfere with walking, and then tear. This happens for various reasons, but it is necessary to eliminate such defects as early as possible so that you do not have to change the linoleum.
Removing bubbles is easy, the main thing is to know how
Small bubbles can be easily removed with heat. You can use a household hair dryer or a bag of hot sand, but it is more convenient to use an iron. To do this, cover the problem area with a clean cloth or a piece of parchment and smooth it out with an iron in steaming mode.
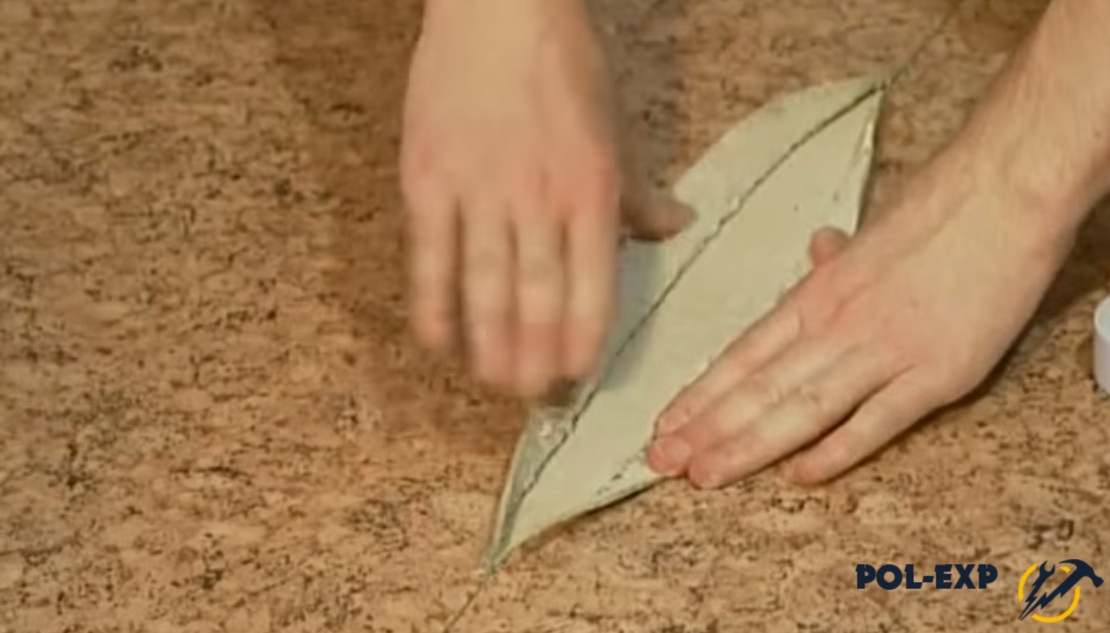
Large bumps are handled differently. A cruciform incision is made in the center of the bladder, after which the resulting flaps are folded together and the excess is cut off at the edges. After making sure that all parts fit evenly, they are bent outward and the base is cleaned of old glue and dust. Now all that remains is to apply fresh glue and press the patches to the floor. You can put some kind of weight on top so that the linoleum sticks better.
If the linoleum was originally laid without glue, you can eliminate the swelling without cutting the canvas. First you need to loosen the baseboards against the wall closest to the bubble. Next, they begin to smooth the surface towards the wall, expelling the air from under the linoleum. If necessary, the edge of the canvas can be trimmed to leave a temperature gap between the wall and the floor.
Video - How to glue linoleum


One of the most common flooring materials is linoleum. It is easy to fit, easy to maintain, does not cause any problems to the owner during operation, the period of which, it should be noted, is very long. However, in order for the coating to look harmonious and serve all the declared time, it is important to lay it correctly. And during the laying of linoleum, there is such an aspect as the correct joining of the edges of two separate canvases. How to join linoleum to each other? Get an answer and get to know all possible ways can be in this article.

Docking linoleum is a fairly simple process, although it is carried out strictly according to certain regulations. But the connection of two separate canvases will directly depend on what method the material will be laid and what it is.

Docking linoleum - features
There are two main types of linoleum - commercial and household... The main difference between the two is the thickness of the material. Commercial linoleum is much thicker and stronger than the usual household linoleum. Because of this, it is more difficult to connect it, but it has high strength and durability. So before laying the material, you will have to make a choice which type will be used. There is also semi-commercial linoleum.

Advice! It is not recommended to buy linoleum thinner than 3 mm, even for laying in an apartment. It wears out very quickly.
Despite the apparent solidity, linoleum consists of several layers. Upper layer- front, which is made of PVC. It is on its thickness that the strength and wear resistance of the material as a whole will depend. Thus, it is precisely possible to distinguish:
- household linoleum, the thickness of the front layer of which varies in the range of 0.1-0.3 mm;
- semi-commercial linoleum with a PVC layer thickness of 0.4-0.5 mm;
- commercial material having a PVC layer thickness of 0.6 mm or more.

In addition to the front, linoleum has other layers:
- the layer that is located in the middle, which is an interlayer of a special reinforcing mesh, which is made of fiberglass;
- heat and sound insulating bottom layer, the material of manufacture for which is PVC foam.

From above, linoleum can be coated with a moisture-resistant varnish, which will not only improve the appearance of the coating, but also provide additional protection decorative layer from external influences.

It is also necessary to decide what color, with what pattern the material will be used. The choice of colors is now very large - linoleum can be monochromatic, or it can have some kind of ornament or even look like a stone or imitate a plank floor. There are designs that resemble carpet or tiles. The material must fit colors To general style interior.

Attention! If linoleum has a complex geometric pattern, then at the joints it (figure) must match. Therefore, you will have to buy material with a margin necessary for joining the canvases. Accordingly, the cost of purchasing linoleum will be increased.

There are two methods of laying linoleum with subsequent joining - laying overlapped canvases or butt-to-joint. The first styling option has some disadvantages:
- water penetration under the canvas and the formation of dampness. As a result - the appearance of mold and mildew on the sub-floor;
- due to the layering of canvases on the floor, a small step will form, which will interfere with walking - the floor will not be even;
- if the sheets are not fixed on top of each other, then debris will fall under the linoleum. And if you fasten them with ordinary glue, then, most likely, in the future, the canvases will unstick.

That is why it is not recommended to use this method of laying linoleum and it is better to lay the canvases joint to joint. The most important thing is to connect the two canvases after laying the material so that moisture or debris does not get under them. Fortunately, there are now several convenient options docking. Let's get acquainted with them and figure out which one is more convenient to use when installing linoleum.

Methods for joining sheets
Docking of individual linoleum canvases is made to achieve the following goals:
- beautiful appearance of the floor covering, its integrity;
- flat and neat floor in the house;
- protection of the subfloor from debris and water;
- protection basements from moisture (if the apartment is on the ground floor or linoleum spreads in a private house).

There are 4 main methods for joining linoleum. They can be carried out both with adhesives and with additional elements... Types of joint joints:
- using ordinary double-sided tape;
- with the help of sills, partitions;
- cold welding with special glue;
- hot welding with a special cord.
Let's take a closer look at all the methods for joining the material.

This method is the processing of the joint between two cuts with a special glue for linoleum. The composition, acting on the material, is able to dissolve it, penetrating deeply into the structure of linoleum, and solidifying, reliably connects two separate canvases. The glue is quite toxic and you need to work with it carefully, observing safety precautions and ventilating the room. Otherwise, you can easily get poisoned by the vapors of the substances contained in the glue.

The method is simple to carry out at home, easily glues and household linoleum, and commercial. But it is only suitable if the gap between the pieces of material is small. Also, the technique does not require the purchase of any special equipment. And the seams between the two cuts will be completely invisible to the naked eye.
It is important to remember that this type of welding is not used for material that has an insulating felt layer on the wrong side. Also, it is not used for thick multilayer types of linoleum.

Adhesive for linoleum joints
There are three types of cold welding adhesives. Each of them is suitable for processing a certain category of seams.

Table. Types of adhesives for joining linoleum.
| Name | Characteristic |
|---|---|
| The glue is used to join canvases of new material just brought from the store. Suitable for gluing both household and commercial linoleum. The glue is very liquid, therefore it is recommended to handle only small gaps with it and, preferably, to work only with dense material. To work with glue, you need to purchase masking tape and use gloves. Drying time adhesive composition are about 30-40 minutes, after which you can safely walk on the floor. |
| The adhesive is suitable for processing materials up to 4 mm thick. It is more often used for joining or repairing used linoleum. Allows you to join canvases lying with large gaps. This glue is thick enough and does not require the use of masking tape when working with it. |
| This glue is used to bond PVC linoleum, which has a polyester base. Suitable for joining both new and used material. Often used for gluing linoleum to rough floor, but quite expensive and is usually purchased for gluing fabrics used for commercial purposes. |


Important! When working with any type of glue, it is important to ensure that the composition does not get on the front side of the material. Otherwise, the web will be damaged. It is not recommended to remove drops of glue by wiping - it is better to wait for it to dry and cut off the drop with a sharp knife.

Step 1. Two canvases of linoleum are overlapped by about 5-6 cm. This is necessary to create a high-quality cut and good joining.

Step 2. The cut of two linoleum canvases is made in the middle of the overlap. To do this, using a ruler, markings are applied, a straight line is drawn.

Step 3. The most convenient way to make an incision is to use a metal ruler. It adheres well to the material along the previously applied markings. Next, a cut is made with a sharp knife. Both layers of material are cut at once.

Step 4. The resulting trimming of linoleum resulting from the previous procedure is removed. The result is a neat joint, which is already invisible to the eye even now.

Step 5. The linoleum joint is glued with ordinary masking tape.

Step 6. At the place where the canvases are joined, masking tape is cut, also using a knife.

Step 7. Per tube with glue-cold welding a special cap equipped with a needle is screwed on.


Step 9. After applying the glue, wait about 15 minutes for the glue to set.

Step 10. Masking tape carefully removed. Complete drying of the glue takes about 40 minutes, after which you can move on the floor.

Video - Cold welding of linoleum
Using hot welding
Hot welding is the most difficult type of linoleum joining, and at the same time it is the most reliable. Unfortunately, it involves the use of a certain type of equipment and therefore is rarely used in everyday life - mainly for commercial use only. Yes, and for household thin linoleum, it is also not suitable, because it is capable of excessively melting the coating.

On a note! The temperature of equipment and materials during hot welding operation reaches about 450 degrees.
Linoleum, in the case of using hot welding, is usually first glued to the rough base. Only after the glue has dried is the welding of the joints of the coating carried out. The linoleum canvases during the flooring are not laid with an overlap, but are joined together as tightly as possible.

To carry out the work, you will need the following tools:
- a special cutter device for creating a groove between the canvases;
- manual apparatus for welding linoleum;
- blade (sickle knife) to remove protruding glue.

A special cord made of PVC and having a thickness of about 4 mm is used as a joining material. You can buy it in hardware store bay 100 m and absolutely any color. Under the influence of temperature, the cord melts, thereby filling the joint between the canvases. After cooling, the cord acquires exactly the same characteristics as the linoleum itself.

Docking of linoleum by hot welding
Step 1. Using a special cutter, a groove is created at the joint. That is, a small piece of the canvas is simply cut out. But at the same time, the material does not cut through to the rough base. Debris, if any, is removed from the groove.

Step 2. The hot welding cord is inserted into a special machine.

Step 3. The spout of the apparatus is attached to the beginning of the groove. After that, the apparatus is guided along it. The cord melts and fills in the groove.


Step 4. Remaining material from the melted cord can be removed with a knife or special device(on the picture). Removal is carried out while the material is still not frozen.

Important! A piece of cord must be taken so long that it can be processed at a time about half the length of the joint.
Video - Hot welding of linoleum
Connection of linoleum with other materials
Linoleum can be joined in other ways. For this can be used Double-sided tape or special sills or profile.
- the easiest material for joining linoleum. The method using it does not imply large time or financial costs, but it will not work to glue two canvases of material qualitatively. In order to glue linoleum in this way, the tape is simply glued to the rough base, and then a linoleum sheet is glued on top of it.

Docking linoleum with metal sills is also simple, but there is more work here than with scotch tape. Also, the sills are not always able to be matched correctly in color and they do not look as aesthetically pleasing as welded seams.
Fasteners are usually sold complete with a nut - screws, dowels. You just need to screw the nut at the junction of the two pieces of linoleum to the floor. The difficulty lies in the fact that concrete base you will have to drill first to get the holes for the dowels.

Metal sill for joining linoleum
On a note! If the linoleum has a figured joint (and this also happens), you can use a flexible profile or still stop at the cold welding method.
Features of joining with tiles and laminate
If joining two pieces of linoleum is not so difficult, then joining the edge of linoleum with other materials is already more difficult. To dock linoleum and tiles or laminate flooring, you will have to solve several problems:
- what to do with the height difference between materials;
- how to choose a similar or contrasting color;
- how to make sure that the materials are connected tightly.

How to arrange a joint
If necessary, such a docking the best way Is the use of a nut if the materials are on the same level. If you plan to leave the step, then you can use the corner profile.
Correct joining of linoleum is a guarantee that it will always be clean and dry under the coating, and externally the material will look very aesthetically pleasing. And, as we can see, there are no special problems with the performance of work - everything can be done by hand.