Decorating a room with balloons is one of the most effective decor options for a wedding celebration and any other holiday. And if you start decorating the ceremonial hall yourself, then you can also save a lot. In one of the articles, we already mentioned that balloons filled with helium can simply be tied to chairs or let them float under the ceiling, and today we propose to create stationary decorations - garlands and arches - from simple latex balloons inflated with air.
How to make a garland of balloons
In order to make a garland, you first need to acquire: balls, fishing line, pump or compressor. You may also need a rope to create a strong base and tape for additional fastening... And you also need time and patience, and therefore, if you are not ready to sacrifice both for the sake of decorating the future celebration, it is better not to take it.

The best option is a garland made of bundles (links) of four balls. You can make bundles of three balls, but in the end they look less impressive, and in order to assemble a garland of bundles of five or six balls, you need to have some experience in this area, so we will focus on four.
So, let's get to work:
Stage 1 - ballooning. Here a pump or compressor will help you wonderfully, otherwise you risk quickly fizzling out. So, to create a garland of bundles of 4 balls, one meter of decoration may need from 15 to 40 balls, depending on their size. However, if you have a dozen assistants, then it is likely that you can do it on your own, without special devices.
Stage 2 - tying balls into links. There is enough sleight of hand here. Your task is to tie 4 balls together. We offer one of simple ways: inflate two balloons, fold their "tails", twist them once and tie them together (if it is inconvenient for you to tie the balloons in knots, then use a fishing line or rubber bands to secure them.).

Also tie the other two balls together. Then fold both the resulting bundles crosswise, connecting all the "tails" in the center and twist the balls together - one link of the garland is ready!

Stage 3 - the creation of the garland itself. If you are making a piece of jewelry shorter than six meters, then you can restrict yourself to a fishing line as a basis, if the garland is longer, then you will additionally need a rope. So, pull the fishing line between two stationary objects, leaving the ends free for further fastening. Then everything is simple - put a bunch of four balls on the fishing line, move it to the very beginning of the planned garland and twist those balls between them, between which the fishing line has passed.
Attention! - we have a bunch of four balls, which means that you need to fix the second pair on the fishing line.

Next, you need to make more bundles, and then, sequentially, attach them to the fishing line. Try to immediately connect the balls in the right position so as not to pull them once more and do not drag them along the line. Observe the direction - each ligament should be in the same plane with the previous one. If you do everything correctly, then the finished garland will then be easy to turn into a spiral (this is optional). If the garland is long, then duplicate the line with a rope.
Stage 4 - installation of the garland. Lead and securely fasten the resulting garland from balloons at the selected location.
Balloon arch
In order to make an arch out of balloons, you can use several methods:
1) Arch based. Here you should adhere to the same principle as when weaving a garland, only as a base you need to lay a thin tube made of metal-plastic or other material that keeps its shape well.

2) An elementary arch on scotch tape. You can also connect the balls with tape, but this should only be done if you are absolutely sure of your accuracy and know that ready product will look aesthetically pleasing.

3) "Independent" arch. Another way to weave an arch of balls is to alternate the balls of a large and small size- the smaller ones should be located on the inside of the "horseshoe". In this case, the woven structure itself will take the shape of an arch.

4) Arch of helium balloons. The original version execution will be an arch of balloons inflated with helium - for this, the balloons are simply tied to each other, and at the ends of the arch, for stability, balloons filled with water are tied. This decoration looks very simple, but in some cases it is quite appropriate. Also, such an "air" arch can simply be tied to something.

Happy wedding to you!
The balloons are inflated with helium and tied to a fishing line (or braid). The ends of the line are tied to the weights. The lifting force of the balls will pull the line upward and the line with the balls will become an arch. Such arches will be called helium balloon arches.
Rice. Helium balloon arch
Rice. Helium arch from LINK-O-LOON
LINK-O-LOON are inflated with helium and linked into a chain. Weights are tied to the beginning and end of the chain. The lift of the LINK-O-LOON will give the ball chain an arch look. Such arches will be called LINK-O-LOON helium arches.
The weights that support the arch must have a mass greater than the total lift of the balls used in the arch. As a rule, balls are not tied to the lowest points of the arch (where the weights are).
Helium chains are a common balloon installation. The main purpose of helium chains is to create a background or entrance group... They are made different sizes and different shapes... Big artistic expression Composite helium arches have when the arches are located one above the other.
Wind and drafts will rock the arches or bend them down. Therefore, helium arches are used indoors; it makes no sense to use helium arches on the street, because they cannot keep their shape there.
Helium balloon arches
While creating helium arches use latex balloons, latex hearts, foil balloons, or combinations of different balloons. In order for the helium balloon arch to be beautiful and to have a symmetrical shape, the following conditions must be met:
All balls in the arch must be the same. In other words, all balls used must have the same lift. In the case of latex balloons (round or heart-shaped balloons), all balloons must be the same size and calibrated the same way. In the case of using foil balloons, all balloons must be of the same shape and size.
The distances between the balls in the arch must be the same. In other words, if the arch is stretched in a straight line, then the distances between all the nodes of the attached balls must coincide. The best option the distance between the balls is the diameter or width of the balls used in the arch.
LINK-O-LOON Helium Balloon Arches
Beautiful LINK-O-LOON helium arches are obtained when the following conditions are met:
All LINK-O-LOONs in the arch must be the same size and calibrated to the same diameter.
In order to disguise the knots, so-called collars are installed between LINK-O-LOON - clusters of fours of balls 5 ".
Calculation of arches from balloons inflated with helium
The correct form of helium arches follows the shape of the so-called catenary. Along this line is a chain of identical links suspended from two identical posts. If the chain sags down, then the chain line of the helium arches protrudes upward. Each link in the chain is attracted by the force of gravity, and each ball of the helium arch has a lifting force that pulls it up. Therefore, the shape of the hanging chain and the shape of the helium arch are the same.
The main task of calculating arches is to determine the required amount balls, given the dimensions of the arch: width and height. To solve this problem, we will define the main forms of arches: narrow, normal and wide. The difference in the shape of the arches is determined by the ratios of height (H) and width (L).
The tables below define the line length (arch perimeter) for each arch shape:
The calculation of the helium arch is performed as follows. First, the shape of the arch is determined, i.e. which shape of the arch most closely matches the given one. For the selected shape of the arch, its dimensions are selected from the table and its length (perimeter) is determined.
Suppose the arch is made of round balls. Then, the resulting perimeter is divided by the diameter of the balls used; we discard the fractional part and the distance from the weights to the outermost balls. As a result, we get the number of balls required to create a given arch.
In the case of using foil balloons, we perform the indicated procedure, but divide the perimeter by the width of the foil balloons.
In the case of a LINK-O-LOON arch, divide the perimeter by the LINK-O-LOON length. LINK-O-LOON length depends on its diameter. For example, when the LINK-O-LOON 12 "is inflated to a diameter of 25 m, its length will be about 34 cm.
Such calculations should be taken as approximate, with an error of several balls. The fact is that real arches will always differ from the calculated ones, both in shape and size. But for the purpose of assessing the cost of helium arches, this method is quite acceptable.
Good luck, colleagues.
Any holiday will become brighter and more elegant if the room in which it is held is decorated with structures made of balls. Unfortunately, organizations involved in such design are very expensive for their services. Therefore, people are often interested in how to make arches from balloons on their own, trying to save money without losing the festive mood. Fortunately, this is quite possible, although it cannot be said that it is very simple.
How to make an arch in a stationary way
It is considered simpler to construct a front entrance using finished base... If the porch or door has a similar frame (and in many restaurants and banquet halls a stationary base is provided), then the matter is greatly simplified. In the absence of it, before making arches from balls, you will have to buy a frame - a wide range of these designs, of all sizes and different outlines, is presented in garden stores. It is inexpensive, made of thick wire, so transportation to the place of work will not be difficult. If the legs seem wobbly to you, or they are not intended for installation, but for digging in, the structure can be screwed to the nearest post.
A drawing is developed in advance (if you intend to use balls different colors). The elements are inflated and attached in the required order to the frame. In the case of a stationary base, it doesn't matter what you inflate: it is strong and will hold the pattern even if the balloons are filled with air. The main thing is not to allow gaps so that the frame does not shine through anywhere.

Aerial arch
A more complex technique, how to make an arch from balls with your own hands, involves the use of a very thin rope and helium. It is better not to use a fishing line, unless you are firmly convinced of its strength. The required length of the twine is measured, taking into account the segments with which the arch will be fixed in the bases. One end is immediately tied to the base with several knots so that the rope does not exactly separate and fly away with the balls. The elements are in turn inflated with helium and fixed at the end of the rope, which is not yet tied (of course, you should step back from the edge to the distance necessary for subsequent fastening). The balls are wrapped either with scotch tape or with wire, which florists use, - both do not stretch. Just in case, it is better to wind several layers. As new balls are attached, the rope will rise so that the balls will not cling to anything on the ground or floor.
Before making arches from balls, the rope must be wrapped with corrugated paper or thin ribbons: since helium is used, and individual elements are not pulled close to the base, an improper twine will spoil the whole look.
When all balls are secured, the free end is tied tightly to the second base. If desired, both bases can be masked with flowers or other design elements.
Multi-color design
Another option, how to make arches from balls on a light base, suggests using balls of two colors. Some are inflated with helium and pull the structure up, others with ordinary air, balancing the former and making it possible to make the arch more dense.
We draw your attention to the fact that "rope" options are used mainly indoors. On the street, they will sway too much under the gusts of the wind.

What you need to know
When collecting an arch from balls for the first time, you need to take into account a number of points.
- All elements of the same color must be of the same size. To comply with it, a measuring hole is cut in the cardboard. It will be more convenient to use the template if you put a box on it.
- Using helium, remember that the balloon inflated by it will deflate in 10 hours, so you need to prepare the elements immediately before assembling the structure.
- Using balls different shades, you should plan their pattern in advance. Stripes and spirals are considered the most successful and easily executed.
Preparation for the wedding consists of many pleasant activities: from buying rings and choosing a bride's dress to decorating a banquet hall. Room decoration for a wedding ceremony is one of the most important points... The success of the entire celebration directly depends on the correct design elements. One of the easiest ways to solve this problem is to contact a specialist. But their services are very expensive. But what if you have a small budget for such an event?
There is one popular way to decorate a wedding celebration today - wedding arches from balloons. Our article will tell you about their varieties and introduce you to the least labor-intensive methods of making them yourself.
What are they used for
Arch - decorative architectural element, known since the times of ancient civilizations. Arches as part of the festive decoration of the wedding ceremony were used already in Ancient egypt.They symbolized the divine firmament above the heads of the newlyweds.
A beautifully designed wedding arch focuses on the place of the young spouses at the table or helps to decorate the area for photographing in an original way. You cannot do without it when organizing an on-site marriage registration. The shape and decor of such an element can be very different.
Forms of wedding arches
The arch-arc is one of the most popular. It not only symbolizes God's approval of the marriage union, but also resembles a horseshoe in shape - famous symbol bringing good luck.
- Rectangular shape arches bring prosperity and prosperity to the future family. If it is equipped with a roof, the marriage is reliably protected from prying eyes and a variety of troubles.
- U-shaped arch- a simpler version. This form will become a symbol of the ease and carelessness of the marriage.


- Enfilade, in fact, is a series of arches, placed one after another or connected to each other. With this arrangement, an impromptu corridor is created for the passage of the newlyweds. It is believed that this suggests that their marriage will be long and happy, and their love - endless. This design option is the most expensive, but it looks very chic.


- Heart shaped arch speaks for itself. After all, the heart is a symbol of ardent love.


Choice of balls
Plain multicolored Balloons made of latex suitable for decoration of celebrations. They are not expensive, they are available, their options colors unlimited.
- Helium balloons will look much better. Helium will help the balloon to easily rise upward, and the weights tied from below will prevent them from flying up to the ceiling.
- Foil-like balls, shiny and bright. They often have unusual shape(in the form of letters, hearts, stars, etc.).
- Balloons for modeling, unlike helium and ordinary ones, resemble a thin sausage in shape. Such balls were previously used in the circus. By bending and tying them in the right places, you can make different figures, for example, flowers.
- Transparent (panoramic) ones have small drawings on inside... Through such a ball, you can view the panorama of the hall. They are filled with helium. They look airy and original.

DIY wedding arch
With frame
Materials and tools:
- balls - 2 packs (100 pieces each);
- compressor or pump;
- ball calibrator;
- metal or plastic pipe;
- 2 containers for fixing and pouring plaster (flower pots can be used).
- Ball preparation
- Inflate four balloons and tie them in pairs by the tails. You do not need to tie the balls with thread. This will make the future design unreliable. Use a calibrator to keep all balls the same size.
- Pairs of balls are folded crosswise and connected into a four, twisting them by the middle. There are about 40 such fours.
- We begin to collect a garland of balls. To do this, take a metal or plastic pipe with a diameter of no more than 2.5 cm. Its length is chosen depending on the height of the arch (no more than 5-6 meters).
- We string four balls on the pipe, which has been given the desired shape in advance, in a checkerboard pattern.
See below for visual instructions for making an arch on a frame.
Securing the frame.
- The frame itself will not stand, and a large number of balls will additionally make the structure heavier. You can fix the pipe to the floor using special holders (they are sold in hardware stores).
- Another option is the manufacture of racks, weights. To do this, it is enough to take two identical flower pot(or any other containers with a height of at least 40 cm), building alabaster(gypsum) and water. Alabaster solution the ends of the tube are poured into pots, the ends of the tube are dipped into it to the very bottom and the solution is allowed to solidify. Instead of alabaster, cement can be used, but it hardens much longer (a week).

Without frame
Arches without a frame can only be used indoors. Most often, such arches are arched. They can be placed at the entrance to the room or to decorate one of the walls.
Materials and tools:
- balls - 1 pack (100 pieces);
- thick fishing line or twine;
- corrugated paper or floral tape;
- nails with a plastic cap - 1 pack;
- compressor or pump;
- ball calibrator;
- scissors with round ends;
- hammer.
Manufacturing sequence.
- First, let's decide on the height of the arch. Depending on the height, we measure the required amount of twine and or line.
- To decorate the twine, we wrap it with ribbons of corrugated paper or floral tape.
- Inflate the balloons with helium, remembering to use the calibrator.
To make an arch, you can use ordinary balloons in combination with helium balloons. This will reduce the cost of construction.
- We fasten the balls at equal intervals on the twine using a thread or fishing line.
- We attach the ends of the rope securely to the floor or fasten to the wall. Additionally, the arch can be decorated with ribbons.


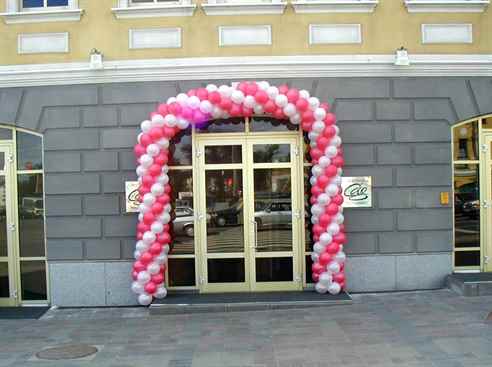
More recently, balloons have been the decoration of any celebration from a birthday to a wedding. And the designs from the balls look beautiful and solemn. Our master class is dedicated to creating an arch from balls with your own hands.
When forming an arch, it is better to use two colors. In this case, we have a red and white color scheme. Photos against such a background will turn out to be very beautiful.
DIY materials for making an arch from balls
So, you will need:
- balls white- 200 pcs;
- red balls - 200 pcs;
- compressor or pump;
- fishing line - 2 packs. Better to take a thick one;
- hammer;
- stationery nails - 1 pack;
- stationery knife;
- scissors;
- buttons - 1 pack;
- decorative tape - 1 reel.
It is better to buy balloons with a margin, since they can burst during the inflation process. If you have never inflated balloons, we recommend watching the video tutorial.
It is also worth using a calibrator so that all balls are the same size.
Mainly on this stage is the choice of balls. It is better to choose balloons German, Mexican or Italian production... They good quality and therefore there will be less waste in your work.
It is better to choose scissors with short blades. This will make it easier for you to work. It is better to take stationery studs with a plastic cap. The longer the carnations are, the more comfortable it will be to work with them.
It is better to choose a two-way pump. It is fast and easy to use.
The preparatory stage is over, let's start forming the arch.

DIY balloon arch: step by step instructions
First, we inflate two balloons and connect them. For this we do not need any thread or ribbon. We tie the balls by the tails. All balls must be the same size, otherwise the final design may turn out to be curved.
Then we inflate two more balloons and tie them by the tails. Now we tie the four balls together. To do this, take two balls by the tails in one hand and in the other. Then we connect them together, twisting them together. You should get a flower with four petals. You need to make several such flowers. They will be needed when forming an arch.
To prevent the balloons from deflating, try not to rub them against each other.

Tie a fishing line to the first flower (four balls). She needs to wrap each ball and make several knots. On this flower, you need to evenly lay the next one so that it enters all the grooves. The second four balls must be laid in such a way that there are no gaps between the balls. Now press the balls together a little and tie the fishing line twice. Try not to press them down too much, otherwise asymmetric tightening will occur, and the structure will lose its shape.
Thus, trying not to rub the balls against each other and not tightening the fishing line, we form our arch.

On the doorway, you will need 5-6 meters of structure, therefore it is better to make it in two parts. This will make them easier to transport. And you can easily tie the two parts together at the venue of the celebration.
After you have finished forming the arch, we proceed to decorate it. To do this, take the previously prepared tape and scissors. Cut a piece of tape and twist it into a spiral with scissors. Make several of these spirals and hang them around the arch in a chaotic manner.
Installation of an arch from balls
Now let's proceed to the most important and difficult stage - the installation of the arch. First, you need to make marks on the wall where you plan to hang the arch. According to the marks, you need to drive in the carnations and hang the fishing line on them. The fishing line must be tied in such a way that small loops are obtained. For these loops, we will fasten our arch.
It is not necessary to make many loops, two at the base and two at the bend are enough. On the arch itself, in the appropriate places, we also make small loops from the fishing line. Then you need to connect the two loops and fix them with buttons. Our arch is ready.
In the same way, you can make garlands for your holiday. And also decorate the hall with flowers from balloons. For a garland, as well as for an arch, it is not necessary to use balls of only two colors. You can make them multi-colored. If you want to add a touch of humor, you can use balloons with emoticons or funny faces. You can also choose balls with small led lamps inside. Such bulbs do not shine for long, but the design with luminous balls will look especially beautiful at an exit ceremony in the evening.
If you are worried that the balloons will blow off, you can pre-order balloons filled with helium. An arch made of such balls will last for several days. And make an arch from already inflated balloons will be much faster and easier. And the size of the balls in this case will also be the same. Ordering such balls will greatly simplify your work.
Related videos