A sandbox equipped with a fungus is an essential attribute of a child's carefree childhood. In an urban area, management companies should take care of a well-maintained area for children to walk. But when sending your beloved child to the village to his grandmother, or planning a joint vacation in the country, you should take the initiative and make a comfortable sandbox with your own hands.
Planning stage
Sandbox games are not only an interesting pastime. They contribute to the development of creative thinking, improve fine motor skills, form balance. Therefore, it is important to make the design of the sandbox for the baby as practical as possible, taking care of safety and convenience.
The easiest option is to make a square or rectangular wooden sandbox, which will take several hours to make. But it will be possible to be in it only in the absence of a scorching sun, so it is better to immediately provide protection. Making a canopy or a fungus is quite simple, but by installing an additional sandbox element, you will solve several problems at the same time.
An important aspect is the location of the structure: it must be visible from many areas, including the house. Second required condition- the absence of nearby trees that can pollute the sand with fallen leaves, and the caterpillars will not bring much joy to the child.

Manufacturing process
Basically, a sandbox with a fungus is installed for several years, so it’s better to do all the work thoroughly so that it doesn’t take next year eliminate shortcomings.
Site preparation
The site preparation process includes the following steps:
- The perimeter of the future sandbox with a fungus or a canopy is marked, after which the soil is removed to a depth of 25-30 cm.
- Take care of drainage in the form of a pillow of coarse gravel with the addition of sand. A well-packed layer of material will ensure that moisture is quickly absorbed into the soil, contributing to the accelerated drying of sand after precipitation.
- It is recommended to make a base for a sandbox with a fungus. It can serve as various materials: dense polyethylene, plywood or paving slabs. The first two options for the sandbox are not very successful - the film practically does not let moisture through, and the plywood quickly deteriorates. They are used when there is an urgent need to save costs. In any case, holes for drainage should be made. It is optimal to make a base for a sandbox with a fungus from geotextile, which ensures the unhindered passage of moisture.
Remark ! You can refuse the last stage, but the reason wooden structure with a fungus prevents premature contamination of the sand as a result of mixing with the soil. The second important function is a kind of barrier against the penetration of insects or rodents.

Box formation
The box is a key part of any sandbox design, regardless of whether it will be equipped with a canopy in the future or not. The most common solution is to make a square or rectangular shape. Sample projects suggest stopping at the square size of the structure with sides of 2.5-3.0 m. Taking care of environmental safety, it is better to make a sandbox from pine boards 2.5-3.0 cm thick. Creative parents can make an imitation of a boat or make round design. Installation of a standard box model consists of the following steps:
- Bars are installed at the corners. Optimal size wooden products- 45/5/5 cm. Approximately a third of the timber (about 15 cm) will be in the ground, therefore, in addition to the antiseptic treatment, it is necessary to cover with bitumen. Dried bars are hammered at the marked corners.
- Next, in the future sandbox with a fungus, you need to make sidewalls. For their formation, several narrow boards connected into a shield are selected, or one wide board is fixed. The quantity is not important, the average height of the side of the sandbox with the fungus is 30 cm.
- After attaching the sidewalls, they move on to the seat equipment. This is easy to do - just nail horizontally to the sides of the board. Usually they are installed around the entire perimeter of the sandbox in the amount of four pieces, with a lack of material, two benches can be made. In the future, they will serve as convenient stands for demonstrating sand cakes.
Important ! All wooden elements of the fungus sandbox need careful sanding. The absence of knots, chips and notches will prevent unnecessary abrasions and scratches in the child. So that the child is not injured on the corner of the sandbox, it is desirable to make it rounded.
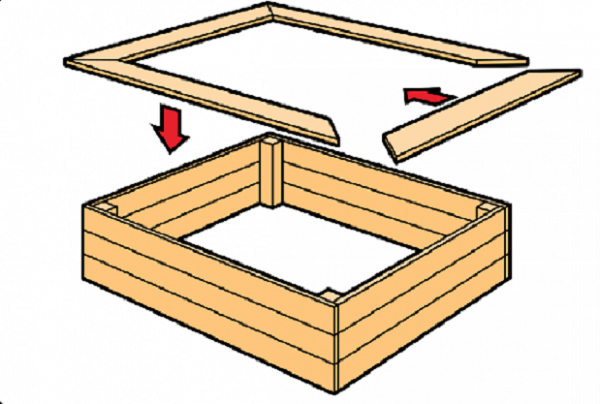
Canopy construction
Having finished work on the box, go to the second important element structures - canopy. It is possible to make it various shapes, but most often they stop at the variant of the fungus. In addition to its decorative role, it perfectly copes with the protective function, whether it is the scorching rays of the sun or a fine summer rain. An interesting solution will arrange a small table around the fungus, which serves as an additional place to store toys in the sandbox. The sequence of actions is as follows:
- Prepare a hole for the support of the fungus. To ensure the stability of the canopy of the sandbox, deepening the legs of the fungus into the soil by at least 1 m is capable of.
- The leg of the fungus is recommended to be made from a beam with a section of 10x10 cm. As in the case of beams for sidewalls, the wood of the fungus needs to be treated with antiseptic agents that prevent damage by rot or insects.
- To make a mushroom cap, you need to form triangles from the boards. Inner side parts is fixed to the support, it is desirable to sheathe the outer part with plywood or a thin board. The material is fixed with nails, with the next piece nailed in such a way as to hide the nail heads on the previous fungus board.
- For high-quality protection, the size of the fungus cap must correspond to the parameters of the sandbox.
- After connecting the cap and leg, the fungus can be installed in the prepared pit. You can fix the structure by wedging the legs of the fungus with stones and falling asleep with loam.
- If you want to make a stronger mount for the fungus in the sandbox, a crushed stone pillow is prepared at the bottom of the pit. The leg of the fungus is installed to a depth of 0.7 m and poured with cement mortar.
Remark ! If the leg of the fungus is planned to be concreted, then it is better to do this before installing the sandbox box.

After connecting and installing all the elements, you can proceed to the design of the sandbox. What kind of decorative decoration to make depends solely on the creative abilities of the parents, the main thing is to finishing material was safe, and the kids liked the idea of designing a sandbox.

For filling wooden sandbox river sand is usually used, it is well polished with water and practically does not contain foreign impurities. Any sand, river or purchased in mall, needs pre-screening. Now you can find special blend for a sandbox containing clay and specific fragrances. This filler is ideal for sculpting figures, while repelling insects from the sandbox.
You can additionally protect the place for games if you make a lid on the sandbox. This improvement simultaneously solves several problems:
- Fully or partially protect the sand from rain and reduce its washout.
- Prevent debris from entering in windy conditions.
- Creates a barrier to unwanted visits by cats and dogs.
The easiest way to make a removable shelter for a sandbox is from a tarp. Even a child can cope with it. A wooden lid looks more attractive. Which option to opt for depends on your abilities and the availability of material.
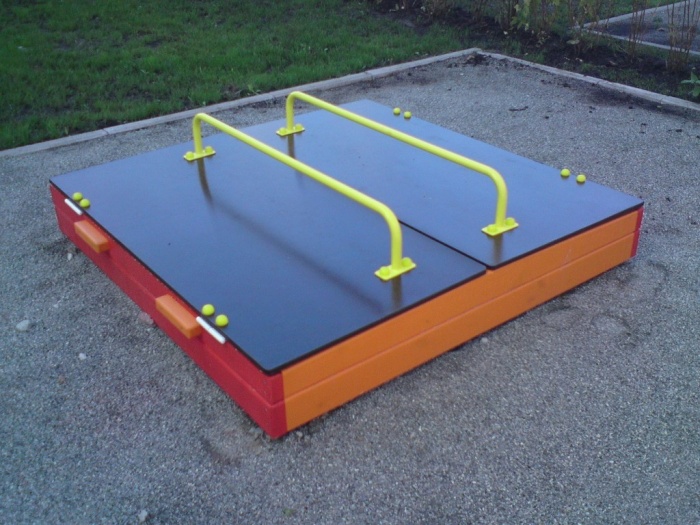
Photo gallery of interesting ideas
There are many on the market interesting ideas for sandboxes. Some models are made of plastic, which does not fade in the sun and does not emit harmful substances. The original forms will appeal to inquisitive kids.

The design of the transformer sandbox is practical, where the lid is transformed into comfortable benches for children. If you have the desire and skills, this option can be done with your own hands.
The round closed sandbox looks original, where each child can sit in a separate compartment.

What could be more beautiful than a garden filled with flowers? Only a garden where children play! Toddlers are big fans of fun adventures on fresh air, and it is very important to take them away from the bustle of the city at least on weekends. At the same time, the child needs to be occupied with something interesting and useful. Today we will tell you how to make a sandbox in the country with your own hands to provide for the kids. good place for children's games.
How to place the building
Surely not only your children, but also their friends will rest at your dacha. So, the sandbox must be roomy. There are several principles for placing a sandbox on a site that should guide its construction.
- Visibility from any point on the site. Children should always be in sight so that in certain cases adults can come to the rescue. The sandbox must always be within sight and reach.
- Hygiene. It is better not to build a sandbox under the trees. Fallen leaves clog the sand, and bird droppings will create additional problems.
- Protection from the sun and drafts. Direct sunlight is more harmful than beneficial for a child, especially if he is in an open area for a long time. Drafts can lead to illness.
- Ease of use. When you calculate the size of your sandbox, be sure to consider the number of children who will be playing in it.
Position the sandbox as conveniently as possible
When building structures for children, it is imperative to adhere to existing standard standards. As a rule, it is customary to make such structures from wood, as the most eco-friendly material. The sandbox is usually square in shape with sides ranging from 2.5 to 3 meters. For. to fill the structure, you will need about 2 cubic meters of sand.
by the most best material for the body of a standard sandbox, there will be a 25-30mm thick pine board.
The installation process of a simple sandbox
Before you get started, first of all, you need to determine what our sandbox will look like. If this is your first time doing this kind of construction, then it is better to stay with a simple, standard design. Highlight in your garden small plot, size 2 X 2 m, over which branches of trees will not hang, and proceed to the improvement of the place for games.
The dimensions of our building will be 1.7 X 1.7 m. Such a sandbox is suitable for the games of several kids and takes up little space in the garden.
Simple Sandbox Enclosure
Prepare the site for the future construction. To do this, take the cord and pegs. Mark the perimeter of the future sandbox and dig a hole inside the fence, the depth of which will be 25 cm. The removed layer of fertile soil can be useful in beds, flower beds and other areas.
Now you need to strengthen the base of the sandbox. It is advisable not to limit yourself to digging a hole: the sand, mixing with the ground, will become dirty, lose its appearance and will need to be changed often. The garden sandbox must be clean, which means that you need to take care of the base.
A bed of sand will help level the surface of the soil. At the bottom of the pit, pour sand with a layer of 5 cm, compact it well and cover it with special material.
Paving slabs can act as such a material, but this option is quite expensive. If you are using polyethylene film, after the first rain, you will have to dismantle the sandbox to remove the accumulated water. Therefore, drainage holes will need to be made in the film. The same goes for plywood if you decide to seal the base with it.
Most the best way- use agrofibre or geotextile. These materials perfectly pass moisture and will not release moles or earthen insects.
Building
Prepare bars with dimensions of 450 X 50 X 50 mm. They will need to be placed at the corners of the structure. Be sure to treat the bars with an antiseptic, because they will be 15 cm deep into the ground. Bitumen can be used for this purpose.
For each side of the box, assemble a shield 2.5 cm thick and 30 cm wide from pine boards. It can be made either from one wide board, or from several narrow ones.
Most importantly, you need to carefully treat the surface of the shields, removing all knots, notches and chips, so that later the children do not get hurt when playing.
To make it comfortable for children to be in the sandbox, make bumpers. Lay 4 boards around the perimeter of the structure, having previously planed them. The sides can be used as seats, stands for toys, buckets, showcases for Easter cakes.
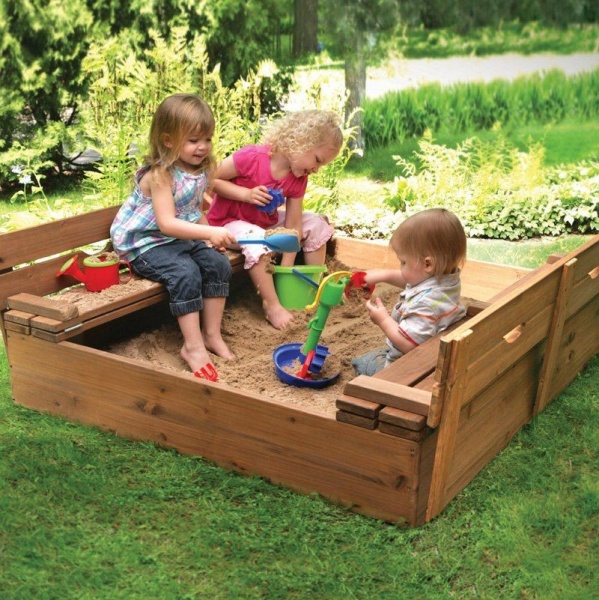
Sandbox with a lid that transforms into seats
Now let's talk about some simple ones. But useful additions. You can upgrade the usual version and prudently add a cover to it, which is useful for protection:
- sand from moisture and rain;
- wind, which can bring debris and leaves into the sandbox;
- pets who will probably want to arrange a toilet for themselves.
As a cover, we will use a shield made of boards attached to the bars. Before the game, it will need to be lifted and removed. The baby can't do it on his own. To make it easier for him, make a two-piece cover-door: put together two shields of the right size, fasten them on hinges and attach handles.
Please note: if it is not possible to make a cover from boards, replace it with a film or awning. By stretching the material and securing it with an elastic band or stones, you will provide protection to the sandbox.
Final preparations: put up a canopy and fill in the sand
A canopy, especially in the form of a fungus, can be a very necessary element of the sandbox. Under such a fungus, you can hide from the rain, and children will be reliably protected from direct sunlight. It can also be attached to a table for added convenience.
The canopy is best made of wood. A bar 100 X 100 mm and a length of 3 meters will serve as a leg. To make the leg stable, dig it into the ground to about a meter deep. Be sure to treat the wood with an antiseptic.
For the fungus cap, prepare triangular boards. Nail them from the inside to the leg, and sheathe them with thin plywood on the outside. For a hat, a width of 2.5 meters will be enough.
You can make a canopy in the form of a roof. To do this, you will need two beams and two rectangular shields made of boards. They should be nailed at an angle to get gable roof, and fasten with strips of the appropriate length.
River sand is best for children's play
Now let's talk about the choice of sand. River sand for children's games is preferable: it is fine, clean, without impurities. Can be bought at a hardware store quartz sand. But in any case, it must be carefully sieved.
A do-it-yourself children's sandbox will serve as a decoration for your summer cottage and will become a favorite place for your kids to play. You can improve the design, add to it additional elements. Tell us in the comments in your DIY sandbox installation experience. Easy work!
Even the simplest sandbox becomes a source of great joy for children. Here you can build castles, bake sand pies and do a million other interesting things. So there is no doubt that the idea of making a children's sandbox with your own hands will be met with enthusiasm by your children. In theory, the idea looks remarkably simple, but a few tips will definitely not hurt here.
Of course, first of all, you need to determine the location of the future sandbox. In no case should it be placed under the open sun. If you don’t have a suitable shaded place under a tree in mind, then you immediately need to tune in to the fact that the sandbox will need a canopy.
Children's sandbox under a canopy

Also, when choosing a place for a sandbox, you need to consider the age of the children. The younger they are, the better the sandbox should be visible from different parts of the site.
Materials for building a sandbox with your own hands

The easiest option for building a children's sandbox with your own hands is already turnkey solutions sold in construction stores. In this case, you will purchase a set of parts already cut to the required dimensions, which you only need to fasten together. But here it will be difficult to implement your own ideas: it will not work to develop a model that meets your own needs. It should also be noted that for the sandbox you will need high-quality fine sand without impurities, which, like other bulk building materials, can be ordered from specialized companies.
DIY sandbox made of wood

If you are planning to build a wooden sandbox, use unfinished wood. Various chemicals very quickly get into the sand, which children sometimes taste. To prevent wood from rotting, use resistant species: larch, Douglas fir or Robinia. It will cost more, but the sandbox will please you longer. But spruce and fir wood is also suitable for building a sandbox with your own hands.
stone or concrete

Instead of wood, paving stones can also be used. The stone has an undeniable advantage: a stone sandbox will last you forever, and neither humidity nor temperature changes will be afraid of it. In addition, a paving stone sandbox is built quickly and easily. Do not forget to coat the joints of individual stones with concrete for greater reliability.
Corner in the garden

You can even build a whole children's castle from paving stones. Choose an unused spot in the garden and build relatively high walls of any shape. In the photo above - a huge sandbox-castle, where your child can play enough.
Concrete blocks with flowers

It is very convenient to build a sandbox from concrete blocks: you just need to set the border of the blocks. But if suddenly the resulting sandbox seems gray and boring to you, then here great idea: plant flowers in the recesses in the blocks, introducing children to social useful work. And the task of watering the flowers and taking care of them will help develop a sense of responsibility in the kids.
Do-it-yourself sandbox from a tire

Here is another simple and inexpensive idea: if you have an old big tire, it is easy to make a sandbox out of it. For more beauty, color it with the kids in their favorite color.
Is it worth it to dig in the sandbox?

The sandbox can be built directly on the ground, or you can dig it in. Which option you choose depends on how much time you are willing to devote to building the sandbox. In any case, the dug-in sandbox has a more reliable design.
Practical DIY Sandbox Ideas

It is very convenient when it is possible to cover the sandbox when not in use. Then the wind will not bring garbage into the sand, and the animals will not be able to do their business in the sandbox. The lid can be designed in such a way that, when open, it becomes a comfortable bench on which the child can rest between games.

Here, however, such a problem arises that the lid will prevent rainwater from entering the sandbox, and it will not be possible to make cakes from dry sand. Therefore, it is necessary to provide for how it will be possible to wet the sand before the game.

The two-leaf lid for the sandbox has a great advantage: if desired, one of the wings can be left closed and used as a place to store any little things or a platform for building sandboxes.

If the sandbox does not have a lid, any rain will quickly fill it with water. Sand can dry on its own, but before building a sandbox with your own hands, you should think about drainage. To do this, you can put crushed stone on the bottom of the sandbox, covering it with a water-permeable cloth and fixing it on the frame of the sandbox. This measure will also help to avoid unexpected guests in the form of insects and worms.
Toy box

love practical solutions? Then we have this idea for you: place a place to store toys next to the sandbox. On the one hand, all the toys will always be at hand, and on the other hand, you will not need to remove the sand that has crumbled from the bucket every time.
2 in 1 storage chest and bench back

By placing a stopper, you can turn the lid from the toy chest into the back of the bench. After all, even the most active children sometimes need a minute to relax.
Sandbox on wheels

If your garden is not so big, you can save space by attaching wheels to the sandbox, then you can rearrange the garden at any time. Here, too, it is advisable to take care of drainage, especially if the sandbox will most often be located on outdoors. The bottom is best used wooden planks leaving spaces between them. And so that the sand does not “run away”, line the day with a waterproof cloth.
Sandbox of an unusual shape

When we talk about a sandbox, we immediately imagine a wooden square filled with sand. But this does not mean at all that we should limit our imagination to this representation. Why not make a sandbox, for example, hexagonal? Enough simple idea, but it gives the sandbox a completely different look.
A canvas cape can be a worthy replacement for a lid

It doesn't matter what shape you choose for your sandbox. But it is still important to take care of the protection of the sand. If building a lid seems like an unnecessary extra waste of time to you, here's an easier option: an ordinary tarp that will perfectly protect the sandbox and its contents from wind, rain, and neighbor's cats.
DIY sandbox in the form of a ship

In such a sandbox, it will be possible not only to build castles, but also to play pirates. And the "sail" will additionally protect from the scorching sun. Original, isn't it?

Photo: ziegler-spielplatz.de, deavita.com