Surely they met you in natural cosmetics stores. Bright, fragrant and ... quite expensive. You can pamper yourself much more in a budgetary way if you organize a home spa-salon yourself. Make your own bubbling bath bombs! You can add your favorite aroma oils, flower petals, sea salt and more to create a unique product that you can use not only for yourself, but also present as a gift to your friends.
How to make a bath bomb
To make a homemade bomb, you will need thin disposable gloves, a large bowl, a spray bottle with cool water, a sieve, and molds - they can be either round or any other. Forms for muffins, cookies or regular egg boxes are quite suitable. In addition, you will need these ingredients for the base:
250 gr baking soda
100 gr citric acid
5-7 ml vegetable oil
Additional Ingredients:
10 ml aroma oil
food colorings
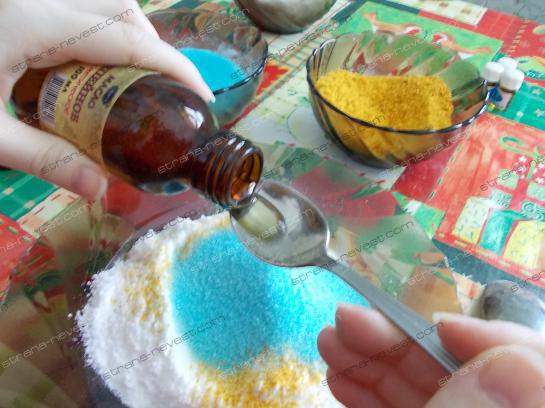
Is everyone ready? You can start creating bombs! The size can be any - it is better to start with small ones so that they keep their shape and do not fall apart. So, first sift the soda so that there are no lumps. Mix it in a large bowl with citric acid.
Now add oils - aroma oil and a little vegetable oil (it can be anything - olive, for example). Stir quickly so that the mixture does not sizzle.
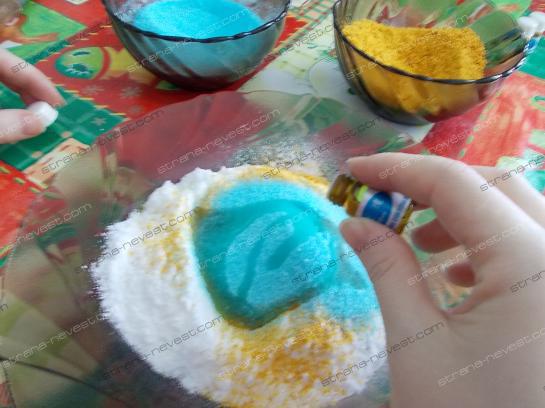
It's time for the food coloring - add it a little at a time and immediately mix thoroughly until you reach the desired color.
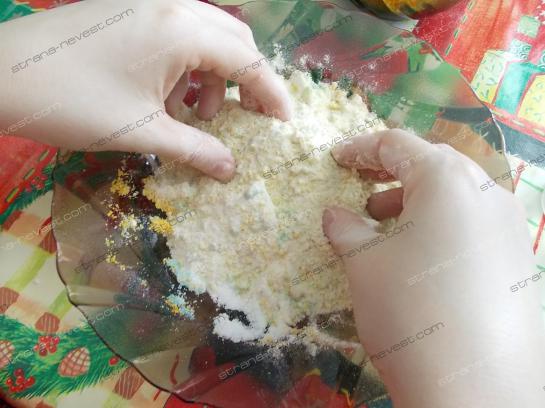
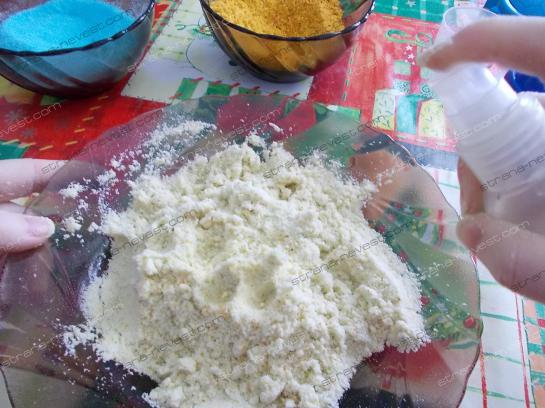
Sprinkle the resulting composition with water. The consistency should be such that you can form something with your hands, but it should be quite crumbly.
Fill the molds and leave to dry for 6-8 hours in a dry, warm place. Ready! It is advisable to use them fresh and not to store for too long.
Bath Bomb Recipes
What oils, dyes, salts and other ingredients can be added to classic recipe? We offer several combinations:
Lavender + sea salt. To create this beautiful and fragrant bomb, you will need 20 drops of lavender oil, 1 tbsp. dry lavender leaves (if any), 1 tbsp. sea salt and 2 tbsp. jojoba oils. Don't forget about a pinch of lilac dye!
Rose with cocoa butter. A real gift for romantics! Ideal for taking a bath together. By the way, you can make such a bath product in the shape of a heart. You will need 50 ml cocoa butter, 10 drops of rose oil and 5 drops of ylang ylang oil. Also pink food coloring.
Honey and lemongrass. Gentle product that also cares for the skin! To create it, you will need 10-15 drops of lemongrass oil, some hard, dense honey and a handful of oatmeal for decoration. Additionally, you can add a couple of tablespoons of milk powder. It will turn out very fragrant!
DIY bath bomb
Now for some recipes for making bath bombs. There is nothing complicated about this, and all this can be perfectly done with your own hands, and not bought in stores for a lot of money. I tried it myself and made amazing bombs with my loved ones essential oils. Taking a bath with a scented "bomb" is a pleasure.
So, let's get started, to prepare 1 bomb we need:
4 tablespoons of ordinary soda;
- 2 tablespoons of citric acid;
- 2 tablespoons of any oil (olive, almond, etc.);
- 2 tablespoons filler ( powdered milk, cream powder, sea salt, herbs, etc.)
- 5-8 drops of your favorite essential oils;
- molds (you can use children's dishes or 2 identical round plastic mugs that need to be connected together to make it look like a circle).
Next, mix soda, citric acid, oil, filler well in a convenient bowl. The mass should turn out like slightly wet sand. Then we tamp the resulting mass into molds and leave to dry for 8-10 hours. To make the bombs well removed, you can first grease the molds with vegetable or olive oil.
All the bomb is ready! As you can see, there is nothing complicated. We throw the bomb into the bath and enjoy :) Keep the bombs in a dry place.
Another recipe for making bombs with mint, the so-called "mint" bomb.
We will need:
- 4 tbsp. l. soda;
- 2 tbsp. l. citric acid;
- 2 tbsp. l. dried cream or milk powder;
- 2 tbsp. l. bath beads (optional)
- 1 tbsp. l. bath salts;
- 2 tbsp. l. olive oil;
- 20 drops of peppermint essential oil;
- 1 tbsp. l. mint herbs (sold in a pharmacy).
 Mix soda and citric acid in a convenient bowl and rub thoroughly with a spoon. Then add dry cream (milk) and rub again as well. After that, alternately add olive oil and mint essential oil and mix everything again. Then add bath salt, dried mint and beads (optional) for the bath. Continuing to stir the resulting mixture with a spoon, spray it with a spray bottle so that it becomes a little wet. You don't need to add a lot of water ready mix should stick together. Now, put the resulting mixture into a greased mold and tamp it well. You can try to do it just with your hands different figures. We put the finished bomb on paper and dry for several hours.
We throw a bomb in the bath and get a lot of fun :)
And in the end, as I promised in the previous article on soap making, I post another recipe for making soap with my own hands, the so-called "puff soap".
To prepare the top layer, grate baby or any other soap and melt in a water bath. Add any dyes and essential oils to it. Then fill with the resulting mass only half of the prepared form, if the soap is two-layer and one third of the form, if the soap is three-layer. In order for the soap layers to hold together, smooth the resulting first layer with a small spoon and let the layer cool. To prepare the second (third) layer, we do the same as for the first. After that, let the prepared soap cool and remove it from the mold. Everything, puff soap is ready.
How wonderful that today bathing can be turned into an entertainment show. One has only to put a bubbling bath ball into the water and enjoy the dance of bubbles with a delicate smell of a cosmetic product.
Bath balls will entertain while bathing and give the skin softness and gloss. They combine the functions of care and relaxation. The composition of the soap product can be various caring components.
Making your own bath bombs is not that difficult. Bath bomb recipes are amazing. But not everyone knows how to make bombs. A master class on their creation can be found here.
you can put any herbs in bath bombsWhat is a bath bomb, we answer: fizzy bombs for the bath are made from different mixtures according to numerous recipes, they are also called "geysers". Once in the water, they seethe, gradually dissolving.
The recipe for bath bombs includes only natural ingredients. They give the skin beneficial caring substances. The balls have a delicate aroma, soothe and relax. Or, on the contrary, they carry an invigorating charge, dipping into a fresh whirlwind of emotions.
In any case, this soapy fireworks will give everyone pleasure and cheer up. The ball with the addition of sea salt will turn the water in the bath into a salt pool, very beneficial for health.
How to make a bath bomb with your own hands, first things first, a specialized master class will teach you this. To prepare a bath popper, you must have the following products:
- Citric acid
- Sea buckthorn, almond - any other oil
- Powdered milk, cream, cosmetic clay
- Any essential oils
- Supplements of dried herbs, flowers, flakes, honey and so on
- Dye
Components are taken in accordance with their tastes. Depending on the condition of the skin and the presence of any allergic reactions. It is important what emotions and what kind of care you want to get in the process of bathing with one or another bomb.
 in each bomb we can add literally everything that is at hand
 Equipment
To create homemade bomb for the bath should be prepared:
- volumetric cup
- Gloves and mask
- Cold water spray bottle
- Bomb molds
If there were no spherical shapes at home, any will do. These can be plastic containers of any size and shape. And then you should purchase the missing forms for bombs in hardware stores or departments for creativity.
Making our own bath bombs, we will use the following recipes:
Master class number 1 "Relaxation"
four tablespoons of soda;
one to three tablespoons of citric acid;
one tablespoon of salt;
two to four tablespoons of powdered milk (cream);
two tablespoons of almond oil;
10-20 drops of essential oils of lavender, eucalyptus, bergamot;
one tablespoon of chamomile flowers, lemon balm.
Combine all ingredients except oils large capacity, crush. While stirring, add almond oil and other oils. Mix everything. We spray on the mass from the spray gun. When the mixture begins to sizzle and becomes viscous, spread the mass into molds and tamp well.
The form must be pre-greased with oil. We leave products for 5 hours. Transfer the finished bath pops to separate place. If the bomb is made as a gift, it should be beautifully packaged.
How to pack a ready bubbling bath ball is up to you. There is no limit to the flight of fancy. Wrapping paper, ribbons, colored cardboard, bright cellophane will do. You can simply wrap the balloon in pretty paper and tie it with a ribbon. And you can combine round geysers into a simple composition of several pieces. Lots of options.
Master class No. 2 "Chocolate Paradise"
four tablespoons of soda;
one to three st. spoons of citric acid;
one tablespoon of salt;
two tablespoons of jojoba oil;
one tablespoon of dark chocolate;
one to three tablespoons of powdered milk can be (cream);
one tablespoon of cocoa powder.
use whatever forms you have
In a spacious container, combine soda, acid and salt, grind. Melt a bar of chocolate. Slowly add jojoba oil to the cooled mass. Add the resulting mixture to the bowl with the rest of the elements. Mix. Place a homogeneous mass according to the forms. Put in the freezer. Remove after half an hour, the soap attraction is ready.
Learn how to make a homemade citrus bath bomb.
Master class number 3
three to five tablespoons of lemon or rather lemon zest
three to five st. spoons of soda;
one to three st. spoons of citric or any other acid;
half st. spoons of salt;
two tablespoons sea buckthorn oil;
15-20 drops of grapefruit or lemon essential oil.
Mix loose powders in a dry bowl. Add grated lemon zest. Carefully pour in the sea buckthorn oil, lemon oil and mix everything well. If desired, add food coloring. Sprinkle the prepared mixture with water and lay in special forms for bombs. And you can leave for 5 hours. When the balls are dry, you can start using them.
These handmade bubbling bath bombs are made from natural ingredients.
BUT useful properties they have a lot:
- take care of the skin, nourishing and moisturizing it;
- give pleasant aroma and a feeling of joy;
- relax and soothe;
- increase overall vitality.
It’s easier, of course, to buy a ready-made bubbling ball. But how can you be sure of its quality and safety? Store-bought balloon water bombs may contain ingredients that are unhealthy. And instead of positive impressions, they will bring problems and poor health. And if these are children's bath bombs, then their natural composition is all the more important.
Children's direction
It is also easy for children to make bombs with their own hands. Every child will be happy to bathe with a soap miracle. Noisy seething and a colorful cascade of splashes will delight any kid. It is only necessary to approach the creation of home-made water fireworks with enthusiasm and imagination.
A baby bath bomb at home is made, just like everyone else. Only this bomb will be brighter, more unusual and interesting. With the smell of sweets or fizzy soda. There are a huge number of children's forms for bath bombs. Of course, when choosing a recipe for bath bombs, it is worth considering the interests and tastes of the child.
Swimming beads
A similar soap firework will provide bath beads. This is a set of small beads similar to pearls. They are different size and colors. Consist of the same ingredients as large geysers + contain gelatin. Often included in large balls. They are placed inside the bomb at the stage of creating a soap masterpiece. Beads give the same unforgettable emotions and sensations. You can buy these wonderful beads on the Internet or in departments with bath products.
Now you can safely make bath bombs with your own hands. There are no particular difficulties here. To replenish theoretical knowledge, there is an opportunity to watch a video master class on their production: "How to make bombs." A fragrant, soapy gift made with your own hands will always come in handy, and will fill the standard hygiene procedure with unforgettable sensations.
It's time to try to create such bombs yourself.
What are bath bombs and why do I need them, I wrote earlier. Now I propose to make them yourself.
I managed to make a bomb on the first try. Despite the fact that on various forums dedicated to the manufacture of bombs, there are many beginners with bad experience. The main thing is not to get upset. If the bomb did not work out, fell apart or crawled when dried, you do not need to throw it away. Can be crushed and used as an effervescent bath mixture. Not as original, but just as effective.
Classic composition for 1 bomb:
* 4 tablespoons soda,
* 2 tbsp. l. citric acid,
* 2 tbsp. base oil (olive, sea buckthorn, castor, almond, etc.),
* 2 tbsp. filler (milk powder, sea salt, zest, corn starch, clay, herbs, etc.). Remember, the filler should be 2 tablespoons, no more, no less. For example, 1 tbsp. powdered milk 1 tbsp. sea salt, or 2 tbsp. salt, or 2 tbsp. powdered milk, or in other combinations. We reduced one dry component, which means the amount of the second increased by the same amount. It is important.
* 7-8 drops of essential oils,
* moulds. I have children's sandbox molds. You can use different caps from creams (great for bombs for foot baths) and so on.
Do not knead the mixture at once for several bombs, it quickly hardens.
A few words about the base oil. I do not recommend taking sunflower oil, it burns out quickly. Linseed oil it also burns quickly, but if the bombs are not stored for a long time, then you can use it. From sea buckthorn oil, the bath is painted in a light Orange color But if you wash it right away, then everything goes away without problems. The best is grape seed oil or olive oil. Often used and almond. Castor oil is considered heavy, creating a very thick film on the surface. But if you take it not 2 tbsp, but only 1 teaspoon, then the unpleasant oil film becomes quite tolerable.
I even recommend 1 teaspoon of base oil instead of 2 tablespoons. So it is more pleasant for the bather and the effect of softening the skin is also obtained. In order to get a mass, like wet sand, you can sprinkle the mixture with alcohol or vodka from a spray bottle (no more than 4-5 puffs!). It is better to spray once, mix the mixture and add more if necessary. Over time, you will determine your number of puffs.
Now about the filler. I strongly do not recommend taking clay. When dry, it has quite beautiful colour, but in water, and even with oil, it turns out just gray oily water. Brrr! Potato starch is also blacklisted. Cornstarch, like milk powder, also makes the water cloudy, but they have more benefits, the skin becomes tender and soft. You can use ground oatmeal, sugar, etc. The scope for flight of fancy is simply huge.
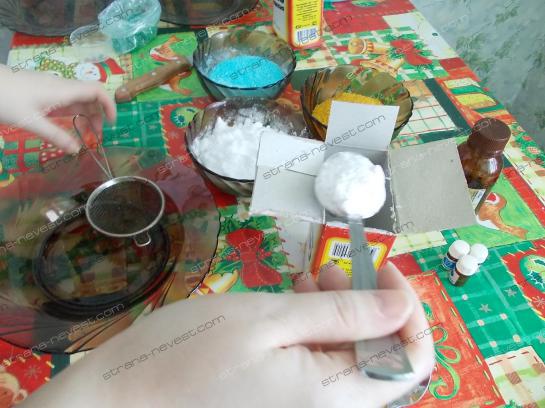
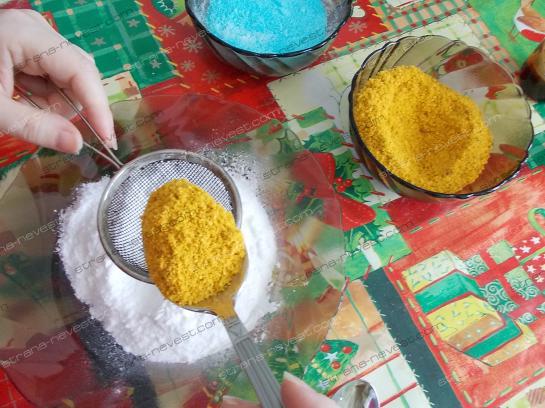
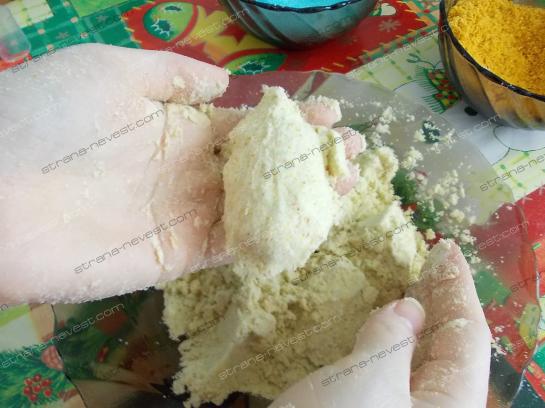
Let's start mixing the ingredients. We take soda, citric acid (it would be better to grind it in a coffee grinder), oil, essential oils and filler - sea salt and tangerine zest. With lemon you need to be very careful, because. it irritates mucous membranes and can cause an allergic reaction, so make sure there are no children or pets around and take care of an airway bandage.
I sift through a sieve so that there are no lumps.
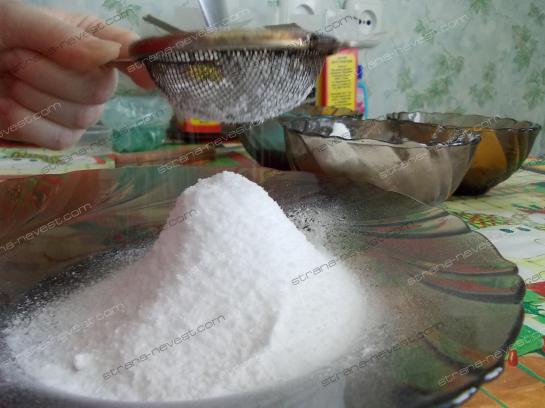
Knead and knead well, like dough.
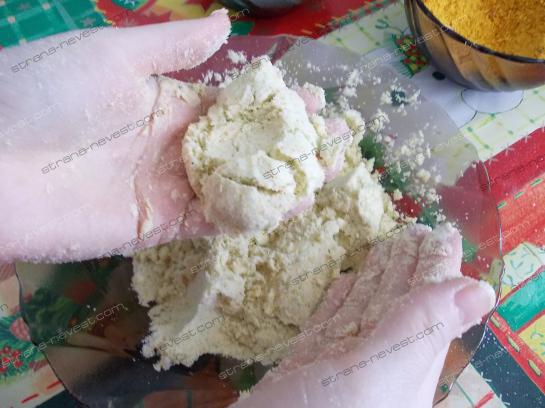
Then I make 2-3 puffs of vodka and mix again. You need to act quickly, because. mass solidifies quickly. The mass should turn out like wet sand. We determine the readiness of the mixture as follows - we squeeze it in our hand. It should form a dense lump that easily breaks apart when pressed with a finger. If it doesn't work, stir the mixture further and add the zilch.
We check if the mass is ready.
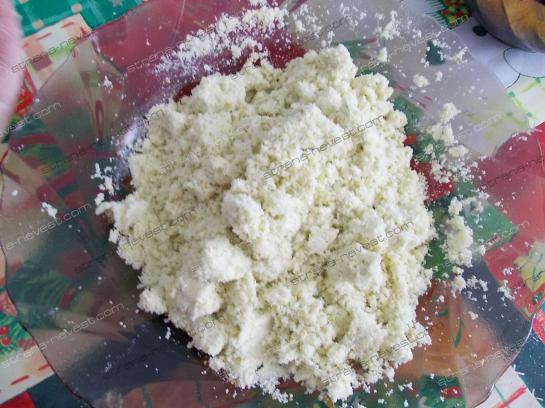
The mass is ready.
Pack the mass tightly into molds. For decoration, I sprinkled unground sea salt on the bottom of the mold.


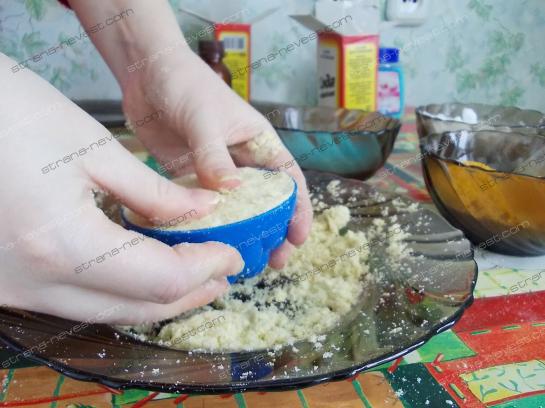
If there is a mixture left, fill out the appropriate form.

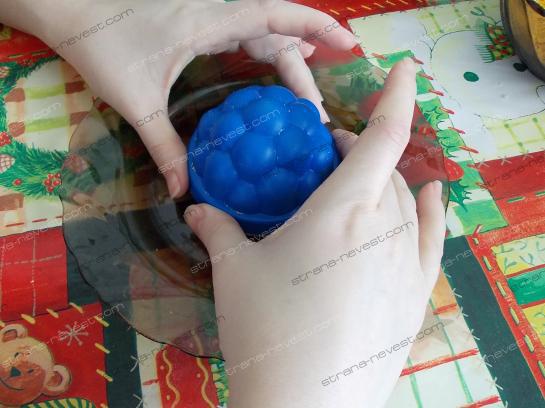
If the bomb is round and consists of 2 parts, then fill in 2 halves of molds with a slide (we fill the sides of the mold well). The halves are firmly pressed against each other. After 2-3 seconds, carefully open the halves (carefully, it can crumble!) And put the bomb to dry. The room in which the bomb dries should not be high humidity, otherwise the bomb will be saturated and float (there will be a reaction).
If, despite all your efforts, the bomb floated, i.e. began to hiss actively, quickly crumble it, add 1 tsp. dry component, knead again and fill the mold tightly. You can put it in for a couple of minutes freezer. Sometimes it helps. But I hope this just doesn't happen.
The bomb is ready. You can leave the bomb in the form for literally one minute. She jumped out of this form on her own.
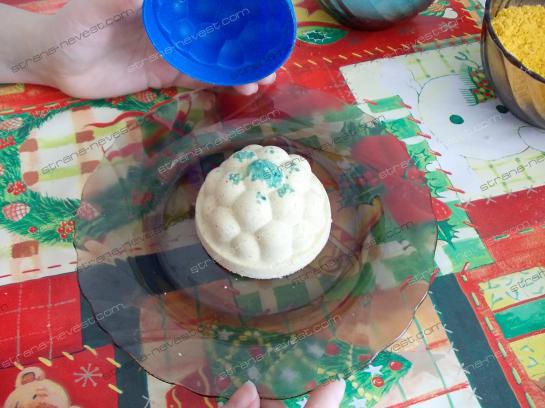
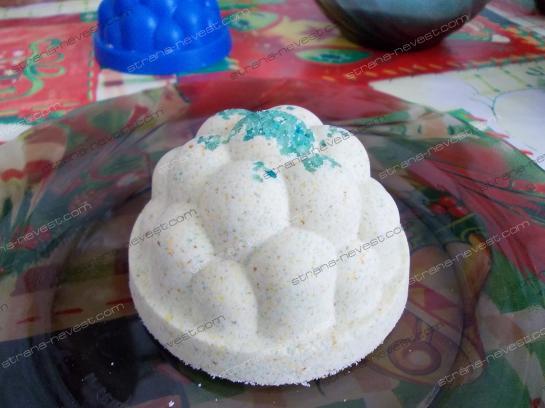
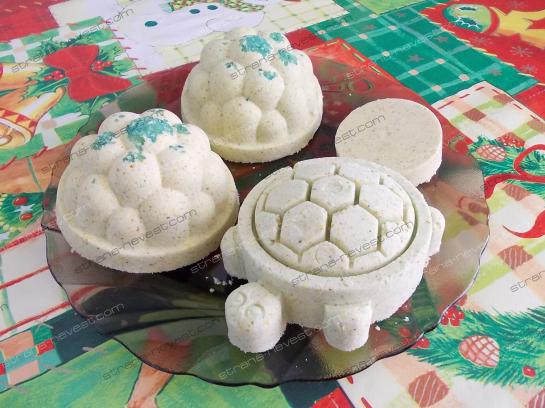
If you add bombs to it as a decoration various flowers, then before use it is recommended to soak them in oil for better adhesion of the components - otherwise it will simply crumble when dried.
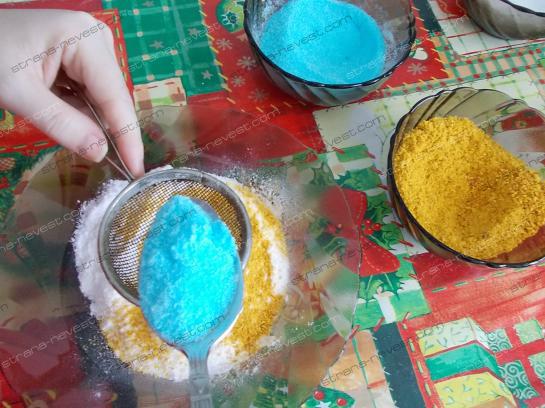
To get multi-colored bombs, the mixture must be divided into two parts. Add dye to one of them - it can be both food and natural ingredients. For example, cinnamon. You need to be very careful and careful with it, because. it irritates the skin, you can simply get burned. by the most in a safe way will use colored sea salt.
There is another component that may be present in the bombs. This is magnesia - Epsom salt - magnesium sulfate. It is added for a long bubbling bomb - from 1 teaspoon to 1 tablespoon. Although I do fine without it. But, as they say, there is no limit to perfection.
Using various fillers and oils, you can create bombs with various properties: relaxing, anti-cold, soothing, tonic, etc.
Try it and you won't be able to stop! It is very exciting!
If you are one of those people who adore comfort and are also looking for some zest in everything, you probably know something about bombs that are rapidly gaining popularity, which are also called geysers. It is these small sizzling balls that give a special touch to the usual bath and turn it into a kind of art that you don’t really want to part with. It is they who can bring a touch of grace, amazing sensations and even bright colors this daily ritual.
And if still DIY bath bombs are made, so their benefits simply increase at times. First, they become 100% useful. After all, at home you can make them only from natural and food ingredients. And you can easily create various options for any level and direction of usefulness. Such crafts look very stylish and can be perfectly packaged to give to people you love. Well, and, of course, a very pleasant moment in all these home-made processes is the opportunity to get a high-quality, extremely useful and very cheap product. After all, often buying ready-made bombs is a very expensive pleasure.
All in all, the benefits of making these mini cosmetic masterpieces are enough to give it a try. And here the question arises for many: how? Indeed, despite their popularity, these small magical spheres still remain an intriguing mystery for many. Although in fact, everything is very simple here: they rush into the bath while bathing and begin to hiss, reacting with water. This allows all the components in the bomb to actively fill the bath with all the useful things that are in this very bomb and enjoy the result of their action on your loved ones. You can see how it all happens in the video:
What are the benefits of bath bombs?
Since the main ingredients of such creations are soda, salt, citric acid and various oils, then, first of all, you can consider the benefits of these particular components.
So, soda softens water and has a beneficial effect on the skin, acid becomes a conditioner and removes toxins, and the benefits of salt has long been known - strengthens the immune system, fights cellulite, improves cell metabolism, maintains skin elasticity, relieves fatigue and soothes nervous system. And if you add to such a cocktail essential oils, then the benefit will be generally invaluable. All this is in such wonderful bombs, which are prepared quickly and are easy to use, and in general - a bath with them becomes a heavenly delight. But this, of course, if you know exactly their composition. Therefore, if you want to be sure of the exclusive use of the bomb used, the best option than to make it with your own hands, not to be found.
How to make bath bombs
The essence of creating such interesting balls comes down to two ways.
First way involves mixing all the ingredients (soda, citric acid, natural filler, base oil and essential oils) without adding water.
Second way, practically, does not differ in composition from the first one (except for the amount of added base oil), but water is already used here.
Important! Whichever method you choose, there are certain rules, following which will allow you to get the perfect result:
- Salt and citric acid are better, pre-grind. For example, a coffee grinder.
- In the process of working with acid, it is very desirable to use a mask and rubber gloves, since without them there is a risk of irritation of the skin, mucous membranes and respiratory tract with citric acid dust.
- If possible, it is better to give preference to silicone options as molds. They are more convenient, make it easy to separate the mass from the walls.
- The mixture in the molds must be well tamped so that there are no voids left. If both halves of the vessel are filled, they must be connected without scrolling, but simply pressed down well.
- To avoid premature reaction, make sure the surface of the molds is completely dry.
- After being removed from the mold, the bombs must be allowed to dry before use. As a rule, 8-10 hours are enough for this.
- As natural fillers you can use cornstarch, oatmeal or milk powder.
bomb recipes
Basic bomb
2 parts (we take as a basis 100 g) soda;
1 part (50 g, respectively) citric acid;
1 part (50 g) sea salt
And essential oil (about 10 drops are enough for this amount).
Water in a vessel, thanks to which it can be sprayed onto the mass. A standard spray bottle will work just fine.
And, of course, molds.
All these ingredients are mixed (do not forget that salt and acid must be ground beforehand). Then, little by little, you need to sprinkle water on them, constantly mixing the mass. The texture of the bomb mixture should be like slightly wet sand.
If it is ready, you can ram it into molds for 8-10 hours. After that, you can take it out and use it.
Advice: since the bomb does not contain various cosmetic oils, it may be difficult to remove it from the mold. To prevent this from happening, the container can be lubricated vegetable oil or cover with cling film.
Bright colorful bombs
This recipe will be more difficult. But the bath will be filled with additional oils and unusual colors.
You will need:
1 cup sifted baking soda;
0.5 cups of Epsom salt (English), corn starch, ground citric acid;
3 tsp water and melted coconut oil.
About 10 drops of essential oil;
Color palette of food dyes;
Dried flowers (optional)
Moulds.
Advice: if you use different essential oils, then you can add them later, when the mass has already been laid out in different dishes. Then ready-made bombs will not only different colors and with different flavors.
Advice: can be mixed different colors in one form, then you get beautiful wavy transitions.
Advice: here you need to be very careful, because the mass can crumble.
Exquisite pink bomber
Such a bath will be covered with the petals of your favorite roses.
We will need:
1a glass of soda;
½ cup dry and sifted cornstarch;
½ cup chopped citric acid;
½ cup salt (ideal if you mix two types: sea and English).
2 tsp tablespoons of essential oil (you can take any oil);
You will also need a base oil. You can take coconut or any other that is available to you. It will need from 2 to 4 tablespoons. Here you will need to look at the progress of preparation. First, add 2 tablespoons, and if the mixture is not well molded in your hands, gradually add the rest to the desired consistency.
If desired, you can add food coloring (a couple of drops).
Possibly water in a spray bottle;
Parchment;
Towel;
Forms;
And, of course, dried rose petals.
Cooking:
By the way, such geysers can be beautifully packaged and presented as a gift.
Mistakes that are made in the manufacture of bombs most often.
- The ball does not hiss enough in the water. Perhaps you just overdid it with the addition of water. Try to reduce the amount next time.
- The mass does not stick together well in the form. Try adding more oil.
- When removed from the mold, the bomb cracks or falls apart. Try leaving the mixture in the molds for a few more hours. Another reason may be the wrong consistency, it may take several attempts to guess the correct one.
- Even after a day in uniform, the bomb still falls apart. Here you can try to let it stand for a couple more days, and if this does not help, then the reason is not enough water. This can be corrected only at the next preparation.
- The geysers hold their shape but crack a little. This indicates that a little more water than necessary was added and a slight reaction took place. It usually doesn't hurt much. appearance and even adds zest to the product.
- Bombs become soft in storage. This is due to the high humidity. These items are best stored in a dry place.
Now that you have all the necessary information about bombs, you can become a real expert in making them. And having tried to make at least a couple of the proposed recipes, you will easily understand that you can make other types of small geysers. To do this, you just need to experiment with base oils, essential oils and food coloring. Such experiences can become very exciting and incredibly creative. And you will be able to become not only a pro in the preparation of such homemade cosmetics, but also get the opportunity to heal, relax nicely, preserve beauty and, of course, delight your friends with pleasant presents.