Homemade seedling cups - budget and convenient option for planting seeds. The beginning of the summer cottage season is expensive, so any way to save money is welcome. Traditionally, wooden and plastic pots, disposable cups and incised cans... You can make convenient and economical do-it-yourself cups for seedlings.
Each type of pot has a number of advantages and disadvantages. To do right choice, you need to consider all the options in more detail.
As a container for seedlings use:
- wooden boxes;
- plastic cassettes;
- peat cups;
- plastic disposable glasses or containers for sour cream, yoghurts and instant noodles;
- Korean carrot buckets or sauerkraut;
- paper cups for hot drinks;
- cut packages "tetra-pack" for juices and dairy products;
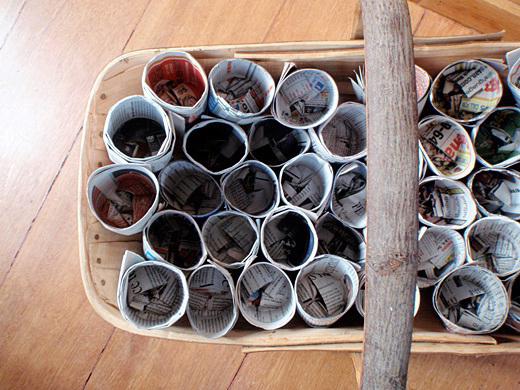
- homemade cups made from newsprint.
Let's talk about each type separately.
Wooden boxes
A large box is used for sowing seeds of tomatoes, peppers, flowers. In a common box, seedlings grow until they reach 10-15 cm. After that, a pick is necessary: planting seedlings in individual containers. Before disembarking, the box is covered inside with cling film (or ordinary polyethylene). There are small holes at the bottom of the box through which water can flow, so the box must be placed on a pallet.
The advantage of such a container is its low cost. You can make a box yourself by cutting and putting together unnecessary boards. You can adjust the size yourself (taking into account the length and width of the window sill). The main disadvantage is heaviness. The wooden box itself weighs a lot, and after filling with earth it can become overwhelming. The need for a pick is another drawback. When dividing seedlings high risk damage the undeveloped root system.

Plastic cassettes
Plastic cassettes are very convenient device for growing seedlings. It has a similar structure with a mold for freezing ice, although the volumes of the containers are much larger. A drainage hole is punctured at the bottom of each recess. Simply fill the cassettes with special soil. Each cup is designed for one plant.
The cost of the cassettes is modest. The seedling cups are not very tightly fastened together, they can be easily cut with scissors. They are lightweight and compact. When transporting, you need to be careful: some cassettes are made of fragile material, and the glass may crack. It is better to plant peppers and eggplants in deeper containers.

Peat glasses
Peat containers are an innovation for gardeners. The main advantage of the product is planting directly into the ground with the shape. Peat decomposes in the ground, so seedlings do not need to be removed from the container, risking damage to the roots. In addition, the cup itself is a ready-made fertilizer for the soil. However, some gardeners advise against sowing seeds in them. In their opinion, it is better to use peat glasses for picking.
The advantage of the product is the minimum of required machinations: picking, transplanting. There is no risk of "injuring" the roots. There is only one minus - the probability of buying poor quality product... In some cases, seedling containers begin to fall apart, crumble, and mold may appear on them. You can buy such pots only in trusted stores.

Peat tablets
Compressed "buns" made of peat are a more expensive analogue of cups. They differ in that the seedling potting soil does not need to be poured into the tablet. Dry tablets are placed in a tray with water. Over time, they swell. Seeds are planted inside. Planting is as easy as shelling pears: a tablet with a germinated plant is buried in the ground.
Advantage - minimum cost forces. The disadvantage is the high cost. Tablets cost 5 times more than regular cups. However, you don't need to spend money on potting mix. Some gardeners use tablets only at the first stage of growing seedlings. After the plant has grown, they bury the pill in a glass with soil.

These can be disposable plastic cups or yogurt cups, processed cheese or sauerkraut. You can use cardboard disposable cups for hot drinks left over after visiting the coffee shop. The main thing is to choose containers different sizes... If you buy disposable tableware, you need to purchase two sets: shot glasses (100 ml each) and beer glasses (500 ml each). The first set is convenient for sowing seeds. Large containers are used for picking.
The advantage is low cost and convenience. Such "pots" can be used for more than one year. An earthen lump along with the root system is easily removed from them. Disadvantages: inconvenience during transportation due to instability and lack of drainage. Before filling them potting soil you need to make small holes in the bottom. It is convenient to do this with a hot awl.

Milk and juice boxes
It is convenient to use cardboard packaging from juice or dairy products for planting seedlings. To do this, they must be cut off. The height of the glass depends on the crop being planted. Eggplant and pepper need more soil for the full development of the root system. Despite the fact that the cups are made of paper, they should never be buried. They do not dissolve in soil. Drainage holes must be made in the bottom.
You can make seedling pots with your own hands. The height can be adjusted independently. These containers can be easily transported: they are light and stable. It is very easy to remove the earthen lump. To do this, you just need to break the glasses.
Homemade paper containers
Homemade paper cups are completely free, non-toxic and easy to use. True, you will need to spend about half an hour on the manufacture of a batch of containers. An old newspaper is folded in half, wrapped around a glass or bottle. Part of the sheet of the newspaper must be tucked inward, forming the bottom. Holes do not need to be drilled.
Such molds can be safely buried in the holes in open ground... It is advisable to use paper without printing ink, but old newspapers will also work for this purpose. The height of the container for seedlings of peppers or eggplants should be about 12 cm, diameter - 8-9 cm. For seedlings of tomatoes and cabbage, smaller glasses are suitable: 10 cm in height and 6-7 cm in diameter.
DIY seedling cups can be made from eggshell... Such small "pots" are suitable for planting small ornamental plants... Before planting, you need to lightly squeeze the shell in your hand so that it crumbles.
Any version of the product has disadvantages and advantages. Each gardener must take into account the specifics of the planted crop and financial capabilities. If you are going to be transported for a long time, you need to choose denser pots. The main thing is to plant the plants with love, so that they will thank you with a healthy harvest.
Next spring I plan to grow a lot of seedlings. A friend told me that you can save on glasses. Tell me how to make cups for seedlings with your own hands?
All gardeners know that summer season requires financial investments. Here you need to buy seeds and seedlings. Let's say you can grow seedlings yourself. But, again, the question arises - what to grow? Buying special cups for seedlings is also expensive, especially when growing in large scale... So, at this stage, you can save a lot - with your own hands. And there is no need to buy material - there will always be old newspapers, cans, bottles, packaging, film at home. And in winter there will be something to do with yourself.
Material for cups for seedlings
As a raw material, there can be both ready-made containers and improvised means, namely:
- Cardboard boxes for juices or milk, both small (for one seedling) and large (cut lengthwise and plant seedlings in groups).
- Large plastic cups for dairy products (small yogurt cups will not have enough space for the seedling).
- Disposable tableware (glasses).
- Used water bottles or bottles (they are treated in the same way as with cardboard boxes).
- Tin cans with canned food or beer.
- Cardboard boxes (for example, shoe boxes) serve both for growing and as a pallet.
- Toilet roll cylinder (you can leave it round or make it square for convenience).
- Cups made of paper (newsprint or toilet paper).
- Film cups.

Since the ready-made container can already be used, we will focus on the last two points that require human participation.
Seedling paper cups
In order to make paper cups, you will need directly paper (newspapers, magazines) and a blank (base) glass. As a workpiece, use:
- trimmed plastic bottle with a loop on the bottom (in order to make it easier to pull the workpiece out of the glass made);
- cropped top tin can.

Cut strips of paper up to 40 cm long and 20 cm wide. Wrap the base for the glass with them so that the paper protrudes 5 centimeters beyond the edge. Then turn this protruding edge and make the bottom of the glass. Now the base can be carefully pulled out, and the cup itself can be fastened with paper clips or glued with glue for strength. Ready! It remains only to fill in the prepared soil and you can plant seedlings. If you use toilet paper, then it is pre-moistened abundantly, and then dried well.

The advantage of paper cups is that they can be planted in the ground along with the seedling; during the growth process, the paper will decompose and will not interfere with the growth of the root system.
Cellophane cups

Such cups are made using the same technology as paper ones, but with careful use they will serve more than once. To do this, twist the strips from the film into a cylinder and fix the bottom and walls with a stapler.
You can do even easier and buy cellophane bags for packaging in bulk. Fill them immediately with earth and place them in a box for stability. Such packages are pre-pierced from below so that moisture does not stagnate.
For more information on how to make do-it-yourself seedling cups, watch the video:
Spring is a hot season for gardening enthusiasts, which primarily means working with seeds. Modern stores offer gardeners a whole range of different containers for seedlings, but for the sake of economy, most gardeners prefer to do with improvised means and materials. There are many ways to make DIY seed growing cups, and below we'll talk about the simplest and cheapest ones.

Cups from metal and plastic jars
The classic version is a container made of metal cans for canned food. Several holes should be drilled in the bottom (best from the inside), and in order to make it easier to remove the seedlings from the container, several cuts are made on its walls. If the cups are supposed to be used more than once, it is better not to cut them, but just put a strip of thick paper or polyethylene on the bottom - in order to get an earthen ball and not damage the roots, you just need to pull it. Likewise, you can use top-cut cans, plastic bottles and toilet paper rolls.


Plastic cups from under yogurt can serve as containers for seedlings of vegetables and flowers. First you need to cut out the bottom of the can, and instead put a circle of tin or cardboard that is suitable for the size.

When the shoots need to be planted, it will be enough to press on the improvised bottom with a stick. It is important to note that transparent disposable cups are the worst suited for seedlings, since the roots in such containers do not receive enough light and shoot growth slows down.

Cups of paper or newspaper

Containers for seedlings made of paper or newspapers are made in several ways. For the first, you will need a suitable cylinder (you can use a plastic bottle or a can, cut off the top) as a base, as well as strips of paper of a suitable width. If the paper is thick enough, three strips will be enough to make one cup, and if it is thin, it is better to add 2-3 more. Paper strips must be attached to the base so that they protrude beyond its edge by at least 5-6 cm (depending on the radius), then wrap it in paper (not too tightly so that the cylinder or jar can be easily removed) ... The protruding edges must be pressed well, thus forming the bottom of the cup. After that, the base can be removed, and the seedlings can be planted in the resulting container.


Seedling cups can also be made using the papier-mâché principle. This will require several glass glasses, a bowl of water, and old newspapers or even toilet paper. Soak newspapers well and form a future container on an ordinary glass. If toilet paper will be used to make the cups, use a spray bottle instead of a bowl of water. Toilet paper wrapped around the mold, after which they are well moistened from a spray bottle and well pressed against the walls of the glass. The workpiece is dried for 24 hours, after which it is removed in a circular motion.


Paper or newspaper cups are convenient primarily because the seedlings are subsequently very convenient to plant in the ground. The paper can be simply torn and thrown away, or even the shoots can be planted along with the container (the paper will naturally collapse over time), without damaging even the smallest spines.


Film cups
To make seedling cups from plastic film it is best to take a film that is used for greenhouses. In addition, you will need a base of a suitable shape and a regular stationery stapler... The film is cut into strips, wrapped around the base and fastened with staples, after which a square cup is obtained. A simpler option is to make tubes from the film, bend the upper edges for rigidity, install them in a box or pallet and fill them with earth. In this case, the most important thing is that the film is dense enough, otherwise it will simply lose its shape.

If a lot of bags of fermented milk products have accumulated at home, they can be used for seedlings. The packages are tucked up, seeds are planted in them, then the edges are turned off and sprinkled required amount land as the shoots grow. The only drawback of this method is that the bags are rather unstable and require additional support. For greater rigidity, it is recommended to reinforce their edges around the perimeter with cardboard strips.


What cups are best for planting seedlings?
It is rather difficult to answer the question of which cups are best used for seedlings, since it depends on the characteristics of the crop that is planned to be grown and other factors. Today in shops for gardeners you can buy different containers for growing plants: peat cups and tablets, as well as plastic containers different forms and sizes.
Peat tanks

Pressed peat containers have a number of very valuable advantages. Firstly, they provide the maximum survival rate of young plants, since they can be planted in the ground directly with the container, without injuring even the smallest roots. This is especially valuable when growing delicate crops that "do not like" transplanting to a new place. Secondly, the material from which the container is made does not just break down naturally, but turns into a nutritious fertilizer.

Peat cups are both round and square - the latter are very convenient, since they do not take up much space on the windowsill.


When buying such a container, it is important to remember that in order to reduce costs, some manufacturers add cardboard to the material, and such containers are not suitable for growing seedlings - when planting in the ground, the roots of the shoots do not pass well through a thick cardboard layer, due to which the plants begin to grow poorly ... In addition, planting seeds in peat pots requires knowledge of some rules:
- containers must be put on expanded clay or sand;
- the land must be constantly moistened, since the water from such pots evaporates quickly, as a result of which the seedlings will grow poorly (however, excess moisture can lead to the appearance of a tribe on the walls of the cups);
- as the shoots grow, they need to be moved away from each other so that the roots of young plants do not intertwine with each other.
Also on sale there are peat-peat tablets, which are no less convenient for planting seedlings - when wet, they can significantly increase in size. If these pills are not available, they can be replaced with self-made nutritional nutritional cubes.

DIY nutritional cubes
To make cubes you will need:
- humus (5 parts);
- sod land (1 part).
- peat (3 parts);
- humus (part 1).

The components must be mixed together, after which, for each kilogram of the mixture obtained, add 15 g of ammonium nitrate, the same amount of potassium sulfate, 50 grams of superphosphate and water so that the mass has the consistency of thick sour cream. It must be laid out in a pallet with a layer of 8-10 cm, and then cut sharp knife cubes of the required size. For convenience, the cubes are slightly pushed apart and the seeds are planted.
Video - Do-it-yourself pills, cubes for seedlings
Plastic containers

Plastic containers for growing seeds can be of two types: ordinary pots and cassette containers, which look like cells fastened together. Pots are more suitable for indoor plants, since it is quite difficult to replant shoots from them - the roots are very tightly intertwined with each other, as a result of which they are severely damaged. If the seedlings are to be grown in plastic containers, it is very important to choose the correct size.
With the onset of the new calendar year, every fan of growing vegetables in their own garden is again preoccupied with finding containers for sowing. Almost all gardeners have given up the habit of growing seedlings on the windowsill in bulky wooden boxes- they are too inconvenient when transporting to the country. In addition, the tender young seedlings have time to grow into the roots of neighboring plants. The optimal solution in the choice of containers for sowing is a glass for seedlings.
Buy in a store or make your own?
Of course, production technologies do not stand still, and every hypermarket that respects its customers keeps in its assortment a convenient container for peat seedlings, which will not only not damage the root system young plant, but it will simply dissolve in the soil. Why build cups yourself when you can buy ready-made ones? The answer to this question is extremely simple. Experienced gardeners accustomed to planting more than a dozen or even hundreds of seeds of various vegetable and flower crops... Can you imagine how much you will need to invest in order to stock up on containers for all the seeds? Therefore, we will save and make peat cups for seedlings on our own. In the meantime, we will determine if there are any improvised materials that could become a container for seedlings.
Simple solutions from scrap materials

During the winter, gardeners collect plastic bottles, juice boxes, milk bags, sour cream containers. Literally everything is used: from paper to thick greenhouse film. And the fantasy of gardeners knows no bounds. The film is stitched together with threads, chipped with a stapler, and wound in several layers. There is another simplest way to design containers. Two-liter beverage cans are cut at the desired height and converted into a planting container. Plastic cups for seedlings, made in this way in a simple way, have one small drawback. Nevertheless, when transplanting, the root system will have to be disturbed a little. Only the removal of those plants that, during the time spent on the windowsill, did not have time to acquire long and strong roots, is painless.
We make paper cups for seedlings
Some plants are so capricious that they cannot withstand transplanting, get sick for a long time and do not take root well. As a result, while the seedling is acclimatized in a new place, the precious time allotted for growth will be wasted. Therefore, we will make paper seedling cups. It is possible to collect unnecessary newspapers during the winter. Pressed cellulose obtained from recycled raw materials is used for printing publications. It will easily rot in the garden, serving as food for omnivores.
We cut newspapers into pieces of 10x30 cm. Newspaper sheets are thin enough, and in order to make the process go faster, you can fold them in half or three times. We take an ordinary glass and wrap it with the resulting blanks in several layers. We leave a small ledge, which will later be needed to form the bottom. Now we dip the bottom edge of the paper in a small amount of glue and crush it well, forming the bottom and fixing it tightly at the bottom of the glass. Press down the newspaper blank with a glass and let the glue dry. We repeat this simple manipulation as many times as we plan to receive blanks. The seedling paper cups are ready! Now they can be stowed away in the pantry right before the sowing date.
Peat container for planting

If we are not sure about the density of newspaper sheets, then we can use a more complex technology for manufacturing a planting container. A peat cup will bring even more benefits to a painless transplanted plant. After all, he, dissolving in the soil, actually becomes good fertilizer... You can make peat containers under your own order. We ourselves will determine the required dimensions of the cups and adjust the tapered steel blank to fit them. We take into account the fact that in order to obtain more early harvest it is necessary to sow seeds in a large, spacious container. Root system it will develop well in it, the transplant will be painless, and the plant will immediately be able to proceed to fruiting.
To make a peat cup for seedlings, we need:
- steel conical shape of the required size;
- blank for forming cups;
- circle with a rod.
Nutrient formula
Having found all the constituent forms for designing future cups, we proceed to making a peat base. We need the following proportions: 50% peat, 40% cow dung and 10% black soil. Any other fatty soil can be used instead of black soil. Mix well and add azotobacterin, phosphorobacterin and water to the composition. The mixture should be quite thick in consistency.
Responsible manufacturing stage
To begin with, we lower a circle with a pin to the bottom of the steel glass and fill it with the prepared peat mixture to a thickness of 2 cm. We carefully tamp the future bottom with a blank. Now, without removing it, we will pour the solution along the edges, filling the entire gap formed between the steel glass and the blank. The seedling glass will not dry out if the mixture is carefully tamped when pouring. The blank can be removed immediately as soon as the peat composition fills the voids up to the very top. It's not scary if the liner is difficult to remove, it can be slightly wiggled from side to side. Now it remains to carefully pull on the rod and remove the finished glass.
Time to experiment

Not all peat cups for seedlings are of perfect quality the first time. Sometimes homemade containers can disintegrate and dry out - perhaps the matter is in the insufficient density of the mixture. Sometimes too dense and hard products are obtained, which dissolve with difficulty in the ground during planting. The necessary skill and flair will definitely come, even if it takes multiple repetitions.
Seedling cup made of polyethylene

To make a container 10 cm high and 7 cm in diameter, you will need a piece of thick film measuring 33x15 cm.We find or cut out a rectangular block to fit the size of the future glass. In the two edges of the bar, which are responsible for the bottom, we make grooves so that the stapler fits in them. We cut the polyethylene blanks and proceed to the design of the landing container. Then we wrap the blank from the film around and fix it with a stapler and 5 staples. We fix two of them from above and below side edge, and with the rest we form the bottom, folding the ends of the film with an envelope. It's okay if there are more staples on the bottom. In this way, cups of various sizes can be simulated.
Conclusion

We've learned a lot about how to make seedling cups. Of course, peat or paper containers are seen the best solution compared to homemade polyethylene glasses. The idea of planting plants in the ground together with a natural glass that dissolves with water in the soil was revolutionary at one time. But only gardeners can decide which of the presented methods of making containers for seedlings is the most acceptable for them. After all, not everyone will be able to find steel blanks for peat glasses, and not everyone will have enough time and patience for painstaking work with glue and paper. Therefore, making cups for seedlings is a purely individual matter.
Perhaps you can use a tried and tested method to plant the seeds in disposable plastic containers, which also show the health of the root system and the degree of soil spillage. And also such a container can be used many times. Whichever container you choose for sowing seeds, we wish you a rich harvest!