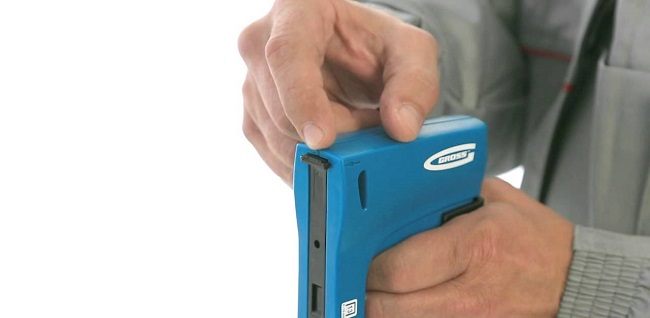
Not sure how to properly refill a large stationery or mini stapler? Read the article, which describes this process in detail.
A stationery stapler is a stapler for paper and files. You can't do without it either at home or in the office.
- To use it, you need staples, without which the stapler will not work.
- Staples are divided into sizes: No. 10, 26/8, 26/6, 24/8, 24/6. Their numbers are indicated on the packaging.
- On the packaging of the stapler itself, the numbers of the staples that fit it are indicated.
- It seems that everything is simple - insert the staples of the desired size into the stapler and you can start using it.
- But many people have problems in order to charge this device. How to do it right, read the article below.
So, you bought staples and want to charge your stapler. How to open and fill a large stationery stapler with staples? Description in the form of instructions:
- Peel back the stapler's plastic cover that is held on by a spring. Opening the roof pulls the spring along with it. The freed space is the groove for the staples. Many large staplers have latches that need to be pushed back.
- Take the braces- one section. Insert them into the groove, the ends should look down.
- Close the stapler cover.
- Click once with no paper. If a paperclip with bent darts falls out, then the stapler is working.
Advice: If the dropped staple is bent incorrectly or it does not fall out at all, then repeat the procedure or buy another stapler, it may be a malfunction.
You can watch the video to learn how to properly thread the stapler. A visual demonstration will help you cope with this process quickly and without problems. In addition, the video tells how to fix the stapler.
Video: how to fix the stapler and charge the stapler?

Mini staplers are easier to refill than larger similar devices. Lift the plastic cover up and back. Now you can insert the staples into the groove. After finishing the filling process, close the stapler and use.
Advice: Mini staplers have a very small compartment for staples. Therefore, if you want to get old staples or insert new ones, then you will need tweezers.
Often the mini stapler can jam during filling. To fix this, open the cover and adjust the staples in the groove. If this is not done, then the stapler may become unusable. Watch the video on how to properly fill the mini stapler.
Video: How to install staples in a stapler?
Video: stapler_stapler.AVI
A furniture stapler or, as they like to call it, a strobe gun is a very necessary thing. But sometimes, even when recently purchased, it starts to work incorrectly and either does not drive the staples into the tree completely, or they completely get stuck in the tool. In most cases, this is "cured" by simple tuning or is due to improper use of the tool. But there are situations when the stapler has already worked out its resource to such an extent that the parts in it simply wear out or they lead over time. How to fix the stapler so that it starts working again, as before, and is it possible to do this in principle?
The principle of operation of the stapler
It is clear to anyone versed in mechanics how this tool works. It is clear that the bracket can only be clogged by an impact mechanism driven by a powerful steel spring. It is cocked by pressing the cocking lever. When we squeeze the palm, the spring is compressed. At some point, the lever releases the spring and it, instantly straightening, activates the percussion mechanism, which, hitting the bracket, hammers it into desired material.
Two main varieties and their device
But in order to start repairing the stapler or, due to malfunctions, to understand what can “break” in it or cause these problems, you should familiarize yourself with the structure of the staplers in more detail. Your attention is presented to two types of mechanical furniture staplers, which have most widespread. The most common is this option, in which the spring adjustment screw is located on top.
Here is another type of stapler, where the spring tension screw is located under the handle. This is a rarer variety.

It can be seen that the principle of operation of both mechanisms is similar, and therefore the setup and repair will be almost the same, as well as the causes of problems with the operation of the tool.
The Problem of Incomplete Stapling
Such a thing is solved by simple tuning of the instrument. If the stapler does not clog the staples, no repair is needed. It is enough to tighten the spring adjustment screw. The more the screw is screwed in, the more stress the spring will be under and the next descent will finish the bracket to the end.

If the problem is not in the settings and before that the stapler worked fine and suddenly stopped, most likely the problem is that one of the next staples was jammed and stuck in the slot. Over and over again, the impact mechanism strikes it, but it is stuck firmly, thereby preventing the magazine clamping device from bringing the next bracket to the “starting” position. Here you need to open the store and remove the jammed bracket. On the next shot, everything will fall into place.
There are staples in the store, but the stapler does not clog them.
How to fix the stapler in such a situation? Most likely, in this case, you just need to lubricate the head of the clamping mechanism of the staples. You should open the store, remove the staples, drop oil on the rammer and develop it. When you are satisfied that the rammer slides perfectly in the folding frame of the magazine, reload the staples and test the tool.
The problem with bent braces
In this case, the media is too thick for the staples you selected. This is treated either by buying stronger branded staples made of quality metal, or by replacing longer ones with shorter ones. Staples with short legs will fit into dense material without any deformation, and they will hold almost the same as long ones, due to the hardness of the wood or other material into which they are driven.
The problem of issuing a pair of staples at once
How to repair a stapler with your own hands, if it began to issue a pair of staples at once? This problem is more serious. Due to improper use or over time, the striker of the impact mechanism may be deformed. If the metal from which the striking part of the mechanism was made was of poor quality, which applies to almost all cheap and Chinese models, its striker can either flatten out or bend slightly, as a result of which, with the next blow, it will catch not one, but immediately a pair of staples. How to fix the stapler in this case and is it possible in principle? You can fix the situation, but you have to disassemble the entire stapler. You can read about the procedure in the next section.
Problem with permanently stuck staples
This problem stems from the same area as in the previous case. Although the striker of the percussion mechanism passes into the slot, even if it is slightly bent, staples will constantly get stuck between it and the guide wall of the casing. At first, it will work normally every other time, and then it will be impossible for them to work at all due to the fact that over and over again, clogged staples will deform it more and more. In these cases, it can be stated that the stapler is broken, and how to fix it should be described in more detail.
First of all, you should prepare necessary tools. What will be needed for complete disassembly stapler:
- screwdriver ordinary;
- file for metal;
- pliers;
- hammer;
- vise (required).
When everything is prepared, you can start disassembling. There is nothing complicated in this and you should not be afraid that you will not be able to collect it later. Otherwise, you simply will not succeed. For repair you need:
- Fold out the magazine, remove the remaining staples.
- Unscrew the adjusting screw completely.
- Remove the released spring through the hole at the top.
- Now disassemble the case. The casing parts are held with pins. They have cast caps on one side and lock washers on the other. They must be pulled out so that each pin freely crawls out of its hole.

For repair, it will be enough to remove two pins from the side of the percussion mechanism.

It happens that on the impact mechanism, the stop against which the spring rests can break off. In this case, only welding will help, and it’s not a fact that the tool in this case will last for a long time. As a result, the welded stop will still fall off and you will have to buy a new stapler.
When the tool is fully assembled, we check it, at the same time adjusting the spring. If everything is ok, you are great. If not, it means that something is “not bent” somewhere. We'll have to disassemble everything and check the evenness of the parts of the impact mechanism more carefully. Therefore, it is better to do everything the first time with high quality and check it ten times.
Breakdown prevention measures
Some craftsmen advise long-term storage tool to loosen the screw of the furniture stapler, which regulates the compression of the spring. The less the spring will be in a compressed state, the more opportunity that she won't sit in as soon as possible and will develop a resource several times longer than stated in the warranty card. Of course, before the next use, it will again need to be adjusted, but this is the lesser of evils. It's better to spend a few staples reconfiguring than going to the store for a new stapler.

An important factor in the prevention of "diseases" of such a tool as a stapler is its lubrication. Regardless of whether he was in constant work or in storage, it is advisable to lubricate the mechanical parts of the tool every three months, then you won’t have to puzzle every time why the stapler does not work well and how to fix the tool. What should be lubricated and how:
- Unscrew the adjusting screw completely, pour a little oil into the hole to sewing machine, screw the screw back in place and fire a few blank shots.
- Then open the magazine where the staple blocks are inserted and pour some lubricant into the slot of the percussion mechanism. Raise the stapler upside down and fire a few more blank shots.
- It is also desirable to lubricate the mechanism (rammer) of the supply of staples.
It's simple Maintenance It will not take much time, but it will prolong the life of your instrument.
Conclusion
In order for the tool to work for a long time and reliably, it should be used correctly and maintained under the agreed conditions. It is especially worth taking care that the strobe is not affected by an environment whose humidity will exceed 70%. The drier the air in the pantry with the tools, the longer they will last and questions like: “how to fix the stapler” will not affect you at all.
The furniture stapler has successfully replaced the usual hammer and nails in many areas of activity. Its use allows you to connect materials of the same or different hardness to each other, for example, wood, plywood, plastic, polyethylene film, the cloth. With regular use, the tool may start to work poorly or even break down, but many breakdowns are easy to fix. with my own hands. To do this, you need to familiarize yourself with the design of the staple gun, its frequent malfunctions with ways to eliminate them, and also stock up on plumbing tools. Only in quite rare cases, repairs will require the involvement of service center specialists.
According to the type of energy with which fasteners are hammered into the surface of the material, staple guns are divided into the following types:
- mechanical;
- pneumatic;
- electrical.
In everyday life, mechanical and electrical models of tackers are mainly exploited. The pneumatic tool belongs to the professional category.
Mechanical Models
Any furniture stapler has in its design store for fasteners, inside which there is a clip with guides. Consumables are inserted into it when performing work operations.
Shops of some models have a transparent insert. This is convenient during operation, because it allows you to control the remaining amount of fasteners.
Staple gun device mechanical type shown in detail in the photo below.
Shock-return mechanism(Striker) is a plate. Its size corresponds to the geometric parameters of the used consumables. The striker is attached to the striker - its shape is determined by the design of the taker. In this case, the drummer on the other side comes into contact with the spring, the compression of which is regulated by a screw. Shock absorption is provided by a polyurethane shock absorber, which is located inside the case.
Manual staplers can be equipped with two types of springs:
- twisted (shown in the photo above), installed on inexpensive models;
- lamellar (spring type, photo below), more powerful and expensive compared to the first.

Mechanical staple gun lever operated(handle). He cocks the shock-return mechanism. During transport or storage, a safety clip protects against accidental operation.
Electric and pneumatic models
The device of an electric tacker connected to a 220 V network is shown in the photo below.

The following design elements are indicated by numbers:
- trigger trigger;
- fuse;
- handle for holding the tool;
- power cable;
- on / off button;
- mechanism for regulating the force of the shot;
- magazine pusher;
- store lock.
Inside the body of the tool are also:
- an electric motor that cocks a spring;
- electric motor operation control board;
- impact mechanism.

Battery products do not have a power cord. The power tool is powered by batteries.
Individual structural elements of pneumatic staple guns are shown in the photo below.

Inside the pneumatic tool is cylinder with piston, as well as the air distribution unit. Compressed air for the operation of a construction stapler is supplied through a hose that can withstand high pressure from a compressor unit or a cylinder. Therefore, if there are problems with the operation of a pneumatic tacker, you must first check the serviceability of the compressor with the air line.
Common malfunctions of the construction stapler and their causes
A construction stapler of any kind can start to work poorly. At the same time, common malfunctions for the considered types of staple guns are the same. Only the reasons why a breakdown occurred can be very different - this is due to design differences different types takers. Consider what to do in each case.
The tool does not work - staples do not fly out
So, if an electric or mechanical staple gun does not shoot staples or nails, then the reasons may be the following:
- the spring is broken;
- drummer problems.
For mechanical devices, the cocking lever hook mechanism with the spring may also wear out.
At power tools there are some more possible reasons because of which the fasteners do not shoot:
- the tool is not connected to the 220 V network;
- cord with a defect (its integrity is broken);
- the electric motor burned out;
- the board that controls the operation of the electric motor is out of order.

Board electric stapler Novus J-165-EAD
Pneumotool the consumable does not shoot in such cases:
- the compressor is broken or not connected to the mains;
- broken hose;
- the compressed air in the cylinder has run out;
- problems with the cylinder, piston or air distribution system.
Fastener stuck
Consumables in all models get stuck for common reasons:
- when it does not correspond in size to the exploited tacker;
- fasteners or magazine are dirty from the inside;
- used consumable with defects, for example, bent.
Staples are not fully clogged or, conversely, too deep
Any staple gun will not drive staples, nails, or pins completely unless Depth adjuster set incorrectly. In such cases, it is enough to properly adjust it. With manual and electric devices, the problem is also often associated with spring wear, and with pneumatic devices, with a clamping mechanism or insufficient operating pressure.
If the fasteners are driven in too deep, the cause may be pinched spring or high pressure compressed air.
Important! Compressed air pressure when using pneumatic tools can be increased no more than to the value specified in the operating instructions.
During the shot, 2 staples fly out
When the stapler knocks out two staples during a shot, simplest cause problem is using dirty consumable or staples that do not match in size. For pneumatic staple guns, the problem may be due to a violation of the compressed air supply. For electrical and mechanical models, the problem is also often caused by wear of the striker or deformation of the striker (or its guides).
It also happens that the equipment bends the staples. This is also due to their poor quality or the inconsistency of the consumable in terms of strength with the material of the elements being connected.
Algorithm for disassembling the stapler and troubleshooting
To fix a broken stapler for mechanical type furniture yourself, you will need the following tools:
- screwdrivers;
- vise;
- needle file or small file for metal;
- hammer;
- pliers.
In some cases, you may also need hand saw for metal or grinder, when repairing power tools - a multimeter and a soldering iron with a soldering kit.
To check the freedom of movement of consumables inside the magazine, simply open it or pull out the pusher.
Spring replacement or repair of worn impact mechanism perform in the following order:
- take out the remaining consumable from the store;
- unscrew the screw that regulates the force of impact;

- take out the spring;
- disassemble the body of the tool, for this they remove the washers and pull out the pins;

- take out the percussion mechanism;

- if the malfunction is related to the spring, then replace it;
- when the drummer is worn out (there is a wear in the striker or in the place of contact with the rocker arm of the starting lever), it is clamped in a vice and the parts are given their original shape with a file or needle file;

- the tool is assembled in the reverse order, while lubricating the percussion mechanism.
The spring stop may also be broken on the impact mechanism (photo below), and because of this, the staple gun does not work well. In this case, to fix the problem, you will need weld stop using welding.
Repair measures do not take much time and often do not require financial costs, but they prolong the life of the staple gun.
How to disassemble and repair a pneumatic staple gun is shown in the video below.
Disassembly and preventive maintenance of the electric model of the staple gun is shown in the video below.
To maximize the service life, it is necessary to store construction stapler under the following conditions:
- the value of relative air humidity not exceeding 70%;
- the temperature must be above +5 degrees Celsius;
- the air of the storage place should not contain alkali or acid vapors, as well as dust-abrasive inclusions.
In order to repair the stapler, in many cases, you only need to correctly adjust the depth of the shots, setting it up for a specific material, and also use high-quality, suitable fasteners. When a staple gun does not work at all, more extensive repairs will need to be made, often accompanied by the replacement of broken or worn components. When performing repair operations, be sure to remember about personal safety: remove consumables, put the device on the fuse and de-energize electric and pneumatic models.
What did you do relatively recently when you needed to change the upholstery upholstered furniture or attach glassine to the frame of a house under construction? They took a hammer in one hand, nails in the other, and then for a long and tedious "bale" on them, and sometimes on their fingers.
Today, few people want to perform such simple operations in an antediluvian way, especially with a large amount of work. After all, there is a stapler for this - a mechanical spring-action staple gun.
Well, if the tool suddenly failed, do not rush to throw it away - the repair can be quite simple.
It is a pleasure to work with a stapler - I loaded a block of staples into the store, put the gun to the right place, pressed the lever - in a moment the material was securely attached to the base. When I needed to insulate attic room country house Isolon (polyethylene foam) with a thickness of 10 mm, I could not get enough - the stapler made my task so much easier. About 70 m 2 of material I attached to the roof slopes in a matter of hours. However, when there was very little left before the completion of the work, the tool began to “fool” - I press the lever, and instead of the bracket, there is only an imprint of the drummer plate. I checked the charger - the store is full.
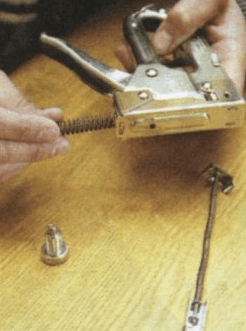
I began to understand what was the matter (photo 1 ... 6).
I unloaded the magazine, unscrewed the adjusting screw, and then removed the spring of the percussion mechanism. After that, he removed the protective casings of the pistol body, first releasing the pins from the locking split washers, and got close to the drummer. The cause of the malfunction immediately became clear - the thrust pad of the drummer body was developed, which ensures the interaction of the impact mechanism with the rocker arm of the trigger.
To make it more clear to those readers who have encountered a similar problem, but have not yet figured out its causes, I will try to explain in a nutshell the principle of operation of a staple gun (see Fig.).
Typical design of a stapler - staple gun
The main executive element of the stapler is the drummer. It is under the action of a powerful spring, the compression ratio of which is adjusted using the appropriate screw.
A charger (magazine) is located perpendicular to the percussion mechanism, in which there are staples under the action of a spring. In the non-working position, they are locked with a “strike” (a plate riveted to the body of the drummer).
Impactor interaction with charger provides a trigger device consisting of a cocking lever, a rocker arm and two return springs.
When you need to drive in a bracket, you press the lever. At the same time, the rocker with its “beak” grabs the drummer by the ledge in the body and lifts it, compressing the spring until the next bracket is in alignment with the striker. After that, the drummer, which is under the action of a compressed spring, breaks off from the beak of the rocker arm, which continues to move along the arc, and the “firing pin” drives the bracket into the base with force.
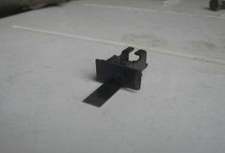
Thus, the main condition correct operation pistol - the consistency of two processes - the supply of staples and the cocking of the drummer. The drummer should not break off the rocker ahead of time. If this happens, the gun "blanks", i.e. the trigger device is cocked and fired, but the striker does not capture the bracket. It is this situation that occurs when the thrust pad of the protrusion of the drummer body is developed.
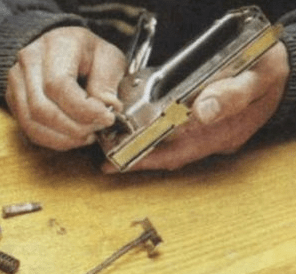
It will take a few minutes to repair this malfunction. It is enough to clamp the drummer in a vice and, armed with a file, restore the original shape of the protrusion (photo 7).
In the same way, you can increase the resource of the pistol several times - it is enough to repeat such an operation every time as soon as the pistol starts to "blank" again. At the same time, you will have to undermine (shorten) the striker plate.
So do not rush to part with your tool - it will still serve if you do not spare a little time to repair it.