People began to use candles for a long time. Previously, they served to illuminate rooms, but now they are an element of decor and a way to create a romantic, festive or cozy atmosphere.
You can find many in stores different types candles ranging from simple to fancy. Such decorations can be made independently from simple materials... Making decorative candles will not require financial costs and will not take much time, but by showing imagination and investing a piece of your soul in your product, you can create a unique thing that will bring joy to you and your family.
How to make decorative candles with your own hands
What is required
Candle material. Wax, paraffin or stearin. For people new to candle making, it is best to start with paraffin as it is easier to work with. Paraffin wax can be purchased or obtained from white household candles or their leftovers.
Stearin is easy to obtain from laundry soap... Rub the soap on a coarse grater or cut it with a knife. Place the shavings in a metal container, fill it with water so that the liquid covers it and send it to melt in a water bath. When the soap has dissolved, remove from heat and add vinegar. A thick mass will float to the surface, which must be collected with a spoon after cooling. This mass is stearin, it must be washed several times under water and wrapped in a clean cloth to remove excess moisture.
Wick... For the wick, you will need a thick cotton thread, for example, braided or twisted into a string of floss. Synthetic materials for candles are unsuitable because they burn quickly and smell unpleasant. It's easier to get a wick from regular candles.
Form... As a mold for making candles, you can use different containers: coffee jars, strong packaging, sand molds and plastic balls. If you decide to make a narrowed to the top or a round candle, the container that you will use for this, for example, a plastic ball, should be cut lengthwise and a hole at least 1 cm in diameter made at the top so that the composition can be freely poured into it.
Dyes... You can use dry food colors, wax crayons, or natural ingredients such as cocoa. But paints on alcohol or water based unsuitable for making candles.
Melting pot... A small saucepan or bowl will work well for the steam room.
Additional materials... You will need them to decorate and add aromas to the product. Since DIY candles are a lot of room for imagination, you can use whatever you like, such as coffee, dried flowers, shells, beads and sparkles. You can scent candles with your favorite essential oils, vanilla or cinnamon.
Working process
- Grind the selected raw material and place it in a water bath. If you are using household candles, be sure to remove the wick. The remains of the candles must be cleaned of black soot. While stirring, wait until the mass melts. Dip the wick into it several times so that it is soaked and set it aside.
- Add flavor and color to the mass. If you are using wax crayons, grind them with a fine grater. By using two or more colors, you can achieve a marbled color. And by dividing the mass into several parts and painting them in different colors, you can make a multi-colored candle.
- Lubricate the mold chosen for the candle vegetable oil or dishwashing detergent. Fix the tip of the wick on a stick, toothpick or pencil and place it on the mold so that the free end of the wick passes through its middle and reaches the bottom. For reliability, a weight, such as a nut, can be attached to the free part of the wick.
- Pour the melted mass into the mold, wait until it solidifies completely, then remove the candle by pulling the wick. If the candle is difficult to remove, immerse the mold in hot water.
- You can decorate candles in different ways, for example, spread dried flowers, grass and seeds along the edges of the mold, and then pour the melted mass. For the manufacture of coffee candle you need to pour a layer of coffee beans on the bottom of the mold, pour them liquid material for the candle and put the grains on top again. It is better to decorate the product with beads, rhinestones and shells after it has solidified and removed from the mold. Decorative elements inserted into the melted surface of the candle or attached with glue.

This post-instruction is for those who prefer really nice-smelling candles to the chemistry that is sold in our stores. Of course, there are manufacturers who add really natural oils to their products, but these candles are very expensive. So if you have a desire to tinker a little and try yourself in candle making, have patience and, of course, free time, this post is just for you.
Ingredients
I will try to give you the most concise and understandable instructions on how to make scented candles.
You will need:
- wax or paraffin (old candles can be used);
- essential oils of your choice;
- lace;
- scissors;
- small glass jars into which candles will be poured;
- heat-resistant ware for melting wax;
- a special thermometer for measuring the temperature of molten wax (optional);
- a thin wooden stick;
- tape measure or ruler;
— cutting board;
- nut for holding the cord.
Manufacturing
1. Wash and dry the containers in which you are going to pour candles. These can be small glass jars, tall glasses different shapes, ceramic or porcelain cups.
2. Line a work surface with baking paper. Since the wax will be soft, it can stick to the table and be difficult to remove.
3. Break a block of wax or an old candle into small pieces - this will melt faster.
4. Now you need to prepare the candle wick - make a "seed". This will ensure that the wick matches the color of the candle, burns more slowly, and is easier to install. So, first you need to melt the wax! Pour a small amount of small pieces of wax or paraffin into a bowl and place in a water bath. When the wax melts, place the wick of the desired length in there for 20-30 seconds. Then remove from the bowl with tweezers and place on baking paper. Straighten the wick, align it and roll it a little on the table, as if you are making a plasticine sausage. Leave to dry for 10 minutes.
5. After the wick is dry, thread it through the nut to help hold the bottom end of the wick to the bottom of the candle. It can be found either in craft stores or borrowed from tea candles.

© photo
6. Heat the wax again, add the remaining pieces there and melt. Then add a few drops of your beloved essential oil... You can make mono scents, or you can try mixtures. For example, a few drops of cedar nut oil, a couple of drops of eucalyptus, and three drops of citrus essential oil. Stir the wax well with a wooden spatula.
7. Remove wax from heat. Pour about 1/4 of the wax into heat resistant cookware.
8. Pour some wax into the prepared candlesticks, making sure that the wick is in the middle all the time. Leave to harden for 20-25 minutes. This will help keep the wick in the middle as the candle is poured all the way through.
9. Heat the remaining wax, pour it into a heat-resistant dish and fill the candles to the end.
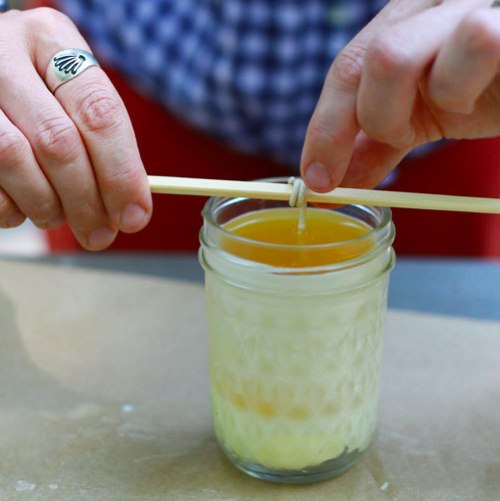
10. Gently screw the remaining top of the wick onto the wooden stick so that the tension is not very strong. Otherwise, you can pull the nut off the bottom and you will have to redo everything again. Attach the wick to a stick and place it on the edges of the candlestick so that the wick remains in the center of the candle.
© photo
11. When the candle has cooled completely, cut the wick so that a small tail, about 5 mm long, remains above the surface.
Trim the tail of the wick every time you use the candle. This is especially true for candles with glass candlesticks which can burst from overheating if the wick is too long.
An excellent table decoration for any holiday will be beautiful candles, you will learn how to make them with your own hands at home by reading the step-by-step instructions and detailed photos the whole process of their manufacture. They will not only become a part of your interior and give you aesthetic pleasure, but also help you out in the event of a sudden power outage. In addition, handmade candles can become good gift to dear and close people who will certainly appreciate your efforts.


Workshop on making wax candles
Wax or paraffin- the simplest and available materials... They are easy to purchase from specialized stores or order online. You can also use ready-made simplest household candles that are inexpensive. When choosing suitable material, keep in mind that wax- natural product and when melted never smokes, and paraffin is a synthetic material that burns completely, while releasing soot. To create a candle you will also need:
- Finished wick. You can take it from an old candle or make it yourself from cotton threads or floss;
- Pan. It will need to heat water to create a water bath;
- Wax melting utensils;
- Candle mold... It can be made from any material. The main condition for it: its upper edge should be even and not narrowed;
- Wooden stick... You will need it to secure the wick. It can be a pencil, sushi sticks.
Before moving on to making candles using these materials at hand, you need to know that:
- Molten wax temperature(paraffin) very high, therefore, you need to work with it very carefully so that do not get burned... In addition, it cools down very quickly (within 15 minutes), so it should be poured into the mold not only carefully, but also quickly;
- If you make the wick yourself when twisting it from floss or cotton threads, note that it shouldn't be too thick... Otherwise, the candle will melt and smoke strongly. The curl density and the length of the wick also play an important role. To let the flame wax candles did not go out, the threads need to be wound slightly.
How to determine the appropriate wick length for the finished product? It should be such that the candle can be comfortably lit.
Step-by-step instruction

| In the mold where you plan to pour melted wax or paraffin, lower the cotton thread or strings of floss twisted together. The upper end of the future wick fix on a wooden stick... Put it, in turn, on top of the form; |

| Cut into small pieces or grate wax(paraffin) or an ordinary old candle, put in suitable dishes... Put on slow fire a pot of water. Place a dish with wax in it and melt it, stirring constantly so that there are no lumps; |

| Pour into the prepared mold some melted wax. Place bottom tip of the wick in the center and wait for the wax to thicken a little; |

| Fill in the form with the rest melted wax; |

| When the candle is completely frozen and harden, cut off the excess part of the wick. It is better to do this no earlier than in a day; |

| Carefully get out the candle from the mold or leave in it if it was intended that way. |
Tip: to quickly remove the finished candle from the mold and not damage it, you can put it in the freezer for 30 seconds or hold it for a little under running hot water.
Important! Do not light ready-made candles until they are completely cured. From the moment of their creation to the first use, it must pass not less than a day.
Decorating and flavoring

Once you have mastered the process of making candles from wax and paraffin, you can make the task a little more difficult. To do this, you should learn how to flavor and color them in any color.
Let's start with the color of wax or paraffin. You can change it to absolutely any at the stage of its melting by adding a piece of wax crayon the desired shade. Acrylic and oil paints to this end not worth using... If you add them when melting the wax, then they will not color it, but stick together and in the finished candle you will have blotches of ugly colored flakes.
Using a few wax crayons of different shades, you can make striped candles, which look very beautiful and original. To do this, you need to consistently melt and pour wax of different colors into the mold in layers.
How to make the finished candle smell when burning? To do this, just add a few drops of essential oil into the melted wax before pouring it into the mold.

Candles are a great souvenir that can decorate family holiday and create a romantic atmosphere. The ease of making candles with an extensive choice of materials allows you to fill in the decor at home. This article will help you understand all the intricacies of candle making.
How to make a candle - preparing materials and tools
To make candle decor, you need to prepare tools and materials. At the first stage, it is important to clearly follow all the recommendations in order to fill the candles correctly later.
- The foundation. One of the cheapest materials for candle mass is soy wax. It has a natural base that is made from soybean oil. It is easy to work with such wax and to clean molds from it.
- In addition to soy-based wax, beeswax is used, which is known for its medicinal properties... But such wax has high cost... An analogue of natural components is paraffin - cheap, but made from refinery products. Transparent candles have a gel base.
- Form. It is convenient to use as a case for candles if it will be with a glass surface. The structure of the candle is visible through it. Metal, silicone and plastic molds are also used for glowing.
- Wick. For it, a thin cord or floss is often used. Soak it with melted wax first, then place it in the metal holder.
- Flavors and colorants. The dye gives the color to the wax. You can add oil paints instead. Essential oils add scent to the candle. Use your favorite oil or a mixture of both.
- Tools. In addition to materials for making candles, prepare following tools... Scales for determining the mass of a hard base, a knife and a grater, measuring glasses and a container, a wooden spatula, a thermometer. Take extra paper towels and oven mitts as the wax will be hot.
How to make a candle - work progress
- If you do not have special molds for pouring candles, then cups from an old tea set or even empty jars will do. Rinse the workpieces in warm water before use. Or dip it in boiling water.

- Wipe the mold well with paper towels. The wax must be poured into a completely dry container, otherwise it may bounce off.


- To determine the amount of wax required, use little trick... Pour water into the mold to the desired level.


- Then pour the liquid into a beaker. This will give you the exact mass for making a candle.

- Weigh the water, excluding the container. Grind the wax on a grater or with a knife. Try to make the same pieces so that they melt evenly. Transfer the wax equal to twice the weight of the liquid to a separate bowl.

- The wax must be melted in a water bath. Pour half of the water into a large saucepan. Put on fire. Transfer the wax mixture to a jug or other container with a handle. When the water boils, dip the dishes into the pot.

- Stir the wax frequently until it is completely melted. So the mass will have a homogeneous consistency.


- If the wax began to look like olive oil, then it completely melted. Remove container from heat.


- The hot mixture should not be poured into the mold immediately. Before adding other components, it is necessary to lower its temperature to 60 degrees.


- While the wax is cooling, install the wick. Fix its base with hot glue at the bottom of the mold. This way, while the wax cures, it will not move.

- It is also important to secure the wick in the center of the piece. This can be done using the line segment satin ribbon... Fold the tape in half and cut it at the fold line.


- Thread the wick through the hole in the tape. Additionally, fix its edges with tape.


- Add essential oils to the cooled wax. The optimal ratio of aroma to candle mass: 1 drop of extract per 400 g of wax.


- Stir the warm wax well. This will distribute the aroma evenly throughout the mixture. Use spices or coffee beans instead of aroma oils. You can add dyes if you like.

- Pour liquid wax into the mold using a thin stream. Try to do this slowly and avoid getting the mixture on the wick and tape. This will help to avoid the formation of bubbles during the curing of the wax.


- When the wax is completely solid, cut the wick to size and remove the tape.

- Now you can light the candles and enjoy the cozy atmosphere in the room.

At first glance, there is nothing complicated in making candles. But there are some guidelines for filling fragrant decor, which will facilitate the process and help to avoid mistakes.
- To achieve a uniform color of the wax, do not use food coloring. They are water based.
- If you can't get special dyes for candles, then use wax-based colored pencils. Grind them and add to warm candle mass.

Making candles at home becomes a fun experience. In addition, handmade candle decor gives comfort and warmth.
How to make a candle with multi-colored wax, watch the video:
A small light can always remove bad and sad thoughts from the head, and its light is so sincere: any conversation or confession by candlelight has a special aura and creates a truly unusual atmosphere.
Perhaps it is for this reason that the candle has long been considered great gift, which is able to bring not only aesthetic pleasure, but also practical use.
How to make candles with your own hands at home: is it possible?
Naturally, such a thing as a candle can be purchased in a souvenir shop, because there you can always find many different variations candles, but if you want to make a gift doubly pleasant, it is better to make it yourself. This article I would like to devote to the topic of how to make candles with your own hands at home.
In fact, making candles at home is not as difficult as it might seem initially, and if you approach this issue correctly, you will understand that in reality everything is quite simple here.
As a confirmation, you can cite the fact that people who decide to engage in the production of candles are gradually drawn in, and for them this is not just a job, but also an interesting and exciting activity. The more often you practice this business, the better you get it. finished goods.
Making candles with your own hands at home does not require a lot of funds, so in addition to the pleasure that you get from the manufacturing process itself, you will also be able to save a lot.
Making candles at home: the necessary materials
Before proceeding directly to the manufacture of the product itself, you need to decide on the right materials, which will help to create the necessary shape for our product. An ordinary saucepan is suitable for this, which we need to create a water bath.
We also need some other container in which we will melt paraffin or wax. It is better to take some unnecessary dishes as a container, since at the end of the process it will be extremely difficult to get rid of the wax that has adhered to it.
If we consider that a vessel must be necessarily refractory, then we are unlikely to be able to find better than an ordinary tin can. So let's take tin can, bend its edge so that a small nose appears (wax will pour through it).
As for the raw materials themselves, wax, paraffin or specialized helium can be bought in a specialized store or ordered online.
If you decide to start creating a candle for the first time, we recommend starting with paraffin, since wax is much more difficult to work with, it is a less lightweight and malleable material. You can also start with old home cinders or buy regular household candles.
Next, you need to take care of the material from which the wick will be made. Often, 100% cotton paper threads are used for this, since they do not have bad smell and burn out much longer. Also for this purpose, we recommend trying the floss (threads different color), it is quite easy to find them and they look very interesting on the candle.
To give the candles an unusual character and flavor, decorate them and give the product a certain tone and shade. Such candles will delight you and those around you not only with their warmth, but also with their beauty and extraordinary appearance.
To give the product the desired color, use children's wax crayons, it is better to choose softer options, since they dissolve better and color the molten mass more evenly. Some people use lipstick and eye shadow for this, it is also a good option if you're not sorry to sacrifice makeup.
There is another common option - coloring with special pigments in the form of tablets. They are the most different colors and shades, so with their help you can make absolutely any color range for the product.
Before determining how to make candles with your own hands at home, you need to decide not only with the materials, but also with their competent use. This, for example, concerns the wick, you need to learn how to twist it correctly, because it depends on how long and brightly the candle burns.
For example, if you are going to use paraffin or gel, then it is better to use thin, tightly woven threads for these materials. For wax candles, it is better to take a thickened wick, woven with a "pigtail", with not too tight threads.
You also need to worry about special shapes, because the basic shape and appearance of the product will depend on them. Here, it's best to use cookware that you don't need too much, that can withstand elevated temperatures. For this, containers of yoghurts, creams, bottles, small bubbles, and so on are suitable.
To make the product not only attractive appearance, but also of a pleasant aromatic content, add a few drops of essential oil to the total mass, the aroma of which resembles the appearance of your candle. For example, the smell of lime or mint is perfect for a light green shade of the product, while vanilla or berry scents need warmer shades.
How to make candles with your own hands at home: technology step by step
So we come to the most important point: the process of making a candle at home. For example, we will consider the option of making a candle on wax.
Preparing the wax for melting
First, decide on the type of wax that will be used to prepare the candle. Keep in mind that wax can irritate some people, so take it seriously.
The most popular today is soy wax, because it is easy to work with, it is environmentally friendly and burns more slowly than other types.
Before starting work, prepare your workplace... To do this, lay newspapers on the work surface, prepare cardboard and towels. You should also always keep warm soapy water nearby, which will come in handy in case you have a wax spill.
Prepare an ordinary water bath, the same as you do when cooking.
Attention! You cannot melt wax on direct fire. The melting process must be slow, otherwise it may burn out and evaporate.
Pour half a pot of water and place a smaller pot on top of it to melt the wax. Do not forget that it is almost impossible to clean the wax, so use the dishes you do not need.
Place the wax on a board and cut or trim it. The smaller the pieces, the easier it will be to work with them.
Melting wax
Place the pieces of wax or shavings in a small saucepan and set the heat to high. When the water boils, it will gradually melt the wax, do not reduce the high heat.
Use a thermometer to monitor the temperature of the wax. For this, a pastry thermometer or a meat thermometer is suitable.
Depending on the type of wax, it melts when different temperatures.
Let's consider the main types:
paraffin wax melts at 50–60 ° C;
bee - within 62.7–79.4 ° C;
old candles - 85 ° C (remember to remove the old wick with tongs before using them).
Then you need to add the fragrance to the fused wax, choose the fragrance as you like. Fragrances are available in all craft stores. To determine the right amount of flavoring, read the instructions, then stir well.
After that, according to the instructions, you need to add the right amount of dye. Ordinary food colors are not suitable in this case, since they have water base... It is better to opt for oily dyes or special dyes for candles. You need to add dyes until the mixture acquires the desired color, after which the mixture must be stirred.
Casting wax
Place the wick in the very center of the candle mold. The wick must be fastened at two points outside the mold in such a way that the fixation is in the very center. For convenience, you can attach the wick to a pencil or pen and then move it to the center. After placing the wick in the right place, fill the mold with wax. If there is a long clip, you can use it. Clamp the wick in the center of the mold, making sure it is long enough to support the entire mold.
After that, you need to pour the melted wax into the prepared molds. You need to pour slowly so that the wax does not spill, while you need to make sure that the wick is securely fixed in one position.
Important! If you use beeswax, do not forget that it shrinks slightly when cooled, take this point into account when pouring the molds.
Each type of candle has its own cooling:
paraffin candles it takes 24 hours to cool;
4–5 hours will be enough for soy;
candles on beeswax require at least 6 hours, optimal solution will leave them all night;
old candles need 2-3 hours.
The last steps remain - take the product out of the mold and cut the wick, leaving no more than 7 mm from the source of the candle. This length will give your candle the desired fire height. Leaving the wick too long will result in too much fire.
That's it, your homemade candle is ready, light it and enjoy!