For several weeks in a row, we have been buying up all the soda and vinegar in all the nearby stores. And all because we decided to do all the experiments in which soda and acid are present. Svyatoslav has reached the age when he feels like a real experimenter. Conducting experiments is now his favorite entertainment and exciting pastime. And the younger one is already in a hurry to move the chair to the table and sit down closer, accompanying everyone with funny exclamations.
I must say that experiments are not only an interesting sight, but also an occasion to reflect on what is happening (for an older child), to put forward hypotheses why this is happening. And sometimes repeat the experience, changing the components. Sometimes the desired result does not occur, for example, due to low acid concentration or excess air where it should not be. And then - this is also a result, a reason for reflection, repetition of experience, and correction of inaccuracies.
For reference: The interaction of baking soda with vinegar is called a neutralization reaction. Its essence lies in the fact that acid, when interacting with alkali (soda), neutralize each other, releasing carbon dioxide.
The main ingredients of all the experiments listed below are soda and acid. In some cases, I use citric acid at a concentration of 1-2 teaspoons per glass of water. And sometimes - 9% table vinegar.
So let's start our journey through soda experiments.
1. Volcanic eruption.
This is one of my favorite childhood experiences! Everyone probably knows him, but for the complete collection I cannot but mention him here. After repeated repetition of the violent reaction of soda with acid, the child, sooner or later, will have a question, why does this happen in nature? Tell him that the earth is made up of a core, mantle, and crust, and sometimes holes form in the earth's crust called volcanoes. Through the mouth of the volcano, hot molten lava, as well as ash and gas, escapes from the depths of the earth. Also locate on the map so far active volcanoes or talk about the most powerful eruptions that destroyed cities in antiquity.
For experience you will need:
Tray or dish
Soda, vinegar, a little paint or dye, liquid soap.
Plastic bottle
There are many ways to make a volcano. The most common is to take a plastic bottle as a base, then sculpt a mountain around this bottle. This can be done from salt dough, hardening mass for modeling, plasticine.
Also, in warm weather, a mountain can be made of sand right in the sandbox by placing a bottle inside.
What we do:
Pour soda and dye into the bottle, add a couple of spoons detergent.
Then carefully add the acids.
The volcano starts spewing soapy foam.
Our last volcano was molded from salt dough, tinted with cocoa, and a depression was made inside. Our volcano dried on the windowsill for about 5 days, after which it has been working hard for a week, spewing lava every day.  And this is a photo from ours, taken a few years ago.
  2 experience. Inflate the balloon
What we do:
About 1/3 of the bottle is filled with acid.
Pour soda into the balloon through the funnel.
We put on the neck of the bottle balloons, and gradually pour the soda from the ball into the bottle.
Result:
The balloon begins to inflate due to the release of carbon dioxide. 

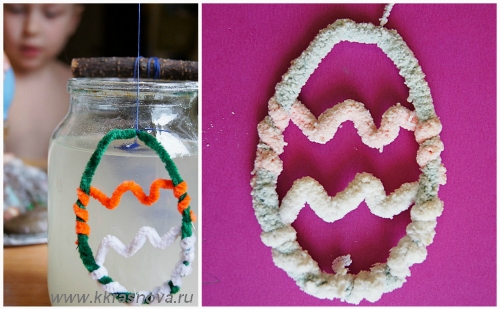
3 Growing crystals from soda
Pour hot water into a glass or jar. Add soda and stir. When the soda stops dissolving, it means that there is enough “food”. I added about 15 tablespoons of baking soda just to be sure 🙂
We hang objects on a thread on which we will grow a crystal. I took chenille wire, but you can hang any object. We tie the thread to the stick and install it on the jar. We are waiting for about a day.
Why it happens: When the liquid cooled, the soda stopped dissolving and began to settle on the thread with the figure. When the water saturated with soda began to evaporate little by little, the crystals began to “grow.
In winter we spent experience in growing crystals from salt and, such crystals are even more interesting and "crystalline" than soda.

4 Drawing on soda
With the help of soda, dye and acid, you can create patterns. This is one of the unusual drawing methods that is worth trying.
There can be many variations of such a drawing. First, you need to pour soda into a wide dish and evenly distribute it. And then there are variations.
Dyes: can be diluted with water and drip on soda. And you can use dry dyes and fill with a pattern, and only then drip liquid.
Acid: You can drip acid into soda, or you can sprinkle soda with citric acid crystals and drip with water.
And of course, various devices can be used as a source of liquid: pipettes, syringes, syringes, spray from a spray bottle.
First, we dripped dyes diluted in water with dissolved citric acid. And in another version, they sprinkled soda with citric acid, then applied a pattern with dyes, and sprayed water into the dish with a spray, and this is what happened.
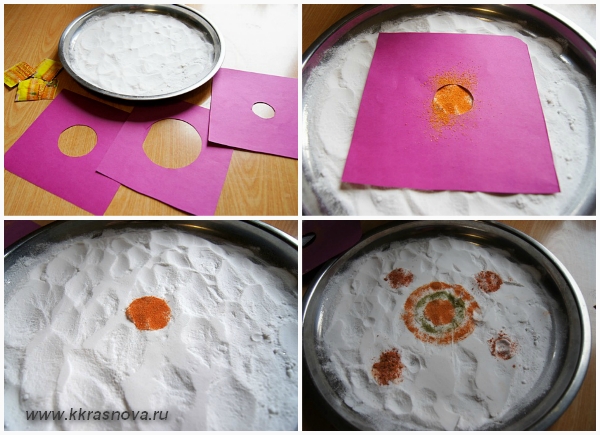
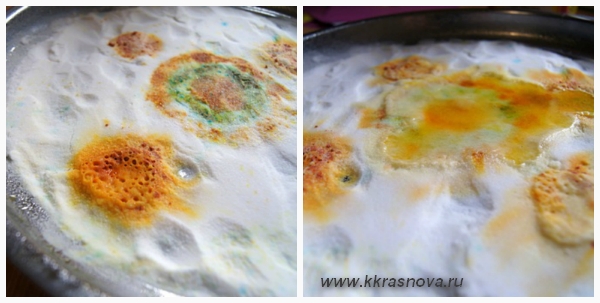
 after everything is mixed, you can take a stick and draw, mixing all the colors. The applied pattern does not spread, but "keeps its shape"
  And little Timothy is madly in love with all our ugliness, and, naturally, he cannot resist touching it all 🙂
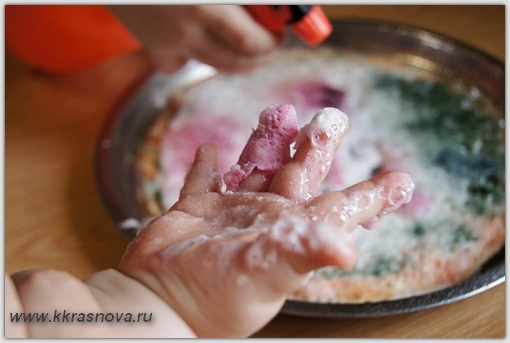
5. Soda bombs.
For this experiment, it is necessary to make soda bombs in advance.
How to do: in a bowl, mix soda and gouache + a few drops of water to knead a thick mass. The mass should be well molded by hand. We make lumps from this mass and leave to dry for a day.
And here's what happens:  And already these lumps can be thrown into acidic water and watch how they begin to hiss and bubble and gradually color the water.
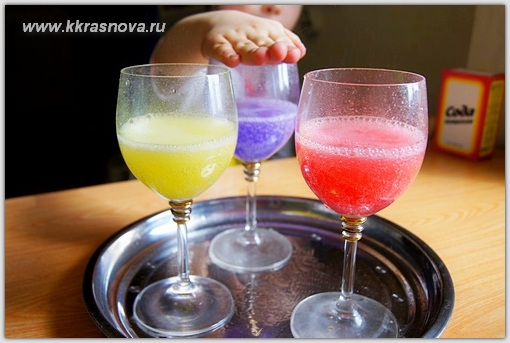 One more unusual option to use such soda bombs is to add oil to a glass.
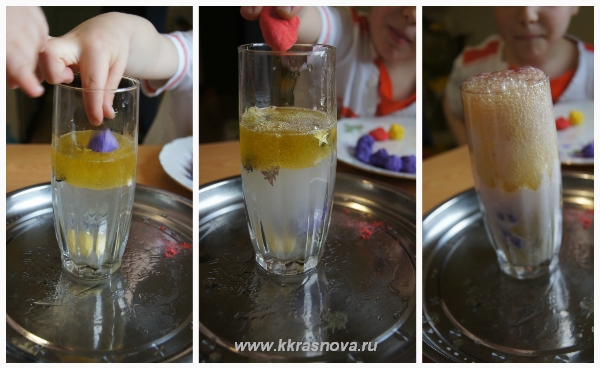
At the bottom of the glass, I poured citric acid and sparkles, added water and vegetable oil.
Then we add a soda ball to the glass and watch the sparkles and oil droplets fly. 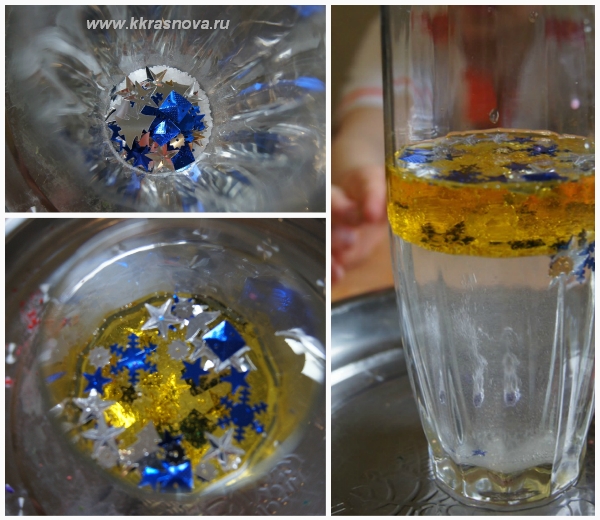
 This experience becomes even more spectacular if you throw an effervescent tablet instead of soda balls, watch this video
6. Ice from soda
Many children love to freeze and melt ice, and by adding soda to water, this process becomes even more interesting and unusual for a child.
First of all, you need to make a concentrated soda solution and distribute it in forms.
When the ice is ready, put it on a dish.
To melt ice you will need hot water with dissolved citric acid, about 1-2 teaspoons per glass.
We give the child a syringe or syringe and watch how the ice melts with splashes and bubbles. 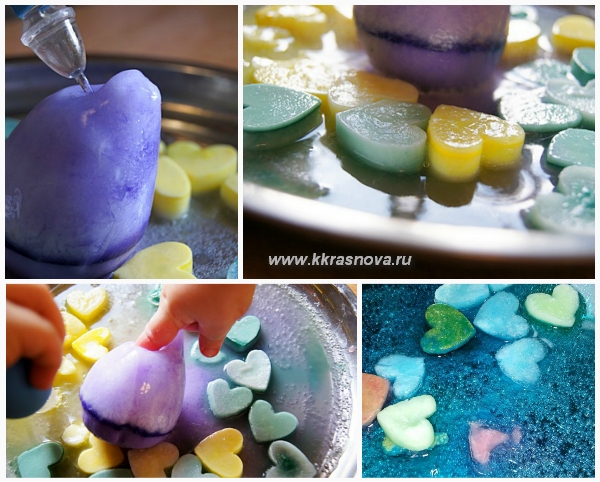 Variations: Add some treasures, such as beautiful beads, to ice molds before freezing, then the child will be even more enthusiastic about getting them from pieces of ice.
7. Dancing Rice
We add dark rice to the water (you can use any cereal) - the cereal settles to the bottom.
Then add a spoonful of soda, stir thoroughly.  We start pouring vinegar into the glass.
Each grain of rice is covered with small balls and begins to “dance” in the glass, rising up and then falling down.  After the dance begins to subside, you can add dye to the water and watch how it is distributed over the glass.
 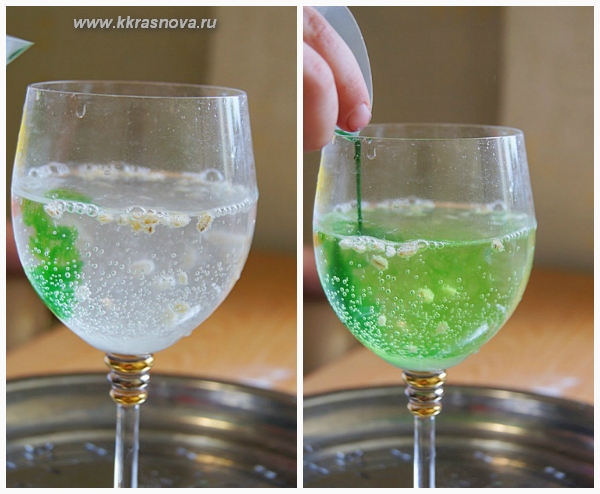 8 Soda explosion
This experience has become one of the favorite outdoor experiences, along with the volcano.
It is done very simply:
Put 2 tablespoons of baking soda in a paper towel and wrap. 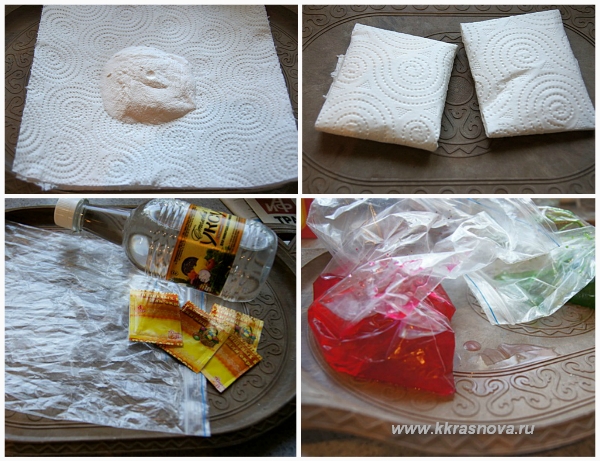 Pour acid tinted with dye into the bag. Before pouring liquid into the bag, it is necessary to check the bag for the absence of small holes, otherwise the resulting carbon dioxide will begin to escape from the bag and the explosion will not work. This is the reason we didn't get this experience the first time!
When an experience doesn't work out for some reason, this is a great way to reflect with your child on why it happened, put forward hypotheses and remove obstacles. 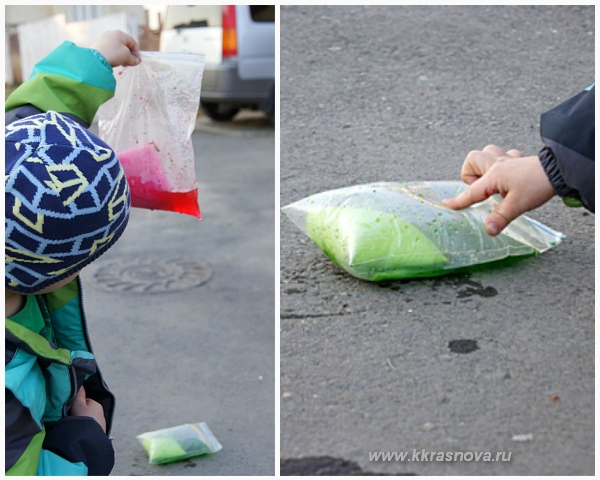 Everything went great the second time! Explosion of the package with a loud BOOM and the flowing liquid. There is no splash from the explosion, so you can not run far 🙂
  9 Rocket launch
Everyone probably remembers how champagne shoots at the ceiling when you shake the bottle. That's about the same, with the help of soda and vinegar, you can launch a "rocket" in the room.
First, we try on a cork to the bottle, it should not fall inside. At the request of the child, we decorate the cork “under the rocket”.
In a bottle, pour 1/3 of table vinegar.
Into a piece toilet paper put a teaspoon of soda and roll it into a roll. 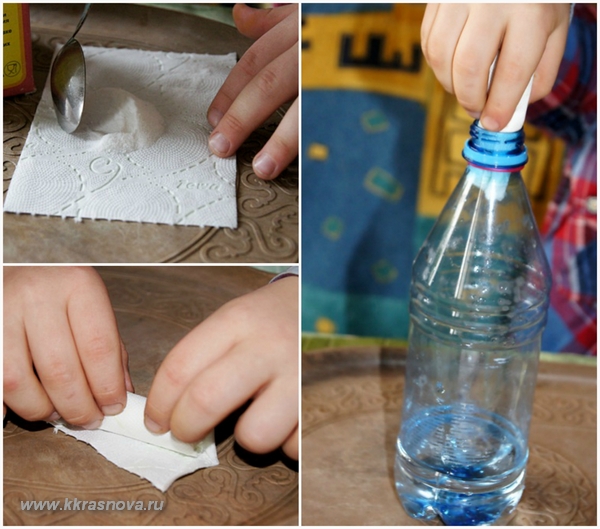 We lower the package with soda into the bottle and close it with a cork. Watching a rocket launch.
10 Making a carbonated drink.
We will need 2 drinking straws. We make an incision on one of them and connect them so that the tube becomes even longer (of course, if necessary, in case one tube is not enough to connect two vessels)
In the bottle cap with an awl, we make a hole for the tube.
Insert the tube into the lid.  We prepare a drink in a glass, which we will carbonate.
We lower the free end of the tube into a glass of sweet water.
Pour 3 teaspoons of soda into the bottle, then add vinegar and quickly close the lid with a straw.
Alternatively, you can first pour acid into a bottle, and then throw a package of soda, as in the previous experiment. Then the reaction will not begin so rapidly, just in order to have time to tighten the lid.  Result: Carbon dioxide rushes into the glass through a tube, filling our water with air bubbles.
11. "Bubbles in the Bank" is one of the strangest experiences. But since such an experience exists, we cannot pass it by.
I must say right away that we did it several times in various variations to get the promised result. But the result was still different.
So, for the experiment we need three liter jar, soda, vinegar and soap bubbles. At the bottom we pour soda, pour vinegar. The reaction begins with the release of carbon dioxide. And now we take bubble and start blowing them into the jar.
Promised result- soap bubbles hang in the center of the jar due to the "cushion" of carbon dioxide!!! 

12. And finally, let's add some fire. We observe how carbon dioxide puts out the fire. Let your child understand why this is happening. 
Also, be sure to try "snow" from soda. See more about this
AND that's not all soda experiments! In the next article, I will talk about experiments with soda that are carried out in Montessori classes.
Do-it-yourself volcano model from salt dough. Master class with step by step photo.
Kushnareva Tatyana Nikolaevna - teacher of geography, MBOU secondary school No. 9, Azov, Rostov region.Target: Making a model of a volcano from salt dough using the testoplasty technique.
Tasks:
1. Contribute to the formation of a scientific picture of the world, the initial idea of the types of volcanoes.
2. To develop the creative research activity of children.
3. Raise interest in cognitive research activities, purposefulness, perseverance, independence.
In my work, I invite you to find out if it is possible to make a volcano at home and look at this dangerous, but it seems to me a very beautiful phenomenon - a volcanic eruption. Schoolchildren aged 10-13 can show their ability to create an artificial volcano, as well as preschool children.
Technique: Testoplasty, it seems to me, is very well suited for the implementation of my idea.
Purpose: Layout for research activities - experiment, as well as use as a visual aid to consolidate the external and internal structure volcano.
"I spit fire and lava,
I am a dangerous giant
I am glorious with bad fame,
What is my name?" (Volcano)
Volcanoes are geological formations on the surface earth's crust or the crust of another planet, where magma comes to the surface, forming lava, volcanic gases, rocks (volcanic bombs), and pyroclastic flows.
Word "Volcano" comes from the name of the ancient Roman god of fire, Vulcan. Translated from Latin - the god of fire and blacksmithing.

Probably all possible natural disasters threatening man, volcanic eruptions are the most dramatic, if not in terms of the number of victims and destruction, then in terms of the feeling of horror and helplessness that grips people in the face of the raging elements generated by the fiery depths of the planet.
Volcano is fantastic spectacle. In a matter of minutes, it can devastate entire cities, kill thousands of people, destroy landscapes, and even change the Earth's climate.
Scientists estimate that about 500 million people live near volcanoes today.
Since 1700, volcanic eruptions have killed over 260,000 people. People can't prevent mass death if they do not learn to understand and respect volcanoes.
Outwardly, volcanoes differ from each other, the most common types of volcanoes are conical and shield. Shield volcanoes are broad, flat volcanoes ranging in diameter from a few kilometers to over 100 km, and are usually low and wide. The volcano was formed as a result of repeated outpourings of high-temperature liquid lava.
In this master class, I propose to make a conical volcano.
Conical volcano. The slopes of the volcano are steep - the lava is thick, viscous, cools down quickly enough. The mountain has the shape of a cone.

Materials:
colored paper;
PVA glue";
Vinegar;
Soda;
Scissors;
Flour;
Gouache paints;
tassel;
Cardboard sheet;
Glass cup.

1. First we need to prepare the salt dough for making the Volcano Model. To prepare salt dough, we need 400 gr. flour, 200 gr. fine salt and 150 ml. water.

2. The dough is ready, you can get to work.

3. To make the foot of the layout, we need to prepare a square of green colored paper 20/20 cm and a sheet of cardboard 20/20 cm

4. Apply PVA glue to cardboard

5. The foot of the Volcano Layout is ready

6. We put the dough on the foot, make a hole in the center and put a glass cup in it, which will act as a vent.

7. Shaping the layout. We need a day for the dough to dry. You can speed up the drying process, put the layout in the oven for 20 minutes, alternately changing sides.

8. We start painting the layout, using gouache paints. We apply paint in layers. The lower part of the slope is covered with green.

9. Add a few light tones of green paint.

10. We cover the middle and upper part of the slope of the layout with brown paint.

11. It is necessary to let the paint dry in order to apply flowing lava to the Volcano model using red gouache.

12. The layout of the Volcano is ready for the experiment


13. For experimental activities, we need vinegar and soda tinted with red gouache in a small amount.

14. We pour soda into the mouth of the model, and then pour tinted vinegar. Volcanism begins!

15. We watch how the lava flows down the slope.

In the course of research activities, it was confirmed that it is possible to create an artificial volcano through experimental activities.

Volcanoes began to "vulcanize" -
Spewing lava from the vent.
Lava flowed down the slopes
And the Earth was badly burned. (Elena Romankevich)
Thank you all for your attention!
Have you heard the joke that soda is a once in a lifetime product? So, this is a witticism for the lazy, because people who are in unison with the times have long been using such a miracle tool not only for cooking, but in treatment, for entertainment and teaching children chemistry and physics. Did not know? Then try a soda volcano for a start, not only children, but also all adult households will be delighted.
How to make a soda volcano
If you are ripe for experiments, then it's time to cook expendable materials and work wonders.
Soda volcano - interesting chemical experience for kids
What is needed for the experiment
So, to conduct the experiment, you will certainly need soda, the volcano will work only with it, this is the basis of the experiment.
In addition to this component, stock up on the following:
- Vinegar or its acid (it is permissible to replace with citric acid, but then in the form of an aqueous solution).
- Plasticine (ordinary - children's will do). It can also be replaced salt dough(but more on that later).
- Water (they say that carbonated enhances the reaction, which means the experiment will be brighter).
- Plastic bottle (1 or 1.5 liters) of any shape.
- A palette of colors (any dye, gouache, even the Easter version of the paint will do).
- Foil (it is allowed to replace paper, but thick - it is better to take cardboard).
- The adhesive tape is double-sided.
- Jars or glasses.
- Volcano stand (can be a tray or an unnecessary plastic bucket lid).
- Detergent.
- Rubber gloves for work.
- Rags and water in case of injury - burn "lava".
And, of course, it takes time and imagination, but such children's experience can become the highlight of the memory matrix program in adulthood.
Recipes for experiments: TOP 3
Video Bonus: Another Volcano Variant
It is worth trying a few positively proven technologies, especially since such a toy will cost you mere pennies.
Cooking a salt dough volcano: step by step instructions
The "origin" of such a volcano - from the dough allows you to make it "erupt" repeatedly, when other recipes are suitable for only one show.
Step 1. Base. For this method, you need an empty liter bottle from any drink. The only requirement: plastic. The container must be cut approximately in half. Then, using strips (foil or paper), strengthen the body of the volcano by wrapping. They say the foil keeps its shape better, which is a guarantee for reusable use.

Vinegar is the second most important component, without which the show will not take place.
Step 2. Fixing the structure. To the tray or plastic cover attach the base wide side down with double-sided tape.
Step 3. Mountain slope. Our salt dough will act as such a natural component. Just stick the base on top of the foil, dividing the dough into several parts for convenience.
Step 4. Filling the volcano. Through the neck, alternately place inside the structure a tablespoon of sodium bicarbonate and detergent (the brand does not matter).
Step 5 Volcano Eruption Show. When you're ready for the spectacle, pour a glass of vinegar into the vent. The reaction, as well as the delight of the kids, will not be long in coming.
Is it possible to strengthen such an enchanting focus? Difficult, but still real. Just cover the structure different colors, and lava can be made in the shade that you or the crumbs like.
Worth paying attention! The dough can be completely replaced with plasticine. Suitable for used.

Divide the dough before sculpting the volcano into parts - it will be easier to form the base
Express method: colorful soda volcano
And how to make a volcano out of soda and vinegar, albeit one-time, but so that instantly, without special purchases and modeling? It's very simple! Although such a show only works once, you will see a mega-colorful and impressive volcano vent.
Take jars or glasses, different color paints, vinegar and soda - where without it, and let's start!
So, set the jars on the tray, you can start with one - for the purity of the experiment. Some stick them double sided tape, but this measure is only necessary if you plan to move your volcanoes around the house.
Place the jars at some distance from each other so that they do not touch.
Pour vinegar into the container - approximately in volume up to half the jar. Then add paint, gouache or other dye that you find around the house. And in the end, pour in a spoonful of soda, which will cause a neutralization reaction and, in fact, a volcanic eruption. Be prepared to run out of baking soda and vinegar in the house soon because kids love this technology because it's fast and fun.

Experienced parents say that the ideal container for a volcano is a jar from under baby food, check!
Long live lava: combine baking soda and citric acid
And in the end - the third recipe, a kind of "golden mean", it will take more time than for express, but much less than for a reusable design. However, do not get tired of experimenting, the kids will appreciate it, you will see for yourself!
Again, jars or glasses will go into action, which, if desired, can also be attached to a tray or other surface with sides with adhesive tape at some distance from each other. But then the technology is different.
From soda and gouache, roll the balls at the rate of one per container. Of course, make them colorful, it will be more interesting! Choose bright colors.
Then fill the cups with water. Experienced experimenters say that the carbonated version will improve the reaction, but this is not required condition. Dissolve citric acid in water (a couple of soup spoons for each container).
Then throw a ball into each cup and admire the colorful lava.
By the way, when different shades from the volcanoes on the tray are further mixed into a kaleidoscope of colors, the next show called "rainbow" begins.

Whatever container you plan to bring the volcano to life, consider a lava stand
How it works
What causes a volcanic effect? What is the secret of such an experiment?
Ordinary chemistry: soda is an alkali, vinegar is an acid, which, when combined, give a violent reaction, decomposing already into carbon dioxide, salt and water. During this reaction, you will hear a hiss and notice abundant foam - why not a mini volcano ?!
By the way, if you want the "eruption" to be longer and more violent, increase the dose of sodium bicarbonate.
Didn't you succeed? There are usually 2 reasons for this:
- You added sodium bicarbonate too slowly. To see what the failure was, just take 2 glasses of vinegar and pour baking soda into one gradually, and into the other in one fell swoop. You will see for yourself that in the second case, the "eruption" was more powerful and, therefore, more effective.
- You mixed citric acid and sodium bicarbonate, while forgetting about water, then, alas, there will be no “eruption” at all, the “work” can immediately be written under the heading “dead volcanoes”. For these two components to react, it is necessary that at least one of them be in an aqueous solution.
Worth paying attention! If you want more foam when erupting, always drip a little liquid detergent into the solution (brand does not matter).

Add color to the experiment
Video: making colored volcanoes
Precautions when working with chemicals
The components for experiments, as you already understood, are the “inhabitants” of the kitchen familiar to us, familiar from an early age, meanwhile, this is not a reason to forget about safety precautions - so that the fun does not turn into an accident and children's tears. Soda lava, although not real, can also be hazardous to health.
So, ground rules during the creation of volcanoes:
- Adults should instruct children that all experiments should take place with their participation (at least passively - if the child is ready to arrange an “eruption” himself, just see if he does everything as it should, correct if necessary).
- It is recommended to carry out experiments in rubber gloves, if possible, goggles.
- During the reaction, you should not come close to the vent, and also stand directly above it, otherwise it can turn into a burn, since the volcano sometimes gives out rather caustic and far-jumping spray.
- If, nevertheless, an injury occurs, immediately wash the affected area of \u200b\u200bthe skin with plenty of water.
- At the end of the show, do not forget to wipe everything thoroughly so as not to damage the furniture, objects, and even the skin later, when you put your hands on the table at the meal.
- Do not dispose of used structures in the trash until all liquid has been drained into the sink. If you have used glasses/jars, wash them thoroughly.
- Always hide all the ingredients so that children are not tempted to repeat the experiment on their own.
Add color to the experiment  Sometimes the colored balloons for the volcano turn out so beautiful that it's a pity to dissolve them.
These simple rules will help you make the fun memorable in a positive way, and not in a negatively dramatic tone.
Baking soda is your ally to help entertain and educate kids by subtly introducing them to chemistry they can't get their hands on in school.
A lot has already been written about the use of baking soda in one area or another. The properties of this substance make it possible to use it in the kitchen when cooking, in everyday life for cleaning various surfaces from fat and plaque, in treatment various diseases etc. Another use of sodium bicarbonate is the ability to arrange educational performances for children, for example, you can make your own volcano out of soda.
Stock up on baking soda and vinegar because your kids will be asking you to do it again and again!
This is possible due to the ability of soda to react violently with certain substances, such as vinegar. And one of the most common experiences associated with this property of sodium bicarbonate is the demonstration of a volcanic eruption. Below is a detailed look at how to make a baking soda volcano.
Experience "volcanic eruption"
The first thing you need to know is why such a reaction occurs when soda and vinegar are combined. Without going into details: soda has pronounced alkaline properties, while vinegar, on the contrary, is acidic. When their molecules are combined, both media are neutralized to neutral, as a result of which carbon dioxide is released, the rapid release of which causes the appearance of foam.
Experience with the combination of these substances can be used not only as a demonstration of a natural phenomenon. This is a good moment to explain the basics of the interaction of various substances and the reactions between them.
Preparation for the experiment begins with the manufacture of the volcano itself. This can be done in several ways, which will result in a reusable inventory or, accordingly, a disposable inventory. To create the first, you will have to make more efforts and time, while the second is suitable for a spontaneous decision to please children with an interesting spectacle.
Method number 1
In this case, just a reusable model is created for repeated execution of the experiment.
To make the body of the "volcano" you need the following components:
- an ordinary plastic bottle for any drink with a volume of 1.5 liters;
- a flat plastic lid (for example, from disposable food containers);
- adhesive tape of any kind;
 It is not necessary to sculpt a "volcano" from a new plasticine, an already used one is quite suitable
 - gypsum or alabaster (can be replaced with salt dough);
- gouache with PVA glue, in a ratio of 1: 1 (replacement is possible acrylic paint);
- cutting tray or cutting board (as a base);
- paper;
- foil.
Sequencing:
- Building the foundation. plastic bottle it is necessary to cut, measuring the desired height of the cone (you need the upper part). The resulting base is carefully attached to the above plastic cover with tape.
- Attaching the base of the volcano to the base. The resulting design is attached with adhesive tape to a tray or cutting board. You can also use a suitable piece of plywood or a thin board as a base.
- Cone formation. With the help of pieces of paper and adhesive tape, a cone is formed around the bottle with an upper base at the edges of the neck. To avoid subsequent soaking of the paper pulp, the cone is wrapped in foil.
- Finishing the "walls" of the volcano. Dilute gypsum or alabaster to a state of thick sour cream. The resulting mixture covers the slopes of the "fire-breathing mountain". With the help of a toothpick or a fork, the relief of the "mountain slopes" and the troughs are formed for the preferred movement of the "lava".
- Final finishing. After the "slopes" have completely dried, they should be painted with gouache mixed with PVA. It's best to use brown and black paint and paint the "lava" chutes a little red.
After preparing the "volcano" it is necessary to deal with the "lava". It, of course, must be prepared immediately before the demonstration of the "eruption". The components in this case are:
- baking soda - 10 gr;
- dishwashing detergent - 2 drops;
- gouache or red food coloring;
- vinegar - 10-15 ml.
This number of ingredients is indicated for the minimum amount of "lava" and low "volcano". If it is necessary to increase the intensity of the "eruption", the number of all components increases accordingly. The sequence of actions in this case is as follows:
- Mix the baking soda, the chosen type of dye and dishwashing detergent, mixing thoroughly.
- Pour the resulting mixture into the "crater of the volcano".
- Add vinegar carefully to the "vent" and enjoy the result.
For a more active reaction, vinegar can be poured quickly. By the way, the added dishwashing detergent is responsible for this.
Method number 2
As mentioned above, a volcano made according to the previous method makes it possible to obtain props that can be used repeatedly. However, this takes a significant amount of time. For a single use, you can make props using a simplified method.
 The spectacle is really spectacular
 In this case, the ingredients will be:
- a sheet of cardboard;
- plasticine;
- small jar;
- tray or cutting board (as a base).
The sequence of actions is as follows:
- Fold the cardboard into a cone, giving the required angle of "slopes". Glue it in this position or secure with tape. Cut off the top to get a "vent".
- The outer part of the cardboard is covered with plasticine, with the formation of "ledges" and "gutters".
- Before the demonstration of the experiment, the jar is filled with a mixture of soda, dishwashing detergent and dye, after which it is placed on the base and covered with a “mountain” cone.
- Next, vinegar is poured into the vent and the "eruption" begins.
It is possible to conduct an experiment with citric acid or lemon juice. In this case, vinegar is not used, and soda should be poured last.
The properties of baking soda allow this product to be used in the most different situations. And as all of the above shows, even as a means of entertainment or to expand the horizons of children. Thanks to the simple preparation and the property of soda to enter into a violent reaction with vinegar, you can give your children an unforgettable spectacle, which they will ask for pleasure more than once.
We have a new set for lovers chemical experiments from the "Superprofessor" series. This time we have to watch the volcanic eruption and pharaoh snakes.
Important! These experiments should be carried out only in nature - there is a lot of fire and ash!
And about our experiments that we conducted at home, see the articles """.
This time we decided to start our chemical experiments with the resurrection of pharaoh snakes.
Qiddycome: Best Chemistry & Experiments Series: Pharaoh's Serpent
For this chemical experiment we needed:
- Evaporating bowl
- Dry fuel
- Matches
- Scissors (or tweezers)
- Calcium gluconate - 3 tablets
- Gloves
Conducting a chemical experiment "Pharaoh's Serpents"
- We put a tablet of dry fuel in the bowl and set it on fire.
- Using tweezers, carefully place a calcium gluconate tablet on the fire.

The pill turns into a pharaoh's snake, which crawls out of the bowl and grows until it crumbles into ashes.

Calcium gluconate should be put in the center of the burning tablet, then the pharaoh's snakes will be fat 🙂 We first put one calcium gluconate tablet in the center, and two along the edges and on the video you can see how the snakes differ in size. Then we moved the calcium gluconate to the center and all the pharaoh's snakes merrily streamed.
Watch the video of how pharaoh snakes crawl:
Scientific explanation of the chemical experiment "Pharaoh's Serpents"
When calcium gluconate decomposes, calcium oxide, carbon, carbon dioxide and water are formed. The volume of decomposition products is much larger than the volume of the original product, which is why such an interesting effect is obtained.
In the "Super Professor" set, the ingredients are designed for a three-fold repetition of the chemical experiment "Pharaoh's Serpents".
Qiddycome: Best Chemistry & Experiments: Volcano Series
Like most blog moms, Olesya and I made a volcano out of soda and vinegar several times. I thought there would be something similar in the box. But I was very wrong. The eruption experiment here was completely different - much cooler!
For the Volcano experiment, we used:
- Evaporating bowl
- Foil (non-combustible heat-resistant material)
- Ammonium dichromate (20 g)
- Potassium permanganate (10 g)
- Glycerin - 5 drops
- Pipette
- Gloves

Conducting a chemical experiment "Volcano"
- We lay foil on the table and put the evaporation bowl on it.
- Pour ammonium dichromate (half a jar) into the bowl and make a depression at the top of the hill.
- Pour potassium permanganate into the recess.
- We collect a few drops of glycerin and drip onto potassium permanganate.

A few minutes later our volcano caught fire. Myself! Without ignition!

Here is a video of our burning volcano:
Scientific explanation of the chemical experiment "Volcano".
It turns out that ammonium dichromate burns on its own when set on fire. But in our experiment, a mixture of potassium permanganate and glycerin worked as a fuse. Due to the reaction of this mixture, heat began to be released, which led to the ignition of ammonium dichromate.
A burning volcano eruption is amazing chemical experience ! We probably have not yet carried out a more interesting experiment!