Using a chair-bed instead of full-fledged individual items furniture relevant for small spaces. Successful combination places for sitting and sleeping allows you to ergonomically organize the space of the room.
Search for options for arranging space small apartment often leads to the idea of buying a folding chair.
Buying such a thing can be disadvantageous. But you can make furniture yourself, if you have the skill. How to make a chair bed , know many who equip their apartments and houses with handmade items.
Advantages of self-production furniture - lots of. First, the main, which are used, can be found at home or in the country, as well as bought in specialized stores at a price incomparably lower than the finished item.

Blanks made of wood or its derivatives, filler and fabric - that's what you need, not counting various types fasteners.
To make a chair bed with your own hands , you will spend 2-3 times less funds. In addition, you can choose the design yourself designs , coating material and color scheme.

All this makes it possible to create original model suitable for your home.
Deciding on design and construction
Chair-beds are divided into two main types:
- Frame;
- Frameless.
Intraspecific differences furniture vary based on the choice of forms and the transformation mechanism.

Traditional materials of execution make it a reliable tool for many years.
It is more difficult to make a wireframe model. Furniture with a rigid base is complemented by a layout mechanism, which must be done correctly so that the “liner” can be easily removed and straightened without distortions. A design with two folding legs is easier to make than with four.

Can be selected as wooden base supports, and metal.
It is necessary to determine one or another suitable design not only based on the complexity of creation, but also on its style, safety and convenience for recreation. For reclining chair you can choose theselike chipboard, plywood, the cloth a certain density, foam rubber for upholstery, if a frame option is expected.

This furniture is compact and ergonomic, its dimensions are noticeably smaller. standard bed, but not inferior to her in terms of comfort.
A product without a rigid base may have a streamlined shape, in addition, it is lighter in weight.

Whatever designs you choose, they must be strong and safe.
Do not forget about convenience - the body should be comfortable during sleep or daytime rest.Remember that the base must be wide enough - at least 60 cm, otherwise the sleeper will not turn around on the bed.

Today there are many varieties of this furniture. All of them find their place in the interior of the apartment.
Necessary materials
To make a wireframe model, you will need the following::
- Chipboard;
- fiberboard;
- Wooden blocks;
- Plywood;
- Foam rubber;
- self-tapping screws;
- hinges;
- PVA glue;
- Sandpaper;
- Upholstery fabric.

We will make a simple but comfortable thing in everyday life, which will be strong and reliable to withstand any unexpected guest.
In building a structure others can be used. For upholstery, it is better to choose a special the cloth , differing in density and well giving in to cleaning.
For frameless furniture used:
- Matter for covers;
- Foam rubber;
- Strong threads.

Upholstery will need high-quality foam rubber.
Required Tools
So that the intended object furniture to do it right and firmly, you will need:
- Long ruler or tape measure;
- Simple pencil;
- Staples and construction stapler;
- Scissors;
- Hacksaw;
- Screwdriver;
- Sewing machine (for making a frameless chair).

Tools for work.
If in the design decor is provided (for example, in the form of applications), then a stencil cut from a dense file folder will come in handy.
Manufacturing process: step by step instructions
Before starting work, it is imperative to complete a drawing of the product, where the exact dimensions will be indicated and parts of the model will be drawn in detail.

Product drawing.
For the manufacture of folding chair frame type you will need enough space. Choose a spacious room.
First we make the body:

Then we start creating the folding part. Make 2 frames of bars along the width and length of the seat. Attach sheets of plywood to them.
Connect the frames with long loops.
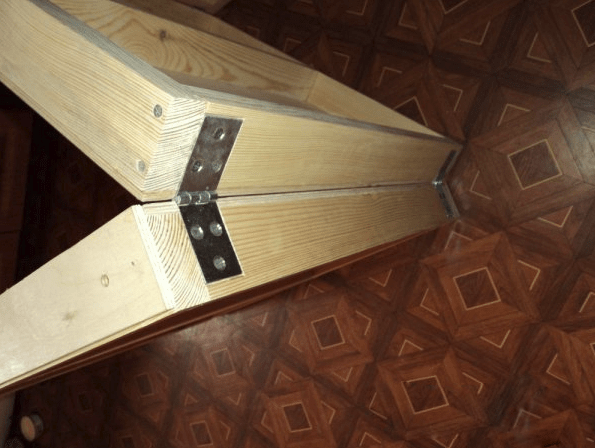
In order for the chair to unfold evenly, use the metal transformation mechanism - attach steel contours with through loops on the sides.

The main thing in business is how to make a bed chair yourself, so that the parts folded together make up a beautiful and even square.

Such a cute armchair bed, which we made with our own hands, can be painted, varnished or upholstered with foam rubber and stylish beautiful fabric.
The next step will be plating:
- Glue cut-to-size pieces of foam rubber 2-3 cm high to the top of the frame.
- Lay the fabric flat and using a stapler, attach it to the bars at the bottom.
- The sides can also be upholstered with a thin layer of foam rubber.

For a folding design, you will need legs.
They are made in the middle and front of the frame, flush with the bottom point of the bottom or slightly higher. For armrests, use sandpapered wide bars.

The seat easily unfolds without clinging to the sidewalls, and just as quickly turns into a chair.
The frameless model is much easier to manufacture. It needs foam rubber, which can be used in 2-3 layers, and a dense fabric like a raincoat fabric (or less slippery). The cut material is stitched from several sides. the remaining opening is designed to be placed inside the foam rubber.

To prepare the chair-bed for sleeping, you should unfasten the straps, then pull the top cushion towards you.
Equip the unsewn section with a “zipper”. For more practical use frameless sample, make an outer cover.

Since it does not have a rigid base, the back should be placed against the wall
Chair-bed decoration
In order to give the finished product a stylish and original look, use fantasy.

The design of the created thing can be improved by using interesting prints, applications.
Of the fabrics used for decoration, tapestries look good. If you want to make the upholstery softer to the touch, choosewith pile like faux velvet.

This material is also stronger and more durable.
Applications are best sewn on before the upholstery process. To keep them neat, prepare stencils and shreds in advance different color matched to match or contrast with the main gamut.

In a folding frame-type chair, the front legs, which are not retractable for all models, can be made carved or metal.
To prevent the surface from gathering dust and rubbing, use a cape or sew a special cover. Suitable and carpet of the appropriate size, and faux fur - this will make the placement in the chair more comfortable, cozy. Another option is to sew interchangeable covers from a light fabric.

This will make it easier to take care of the upholstery.
VIDEO: Armchair bed with your own hands.
Each person wants to make the atmosphere of his house or apartment as cozy and comfortable as possible, but at the same time unlike any others.
To achieve the uniqueness of the interior, you can use hanging chairs. They can be purchased at furniture stores or make your own.

Today, on the Internet and in specialized magazines, you can find drawings of the chairs of the different design and forms.
In our article we will look at how to make such a chair with your own hands.

Varieties of hanging chairs
Today, manufacturers offer a huge range of hanging chairs, among them there are those that can be made by hand.

Such furnishings can be an unusual accent in the design of the room. Below we consider several options for chairs that you can create yourself.

Armchair in the form of a swing
In the manufacture of original hanging swing chairs, the most different materials. Such models are characterized by an elegant appearance, a fairly simple design, rigid or soft frame. They will decorate the cottage beautifully.

They can also be used as an original piece of furniture for a bedroom or children's room, terrace.
Armchair in the shape of a cocoon
This is one of the most common models of hanging chairs. The difference between such a chair is the presence of hiding inner part wall chairs.

This product is designed to enjoy loneliness, it is also very popular with children, as it looks like a hanging house. Only natural materials are used to make the cocoon.

Armchair in the form of a nest with a hoop frame
These chairs are the most popular. They can be equipped large quantity decor and perfectly complement modern interiors. For such models, a variety of weaving techniques are used.

What are chairs made from?
When choosing materials for a chair, it is necessary to take into account its specifics.
If you settled on the option of a swing chair, then you will need a dense fabric, different types artificial ropes and wood bars.

To make a chair in the shape of a cocoon, you will need rattan, willow twigs, bast, branches of bird cherry or willow.

For a chair in the form of a nest, a hoop made of plastic or steel, durable fabric that is resistant to wear, synthetic filler, special cords for weaving, and a variety of wood bars are suitable.

For the seat itself, the following techniques are used:
- Macrame;
- Patchwork technique;
- knitting;
- Tatting.

Do not forget about the compliance of the selected materials and fasteners with the planned load.
Note!


Workshop on creating a chair
This is the simplest type of hanging chair you can make yourself. To make it, you will need:

- dense material - 2 m;
- wooden beam - length 1 m, radius 3 cm;
- several carbines (0.11 m) designed for a weight of up to 0.16 tons;
- cable with a diameter of 1-1.15 cm with a tensile load of up to 3200 kgf;
- paints, brushes, kapron threads.
Of the tools you need a drill, sewing machine, iron, scissors, ruler.

We work wonders step by step
Step 1. Fold the material in half, measure 0.18 m from above and cut off the resulting triangle.

Step 2. We bend the edges of the canvas by about 1 - 1.5 cm and carefully hem them.

Step 3. We make pockets for the cable. To do this, it is necessary to bend the edges on the long part by 4 cm and stitch them on a typewriter.
Note!


Step 4: Each Side wooden beam make 2 holes. Between two adjacent holes there should be a gap of 5 cm, and between pairs of holes - approximately 0.8 m.

Step 5. We put the rope into the central holes and fix it with knots. First, in the middle of the rope, we make a knot for the carabiner.

Step 6. We pass the ends of the cable through the prepared fabric, stick them into the free holes and fix them with knots.

Step 7. To the hook previously attached to the ceiling, we attach a pair of carabiners that are connected to each other. This will give the reliability of the design. We put a rope into the last carabiner.

You can decorate the swing chair with bright pillows.
Note!

Hanging chairs are quite a popular piece of furniture. They can easily become the highlight of your interior.

We hope that this article has convinced you that it is not difficult to sew a stylish bean bag chair or a fashionable hammock chair with your own hands.

Such self-made products have a unique charm. They are sure to impress your guests with their uniqueness.

DIY armchair photo


A do-it-yourself armchair for the home can be made by everyone. You only need to purchase some materials and spend a few hours of free time. It is also important to prepare accurate drawings, work schemes, and a master class on how to make a chair with your own hands will help beginners.
When creating furniture, feel free to show imagination. Even at home, you can make original, unique interior elements from the simplest products.
Types of chairs and general instructions for creating
Regardless of which drawings are used, there is a certain algorithm for how to make a chair. First, separate parts of a piece of furniture are created, then they are processed - holes are made in them for fastenings, coatings are applied. After that, the product is assembled into one whole. In some cases, painting and opening with varnish is carried out after the manufacture of the chair has come to an end, that is, the whole, assembled product is already being processed.
Before you make a chair, you need to decide on its type. Furniture items can be divided into:
- Solid. They do not have upholstery. In fact, they are chairs with armrests.
- Semi-soft. The upholstery with a filler keeps within on a seat, a back, armrests. This saves materials.
- Soft. The easy chair is completely upholstered with material with a filler. it the best solution for a home that will allow you to relax comfortably.
- Rocking chairs.
The easiest option: create a solid chair
For those who have never made chairs with their own hands, you should first pay attention to the drawings and instructions for creating solid products, without upholstery. If necessary, they can be supplemented with soft elements. Such products are distinguished by the fact that they are light, not so afraid of moisture, so they are well suited not only for the home, but also for the summer cottage.
The interior item can be made from improvised materials (for example, pallets) or wood. In the first case, finished parts are used, which should simply be processed to assemble in ready product.
Drawings or a master class for making a product from improvised materials are not required. A homemade pallet chair is created according to the following algorithm:
- Preparation of materials. If the pallets are old, it is better to disassemble them and perform a series of actions.
- Get rid of old nails. Rusty hardware does not just spoil appearance, but also very dangerous if they get hurt.
- Sanding. This is the only way to give the old, polluted wood an aesthetically pleasing appearance.
- Collect again.
- Connect several pallets into one. The height of the seat is chosen arbitrarily depending on the wishes. The standard distance from the ground to the seat is 300-400 mm. If the product is intended for children, you can make it lower.
- Painting and varnishing. This procedure can be performed before assembly.
The result is a strong homemade chair that will fit into general form suburban area or apartment in a loft style.
wooden armchair
Drawings of a simple wooden chair:
The work will require the following materials and tools:
- Boards and beams. It is important that the wood is carpentry - it has a moisture content of no more than 10-25%. From building materials in no case should you create a frame for furniture. Drying wood is a very long and technologically complex process.
- Hardware - self-tapping screws, screws, nuts, washers.
- furniture conductor.
- Saw or jigsaw.
- Mallet.
- Joiner's glue or PVA.
The algorithm for creating products is described above: first, all parts are cut and processed (the drawing displays the required dimensions), after which they are fastened together. Here are a few important points that should be taken into account:
- You can fasten the parts together with the help of dowels. To do this, holes of such a diameter are made at the attachment points so that the connecting element enters them tightly. For greater strength, each hole is treated with glue.
- When fastening with self-tapping screws, it is recommended to pre-drill small holes - so they will be easier to enter.
- This product can be used as a frame to create easy chair. You can cover it with foam rubber and thick cloth or make separate cushions with ribbons for attaching to the seat, back and armrests.
The rocking chair is created according to the same algorithm as other products. The most difficult task- make a round base. In principle, it can be cut, but this will require a very thick board or beam.
These are not always found. Any master class on this topic provides a more professional solution - to bend the prepared part. To do this, it must be softened using one of the following methods:
- Steam in a box. A special plywood box is created. Holes are made in it for starting steam and several small holes for it to exit. Parts are placed inside, and water vapor is supplied (you can use a kettle).
- Soak in ammonia. Work must be done with gloves and in a well-ventilated area.
After the material has become soft, it must be bent. To do this, either use special machines, or use simple design: put two supports at a distance slightly less than the length of the part, install the product on them and put a load in its middle. The bending radius depends on the mass of the load and the height of the supports.
A metal product can be either an independent piece of furniture or provide a frame in order to make an easy chair. The metal chair is very durable and strong, suitable for installation at home or on suburban area.
A master class for creating a chair made of metal practically does not differ from the instructions for making wood products. It's just that welding or hardware is used to connect parts.
The metal frame is also made in a round hanging chair(hammock chair). A wicker seat can be made from wicker, rattan or other material. If you want to make a soft round chair, then foam rubber with fabric can be sewn onto the frame or pillows can be made separately.
All children deserve a cozy place they can call "their own", whether it's for lounging, watching cartoons or reading. Even something as small as a comfortable seat can be one.
And while you can choose absolutely any chair in the store, wouldn't you like to make it as unique as your child? Try to make a baby easy chair yourself.
By building something with your own hands, you will get exactly what you would like, as well as save money.
 by the most simple option there will be a pear chair, or a bean bag chair. Simplicity, perhaps, lies in the fact that this model is frameless.
Some online tutorial videos can be intimidating in their complexity. But don't worry. Two pieces of fabric, a zipper, a little machine stitching with straight stitches - and a charming baby bean bag is ready.
Necessary materials:
- two pieces of fabric (upholstery fabric is preferred - it is more durable);
- zipper 60 cm long;
- filler (the amount will depend on the type of material).
For seam allowances, leave 1.5-2 cm.
 Progress:
- Cut out two pieces of fabric 107 × 82 cm. The cuts can be identical or different colors.
- Fold the fabric right sides. Sew the long raw edges with a zigzag stitch. This is how you prevent wear. Then sew the same edges with a straight seam. It is advisable to use a short stitch length, which will also add density to the product.
- Fold the fabric in half (horizontally).
- Starting from the folded side, round off the ends by trimming about 15 centimeters from the corner.
- Turn the fabric right side out. It turned out a symmetrical rounded bend on one side. You have a rough edge again. Work it with a zigzag stitch, and then sew with a straight line.
- Open the raw edge. Fold the right sides together, but now in such a way that the seam between the two pieces of fabric faces up.
- Sew the zipper into the hole. You can use invisible lightning, it will be almost invisible.
- Close the edge of the fastener with straight stitches on both sides.
- Turn the finished cover right side out and fill with filler.
Frame chair
What does it consist of:
- chipboard;
- plywood;
- foam rubber;
- special glue;
- upholstery fabric.
Tools:
- self-tapping screws.
 Progress:
- Cut the chipboard sheets in a semicircle - this is your basis. Using self-tapping screws, attach three bars (40 cm each) at an angle of 90 °.
- From plywood, cut out the front pillars. Their width should be half the length of the semicircular part. The length is equal to the length of the bars.
- Attach all parts to the bars with a drill and self-tapping screws.
- Attach foam rubber to the frame.
- Sheathe the finished fittings with a cloth.
For covering, you can also use a leather substitute, which is very convenient for children's furniture. This upholstery is easy to care for.
Wheelchair from tires
A great idea on how to put into use the plywood scraps and worn tires left after the repair.
What you need:
- 2 tires;
- plywood;
- foam rubber;
- upholstery fabric.
Tools:
- self-tapping screws;
- furniture stapler.
Progress:
- Install tires one by one.
- Fasten together with large self-tapping screws.
- Be sure to cover the bottom tire with felt so as not to damage the floor in the future.
- Make a plywood back. Give it the desired shape. Also attach it with screws.
- Choose a denser foam for the inside of the seat. Cut out the circle and fill the tire with it. Then cut out a larger circle to cover the top of the seat. You can use thinner foam.
- Sheathe the back with foam rubber using a furniture stapler.
- Cover the chair with upholstery fabric.
Instead of upholstery, you can sew a cute quilted cover. The child will appreciate!
Unfortunately, sometimes it is difficult to navigate the size and quantity of materials if you use leftovers. Try to create your own unique model.
 First, evaluate your resources: what materials and tools do you have at your disposal? Is there enough? Get down to drawings! Don't worry if the materials available to you are a bit out of the ordinary. By connecting imagination and enthusiasm, a chair for a child can be made from anything.
What is upholstered children's furniture made of? Yes from everything:
- Styrofoam;
- thick cardboard;
- old furniture pillows;
- foam rubber without the use of a frame;
- remnants of laminate or parquet;
- mounting foam;
- plastic bottles and more.
Involve your child - he will give you a thousand ideas. Make your chair soft and comfortable. Choose from fun prints that you think fit with the personality of your favorite little person. This will be an unforgettable gift not only for the holiday, but just like that.
There are no related posts.
You can buy anything in modern stores. A little imagination, a mouse and keyboard with Internet access, how a huge number of offers from social networks and online stores. It also happens that the financial situation is not the most prosperous, and purchases in online stores are considered luxury items. And sometimes you just want to do something with my own hands, they itch like that. Here is a small selection of examples of how you can make some furniture with your own hands.
DIY bean bag chair
In the first example, we will see the manufacture frameless furniture, the most popular thing in stores today is a bag chair. A photo of the chair with your own hands is presented below.

Material costs for one bean bag chair are $40. This includes: polystyrene balls (filler), inner cover, outer cover.

First, the inner cover is sewn and filled with foam balls, then the outer one. Then just insert the inner cover into the outer one and you get a finished bag chair.

The most difficult thing is to collect the balls in a bag, they are trying to jump out of it, I had to use a vacuum cleaner. it short instruction how to make a bag chair with your own hands.
DIY home chair
Now consider making your own ordinary home chair. Unfortunately, there were quite a few photos, there was no time to take pictures. The main stages were fixed in a timely manner, switching from a tedious workflow.

I wanted to get just an ordinary chair, and not just some incomprehensible rookery. To make it strong and stable, like store options. I had to look on the Internet for views and drawings of chairs in order to correctly assemble my design. I suggest you immediately look at the photos of the process of assembling the chair.

At the first stage, the basis-frame for the future chair is made in the form of a semicircle. Used chipboard with timber. The base of the chair is 10 cm thick. This will just be enough to fix the walls. And vertical racks have the same final function.

Hardboard was perfect for the back, and plywood for the front wall. All the curves and outlines of the future chair were drawn by eye from the remaining wallpaper. For the base, children's wooden cubes were used.

In the next step, I started gluing cardboard to fill inner space. In the process of work, even the glue had to be changed, the initially selected PVA did not fit. The walls swelled and became like a waffle, the glue was replaced with ordinary carpentry glue. turned out to be the most the best choice from all that is offered. There was even an idea for a rocking chair with my own hands, but I will implement the idea a little later.

After looking at the photo, you can immediately easily figure out how the finished walls were obtained. For leveling, I used an ordinary knife, the material is easily cut and deformable.
At the next stage, work with glue and foam rubber, glue the entire surface with a layer of foam rubber, do not leave any bald spots and uncovered places. On a monotonous surface it is necessary to sew a cover.

Well, we have reached the final stage, when we pull the cover and get a beautiful finished chair. The product turned out to be very heavy, but it will be completely safe for children, can be attributed to the pluses. As for the fabric used, nothing was bought anywhere. The scraps available at home and the remnants of sewing were used.

We wanted to get temporary furniture, no one planned to make a chair for centuries. The sieve on the armrests, despite a good tack with glue, will peel off over time. If you say a little about the design of the chair, then it turned out to be simply indestructible.

Chair made of plastic bottles
What people don't do plastic bottles. And rafts in their youth, and bird feeders in kindergarten. This material has excellent inclinations for creativity.

Plastic bottles are a real find; in ordinary life, brooches, scoops, curtains and buckets are made from them. They are used to decorate flower beds, lay them out instead of pipes, make a hanging chair.

We wanted to try to make a chair out of bottles, why not? At first it all started with great enthusiasm for collecting bottles, and then everyone unanimously realized that there was simply nowhere to store them in such quantity in a small home area of the room.

Even at the initial stage of storage, it immediately became clear that bottle necks were not needed, more precisely, half of the bottles. We decided to stack them in blocks of two bottles, carefully cutting off the throat and fastening 2 pieces to each other. One was cut off the neck, turned over and inserted into the second bottle. Of course, a wooden chair looks much more attractive and solid.

For the complete manufacture of the chair, it took about 90 bottles to collect, they were fastened together with adhesive tape, and covered with stretch film on top. It will not work to talk about the entire process of assembling the chair; at the time of writing the article, the chair was ready.

In short, we can say that you should not regret attaching bottles of scotch tape, because. during assembly, they can simply diverge from each other, you will have to spend a lot of time in order to redo the structure later. In this regard, I had to resort to stretch film and finalize the chair to the final stage.

DIY armchair photo


