Do-it-yourself ottoman in classic style start with legs... Two boards with a length of 48 cm and a section of 5x5 cm are cut at an angle of 45 degrees. They are knocked down with a cross.
A 35 cm long bar is glued to the resulting crosspiece.In addition, it can be fixed with a self-tapping screw.

Another similar cross is attached on top.

how to make an ottoman with your own hands. Photo
For seat take plywood 1cm thick and 40x60cm in size. Foam rubber 10 cm thick and a layer of padding polyester with a margin are placed under the plywood so that you can bend it.

We bend the synthetic winterizer and nail it to the plywood. Then they take the upholstery fabric and also fasten it from the inside out.

For decorations The ottoman uses decorative nails that additionally secure the upholstery.

DIY ottoman. Master Class
Cross boards are added to the legs. The entire structure is treated with wood stain.

Screw the seat to the base with legs. It turns out a comfortable, hand-made ottoman.


DIY ottoman from the wheel
To make an ottoman out of a wheel, you need to take a wheel of the right size and wash it thoroughly.

DIY ottoman made of tires. Photo
From plywood cut out two circles. One along the diameter of the inner part of the tire, and the second along the outside, but so that it does not protrude beyond the boundaries of the tire.

For the manufacture of legs take sample, circle, and then saw out from the board. A total of four legs are required.


The legs are attached to the base circle. They are placed at regular intervals and reinforced bars.

The legs are painted and glued to the base, and then additionally fixed with the help of corners.

Glue is applied to the base and the wheel is applied from above.

Glue is spread on top of it and the top cover is glued.


The tire is pasted over rope using hot melt glue. The rope can be used in different colors.


At the end, the legs are additionally painted.


Plywood ottoman

DIY ottoman step by step. Photo
Step-by-step instructions will help you make an ottoman with your own hands. Take plywood sheets with dimensions 45x45 cm and cuts at 45 degrees.

Vinyl is cut to the size of the plywood with an increase of two or three centimeters of stock. A soft cloth is placed on top of it, you can take non-thick foam rubber, and then cover it with a plywood sheet.

The vinyl upholstery is folded over and fixed with a stapler, the excess is cut off.


Angles are used for fastening. The screws should be less than the thickness of the plywood.

A patterned paper is placed on the surface of the vinyl.

do it yourself ottoman. Master Class
This pattern is made with decorative carnations, creating an interesting pattern and additionally securing the upholstery. The paper is then easily removed. The result is a beautiful ottoman made of plywood with an original pattern.


How to sheathe an ottoman?
An old plywood ottoman can be updated, sheathed his new materials. To do this, remove the lower part of the cover.


The new fabric is cut, tried on and fixed by stapling in the corners.


The bottom is re-screwed to the top cover.


Measure the amount of fabric, making a stock.
Textile mark out... It is more convenient to do this on the ottoman itself, marking the seams with needles.

Trying on everything on the ottoman.

The excess fabric is cut off, and the joints iron iron.

Attach the fabric to the top of the ottoman by wrapping it.


Then it is wrapped on the inside of the product.

After that, the fabric is pulled at the base and nailed staples... The result is new do-it-yourself ottomans made from old ones.

Ottoman made of plywood and fiberboard

Pine timber make ribs for a pouf.


From Fiberboard cut out squares of the same size. The bottom and seat will be made of them.


With the help of self-tapping screws, it is assembled carcass products. Its sides are covered with plywood sheets.


First, the base is pasted over polyurethane foam... To give the ottoman made of fiberboard and plywood additional softness, it is complemented with padding polyester.


While the structure dries, cut out case... You can take flock or leatherette.

The details of the cover are stitched using strong threads.


The finished cover is put on the pouf.

They fix it from below furniture stapler or a pneumatic gun.


To make the product look more aesthetically pleasing, the bottom is glued non-woven fabric.

Finally, the legs are attached.


DIY cylindrical ottoman

Consider a master class for making a cylindrical ottoman. To do this, you need to cut out circles. Chipboard the required sizes and timber details of a certain length.

We connect the circles and the timber with self-tapping screws in frame.

Along the perimeter, the frame is fixed chipboard sheet making a wall.


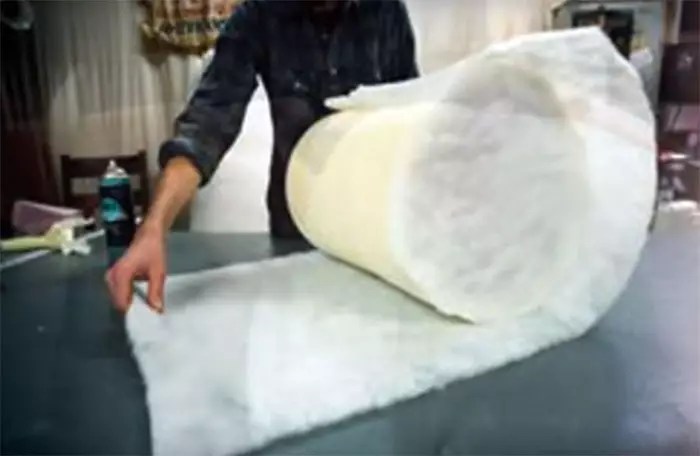
Take foam rubber and synthetic winterizer. The latter is needed to smooth out the folds.

Foam glue is applied to the frame.


A layer is attached to the seat foam rubber four centimeters thick. Then the whole structure is covered padding polyester.

The cover is made of a suitable material.


The cover is put on and secured from below with a stapler or nails.

Legs are attached on the underside.


Making a cylindrical ottoman with your own hands is not difficult if you follow the instructions.
Ottoman with storage box
To make an ottoman with your own hands with a storage box, you must follow the instructions. First, the material is prepared: two blanks are cut out from Chipboard with dimensions 37x40 cm and 37x37 cm, as well as one square 40x40 cm.
From timber with a section of 4x4 cm, four parts are cut out with a length of 37 cm.

From the resulting fragments, they collect box, whose height is 37cm.
In inner corners timber is attached with carpentry glue. From the outside, the corners are fixed with self-tapping screws or metal corners.
The glue is applied to the bottom and the bar. Glue the bottom and leave to dry.
After drying, the bottom is fixed with self-tapping screws.
To do cover, four locking bars are attached to the square sheet so that the lid is fixed in the box.

It remains to upholster the lid with soft material. To do this, use foam rubber, batting, synthetic winterizer, as well as upholstery fabric.


Fluffy foot ottoman
A master class on making an ottoman will help to make such a product. It will require four ready-made furniture legs and a circle of plywood or natural wood.

Cut out according to the size of the circle foam rubber, and then cover it with padding polyester. Excess material is cut off, and the main one is fixed on the wrong side.

Four holes are drilled to secure the legs. Legs are screwed into them and the finished ottoman can be used. But to make it look more attractive from the bottom, a circle with holes for the legs is cut out of the fabric. It is put on the base and fixed with furniture studs.


How to sew a soft ottoman?
To sew a soft ottoman, you need to act in stages. First, an inner cover is made, which will contain filler... For this, two circles are cut out of dense fabric. Their diameter should be about half a meter. If you need square ottoman then two squares. These will be the top and bottom of the product.
Then a strip is cut with a length equal to the circumference or perimeter, and the width is equal to the height of the pouf. Be sure to take into account the seam allowances.
The resulting strip is sewn from the inside out. First sew to the bottom, and then to the top of the ottoman. The finished cover is turned inside out, stuffed suitable material and the hole is sewn up.
Remains an ottoman decorate. For this, a decorative cover is sewn on it. The procedure is the same as above. Only in the middle part the hole is not sewn up, but a zipper is inserted into it, Velcro or buttons are sewn on. Any fabric can be used for a decorative cover.
DIY ottoman from a plastic bottle
Consider how to make an ottoman out of bottles with your own hands. Take two large plastic water bottles. They are cut and the two parts are combined to make a part of the desired height.

Details on how to make an ottoman out of bottles with your own hands can be seen in the photo.
For the base and seat, take circles from Chipboard... A plastic base is fixed on one, and the second is attached from above.


DIY plastic pipe ottoman
Consider a master class for making an ottoman from plumbing pipes.

Pipes first cut into pieces about thirty centimeters long. You will need about nine pieces of such segments.

Dyes pipes acrylic paint gold color. It is necessary to paint in several layers. Each layer is allowed to dry for about twenty minutes before applying a new one.

Top painted surfaces process protective varnish. This makes it resistant to water.

The pipes are held together with a glue gun. The glue will set quickly, so everything should be done without delay.


Polyurethane rugs for the bathroom, they are folded in half and cuts are made in them along the perforations. The length of the cuts is approximately five centimeters.


The rug is folded up and a kind of bud is obtained.

Such rolls with buds are inserted into pipes. They have to get in tight. In this case additional mount will not be needed.


The result is an original ottoman that will look great in the bathroom.
Ottoman made of plastic bottles. Step-by-step instruction
Consider a master class on how to make an ottoman out of bottles with your own hands.

Bottles first connect with scotch tape into a round piece.
From cardboard circles of sufficient density and thickness are cut required diameter... This will be the seat and the bottom of the pouf.
Bottles are connected to cartons with tape.

The surface of the resulting frame is closed padding polyester or foam rubber.

Two circles and a rectangle are cut out of the fabric. Partially the cover is sewn on a typewriter, then put on the structure and sewn by hand.
The top and sides are knitted from yarn with pile, and fabric is used for the bottom.
All parts of the decorative cover are connected by hand.
As with minimal investment? You can make a designer ottoman with your own hands, which, in addition to the decorative function, solves several practical problems. This is a rather unusual accessory that immediately attracts attention. With a little creative imagination, you can make a completely unique product out of old tires or suitcases, and the addition of wheels will make the structure also mobile. Today, the editors of the online magazine site will hold several master classes on making an ottoman from unusual things, with the help of which you can perform first simple, and then more complex and unusual interior items.
The ottoman came to us from the East, it is not so often used there, preferring to sit on small structures. It quickly gained its popularity due to its portability and versatility. The main advantage of the design is that it is easy to make it yourself from old things that you decide to dispose of. Today you can buy an ottoman bag or on a rigid frame of any design and finish. But why invest in something that is easy to do with your own hands in just 1-2 hours?

Non-standard ideas for making a pouf with your own hands from unusual objects
Manufacturers produce a wide variety of ottomans: for a children's room, a hallway, a bedroom and even for a summer cottage. They are offered at a fairly high price, but why spend your personal finances on something that you can do with your own hands? And for this you don't need to be a professional at all, just show a little imagination and follow our instructions.
Step-by-step instructions for making a do-it-yourself ottoman from plastic bottles
The easiest way to make an ottoman is from plastic bottles... You must first prepare the following materials:
- plastic bottles - 14 one and a half liter pieces;
- transparent tape;
- plywood sheet;
- material for decor;
- double sided tape.
- thin and thick foam rubber or.
Advice! First, you need to unscrew all the lids and put them out in the cold overnight or put plastic bottles in the freezer. In the morning, screw the covers back on and place them under the battery. In such a simple way, the strength of the bottles increases.
A step-by-step photo description of making a pouf with your own hands from plastic bottles.
| Illustration | Description of action |
 | Connect with an elastic band 2 times 2 bottles, 2 times 3 bottles and 1 time - 4 plastic. Then secure the structures with tape. |
 | Connect the entire structure to each other and fasten it. |
 | Cut out 2 ovals from plywood to fit the bottom of the ottoman, make small notches on them from the outside. Glue a dense fabric on one oval - this will be the bottom of the structure. |
 | Glue the plywood to the structure from above and below with double-sided tape. |
 | For greater strength, tie the ovals with twine along the notches. |
 | Wrap the ottoman with thin foam rubber and sew with thick thread. |
 | Cut out the top of the structure from wide foam rubber. |
 | Sew the seat to the foam sidewalls. |
 | Sew a cover made of bright fabric, pull in the cord along the lower base and put it on the workpiece. |
 | The finished product weighs no more than a kilogram. |
You can watch the video for more details on the master class.
Related article:
Photo examples, drawings, diagrams, materials; features of the manufacture of furniture for the garden, nursery, baths, gazebos, advice and recommendations of the masters - read in our publication.
Plastic ottoman for children's room, 20 liters
If you have a 20-liter bottle left over, you can make it for the smallest children. For this you will need:
- 1 20 liter and 4 1.5 liter plastic;
- Scotch;
- fabrics and decor.
The work is carried out as follows;
- Cut off the top of a 20 liter plastic.
- Insert one and a half liter bottles into it, which will act as legs.
- Next, you need to decorate the workpiece. To do this, you can use a dense soft fabric, colored tape, fur, the options depend on your imagination.

The nuances of making a do-it-yourself ottoman from a tire
A creative ottoman can be made with your own hands from an old wheel. It is quite heavy, so or is more suitable. It is also a great option for or. The manufacturing procedure is as follows:
- Wash and dry the tire thoroughly.
- Cut 2 circles out of plywood, the diameter of which is equal to the diameter of the tire.
- Drill several holes in both plywood pieces and tighten.
- Starting from the center of the structure, glue the twine in a circle in the shape of a snail.
- To leave the ottoman outside, it should be varnished.
- For mobility, castors can be installed on the underside.

In more detail, a master class for making an ottoman from old tire can be viewed in the video.
How to make a pouf from an old plastic bucket
If you have an old plastic bucket, you can convert it to a padded seat as well. For work you will need:
- measuring tape;
- chalk or a piece of dried soap;
- glue;
- stapler;
- foam rubber and non-woven;
- the cloth.
Before you sheathe an ottoman with your own hands, you need to measure the diameter of the bottom and top of the bucket. Further, the operation algorithm is as follows:
The finished ottoman will become a real decoration of any interior.
In more detail, the process of making an ottoman from an old bucket can be seen in the video.
Related article:
: what it is, advantages and disadvantages; step by step production coffee table, armchairs, sofas, benches, shelves; decor features with a photo - read the publication.
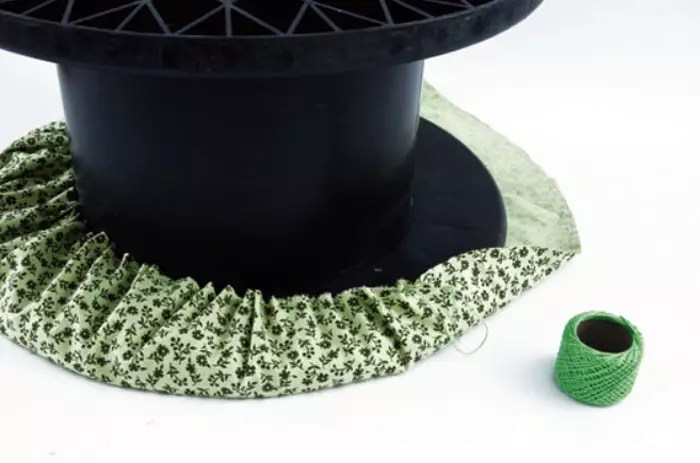
Non-standard solution: do-it-yourself ottoman from a cable reel
A comfortable child seat can be made from old coil from the electrical cable. For work you will need:
- synthetic winterizer;
- glue gun;
- braid for decoration.
Progress:
Interesting ideas for making poufs for the bedroom
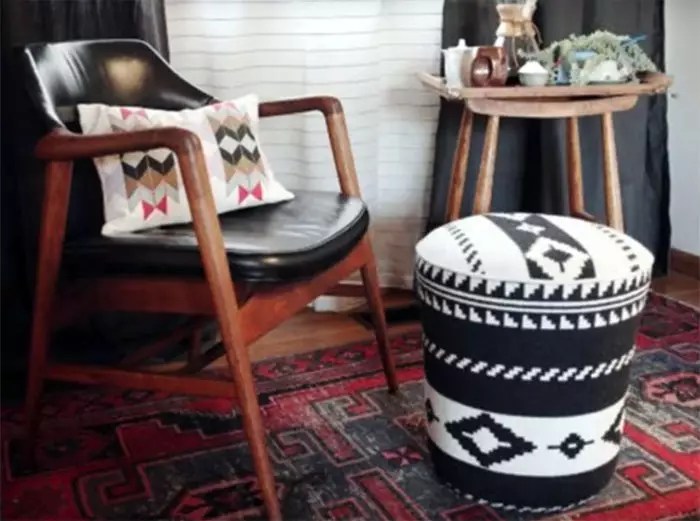
For a bedroom, soft frameless poufs are perfect, which, in addition to their functional load, also act as a bright accent in the interior, photo examples are proof of this. And if you take an expensive fabric for decoration, the soft construction will emphasize the owner's wealth and taste.
How to tie a round pouf
Needlewomen can please the family with their creativity and tie a bag with filler. This is a great addition to stylish interior, issued in. First, you should sew the bag, fill it with foam rubber, and then proceed to the main work. DIY master class on making a knitted ottoman:
- Tie two circles, their size should correspond to the diameter of the bag.
- Sew the edges of the blanks to the middle.
- Sew a zipper into the hole.
- Put the cover on the bag and close the zipper.

One more interesting master class for making a knitted ottoman can be seen in the video.
The nuances of making a soft frameless square pouf
The order of work is practically no different from the manufacture of a round pouf, only templates should be prepared in a square shape. Each part must be knitted separately, the inner cover is sewn, and then filled with filler. You can also make a wireframe model, for example, from which it is covered with foam rubber and decorative fabric. In more detail, a master class on making a pouf from pallets can be viewed in the video.
How to sew a frameless pear-shaped pouf with a soft back
A modern accessory that many families love so much is the pear bag. To make a soft ottoman with your own hands, you need to master the sewing technique. Prepare the following materials before work:
- upholstery fabric 320 × 150mm;
- smooth material for interior decoration- 300 × 150 mm;
- filler. It is advisable to find expanded polystyrene with holofiber with a volume of about 1 m³;
- a zipper with a length of at least 60 cm;
- pattern paper and thread.
The manufacturing procedure is as follows:


Work for half an hour or how to sew a pouf in the form of a bag
A bag of any shape can be sewn from a beautiful fabric. For work, prepare a flowing fabric for the inner cover and beautiful material for the outer surface. Before you sew an ottoman bag with your own hands, you need to make patterns for 4 sides, bottom and top, photo ready-made solutions will help you choose an interesting design.
Then transfer them to the fabric and cut out taking into account the seam allowances. After that, sew all the fragments of the inner cover, leaving a small hole in which to pour the filler. All manipulations should be carried out with decorative fabric, the patterns of which can be made according to the same patterns.

How to assemble and trim soft square and round ottomans on a rigid frame
For more complex work, it will take a little more time and carpentry skills. But there is nothing heavy in such works, it is enough to look at a few of our step by step instructions, and you can do everything yourself.
Detailed instructions for making a square soft ottoman on wheels with a box for small items
With a little work, you can make a more solid structure - a square ottoman with a removable cover on wheels. This is also an additional toy, and you can also store slippers for guests in it. For work, you will need the following materials:
- plywood sheet 12-16 mm thick. Sizes are for children and adults;
- wooden block 20 × 40 or 40 × 40 mm;
- wheels;
- piano loop;
- foam rubber for a soft seat up to 100 mm thick;
- synthetic winterizer;
- upholstery fabric;
- carpentry;
- glue.
For children, an ottoman is suitable up to 40 cm in height, for adults - up to 55 cm. In the table we have prepared the dimensions of parts for an ottoman designed for children and adults.
| Detail | Quantity, pcs. | Sizes for children, mm | Dimensions for adults, mm |
| Front and back panel | 2 | 350 × 250 | 400 × 370 |
| Side panels | 2 | 326 × 250 | 368 × 370 |
| Bottom and top | 2 | 350 × 350 | 400 × 400 |
| Wooden blocks for sidewalls | 4 | 40 × 40 × 250 | 40 × 40 × 370 |
| Upper sticks | 2 | 350 × 1450 | 550 × 1650 |
| Upholstery fabric for sidewalls | 1 | 350 × 1450 | 550 × 1650 |
| Sintepon | 1 | 300 × 1410 | 450 × 1610 |
| Foam rubber | 1 | 350 × 350 × 50 | 400 × 400 × 100 |
| Cover material | 1 | 500 × 500 | 650 × 650 |
Step-by-step manufacturing process


The second life of an old stool
Do not rush to throw away the old, but still sturdy stool. Just a couple of hours and you will add an interesting one to your interior. design item furniture. The manufacturing process is as follows:


In order to update the design of your home, use additional pieces of furniture, which include homemade ottomans. Compared to factory ones, they have great advantages: due to their size, poufs are mobile, as well as multifunctional and lightweight interior elements. For their manufacture, you can use various materials at hand that are in your house and independently choose the type of upholstery, color, shape, size. As a result, such a product will cost almost no investment.
How to make an ottoman with your own hands, you will learn from this material, and nice pictures and a video instruction at the end of the article will simplify your task.
A simple way to make soft poufs

We often do not have enough time and desire to deal with patterns, so soft ottomans can be made like this:
- We cut out two circles from the fabric, which in their diameter should be the same as the diameter of the bottom and top of the product. Be sure to leave seam allowances;
- Next, cut out two identical parts. rectangular, the width of which is the height of the ottoman, length - 1/2 the circumference of the lower and upper parts;
- We sew rectangular pieces with each other in width from one edge until a long tape is obtained;
- We sweep one circle to it, sew along the seam, do the same manipulation with another circle. If you get an uneven seam, you can sheathe it with a decorative border.

Using this method, a case for a product is made simply and quickly. It is stuffed with whatever soft material is at hand. At the end of the process, a zipper is sewn into the non-stitched edges of the rectangular tape.
"Chair" from plastic bottles
Plastic bottles can be creatively used in everyday life and even form practical pieces of furniture from them, because plastic container is cheap, convenient, lightweight, and, in fact, timeless. Having made an ottoman from bottles with your own hands, you will get irreplaceable thing, which will perfectly fit into the interior of a summer cottage or house, will not take up much space and will serve for several years.

For a compact and soft seat, first prepare the bottles - wash them, remove the stickers. To make the container stronger, put it in open form into a cold room for an hour, then close it with a cork and place it under a well-heated battery. Bottles expand due to temperature differences and keep their shape for a long time.
For upholstery, it is better to take such furniture fabric as faux fur, tapestry. The fabric should have a dense base and wash well.
You will need:
- Stationery knife;
- 16 bottles of 1.5 liters;
- Threads, needles, sewing machine;
- Two types of adhesive tape - transparent and double-sided;
- Foam rubber (thickness - 3 cm);
- Lightning;
- Plywood (corrugated board);
- Upholstery fabric.

How to make an ottoman:
- We make the seat from its middle: wrap double-sided tape the central bottle, to which we glue three or four more. We will fix it well with transparent tape;
- We make a circle, level the base along a straight and solid surface. We fix each layer with tape from bottom to top;
- We will cut out two round timber from cardboard, which correspond in size to the seat of the pouf. Wrap the bottom and top with scotch tape;
- Take a piece of foam rubber and completely wrap the future piece of furniture. Sew round foam rubber to its edges from above;
- The turn came to take measurements, which we will transfer to the fabric. Next, we cut out the details of the product from the fabric and sew them round. We will sew a zipper into the cover on the side and "dress" a pouf in it.
We get a lightweight and reliable seat, which is also great for a child's room.

Another variation of a seat made from a large amount of foam rubber:
- This material is taken in a rectangular piece, a container is placed on it and wrapped. It turns out a soft bag "with a plastic filling" inside and a voluminous seat. The container lies much smoother than when wrapped with tape;
- This ottoman stands on the bottlenecks. For its stability and strength, we take containers twice as large. We cut off the necks, stick a whole bottle into them, as a result we get a cylinder, which we further decorate at our discretion.
Bus stool with backrest

From tires, you can make comfortable and durable ottomans in the hallway or any other room:
- Let's prepare two round timber from MDF or thick plywood, which should be slightly smaller in diameter than the wheel. They will serve to close the holes;
- We take bolts with nuts or self-tapping screws, fasten the circles in three places.

The ottoman can be designed in two variations:
- We glue the upper round timber of plywood with foam rubber, and attach this material to the side of the tire with a furniture stapler. We will make a cover, which we will stretch from above. If you have small squares of bars, then you can paint them and make legs from them;
- Country style method. Take a thick braided rope, wrap the ottoman, not forgetting to fix it with glue. We glue both round timber first in a spiral, then - the side parts of the wheel. We hide the ends of the rope, cover it with varnish on top.

You can improve the resulting product and make an ottoman with a back. It will require carefully crafted wooden blocks(five pieces).
- They are attached to the bottom of the chair, for which all the bars are connected to the tire barrel with four bolts.
- The back can be made with a slight backward tilt. To achieve this, the upper bolts are fitted with a washer spacer.
- We make a pillow the size of the back from two-layer foam rubber with a fabric cover. We sew ribbons on it (one third below the top level), they will also be attached to all the bars. The ribbons fix the cushion and at the same time serve to decorate the back of the pouf.
Ottoman pear option

Let's consider how to make an ottoman bag, which is a fashionable element of modern interiors.
You will need:
- Pattern paper;
- Cloth for the inner cover - 300x150 mm;
- High density threads;
- Strong and dense fabric for upholstery (suede, tapestry) - 320x150 mm;
- Lightning - 60 cm;
- Expanded polystyrene filler with holofiber additive - 0.5-1 cubic meters meter.
For the inner cover of the garment, choose a slippery, smooth fabric. Thanks to her, the filler will easily roll over the bag and take the form of a person resting in it.

The pouf pattern contains six bag gussets and one bottom piece for the base.
- First, the drawings of the necessary parts must be made on paper. Then they are transferred to the fabric, which will be used on the outer and inner part ottoman;
- When cutting, leave allowances for seams - 1.5 cm;
- The upholstery bag should consist of parts that are slightly more details for the filler, so the outer cover will be easier to put on the filler bag;
- We sew all the fabric parts of the bag. First, these will be wedges that are sewn together, then proceed to the base;
- We leave space for the lightning outside;
- Pour filler into the inner bag, which will take 2/3 of its volume, sew the remaining places;
- We put on the cover on top, fasten the zipper.
A nice pear ottoman will add comfort and coziness to your home.
Item with box

To make an ottoman with a drawer, you need to follow the instructions below:
- We cut out 2 blanks from chipboard with dimensions of 37x37 cm and 37x40 cm, and one square piece - 40x40 cm;
- We cut out 4 parts 37 cm long from a bar (4x4 cm in cross section);
- From these elements we make a box with a height of 37 cm;
- With the help of wood glue in the inner corners, we fasten the timber;
- We fix the corners outside with metal corners or self-tapping screws;
- We apply glue to the bottom and timber. Glue the bottom, give time to dry. After that, we fix it with self-tapping screws;
- We attach 4 locking bars to the sheet of the square for the manufacture of the lid. This will fix the lid in the box;
- We cover it with soft material (batting, foam rubber, synthetic winterizer).

Such a piece of furniture can be perfectly used as an ottoman for shoes, which can be stowed away in a storage box from season to season.
Video: Detailed instructions on how to make an ottoman with your own hands
Have you ever wondered how to make an ottoman with your own hands? In fact, it is not difficult. The main thing is to choose necessary materials and tools, and then follow the instructions. An ottoman is a very handy thing in the interior. It doesn't take up much space. You can choose from many design options depending on the style of the room. In addition, making it with your own hands is a pleasant business that allows you to embody the most interesting ideas.
How to make a frame pouf
The frame pouf is very easy to make yourself. Such a piece of furniture will decorate the room and will function as a chair (and very comfortable and soft). In addition, it can also store any small items.
It is necessary to prepare in advance a ruler, glue ( carpentry type), pencil, stapler (construction), hacksaw, wood screws, screwdriver and hammer. Of the materials, you will need a special fabric with which we sheathe the frame. It is necessary to choose exactly the one that is intended just for decorative upholstery. upholstered furniture... In addition, you need another 1 bar with dimensions of 15 * 4 * 4 cm, a pair of piano loops, 4 rollers for furniture, chipboard with dimensions of 175 * 240 * 0.16 cm.All this is taken on the basis of a standard ottoman with dimensions of about 40 * 40 * 50 cm.

Before starting work, you need to study step-by-step instructions... It is as follows:
- First, you need to make the markup on the material, and then the blanks. To make the walls of the structure, you will need 2 cuts with dimensions of 37 * 40 cm.To arrange the side parts, you need 2 blanks that have dimensions of 37 * 37 cm.In addition, you need to cut out another 1 square with a length and width of 40 cm.
- Now you can start cutting out these parts. To do this, you can use a hacksaw.
- The beam is supposed to be divided into 4 parts, so that the length of each is 37 cm.
- Now it is supposed to assemble a box from the cut parts. The height should be 37 cm.
- The made structure is fixed with wood glue. It is supposed to be applied with inner sides products. This will make the part more rigid.
- Now it is additionally required to fix the corners with self-tapping screws - this must be done from the outside of the corners. If there is a desire, then the structure can also be strengthened with metal corners, which should be purchased before that in any hardware store.
- Now the adhesive is supposed to be applied to the underside of the box. The same applies to the end side of the beams.
- Glue the bottom and wait until assembled frame dry.
- Additionally, insert self-tapping screws into the ends to strengthen the product.
- Now you can start making the lid. It is necessary to fix the 4 stopper bars in inner surface perimeter of the box.
- It is necessary to check that the stiffeners are correctly fixed. They should not interfere with the lifting of the pouf lid.
- Now it remains to make the upholstery. How to sheathe an ottoman - everyone chooses independently, depending on their own preferences and the interior of the room. It is recommended to use batting, padding polyester, foam rubber, holofiber. The top can be covered with additional upholstery.
Now the ottoman is completely ready. And it's not just a beautiful item - it can replace a chair and a small nightstand for small things.
Ottomans made of bottles and spools
At home, you can make an ottoman from the most unusual items. For example, you can use plastic bottles. There are already many crafts from this available material... A pouf made of it will not only differ in its decorative properties, but also become very practical.

It is necessary to prepare 40 plastic bottles in advance. Moreover, do not throw away the covers from them. In addition, you also need scotch tape - choose only a wide tape. For filling, a synthetic winterizer or foam rubber is needed - the material will be used for lining. Additionally, you need scissors, knitting threads, a stapler, a hook or knitting needles that are used for knitting. And of course, you need to choose a decorative fabric for upholstery.
The do-it-yourself ottoman looks like this step by step:
- First, make a design out of bottles. All containers must be tightly closed with lids. Use adhesive tape to connect the parts. It is necessary to make several layers of plastic bottles. You can fix all the bottles at once, but experts advise fixing them only a few pieces at a time - this will increase the strength of the structure. When the sections are received, then they are also supposed to be fixed together.
- Now you will need to do a cardboard pattern. To do this, you just need to attach the workpiece to a circle, the diameter of which is about 40 cm. Then draw lines with a pencil. Then cut out 2 circles. Both blanks must be attached on both sides of the makeshift pouf and secured with tape.
- Next comes the lining. It is necessary to cut 2 circles of the same diameter as the previous blanks. In addition, you also need to cut out a rectangle, which is supposed to wrap the structure on the sides. Using a stapler, you should fix the foam rubber or other material that is used for linings on the structure. The linings will still need to be additionally sewn together along the connection lines.
- It is necessary to make a cover. For this, any dense fabric is used. You can choose a special material that is used for upholstery of upholstered furniture, but if this is not possible, then any other will do - the main thing is that it is dense enough.
- At the end, it remains to sew the side and upper parts of the pouf to the lower part.
Now the pouf from ordinary plastic bottles is ready. By the way, it can be done with a back. In this case, it is still necessary to make a blank of the shape that the pouf should have. The back of the product must also be sheathed with foam rubber and decorative fabric.
Round ottoman with your own hands it will turn out to be made from a coil. If the interior of the room is made in a rustic or classic style, then you can decorate it with a pouf, which is made from a coil. As a result, a durable and reliable product comes out that can be decorated according to on their own... The pouf will turn out to be original and interesting.
You need to find a wooden coil. It can be made not of wood, but of chipboard - this option is also suitable. More cardboard is needed, upholstery, batting or foam rubber, foam and adhesive mass. Of the tools, you need to prepare in advance a drill, a stapler and sewing machine.
The instructions for creating a pouf are as follows:
- Cut out parts with the planned shape from the foam. They should be the same size as the coil tops. Fix the parts with glue.
- Now you need to make a template to work with soft interlayer and decorative fabric. To do this, on paper or film, it is supposed to cut out a circle with the same dimensions as the tops of the spool, but you also need to make a small allowance in order to sew these parts.
- Wooden circles are supposed to be smeared with glue and to fix circles that are cut from foam rubber on them.
- It is necessary to wrap the entire structure with cardboard and fix it with glue and a stapler.
- After that, you need to wrap the pouf in batting and also fix it with a stapler. First, it is supposed to measure everything, and then remove everything unnecessary.
- All that remains is the upholstery. The material should be stretched, but not too tight.
At the end, it remains only to attach the legs to the structure.
How to make fabric poufs
You can make a multi-colored pouf from the fabric. An original product comes out. It will need different pieces of fabric, but they should all be combined in shades. In addition, fillers and lining material are needed. You also need large buttons.

The algorithm of actions is quite simple:
- First, think over the pattern. It is necessary to draw a circle whose diameter will be the same as that of the planned product. Then divide the circle into 4 parts, and then each part obtained by another 3. Now it is supposed to cut out pieces in the shape of petals from the fabric. Be sure to leave a couple of centimeters more to connect the joints. The same is supposed to be done with the lining material.
- Connect all parts.
- Now make the lower part of the product. Best to take advantage of thick cloth... From the inside out, the top and bottom of the pouf must be sewn. At the same time, do not sew at the end of 1 petal-shaped part.
- Now you need to turn the material out and use the filler.
- At the end, it remains only to sew the remaining places and mask the seams with large buttons, attaching them to the top and bottom of the structure.
You can also make an interesting and simple pouf from a regular sweater. Such an item will fit into any interior, and everyone will cope with its creation. It is necessary to find a suitable sweater - you can even take a worn one, but it is still recommended to choose a product made of wool.
One more interesting option Is a pouf that looks like a ball. To create it, you only need polyethylene, fillers, graph paper (to make a pattern) and various fabrics of two shades. This ottoman is very simple, but at the same time comfortable and will fit exactly into any room.
Conclusion
Among all the options listed, everyone can find the one that suits him best. All the described instructions are very simple, so even a beginner can cope with such a task and make a pouf with his own hands. This piece of furniture is very comfortable and practical. In addition, he will also decorate the room.
Today we will share with you an interesting and easy-to-perform master class on creating a charming and multifunctional ottoman, which will be a wonderful addition to any interior design, not only modern, but also traditional.
This headset has small size so you can place it anywhere in your apartment. At the same time, it is distinguished by its low weight, low cost, ease of manufacture and reliability. These features make the ottoman an irreplaceable element of the decoration of the apartment.
The following photos show you the diagrams and drawings of the product. They will greatly facilitate the process of making furniture for you.


Here's what you'll need to craft this decor item:
- Plywood;
- MDF sheet;
- Bar;
- Upholstery fabric;
- Cardboard;
- Staple staples.
- Instruments:
- Electric jigsaw;
- Drill;
- Electric drill;
- Fasteners;
- Blade;
- A pen;
- Stapler;
- Foam rubber;
- Glue.
Manufacturing process:
Dimensions (edit) stylish furniture choose at your discretion. In this example, the specialist used the following dimensions as a basis: height 50 cm, diameter 70 cm.
Round seat
Draw a curved line on the plywood, step back seven centimeters and draw another one. Mark the points of the future fastening of the vertical supports.


Cubic part
Cut two squares out of the plywood to serve as the bottom and roof. To do this, use an electric jigsaw. Next, fix in the four corners of the rack with screws and glue, then install the side sheets.
Drill holes on each side. Sand all edges and surfaces as you may get hurt later.


Sew on Pacman's eye. To do this, select a similar material that you will use to upholster the pouf. In this project, the master picked up a snow-white leatherette. Cut out a small circle and sew to the red fabric.
You can perform this action on sewing machine or manually. At the same time, make sure that the seam runs along the very edge of the eye.


Make upholstery for a square, quirky chair as it is smaller.
Glue soft foam to the top edge. Apply wood glue to the surface and leave to soak for 15-20 minutes, then attach the material. Try to squeeze the foam harder at the edges and looser in the center. As a result, it will take on a convex shape.

Tighten the top plane of the headset upholstery fabric... Fix to the surface using a special furniture stapler. Carefully control the process, try to avoid distortions and excessive tension.


To prevent small folds from forming at the corners, tuck the fabric to the side, as was done in the next photo. Cut off excess fabric.

Tighten the sides
For their decoration, the master chose a snow-white leatherette. To do this, she used four squares of matter of equal sizes, sewn together. Attach thin strips of fabric along the uprights to make the corners more rounded.
Fix a thin leatherette on the sides of the cube. Then cover the pouf with a snow-white cover, securing it on the upper edge with cardboard strips, and on the lower one - with metal brackets.


Decorate the semicircular ottoman in the same pattern as the square one. You may have some problems with upholstery inner corner(with Pacman's mouth). To facilitate the process of stretching the fabric, make several wedge-shaped cuts on it.


The following photos show you creative furniture. It has a stylish, functional and aesthetically pleasing appearance.
It practically does not differ from the factory models, and also perfectly suits the decoration of modest apartments.

