An old or faceless floor lamp can ruin the whole impression of the interior. You don't have to go to the store looking for a better replacement to change the look of a lamp. You can make a lampshade for a floor lamp with your own hands. How, we will tell in our article, and at the same time we will give ten original ideas for homemade shades.
Original ideas for floor lamps from scrap materials
You can make a lampshade for a floor lamp with your own hands from fabrics, as well as any available means. No need to rack your brains and invent a bicycle - this has already been done before you. We have collected ten original plafonds, simple in execution, but stylish and beautiful, which can become a design highlight for your interior.
All ingenious is simple. When creating this shade, the shadow effect was used. The stencil, cut from dark paper, is mounted on a light-colored lampshade that you can make from cotton, linen, and silk fabrics.

The original solution of a round shade made of thin paper or plastic tubes. By the way, the shape can be either cylindrical or conical.
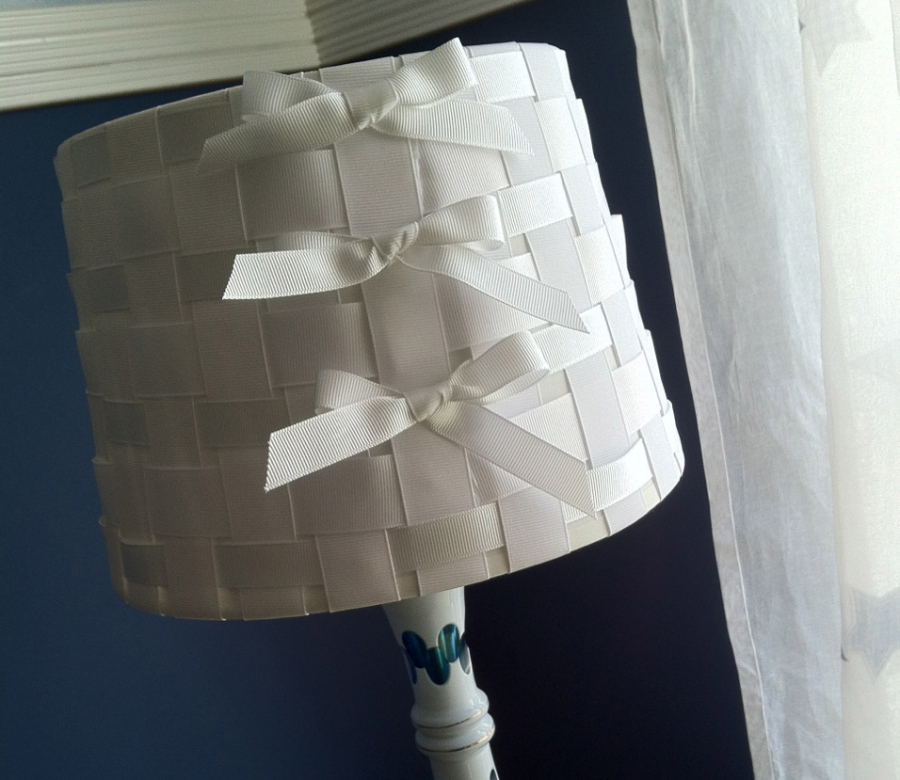
Plain checkerboard satin ribbons and flirty bows made from them can give the lamp a surprisingly elegant look.

This model combines several techniques: applique, embroidery and quilling. A little difficult, but how beautiful!
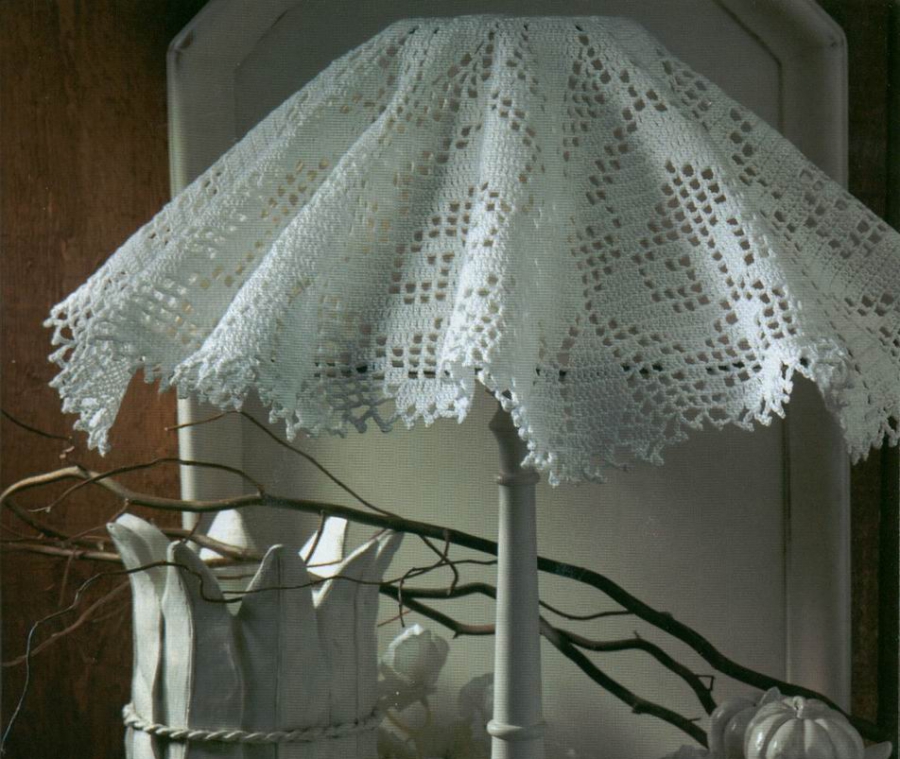
Do you have a napkin knitted by your grandmother unnecessarily in your closet? Find a use for it.

Plastic spoons will work too. It will turn out to be funny and exclusive.

Is the old school globe idle? Half " the globe"May well become a lampshade.

Used photographic film is an excellent material for floor lamps. Moderately plastic, it sticks well, forming a cylinder, and light, refracting through the frames, casts bizarre patterns on the walls.

Guess what this masterpiece of modernism is made of? We will tell you: from ordinary tetrapacks folded in a special way and cut into pieces.
Disposable paper plates can also become excellent material in the hands of the master. Watch the video:
Tools and materials
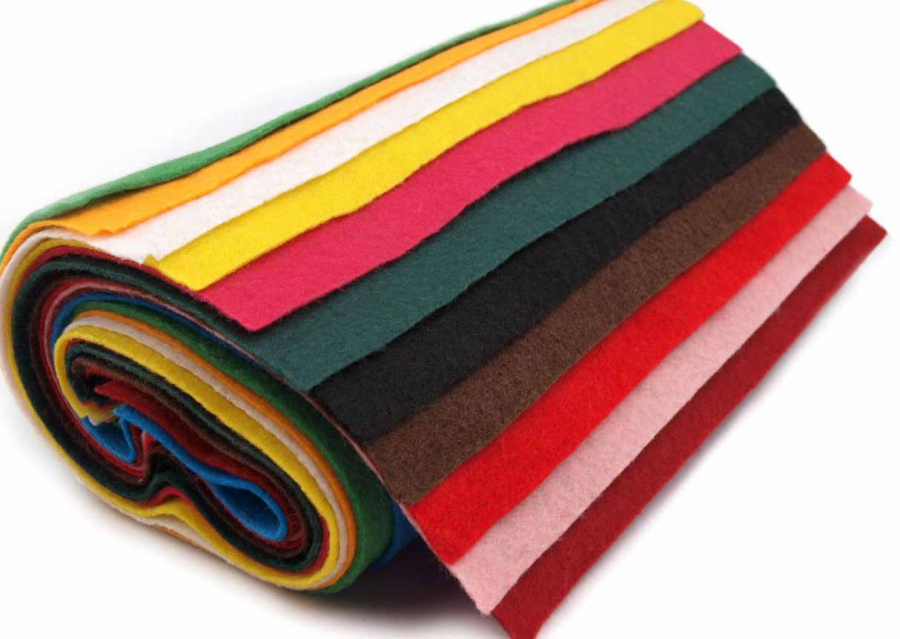
One of the most simple ways do DIY lampshade Is to make it out of felt. This fabric is not expensive, and therefore ready product in the end will cost quite inexpensively. However, keep in mind that it is permissible to use felt only when the luminaire contains energy-saving and LED lamp... Conventional incandescent lamps get very hot when the floor lamp is turned on, and the matter can ignite.
One more nuance: today felt of various colors and density is sold in our stores. The denser and darker the fabric, the less light it will transmit. Such floor lamps are best used in the bedroom, where soft intimate lighting is appropriate.
Do not forget about the shades of the color of the fabric, because they determine how warm or cold the lighting will be in the room. Coral, orange and yellow lampshades will add coziness and warmth to the interior, while blue, green and purple lampshades will add coolness and freshness.
The luminaire frame also influences the choice of fabric. If it is unattractive and you need to hide it as much as possible, choose dense felt. In the rest cases will do the fabric is lighter.

To make a lampshade for a floor lamp with your own hands, you will need:
- felt. To find out the dimensions of the material cut (we have a floor lamp in the form of a truncated cone), mark on the upper, smaller rim of the frame - it will become a "reference point". Place the frame in this place on the paper and, rolling, draw lines with a pencil to mark the passage of its upper and lower rims. Add 10 cm to the height of the frame - and you will get a "pattern" of the future lampshade, according to the size of which the material should be measured;
- fast setting glue capable of bonding fabric and metal;
- paper. We will cut out stencils from it, so you can even use old student notebooks;
- scissors;
- simple pencil.
We will assume that you have an old floor lamp frame. But if there is none, the base is easy to make from metal wire.
Instructions for making a floor lamp
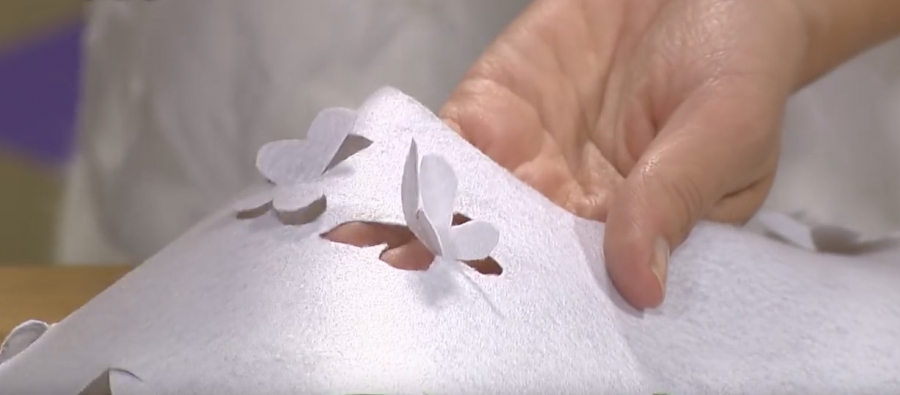
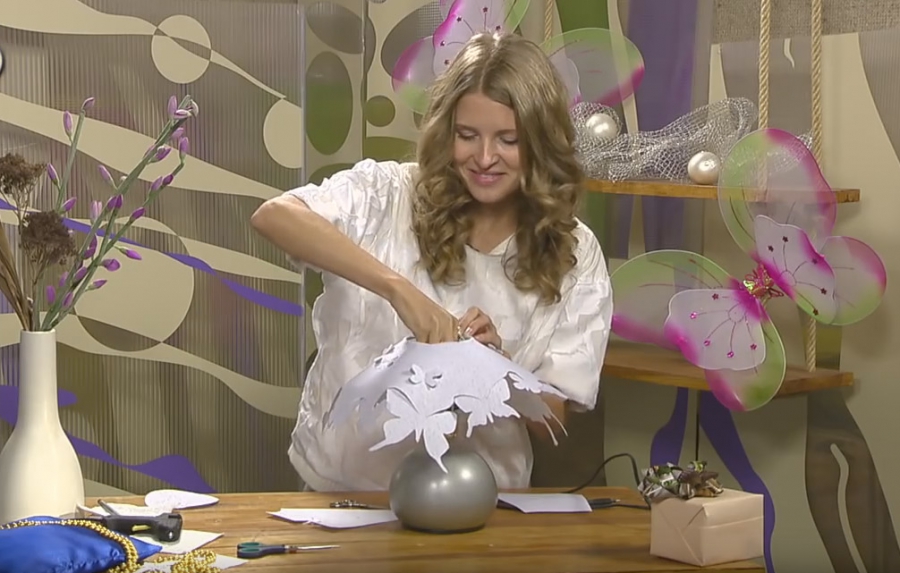
During the measurement of the wireframe, you have already made a pattern on paper. Attaching it to the felt, draw outlines with a pencil and cut out. Find drawings of butterflies on the Internet, redraw or print them (it is enough to transfer only the outlines). Attach the resulting stencils to the fabric and use a pencil to outline the contours.

It is better to use stencils of different sizes and arrange them randomly: at the top, center and edge of the lampshade.

Cut out the butterflies, but don't cut them all the way. Raise the wings slightly by pressing them in with your fingers.
Apply glue to the rim.

And glue the blank to it.

At the end, glue the joint of the lampshade.

Attach the lampshade to the lamp.
Take it for yourself, tell your friends!
Read also on our website:
show more
Traditional lamps with fabric lampshades- these are beautiful table lamps, luxurious chandeliers, laconic sconces that create a romantic and cozy atmosphere in any room. If you have such items at home, remember that they are easy to inhale. new life by making a do-it-yourself lampshade based on old lamp.
Tip 1. In this way, it is best to update lampshades, the diameters of the upper and lower rings of which are equal. If you decide to decorate a lamp with rings different sizes, do not rush to throw out old decor... He will help you make the right pattern. Without it, it will be quite difficult to choose the size of the fabric, be careful with the calculations.
Main materials:
- lampshade textiles;
Tip 2. To find out how the fabric will look when the light is on, you can bring a sample of textiles to the window. When making a lampshade for a lamp with your own hands, you should not choose too dense textiles, it can transmit an insufficient amount of light.
- upper and lower lampshade ring;
- plastic with adhesive solution for gluing textiles, designed for the manufacture of lamps. (Available from specialized stores, may also be called "PVC film for lampshades"). The color of the plastic is selected depending on the shade of the fabric. For light colors it is better to use white.
Technique (good if you have it, but you can do without it):
- sewing machine;
- iron;
For measurements:
- a ruler or other flat long object;
- square;
- tailor's meter.
Little things:
- paper tape;
- masking tape;
- chalk for drawing;
- PVA glue;
- pencil;
- scissors;
- clips for paper or clothespins;
- glue brushes (preferably thin);
- threads.
Prepare:
- work surface (table);
- heavy objects that can be used as weights when gluing;
- a damp cloth or towel with which you can remove the remaining glue from the product.
We make a lampshade with our own hands. Master Class .
Stage 1. Preparation
1. Measure the diameter of the rings and determine the height of the future lampshade. Make a note of this information.
2. Cut the plastic to size. Keep in mind that the length of the plastic should be a couple of centimeters larger than the diameter of the bases so that it can be connected into a ring.
3. Cut the fabric, having previously added 2-5 centimeters on each side to the measurements from point 1, so that you get a cut that is convenient for further work. Consider the location of the pattern on the lampshade. This point is especially important in the case of large ornaments.
Tip 3. A cut of fabric for easy work can be attached masking tape to the table, face down. So it will not move and wrinkle.
4. Finally, we determine the location of the ornament on the future lampshade. We mark on the fabric the exact edge of the future lampshade (according to the dimensions from point 1). To do this, you can draw a corner from the left and bottom edges. This will be enough for further work.
Step 2. Gluing the fabric
5. Prepare the PVC tape for bonding. Make sure the fabric is clean and free of lint and other small contaminants. We start gluing using the lines made in the previous step.

6. Gluing should be done gently, holding the fabric, if necessary, use a ruler to remove air pockets and wrinkles. The fabric remaining from the edges can be trimmed so that the edge of about 5 mm protrudes beyond the PVC tape.

Stage 3. Preparation of rings
7. Place the rings on the table to make sure they are straight. If some part is not in contact with the surface, align the frame until it becomes flat.

Stage 4. Gluing the structure.
8-9. Secure the lampshade with the glued PVC tape to the top and bottom ring using paper clips or clothespins. Make sure that the indentation from the edge is the same everywhere and the lampshade evenly adheres to the frame.


10. After making sure that the lampshade is fastened correctly, without distortions, mark with a pencil the beginning and end of the seam, the top and bottom lines, mark where the top and bottom of the lampshade are located.

11. Then the structure can be disassembled. To accurately glue the lampshade with your own hands, connect the top and bottom points of the seam with chalk.
12. Place the workpiece face down on the table. Fold over the edge with the marked line and apply the adhesive gently without going over the edge.

13. Join the seam.

14. Place the lampshade and press down on the seam as shown in the illustration.

Step 5. Edging
15. After the adhesive has dried, remove the press. Place the lampshade with its top edge on the table. Gently apply a thin layer of glue around the inner edge of the lower edge of the lampshade.

16. Insert the frame, fold the fabric, fixing the edge on the ring with clothespins. After the glue is dry, you can start working on the other edge.

17. Place the remaining frame inside the lampshade and only then apply the glue. To make the inner ring joints less visible, position one of them over the seam. The structure is also secured with clothespins until dry.


18. Make sure the rings are tight. Only then carefully remove the clothespins.
Step 6. Bonding the paper tape
19. Place your pencil on the table and draw a line as shown.

20. Apply the adhesive in a new line and secure the paper tape to it, aligning the joints of the tape and the fabrics of the lampshade. Half of the tape is attached to the outer edge as in the photo.

21. Glue the entire tape in this way.

22. In the places where the central guides of the frame are located, cut out small triangles in the tape like in the picture.

23. Gently apply glue to the remainder of the tape and tuck it inward, tucking it under the ring. Make sure the tape is flat.

24. Repeat steps 20, 21, and 23 for the bottom edge.
 25. Below we will tell you how to make a lampshade with your own hands with a textile ribbon of the same color, but you can choose not to use this technology, but choose other options for the finished finish: fringe, ribbons of a different color, etc.
Preparation of textile tape
In total, three ribbons need to be made in this way:
- two for processing the bottom edge. (Their length should be a couple of cm more than the diameter of the rings);
- one equal to the height of the lampshade to mask the joint.
1. On the existing piece of textiles draw parallel lines about 5 cm wide at an angle of 45 degrees to the weaving of the fibers. (If you want to make a wider or narrower edging, you can change the width of the tape. However, remember that there should be enough cut to cover the paper tape and tuck in.)

2. Cut the fabric into ribbons.
3. The edges of the tapes must be cut at a 45 degree angle and sewn. Remember that you will need right and left angled tapes. You need to choose the right ornament, which will make the junction invisible.

26. Smooth out the joints of the tapes with an iron.
Stage 7. Masking the junction.
Tip 4. To make a beautiful lampshade with your own hands, you should observe the maximum accuracy and clarity of actions at this and the next stages.
27. Take a shorter tape and, dividing it into approximately 3 parts, glue it together as shown in the figure below. For a better connection, you can iron the tape with an iron. Attach the rest of the tape in the same way.

28. After it is completely dry, apply on inner side glue and stick the tape to the joint on the lampshade.

Step 8. Finishing the edges of the lampshade
29. Fold one end of the long tape in half and cut the end off at a 45 degree angle. After the spread, you should have a triangle cutout. Tuck the edges of the tape so that they join at the middle of the seamy side (see illustration) and glue them in the same way as in step 27.

30. Glue the tape in the same way as we did in points 20 and 21. In this case, while you do not need to glue the end of the tape, just secure it with a clothespin. It will be more convenient to work if you apply glue to the tape from the inside to one of the halves.

31. After making sure that the tape is glued evenly, proceed to join the ends. At the other end (flat), cut the triangle in a mirror-like fashion so that when connected, you get a continuous tape.

32. Apply glue to the ends and gently join them.

33. Repeat step 23 to secure the tape to the inside of the lampshade.

34. Repeat Step 8 for the second edge.
After complete drying, the production of the lampshade can be considered complete. All that remains is to attach it to the lamp and enjoy the result.

Comfort at home and new creative solutions!
← share the light with others
Even the smallest and insignificant element plays an important role in the interior of each apartment. Only one unsuitable detail and the interior is ruined. That is why the choice must be approached carefully and very responsibly. Let's talk in this article about such interior decoration as lamps. It is not enough to hang only a light bulb; you also need to decorate it somehow. This can be done with a lampshade. Shop variations of lampshades can not always please, and rarely among them you can choose the model that will harmoniously blend into our interior. We do not always choose a new lamp with beautiful design, sometimes the old one no longer attracts us, has gone out of fashion or absolutely does not fit into the new interior. All these factors push us to create DIY lampshade (photo).
It would seem that decorating a lampshade on your own is a rather complicated procedure, but in fact, everything is very simple. Allocate some free time, and we will show you several options for creating a beautiful lampshade. Do DIY lamp shade can be from any materials that come across at your fingertips. It can be any fabric you like, and ribbons, and beads and many other materials that, in your opinion, are suitable for decorating an original lampshade.
DIY lampshade for a floor lamp everyone can do it. The main thing is not to set yourself too serious tasks. If you have never encountered homemade products and it is difficult to imagine how to cope with the task, then it is better not to risk it, but to choose for yourself a simpler version of the lampshade design.

A beautifully selected material, color and shape for the future lampshade will create a truly spectacular element of the interior. Neat and original floor lamp or another lamp can perfectly complement the design of a hall or other space.

It is not always convenient to make a lampshade from scratch; it is much easier to transform an existing one. In particular, such a solution is much easier for those who first decided to make with my own hands the decor of the apartment and add a fresh touch. To create a new design for central lighting or a floor lamp, you need to take an existing lampshade or purchase the simplest inexpensive option in the store. Each of the proposed options is good in its own way. In the first case, the former lampshade does not always have ideal condition, which, accordingly, can add to the problems in its design. In the second case, you get the whole new material for the manifestation of your imagination, but at the same time you will incur small losses.

But in any case, making a new one from a finished lampshade will not be as difficult as decorating a new one. What can be done from an old floor lamp? Having cut out, for example, parts from cardboard or plywood, they can be attached to the existing lampshade, painted in one color or covered with fabric. We will receive a lampshade with new shapes. This solution is often used when parents are looking to create a fabulous design. Just imagine how great the boy's room will look, decorated in a space style with elements of unearthly planets, and a lamp made in the form of a space creature or a small satellite. But it is not difficult to make such a lampshade for a lamp in the above way. Imagine a little, involve your child in the process, who is always full brilliant ideas that you would not even think about. A little time and effort and you will succeed original solution for central lighting of a children's room. All guests who come to visit you will be delighted with the solution they saw.

If you have a solid-colored lampshade, there will be no problems with its design at all. Solid color - perfect material for homemade decoration, because here you can embody any wishes and ideas. For example, you can get an original lampshade using appliqués, embroidery and even ordinary stickers that can be found in many stores.
DIY lampshade - master class
We offer you an interesting DIY lampshade (master class), in which we will tell you how to get a work of art from an ordinary light lampshade. During the day, our floor lamp will represent an ordinary element of the interior, and at night it will turn into a wonderful decoration.

Our master class will be devoted to creating a lampshade in the form of a night city. To do this, we need directly the lampshade itself in light colors, yellow, orange or light pink shades are desirable. They will most of all resemble night lighting when the lamp is on. We take black fabric and cut out our model of the night city from it. It can be trees, buildings and even cars. Using PVA glue or any other, we glue our applications on the inside of our lampshade so that no wrinkles form. You can sew a black ribbon on the bottom. Please note that it is better to stitch with a white thread or a thin ribbon. This will create the effect of a city road.
In daylight, our app will not be visible. And when the light is on, the landscapes of the night city with houses and trees bathing in the moonlight will open in front of us.

Choosing a colored floor lamp with bright ornaments and patterns for decoration, it is enough to slightly decorate it by adding pendants with beads bright colors... It is possible to decorate with satin thin ribbons for a more striking effect. Such a lamp will fit perfectly into. Thanks to such a small additional interior, she can feel like a real princess living in a fabulous room with a cute interior.
How to make a lampshade with your own hands from scratch?
If you are interested in a question, how to make a lampshade with your own hands from scratch? Then you can simply purchase a few plastic folders and wire. Cut out the necessary parts for the frame from the folders, and use a wire to connect them together. This solution will allow you to create a completely new, original and unique lampshade.
Before embarking on any design of a lampshade, you need to take into account all those colors that are found in the room for which it will be intended. As you understand, the lamp should harmoniously fit into the interior of the room, match the texture and color scheme space. In addition, observe the safety measures. That is, if you have a baby who is still too small and strives to grab onto everything that comes his way, then try to arrange a more restrained version of a floor lamp or lamp to which the baby will not reach out. The fact is that more than once we have encountered situations when children pulled on pendants on floor lamps and overturned it on themselves, while receiving various injuries. Let's not talk about the bad. Just try to take into account all factors besides beauty.

What materials are used most often to create a lampshade? The most common option is textiles. It is good not only for its flexibility and ease of use. Its popularity is also deserved thanks to the chic variation of colors, which allows you to design absolutely any floor lamp that is perfect for any interior, let it be minimalism or Ethno style. Among all the variety of fabrics, it is best to choose thick cotton or felt, which will quickly gain its popularity among needlewomen. Felt is an excellent material for creating a lampshade. It allows you to create a variety of multi-layered compositions, for example, DIY lampshade with butterflies.
If you do not want to tidy up your old lampshade for central lighting, we offer you a very interesting option doing it from scratch. This option does not take much time and effort, it is good for any interior, especially for.

To create a new lampshade for the ceiling lamp, we need a ball, glue and thick threads. Performed DIY thread lampshade very simple. We inflate the balloon. Dip the threads in glue and wrap the ball in random order. Just don't overdo it. There should not be too many threads, there should be enough space between them in order to let light through. It is also worth leaving small space without threads on one side, this will be the bottom of our lamp, through which light will flow. The creation process is almost ready, just wait a little until the glue dries, after which you can blow off the ball.
Our threads will remain in the form and shape in which they were at the time of drying. If desired, our lampshade can be painted with paints in order to give it brightness and originality, while combining several colors. Now we just have to hang our lamp on the lamp. As you have seen, there is nothing difficult about this. But the interior will receive a new note of originality.

To decorate an old lampshade, you can use satin ribbons and even scraps of fabric. They can be sewn along the diameter of the canvas, thereby creating horizontal stripes. For example, you can make a combination of several colors. For example, let our lamp be light color pink, and we will insert the stripes in burgundy colors with bright small flowers... The combination of turquoise with brown... Such a lampshade is suitable for interior decoration of the hallway, and one of the rooms. A cute floor lamp can be placed in the nursery, and a brighter solution can be left for the guests to see in the living room.

V recent times people strive to create new and original elements for interior decoration with their own hands. Therefore, in their works they use absolutely unpredictable elements, among which we can note kitchen utensils, artificial leaves, bamboo and other equally interesting materials. Lampshades look unusual, the frame for which is made of transparent plastic, and pasted over from the inside with old slides, photographs or decorative stones.

As you have noticed, making a new floor lamp or chandelier is not as difficult as it might seem at first glance. Everything is quite simple if imagination works and there are many brilliant ideas. Do original item the interior can be made from any available means, applying a little new look to their design. Imagine, experiment and you will be able to create bright interior full of unusual and unique details of the overall composition.
Nowadays, many people strive to ensure that an atmosphere of comfort and beauty is always present in their home. As a rule, we do this using different ideas helping us to decorate the house in a certain style. We also try to decorate our interior with various decorative elements, bringing some mystery and originality into it.
In this article, we will focus on such an important interior detail as a do-it-yourself lampshade. If your favorite lampshade is completely worn out, you can always decorate it, thereby breathing new life into it. You can also make it yourself for a floor lamp, night lamp, ceiling or floor light source.
Advantages
The first lampshades were created two hundred years ago. Such an interesting name came to us from French and translated means "muffled light"... As a rule, they were made of leather, wood or fabric, but lampshades made of multi-colored glass and crystal were especially popular and fashionable in those days.

You can also use whatever materials you like to create this beautiful and sophisticated decor item for your lamp.
In order to decorate the lampshade for the lamp ourselves, you need to pick it up with not too much complex design, therefore, the simplest floor lamps and night lamps will suit you for this. They can be both floor-standing and suspended. After all, interfering with their simple mechanism from a vertical base and a round frame will not be a big problem for you.
Usually, it is very easy to pick up parts for such lamps or replace them with a frame made of wire, wood or metal. The main thing is that the lamp with a lampshade is very firmly attached to its structure.... At the same time, a floor lamp with a lampshade will never be damaged or fall, and you can safely move it to any place convenient for you.
Master classes with description
Making or decorating lamps with lampshades is a creative and interesting activity, at the same time very fruitful: it gives the opportunity not only to make unique element decor, and in full accordance with the style of the room, but also helps to save money. You just need to buy the most uncomplicated floor lamp or night light for little money and decorate it for every taste. They will help you with this. various techniques workmanship and materials.

At home, you can create lampshades for every taste. For this you will need any serviceable night light, lamp or floor lamp, as well as the frame and base for them. The lamp should be LED or energy saving so that the material from which your lampshade will be made does not deteriorate. When making such a decor item, you must carefully observe all safety standards, because working with electricity can carry a potential threat of fire or electric shock.
Try not to use materials that can be flammable and have a toxic composition during work, so as not to harm yourself and others. A frame of any shape can also be made independently from wire or purchased ready-made in advance.
You can use the most extraordinary things as items for decorating the lamp, from children's toys to building materials or items made of plastic and paper.

Made of wood
The most durable and moisture resistant are wooden lampshades that will serve you for a long time and at the same time will fit into any interior in a classic or modern style... But usually they are of great relevance for a bath or sauna. To make such a lamp out of wood with your own hands, you will need a roll of paper, a simple pencil, wood and self-tapping screws.
Using these materials, you can make a corner light:
- To do this, on paper, draw a layout of the frame in the shape of a trapezoid. Please note that the side pieces must match the wall on which the luminaire will be mounted.
- Next, take wood and apply a layout drawing on it and cut it out. Wood can be treated with paint or varnish. Make a frame from three wooden planks one centimeter wide and half a centimeter thick.
- Combine the top and bottom of this frame at the sides and center. Measure from the middle to the edges and cut a few more planks of the same size. The strips must be fastened with self-tapping screws from the inside.

- You can also make a lamp from vines or dry branches. To decorate a dry twig lamp with your own hands, you will need twigs different sizes, lamp, shade base, glue, paints, brushes.
- Before gluing the branches to the base, sand it with sandpaper, then wipe it with alcohol. This will make the branches stick better. Next, take the branches and glue them in different order to the base in a circle.
- After the lampshade is completely dry, attach it to the lamp.
- To make the lamp look bright and modern, paint the twigs silver or gold acrylic paint... By combining these shades, your lampshade will turn out in a Nordic style and will decorate any interior.
- You can also add various decorative elements in the form of cones, chestnuts, feathers, artificial leaves, beads or sparkles.

Weaving from vines and branches has never lost its relevance, and if there is a desire to please yourself, as well as create interesting decor items for the home, then you can do it yourself, only by studying the sequence and rules for working with such material as a vine.
For weaving a lampshade or various objects, you can use branches of all varieties. and you... This should be done in the spring before the first shoots appear on the branches, so that the product is of high quality and lasts a long time. An excellent material will be branches of willow, straw and reeds, which are also procured in advance. As a rule, this happens in the autumn season. And for a solid base of products, twigs are suitable walnut and willow.
You can select rods for the product in different sizes and make ribbons from them for decoration. You can also change the color of the product by holding it in water for some time. This will give it a more sophisticated appearance.

From paper
The advantage of a material such as paper is its availability and ease of making products of any shape. A lampshade made from newspaper tubes is one of the most popular and creative ways. To weave such a lamp shade, you will need newspapers or magazines, a bottle, scissors, glue, disc, paint or varnish.
Operating procedure:
- The tubes are harvested in advance by folding and gluing, they also need to be dried well.
- Next, we cross three tubes, put a bottle on them and weave in a spiral. Thus, the lampshade expands by superimposing the tubes on top of each other. Thus, we reach a certain size, glue and cut unnecessary tubes. After that, you need to paint the lampshade and varnish.

It will be very easy to make a paper lampshade with butterflies... You can also use various origami fakes.
The lamp frame is taken as the base of the lampshade. Next, we cut out a large number of butterflies according to the pattern and fasten them to the frame with a transparent fishing line or white thread. Such a product will look very original and will fit well into the child's room.

To decorate a paper lampshade, any decor elements will work. Consider several useful ideas for decorating such lamps. To add a little flair, get some butterflies from a stationery store, or make your own. Next, attach it to your lampshade. Such a decoration idea lighting fixture will appeal to any child or teenager.
Even more original idea is the decoration of the lamp with special aromatic bags, which include dried herbs and essential oils... This will create a romantic and cozy atmosphere in your room or bedroom.
Pleasant aroma herbs and flowers will always be present near you.


If you are fond of collecting herbarium from flowers and leaves and decided to use them to decorate the lampshade, then you definitely cannot go wrong creating such unusual element decor. You just need to glue them onto the finished lamp and let the glue dry. So you can do it lampshade in rustic style , which will decorate any interior in the country or in the house.

Wallpaper lampshade would be a great idea. Its creation does not require large costs and efforts. Consider the most interesting option, made in the form of an accordion. This will require a lamp frame and wallpaper. On the section of wallpaper you need, draw stripes, the distance between which will be at least two centimeters. Then fold the wallpaper into an accordion shape and make holes on the top of the cut. Then you need to thread a lace through them to fix and glue the structure.

Another idea for creating a lampshade - from a napkin. To do this, you need to have glue, openwork knitted napkins and balloon uk... Next, we take napkins and coat with glue, put them on a balloon and wait for them to dry completely. The ball can be pierced or lowered, and a light bulb can be attached to the resulting lampshade.
Napkins can also be made of paper. Cut them into equal parts, glue the lamp with glue and glue to its surface. You can attach a ribbon or braid to the bottom or top of the luminaire for a more vintage look.

From scrap materials
To make a lampshade from scrap materials, you should initially decide from what means it will be made, and you also need to have a frame for the lamp. A balloon or a ball can serve as such a basis.
Another option for the material for creating the frame of the lampshade is the usual five-liter plastic bottle... To do this, you need to trim upper part bottle and paint it from the inside with any light paint, and from the outside with blue or green. To make the edges of the bottle look neater, tape the edges of the bottle to match the color of your lampshade.


With your own hands you can make lampshade made of plastic cups. To do this, you need a stapler, wire, a wooden base and a lamp holder. Next, the glasses are fastened in a circle to each other, and on wooden base a cartridge with a lamp and a design made of cups are attached.
Such an original and practical lampshade will serve as a worthy addition to your interior.

Any material at hand can be used when decorating a lampshade. Cocktail tubes are no exception. To do this, it is necessary to prepare about two hundred straws, which are glued to the glass base of the lamp with the help of construction glue. And from finely chopped multi-colored tubes, you can make a small night light in the shape of a cube.
The most easy decision decorating is gluing cocktail tubes vertically to make the old lamp even brighter and more beautiful.


It will not be difficult to make a lampshade made of simple galvanized wire and beads. This will require a pair of wire cutters and pliers to shape the wire into a variety of shapes. These can be curls, leaves, hearts, circles and patterns. Such simple construction will look very original. You can also make a wire base and stretch fabric or leather over it.


Cardboard lampshade do it yourself is very simple to manufacture and will differ in its unusual appearance, while finding a place in any room. To do this, you need to cut four frames from durable cardboard and attach to them with back side with lacing fabric. For this, not only ordinary threads can be used, but also various ribbons or braid.
Thus, you will get a flashlight, which must additionally be glued with glue. Then you can paint this unusual lampshade in any color and install on the lamp.

Cork or self-adhesive paper can also be great for making lampshades. First, apply a silver paint to the old lamp, then glue it over with cork paper. Glue twigs of different sizes on top of them. And if you still have felt, then you can sew a new lampshade out of it. First, make a pattern for the base of the lamp, sew its parts and pull it over the base. Decorate with various appliqués.

From threads
The most sustainable option for your home would be DIY lampshade made of twine or twine. To work you need a thread of two different colors or varieties, a needle, a balloon, glue and a cup. In order for the thread to be impregnated with glue, it must be passed through a glass of glue or a jar of glue should be pierced. This can be done with a needle.
Next, take the ball and draw a circle on it for the hole for the light bulb, while wrapping the ball so as not to touch this circle. After that, we leave the ball for a while so that the glue dries well and the structure does not deform when air is released from the ball. Next, we insert a cartridge from an old lamp into the hole and fasten the resulting product to the ceiling.


One more unusual way decorate a lampshade is crochet it... To do this, you need a base for a lampshade, yarn, crochet hook, glue. According to the knitting pattern, knit two openwork products of the required size and completely circle the frame of the lampshade. Patterns can be varied.
To give the product an even look, apply a mixture of water and glue, diluted in equal proportions. While drying, you can shape the lampshade to any shape. Next, install it on a floor lamp or lamp.


And in order to make a wicker lampshade with your own hands, get a frame from an old lamp in a retro style. This element will make your interior unusual and highlight its dignity. For making, you need threads, glue and a spray bottle. Wrap the base of the lampshade with free and simple movements.
Make sure the threads are tightly wrapped. After that, dilute the glue with water and spray from a sprayer onto the threads so that after drying they keep a certain shape.

Manufacturing jute lampshade will become great ideas for those who want to decorate their home. To do this, you need jute thread, glue, wire, decorative leaves... First you need to make a shade template that will match the lamp frame. TO ready-made template we fasten screws or nails. Then we pull the thread along the outline of the layout and drag it vertically along the entire outline. Next, we do the weaving horizontally and process it with glue.
Immediately after drying, remove the product from the model and glue the side parts. In order to decorate the lampshade, take decorative ivy leaves and attach them with wire to the base of the lamp. Such a lamp will create a fabulous atmosphere in your home.
From fabric
First you need to choose the fabric for your lampshade. It can be fabric of any density and rigidity. The choice of material will depend on what the lamp frame is made of, but preference should be given to dark fabrics over transparent ones, as this will be more practical.
Use blue or green fabrics to keep the light emitted cool, and yellow or reds for cool light.

If the base for the lampshade is made of wire, paint or tape should be applied to it so that the fabric does not deteriorate over time. You can sew the product manually or on sewing machine... You will also need an iron, pencil, tape measure, thread, and glue.
First you need to take measurements and cut out a template that will fit the frame of the lampshade. Next, cut out a pattern according to the template and match the threads to the fabric. We sew the details on the sewing machine and then smooth them with an iron. The next step is to glue the product to the base of the lamp. In this case, you need to carefully hide the seams, tightly fitting the frame. It is enough to dry the finished lampshade and put it on your lamp.

Cozy evenings with a book in your favorite armchair, soulful tea drinking with your family in the kitchen, romantic dates with your loved ones ... And above all this - the familiar, familiar, traditional lampshade for table lamps, wall lamp or a floor lamp standing on the floor.
Beautiful handmade lampshades become noticeable and irreplaceable interior items. They bring a touch of romance into everyday life and fill home atmosphere warmth and beauty.
The material for making a lampshade for a lamp can be fabric, paper, beads. Having shown imagination and patience, you can transform the old lampshade for the lamp with your own hands beyond recognition. Such an exclusive element will make the interior individual and truly homely.
DIY workshop on making a lampshade for a lamp
A popular material from which to make a lampshade with your own hands is fabric. Linen, silk, jeans, organza - any option.
A whole piece or strips of cloth will do. You can simply cover the frame with a printed fabric, make it monochromatic with embossed flowers from the same fabric.
It is important to understand in advance exactly where your lampshade will "live". A romantic environment requires an appropriate "companion", strict minimalism - another.
Expert advice: As a basis for the lamp, you can take the frame from an old lamp. Making it out of stiff wire yourself is also easy. And lamps should be selected of an energy-saving type - so that the fabric does not catch fire.
How to make beautiful lampshade with your own hands?
- We take a ready-made frame, for example, with a ring diameter at the top of 20 centimeters, at the bottom - thirty-six, twenty-eight centimeters high;
- choose the fabric and cut it into strips, the width of each is four to five centimeters; about twenty-five stripes in total;

- the edges of the ribbons should be even;

- iron them well with an iron;
- we wrap the upper ring with one edge of the tape and sew it by hand;

- now we lead it down and wrap the lower ring, and again the upper one;
- when the strip ends, we fix its edge by sewing to the fabric;

- take a new tape and continue;
- when the whole frame is wrapped, we sew "belts" for the edges;
- to do this, we take two strips of matter of a different shade and cut out two strips from it, the length of each is thirteen centimeters, the width is ten;

- we iron the tapes, bending the longitudinal edges by 2.5 centimeters to the wrong side;

- then we bend the strip in half;
- we glue double-sided tape on the hoops of the frame;

- we glue a strip of fabric on it, along the way slightly cutting its edge so that the fabric lies as evenly as possible;
- bend the second edge of the tape on inner surface the case and also glue it with tape;
- thus we decorate the top and bottom of the frame with "belts".
You can use crocheted tape or ruffle to trim.
DIY lamp shade made of plastic and fabric
The second homemade lampshade is also made of fabric. You can make it on the basis of an old lampshade. Or you can transform a typical product bought in a store:

DIY lamp shade. Photo
- the first step is to measure the circumference of the upper and lower rings, as well as the height of the frame;
- add two centimeters to the resulting dimensions from each edge so that the seams can be made;

DIY lamp shade. Master Class
- we take a sheet of thin plastic and cut out a rectangle or trapezoid from it - the base on which the homemade lampshade will be held;

How to make a lampshade with your own hands. Step by step photo
- we cut out the fabric to size, with the help of masking tape we glue it to the table;

- we glue the fabric on the plastic;

Master class - DIY lampshade. Photo
- we bend around the frame of the lampshade with the obtained part and fasten its edge with clamps;

- mark on the fabric the place where the seam will pass;

- remove the paper clips and glue them along the marked line with glue; press the joint with something heavy and let it dry;

Homemade lamp shade. Photo
- then we turn the lampshade over with our own hands and also glue it inside;

- now you can glue the body connection with the rings;

- when everything is well fixed, remove the clamps;

- decorate the bottom and top of the lampshade using a paper tape; we glue it so that one edge goes beyond the ring;

- bend the free edge inside the case and glue it;


- fold a strip of fabric of a different color to the height of the lampshade and a width of five centimeters in half, fold the edges inward, iron;

- we apply glue to the inner surface of the tape and glue it;

DIY lampshade. Step by step photo
- glue the strip to the seam on the lampshade;
- cut out two ribbons from paper of the same width as the finished strip for the seam; then we glue it to the upper and lower edges of the lampshade; fix with clamps; glue a strip of fabric on top of the paper.
Homemade lampshade is ready.
DIY lampshade making ideas with photos
Such a "floral" lampshade will perfectly complement a romantic interior.

A little imagination - and a bouquet with variegated roses is ready.

Delicate tones create a romantic mood.

"Ruffle" of white roses is the perfect complement to the strict, simple design.

This wonderful lampshade brings back memories of grandma's napkins.

These origami lamps will look good in a minimalist interior.

Another representative of the ancient Japanese art of creating masterpieces from paper.

Light green-blue strokes will perfectly fit into the design of green tones.


Beautiful lampshade from postcards or castle pictures
 You will get a beautiful and original lampshade. We need a picture with locks, scissors, tape, a cutter and a small lamp (lamp).


