Floriculture has gained widespread popularity. Owners of private houses are trying to equip a beautiful area in the garden, creating great mood... The landlords of the apartments arrange entire mini-greenhouses. But no plant lover can do without a flower pot. Such a part can be easily purchased at the store. However, it is more interesting to make flower pots with your own hands. After all, such an item will not only emphasize your individuality, but also become a real work of art.
Cloth decoration
If you are tired of boring old flowerpots, do not rush to throw them away. Can be beautifully decorated This is a very simple method that allows you to turn an ordinary container into an original piece of furniture.
For decoration you will need:
- beautiful fabric;
- old pot;
- glue (PVA can be used);
- scissors;
- centimeter;
- hard brush.
Now let's look at step by step how to create such flower pots do it yourself:
- Measure the pot with a centimeter. Cut the appropriate blank from a piece of fabric. At the same time, add 10 cm to the hem of the fabric (top and bottom).
- Apply a thick layer of glue to the surface of the pot.
- Cover the container with a cloth. Smooth wrinkles very carefully.
- At the bottom, make cuts to the surface of the pot. Glue each piece to the base.
- Do the same with the rest of the upper fabric. Glue them to internal surfaces pot.
- Cover the flowerpot acrylic varnish or a layer of glue. Be sure to let dry.
Painting pots
To perfectly decorate flower pots with your own hands, you need to dream up a little. Original flowerpots can be created using paints. The multi-colored palette is able to harmoniously decorate winter Garden or the interior of the room.
You don't have to be an artist to create a unique masterpiece. For people who cannot draw, you can use the following guidelines:
- If you use masking tape, you can create striped patterns.
- A strawberry pot is easy to make. Paint the surface of the flowerpot with red paint. Make the top ring of the pot green. Apply specks on the red surface. Try to distribute them evenly.
- To apply a drawing or pattern to the pot, use the ready-made pictures. Copy the selected motif onto the surface and only then proceed to staining.
- You can use ready-made stencils.

Decorating with cereals
This is another one uncomplicated method, allowing you to create beautiful flower pots with your own hands.
To create such a decor you will need:
- plastic or ceramic pot;
- a piece of paper;
- pencil;
- carbon copy;
- PVA glue;
- brush;
- dry peas;
- buckwheat;
- small beans;
- lentils;
- grains of poppy;
- rice groats;
- flax seed.
It will help you understand how to create such flower pots with your own hands, a master class:
- On a piece of paper, draw the sketch you want to transfer to the flowerpot. Multilayer drawings look harmonious.
- Using carbon paper, transfer the sketch to the surface of the pot.
- Apply glue to one of the areas with a brush.
- Sprinkle the surface with the selected grits. Try to keep it completely filled.
- Repeat these steps for all other areas.
- Be sure to let the glue dry. The unique product is ready.
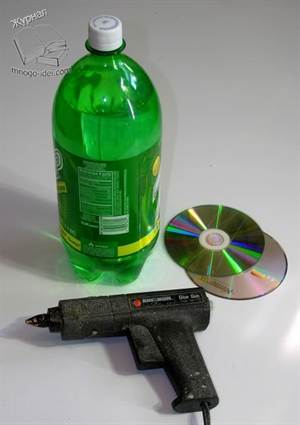
Plastic bottle pot
The ability to make original objects out of ordinary or unnecessary things is a whole art. Such methods are often used to create furniture, decorative ornaments... The creation of a flowerpot is an opportunity to bring original ideas to life.
Modern craftsmen offer to create flower pots with their own hands from bottles. An ordinary plastic flask in talented hands can become a real masterpiece. The resulting flowerpot will be a wonderful interior decoration and your pride.
So, let's take a look at how to create flower pots from plastic bottles do it yourself.
Initially, you should stock the necessary tools and blanks. This:
- plastic bottle;
- scissors;
- disk;
- glue.

Now you can go to work:
- Use a sharp knife to cut the bottle in two. The cut can be left straight. However, the top, decorated with a wavy line, will give originality to the flowerpot. An excellent solution would be to make flower “petals” from the upper edge. To do this, carefully mark the surface, make cuts and bend the resulting pieces.
- Use a glue gun to glue the bottle cap to the surface of the CD.
- Paint the resulting structure in the form of a glass with acrylic paint.
As you can see, it is not at all difficult to create such flower pots from plastic bottles with your own hands.
Tin can - the basis of the flowerpot
Such material can be found in every home. You can use paint cans, canning cans. Beautiful flower pots are made of them by hand. The photo allows you to get acquainted with interesting solutions.
Tall jars that used to contain pineapples or other fruits are great flowerpots. They need to be stripped of labels, washed well, and can be used for planting. The silvery surface will harmoniously fit into the interior, made in the style of minimalism, hi-tech.
If this decor is not suitable for your design, then the surface of the cans can be painted. And if you wish, you can depict any drawing on it.

Jars with low sides (after canned fish) can be used as follows:
- Wash the container thoroughly and remove the label.
- Put clothespins on the sides of the jar, tightly combining them.
- The wooden surface can be varnished, painted with paints.
Plank pot
Using corrugated or thick cardboard, you can create a wide variety of flowerpots. They can be round, elongated. You can make flower pots with your own hands in a diamond-shaped or square configuration.
The main thing is to decorate them stylishly. A small flowerpot can be decorated with small thin sticks. To do this, apply glue to the surface of the cardboard. Then start glueing the sticks, aligning them tightly.
Complete the decor with ribbons, burlap pieces and other details of your choice. Such a flowerpot looks not only original, but also stylish.
A good solution is to use pencils instead of dry sticks. Such a flowerpot will become an irreplaceable attribute of a creative workshop.
Mini potted garden
An amazing solution will allow you to create a small "landscape" design in the flowerpot. Such original design flower pots do it yourself will not leave anyone indifferent.
To create you need:
- large flowerpot;
- clay for modeling;
- thin wooden plank;
- cardboard;
- toothpick;
- the reel left after the scotch tape;
- wooden sticks;
- toothpick.

Progress:
- Draw your mini garden design on a piece of paper.
- Use clay to make garden paths. To give them curves, use a stencil made from a sketch. Use a toothpick to draw lines that simulate tiled masonry.
- Use a wooden plank for the bench. It is necessary to cut 4 planks from it (2 - for the seat, 2 - will be the back). Also make the side pieces out of clay.
- Use a reel for the well. It must be decorated with planks. WITH inside glue two long sticks. Place the corner roof on them.
- A wattle can be crafted from a vine. Stick in some twigs. Weave others in between. Make a small pot out of clay (you can use your little finger).
- It remains to plant original plants... And the mini-garden is ready.
Original "little men"
There are many variety of options allowing you to decorate the garden. You can come up with a variety of flowerpots. By creating flower pots with your own hands for the garden in the form of "men", you will make a real highlight of your landscape.
For the manufacture of decor you will need:
- flower pots (plastic) of various sizes;
- wire;
- gouache;
- gouache brushes;
- cups for coffee;
- leg-split.
Now let's get down to creativity. A master class will greatly help those who decide to make flower pots with their own hands:
- Choose the two most large flowerpots... Connect them with bases. Pull the wire through the holes and clamp it. These will be the head and torso of the future man.
- Plastic cups will become hands. They are attached to the body with wire or glued.
- To make the little man legs, use twine or other twine. To do this, you need to weave two pigtails.
- Make cuts on the sides of the pot that serves as the body with a knife. They are threaded with woven legs.
- Small plastic pots are put on pigtails. To do this, a hole is made in such vases in the middle. The pot-man is ready.
- Now it remains to connect your imagination and take up the brush. Draw the man's face and clothes.
- After the gouache dries, be sure to cover everything with varnish, otherwise the paints will leak.
- The hair of the man will be the plants planted in the upper pot.

Stylish decor
A good example of how to make flower pots with your own hands from scrap materials is the following masterpiece.
You will need:
- containers (pots, small buckets);
- glue;
- packing tape;
- nylon tights;
- brush;
- silver paint.
Progress:
- Degrease the surfaces of the containers. You can use dish detergent.
- Open the future flowerpots with a layer of glue.
- Wrap the first pot in random order with packing tape.
- For design work on the second flowerpot, cut the tights into thin strips. Lay out various patterns on the surface of the pot.
- Be sure to let the pots dry. A flowerpot decorated with patterns (from tights) must be re-coated with glue.
- Once dry, spray them with silver paint.
Original ideas
If you take a close look around, fantasize a little, then great solutions will come to your mind by themselves.
Several design ideas:
- Old shoes can make great flowerpots. Rubber boots or sneakers look original. This decor is used to decorate a summer cottage, garden. In an apartment, it is not entirely appropriate.
- Fancy flowerpots can be made from old bags. This decor will look great on the fence, creating an amazing atmosphere.
- An unusual plant pot can be created from a teapot. Such a surface does not even need to be decorated. But if your soul strives for creativity, then after degreasing you can paint it with acrylic paint. And then - embody your fantasies. Decorate with any items: beads, twine, buttons, shells, pebbles.
- A flowerpot can be made from an old vinyl record. When heated, they easily change shape. Take advantage of this property to add exclusive lines to your flowerpot.

Conclusion
Making flower pots can be a real treat. After all, interesting, original and unique things will be born in your hands. They will give your apartment or garden individuality and spontaneity.
With this simple step by step instructions in just 10-15 minutes you can make a charming flower pot from a plastic bottle with your own hands. We will tell you how to turn an ordinary and already spent bottle into a cute little cat. The craft is so simple and straightforward that even small children can handle it.
Such flower pot will fit well both in the country house and in home interior... If you have children, let the flower in the "cat" stand in the child's room, especially if he makes this pot with his own hands. True, in the process of creating crafts, you must strictly follow safety precautions: cut the bottles yourself, do not trust the child, but you need to paint them in rubber gloves, preferably in a gauze bandage to cover the airways (for adults, fresh acrylic paints are almost completely do not affect).
What do we need?
- clear plastic bottles
- acrylic paints (can be in a spray can)
- permanent marker
- craft varnish (non-toxic)
- priming
- plant
Plastic bottles don't have to be big. If, for example, you decide to plant a cactus in a pot, you can even take a 0.5 liter bottle. For large flowers bottles from 2 liters are more suitable.

How to make a pot?
Trim the bottles so that they form two cat ears in front and a tail in the back. If the edges are too sharp, you can gently melt them with a candle or lighter. Keep the bottle 2 to 3 cm away from the fire with the edge facing towards it. Observe precautions!

We paint future flower pots both from the outside and from the inside. Acrylic lays down on the plastic evenly, so there should be no problems. Since we paint from the inside too, the craft will not turn out pale - you do not need to apply an additional layer. If you have paint in cans, use them, the scheme will be the same.

Draw the eyes and ears on the bottle using a permanent marker. If you don't have one, use a different color of acrylic and a thin brush.
Leave the cats to dry for a day. If you wish, you can coat the flower pot with a non-toxic, water-repellent varnish (if your acrylic is already water-repellent, you do not need to do this).
It remains to fill in the soil (this important point, since we need to make the plastic pots stable). Then you can add earth or plant a flower directly in the ground - it depends on the plant itself, on its needs.

Gardeners and indoor plant lovers should definitely know how to make do-it-yourself flower pots. Tubs and pots will transform the interior and give a "zest" to each plant. Plus, homemade pots can help you save money and get rid of unnecessary items and materials.
Decorative pots give great opportunities for creativity. They can be painted, decorated with decoupage, ribbons, fabric, accessories, made from different material and give the most unusual shape.
We do it ourselves
It is not difficult to think of what the pots can be made of.
Any material is suitable for flower pots, including waste material, which does not allow moisture to pass through and holds its shape well.
Undoubtedly, the most beautiful and comfortable pots are ceramic. If it is possible to make a pot on potter's wheel, then you need to boldly use it. Clay - optimal material for disembarking pets and ornamental plants... It retains moisture and allows air to pass through, does not overheat and keeps its shape well.

If it is not possible to make a pot yourself, then you can purchase a ready-made one and come up with what and how to decorate it. There are many ideas for decorating pots. It is not necessary to paint the pot with paints, you can dream up and come up with the most unusual "outfits" for it.

Thrifty gardeners can save money on a ceramic pot and make it from materials at hand. The simplest pots and tubs are made from plastic bottles. It is enough just to cut off the upper part, fill in the earth and start planting the plant. However, you can fantasize a little and make graceful flower pots from such an unsympathetic material as plastic.


For the manufacture of two options for pots you will need the following materials and tools:
- a bottle with a volume of 1.5-2 liters;
- CD-ROM;
- glue gun;
- stationery knife;
- marker;
- hole puncher;
- spray paint.
Progress:
- Draw a wavy line in a circle approximately in the middle of the bottle (you can straight) and carefully cut the bottle into two parts along it (you get two blanks for pots);

- Glue the part with the neck to the middle of the disc (before that, tighten the lid tightly);

- When the glue sets, turn the workpiece over and drip a little glue around the edges for stability;

- Use a hole punch to make holes along the wavy edges;
- Spray the resulting pots and wait until they dry completely.

The pots are ready! Plants can be planted.


To keep the edges of the cut bottle straight and smooth, they can be trimmed with a soldering iron. You can also give the edges an original shape with a soldering iron.
Hanging pots are also easy to craft from bottles. The simplest model is hung from two sides - by the bottom and the neck. One side of the bottle must be cut lengthwise, and two holes through the sides must be made with an awl or a soldering iron so that you can hang the bottle-pot.

Plants can be directly planted in such pots, or they can be used as pots. If desired, paint the outside with acrylic paint.
More interesting models are cats. To make them you will need:
- bottles with a raised bottom;
- marker;
- spray paint;
- stationery knife;
- soldering iron or awl;
- ropes or pieces of strong fishing line (4 pcs.);
- sample.
- Cut off the bottom of the bottle;
- Draw ears and cut out by hand or according to a template;


- Paint the blank from a spray can and wait until it dries completely;

- Make a muzzle with a marker: draw eyes, ears, mustache, nose;
- To hang the pot, you need to make holes on four sides and thread ropes or lines through them.

Ready! You can plant a plant.

Instead of cats, you can make other animals, for example, a bunny or a bear.

The original pots are easily made using cans and clothespins. To do this, follow these steps:
- Peel off the label and wash tin can, dry;

- Attach ordinary wooden clothespins to the wall of the can tightly.


The result is a small pot that resembles a traditional tub. You can paint the clothespins if you want. acrylic paints, and so that they retain their original appearance longer, cover them with varnish.


Eco-friendly pots and flowerpots can be made from wood. They will decorate both the apartment and Vacation home... Wood is a cheap material that lends itself well to processing. However, it is worth remembering that when making a wooden pot, the hygroscopicity of the wood should be taken into account. In order for the tub not to start to rot or deteriorate from moisture, it must be treated in a special way - soaked in moisture-protective agents, covered with stain, varnish or other means.

The easiest way is to assemble a pot from ready-made wooden beams securing them with glue or nails.


Unusual outdoor wooden tubs and flowerpots for suburban area can be made directly from a piece of log. This requires:
- a log or stump of a sufficiently large diameter;
- drill with drill length up to 25 cm and diameter - 20 mm;
- chisel;
- file and skin for aligning the walls of the pot;
- impregnation for wood from moisture and decay;
- polyethylene.
Various little things and crafts help to emphasize the features of the interior and significantly diversify it. DIY flower pots made from plastic bottles - bright to example. The presence of various indoor plants and flowers in the house makes it more comfortable. In addition, plants, in addition to their aesthetic appeal, also contribute to the production of oxygen, purify the air, refreshing the apartment. The decorative component, which is achieved by placing a variety of plants throughout the house, is also very important. One of the factors contributing to the development individual style, is a flower pot. At the same time, those products that are made on their own carry a special shine and brightness.
Beautiful flowers and laconic houseplants have excellent external characteristics. However, such beauty is in most cases planted in faceless and angular store-bought pots. Unfortunately, modern market brings to our attention not a very large selection of flower pots. The same products that are in stock do not differ in special decorative qualities besides, they are not very good in terms of durability either.
As a rule, similar products are made of plastic or they are based on ceramics. Moreover, their appearance rather monotonous and does not stand out with special colors. There are, of course, high quality original products that differ decorative design and increased strength characteristics. But the disadvantage of such products is their high price, but it is this factor that becomes decisive and makes you think about the expediency of the purchase.
Consumers have to either use the faded containers that the modern market provides us, or experiment and make flower pots with their own hands. Why not try yourself as a creator? After all, this will not only allow you to get colorful and bright products, but also significantly save your family budget.
Making flower pots yourself is not that difficult. The main criterion for their creation is the presence creativity and the desire to make your own fantasy come true. The resulting specimens will significantly stand out against the background of traditional products, outperforming them in almost all criteria - from the decorative component to the strength characteristics.
DIY flower pots from plastic bottles can be considered one of the most striking examples of such works. It is they who make it possible to get wonderful colorful and practical products, as well as significantly save material resources.
Materials and stages of work
Plastic bottles are the raw material that can be found in every household. Modern food industry focused on the use of plastic containers. Based on this, each of us receives at least one empty bottle every month. At the same time, making a flower pot out of it is a wonderful solution.

A self-made hanging flower pot is a magnificent product that can not only dilute the existing interior, but also give it a zest. Moreover, such a sample can be made in just a few minutes. So, to create such a piece of furniture, you will need the following set of tools and materials:
- plastic bottle 2 l;
- rope, cable or line;
- scissors;
- roulette;
- knife or awl.
First we take plastic container and we wash it well, since the remnants of old liquids can not only worsen the appearance decorative element but also harm the plants that will be placed in it. After that, you need to tighten the cork tightly, put the bottle horizontally and use scissors to cut a rectangular hole on its upper side, into which the plant will be placed.
The next step in making an impromptu flower pot is to create drainage system... It has a simple structure and consists of only a few holes that need to be made at the bottom of the bottle. To accomplish this task, you can use a knife or awl. At the same time, the number and diameter of the holes should not violate the integrity of the container, therefore they are made at different ends of it.
The suspended structure also has a simple design. It consists of a rope mechanism that fixes the bottle and prevents it from falling to the floor. To create it, you need to make several additional holes into which the rope will be threaded. At the same time, large knots must be tied at its lower ends - it is on them that the entire structure will be held.

The flower pot is ready. Now you can fill it with earth and plant the plants. It is possible to arrange such objects in any order both on the surface of the wall, and separately. Any of these options can significantly diversify almost any interior and refresh it a little.
Planters from a plastic eggplant
Garden pots made from plastic bottles can update the design and make it more personal. However, there are other techniques for decorating flower pots. One of them is the use of an impromptu pots designed to hide appearance not very attractive pots. Sometimes transplant a growing flower into new pot can be problematic or simply impossible. A way out of this situation is a pots, which can also be made from plastic containers. To create it, you will need the following set of tools and materials:
- plastic bottle;
- scissors;
- roulette;
- garden hose;
Making a planter from a plastic container is a simple task that can be completed in a short period of time. The procedure for making such an object begins with choosing the diameter of the bottle, which will serve as the basis for the planter. It follows from the size of the plant itself, but, as a rule, to fully accommodate the flower, it is enough to use a 5-liter eggplant. Therefore, we will take it as a basis. It is necessary to rinse the plastic container and cut it carefully. In this case, the size of the plant that will be placed in it should be taken into account. In most cases, 2/3 of the bottle is trimmed and the rest is used to make planters.
The difference between such a product and an ordinary pot is that there are no drainage holes in it. Therefore, the plastic base itself is ideal for creating planters. However, when trimming the plastic, its edge comes out too sharp and not very beautiful. To give it an external aesthetics, you can use an ordinary garden hose, which will hide all the irregularities.
The plastic base itself is not very colorful. However, it is easy to process and decorate. To create brightness and visual appeal, you can use paints and paint the surface of the pots as you wish.
Using plastic bottles to create flower pots is a great solution, allowing not only to significantly save material resources, but also to get bright and colorful products that will stand out favorably against the background of faceless and angular factory ones.
The idea of \ u200b \ u200bcreating a flower pot from plastic bottle cannot be called new. However, I have not yet met the named craft in such a performance. In fact, the container was originally intended for planting onions, which in the spring, while still in the refrigerator, begins to actively sprout.
Ordinary cups or boxes adorn the windowsill a little, if not to say that they absolutely spoil its appearance. Last year, my family members successfully planted onions in pots where flowers grew. The plants turned out to be quite friendly neighbors. The flowers did not react in any way to the appearance of the onions, and the uninvited guest, in turn, pleased the hostess with lush greenery.
This year, in order not to embarrass indoor flowers, I decided to make several flower pots from plastic bottles. Here is the result of one of the works.
For used:
- brown and white plastic bottle
- ready-made eyes for toys
- scissors
- pliers
- the fire
- pink nail polish
- glue for plastic, glass or wood parts.

First, cut the brown bottle in half to obtain a glass of the required height. Further from the upper part with the neck, cut out the lion cub's head in the form of an irregular oval. Initially, the shape of the bottle contributes to the fact that our head will turn out to be convex.
We cut the edges of the oval into thin strips up to 1 cm long. This way we imitate animal hair. We bring the ends of the stripes to the flame gas burner, matches or candles for a few seconds. The plastic melts and takes on slight bends. The base for the head of the craft is ready.


Go back to the top of the bottle with a neck and cut out the face of a lion cub from it in the form of a figure eight. This detail also turns out to be convex. Traditionally, we will melt the edges of the muzzle over the burner flame.

We cut out rings from white plastic, from them we make two strips. Then, with scissors, we cut through the strips along the length, leaving about 0.5 cm intact from the opposite edge. We melt the details over the fire, we get a fluffy mustache.


Then we cut out a drop from the remnants of white plastic and paint it in pink color... This is the language of the animal.

It remains to arrange the lion's tail. To do this, we bend half or even 2/3 of the brown ring cut from a plastic bottle in several places, and burn the tops of the bends with fire. Due to the deformation of the plastic, we get the curve we need.

To decorate the tail brush, cut one side of the rectangular plastic into thin strips, then roll the rectangle into a tube and burn both ends of the "brush" over the fire. The stripes will curl up and become curly. Next, we will attach the tail itself to the rounded base of the brush.


At the last stage, we put the parts together. First, we glue the lion's head, then the muzzle, and attach the mustache, nose and mouth to the muzzle. We glue the eyes over the cheeks, and the tail from the back.
