Lucky day has come and you have purchased a DSLR. There is a lot of inspiration and plans, but only the power button is familiar. In fact, the camera is quite amenable to training and anyone can handle it. If you plan to shoot a little more than your friends for avatars, then all roads are open for you to study. The article will help you understand the terminology and embark on a creative voyage.
The first steps
DSLR Photography Basics
We start with simple explanations about capturing your new camera. The right hand should rest on the grip, and the left one underneath, as if supporting the lens. The position of the hand on the lens allows you to quickly change the zoom in case you are using a lens with a variable focal length. Forefinger the right hand rests on the release button.
How to set up a DSLR camera
For simplicity, we will use the 3-whale theory. Only we will not put the planet Earth on them, but a photograph. For a good shot, you need to be able to use each of the "whales". Let me introduce you! Whale number one is the diaphragm. Keith number two - excerpt. Kit number three - ISO. And now, in turn, about each.
Diaphragm
Know that photography is a drawing with light. And this light enters the camera matrix through a hole called the aperture (F). You can adjust its size. Possible options from F-1.2 to F-22 (sometimes higher). The following pattern works: the smaller the F number, the bigger hole... It is clear that at F-2.8, the aperture will be larger than at F-8, which means there will be more light too. Practical method it is necessary to set the desired aperture value for a high-quality frame without overexposure... You need to set the aperture so that the right amount of light gets into the camera.

Excerpt
Another tool in light control. Shutter speed (t) is the time that the aperture is open. It's simple. The longer the hole is open, the more light hits the matrix. Therefore, the lighter the frame is.
ISO
These three letters represent the sensitivity of your camera's sensor. Photosensitivity - the ability of a matrix to change its parameters under the influence of light. The ISO value can fluctuate from 100 to 6400. If you set the ISO to 400, then in this case the matrix will receive less light than in an equal period of time, but at a value of 1600. It would seem that there is nothing to puzzle about - set the ISO more, but shoot yourself to health. Oh, if everything were so simple ... Only now, if you strongly "lift" the level of light sensitivity, noise (graininess) will appear in the photo, and if this gave a film photo a certain charm, then on the "digital" - there is nothing particularly aesthetic ... On modern cameras, you can set ISO automatically. At first, you can use this option, but, with the advent of experience, try to set the level of light sensitivity yourself, relying on your own knowledge and intuition. 
Tip: The main thing is to practice a lot by changing these three camera parameters. Then you will understand what and when to switch.
Shooting modes
If you want quality pictures, forget about modes like Portrait, Landscape, Flower and so on. The camera has 4 main modes, and let's talk about them in more detail. Note: Camera manufacturers use different designations. What letter denote a specific mode, the instruction will help you determine. This is a very useful book that was sold to you with the equipment. We advise you to read it. You will find a lot of useful information.
A (Av) Aperture priority mode
Under such conditions, a person sets the aperture value, and the camera independently chooses the shutter speed value.
Aperture is one of the main parameters in settings, it is denoted in the camera by the letter F. This shooting mode is suitable for portraits. You open the aperture as much as possible and get beautiful bokeh (Bokeh is an artistic blur of the background).
S (Tv) Shutter priority mode
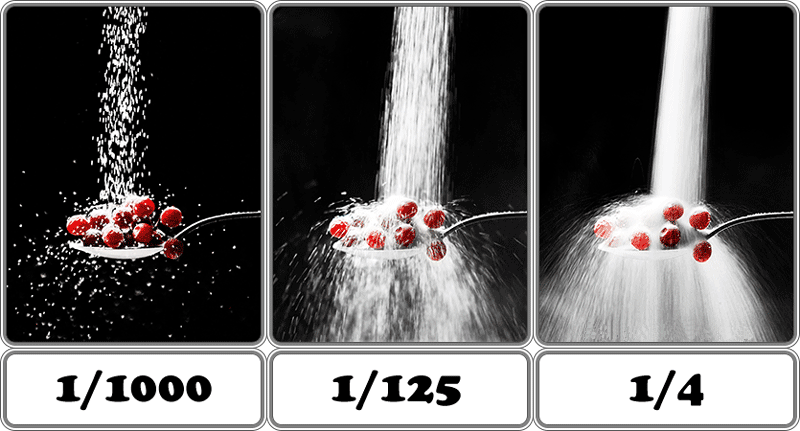
In this case, the photographer sets the shutter speed, and the camera itself chooses the aperture value. We remember that shutter speed is the time for which the aperture is opened in order to let the light flux through. Time is measured in fractions (for example, 1/1000 - 0.001 seconds, 1/100 - 0.01 seconds, 1/10 - 0.1 seconds, and so on). If you want to “freeze” a subject in motion, it is worth setting a fast shutter speed; if, according to an artistic idea, it is necessary to blur an object, for example, water, then increase the time and the moving object will be blurred.
M Manual mode
This is a mode of independence. You choose the parameters of the aperture and shutter speed. Professional photographers shoot only in manual mode, as the camera is not able to fully understand your idea and implement it. But if you've just started your creative way, practice on modes A and S. With experience, go to manual.
And a few more important points that will be useful to you.
Focusing
The quality of photography is important. Correct focus is one indicator. Focus is the sharpest point in the frame. When you look through the viewfinder, you can see the focus points. Their number may vary depending on the model of the camera. When you lightly press the shutter button, one (or several, depending on the settings) point will be highlighted in red. This means that it is at this point in the frame that the focus will be triggered.

It is possible to set focus on several points at once, but we advise you to choose one. We tell you in secret that the central focus point has the most best quality... Always work with her. But what if the subject is on the side, for example? There is an exit. Focus on the center point and, without releasing the shutter button, build the desired composition. That is, even if you take the focus away, but do not release the button, the place where you focused initially will remain sharp.
The lens can focus in automatic and manual modes. It is clear that it is easier to work with automation. If shooting requires taking pictures quickly, then there is no time to direct focus. This, for example, happens in reportage work. When 5 frames are taken per second. But for experiment and in order to get a good feel for your working horse, it is better to be friends with manual focusing. By the way, some cameras only have it. But this is rather an exception.
File type
The photographer can work with two types of files, they are JPEG and RAW.
JPEG is a compressed file type. Such a photo will be ready for printing directly from the camera and its weight is much lighter, unlike RAW.
RAW (raw) is a file type that necessarily requires post-processing in special programs. It contains more information about the photo, so it weighs a lot more.
If you've just picked up a DSLR, it's best to start with JPEGs. Once you practice photography, switch to RAW. All professional photographers shoot only in this format, as it allows you to make more corrections, while not losing image quality.
White balance
This is one of the parameters of the color image temperature transmission method, which determines the correspondence colors Images. The human eye automatically adjusts the white balance, so we perceive the color of an object correctly in any light. It doesn't work that way with a camera. He needs a hint of what type of light you are currently working with. It could be the sun or an incandescent lamp. Then the camera will not lie in the colors.

In a bad way, you just end up with a very yellow or very blue photo, which is not a repeat of reality. At the beginning of your journey as a photographer, you can set this parameter to "auto" mode, but it does not always guess. Therefore, we do not recommend using it all the time, the camera is just a device that can make mistakes and thus spoil your picture.
With a DSLR camera, you open up a lot of new possibilities for creating high-quality photographs. Go pro and don't shoot in automatic modes. This is convenient, but then don't be surprised why you are not happy with the result at all. Why didn't it work out the way you wanted. Once you understand all the settings and learn how to manage them with your eyes closed, things will go uphill.
Then you can think about the artistic side of photography. But it shouldn't take you long to find a mode switch or aperture increase. Risk missing important point... We hope our answers to the question "How to use a DSLR" will be useful to you.
Probably every novice photographer who is seriously keen on his business sooner or later thinks about buying a DSLR. However, one should not think that just purchasing a DSLR is enough to start creating masterpieces.
Of course, most DSLRs come with pretty good automatic settings that allow you to take pretty decent amateur shots - but it's much more enjoyable to use the capabilities of your camera to the maximum. And he, believe me, can do a lot - you just need to learn how to use it correctly.
So let's start a conversation about how to properly photograph with a DSLR.
Focus and depth of field
Surely, looking at the work of professional photographers on the Internet or in magazines, you noticed the difference in sharpness between the foreground and background. The main subject appears sharp and clear, while the background is blurred.
It is almost impossible to achieve such an effect with an amateur camera, and this is due to the smaller matrix size. The sharpness of such images is evenly distributed across the entire screen, that is, all the details have approximately the same clarity.
This is not always a bad thing and is great for landscapes or architectural subjects, but when creating portraits, a well-defined background will distract from the main subject, and the whole photo will look flat.
SLR camera enjoying large size matrix, allows you to adjust the depth of field.
Depth of field (DOF)- the range between the front and rear boundaries of the sharp area in the photograph, that is, exactly that part of the image that the photographer highlights in the photograph.
What influences the depth of field and how to learn how to manage it? One such factor is focal length... Focusing - aiming the lens at the object, providing it with maximum sharpness. DSLR cameras have several focusing modes, from which you have to choose the most suitable for your specific shooting conditions. Let's consider each one separately.
- Single autofocus – the most popular and convenient mode in static conditions, in which focusing is carried out, as mentioned above, by half-pressing the shutter button. Its undoubted advantage is the ability, without lifting your finger from the button, to change the position of the camera at your discretion. The subject you selected remains in focus. The disadvantage of this mode is the delay, which creates the need to re-focus on the subject each time.
- Continuous autofocus – a mode suitable for shooting moving subjects. The focus moves at the same time as the subject, and you do not need to re-focus it every time. Of course, this mode has a number of errors: due to the change in speed and distance, the camera does not always manage to focus in the right way, and not every frame will be successful. However, the chances of getting at least a few good shots are also quite high.
- Mixed autofocus – a combination of the first two options. When activated, the camera shoots in the first mode exactly until the object starts to move, and then it will automatically switch to the second. This shooting mode is well suited for beginners as the camera takes over focusing problems by allowing the photographer to focus on composition and other factors.
Learn how to get rid of the first steps in your career and your path will be easier.
Try to always develop and improve. In addition to practice, theory will also be useful: a large selection of photo sites for photographers.
For high-quality portrait work, you need good light... You can find out how to make a softbox with your own hands at this address:
Shutter speed and aperture

The second factor affecting the depth of field is aperture value.
The diaphragm adjusts the amount of sunlight transmitted to the lens by opening and closing the shutters of the lens aperture. The more the sash is open, the correspondingly more light it lets through. It is with its help that you can distribute the sharpness in the picture and achieve the creative effect you need.
It is necessary to remember a simple relationship:
the smaller the aperture, the greater the DOF.
If the aperture is closed, the sharpness is evenly distributed throughout the frame. An open aperture just makes it possible to blur the background or other not so significant objects, leaving sharp only what you want to focus on your camera.
Excerpt- the period of time during which the shutter is open. Thus, the duration of this interval depends on the number of light rays that have sung to pass inside. Of course, this affects the look of your shot in the most direct way. The slower the shutter speed, the more “blurred” objects will be. A short exposure, on the other hand, makes them static.
In stable lighting, shutter speed and aperture are directly proportional to each other: the more open the aperture, the faster the shutter speed - and vice versa. Why this is so is not difficult to guess. Both affect the amount of light required for your shot. If the aperture is wide open, the amount of light is already sufficient and a slow shutter speed is not required.
Light sensitivity

Light sensitivity (ISO)- the sensitivity of the matrix to light during the opening of the diaphragm.
The ISO value also does not have to be set yourself - you can use the automatic mode, in which the camera will select it itself. But in order to understand what sensitivity is and what it affects, it is still better to take at least a few frames, raising and lowering the ISO and comparing the results.
Its high or maximum value allows you to take pictures in low light conditions, thus providing an alternative to flash. This is the ideal solution for you in situations where flash photography is prohibited - for example, at concerts or other official events.
Also, ISO will help you out in a situation where wide open apertures and slow shutter speeds result in an image that is too dark. But as you experiment with ISO, you will quickly notice that increasing its value increases the amount of noise in the frame as well. This is an inevitable effect, but it can be smoothed out, for example, with the help of graphic editors.
Shooting modes
The SLR camera has a wide range of shooting modes, which can be roughly subdivided into manual and automatic. The latter roughly correspond to similar modes on an amateur camera: they are named "Sports", "Landscape", "Night portrait", etc.
When you select this mode, the camera automatically selects the settings necessary for the given conditions, and you no longer need to worry about anything. This is quite convenient, and photos taken in these modes can be quite successful. And yet, if you set up a DSLR camera for manual settings, then you are provided with creative scope, and a person planning to take photographs seriously needs to be familiar with them.
So what are the manual shooting modes are at our disposal?
- P (programmed)- a mode similar to AUTO, but leaving more room for independent actions. Using it, you can independently change the ISO and white balance, as well as correct the shutter speed and aperture automatically set by the camera. All other settings, as well as in automatic mode, will be selected by the caring camera itself.
- Av (aperture)- a mode that allows you to set the aperture value at your discretion, without worrying about the shutter speed - the camera will select it on its own. Great for portraits and other depth-of-field experiments.
- S (shutter)- in contrast to the previous option, this is the shutter priority mode. As you might guess, the camera will automatically set the aperture in this case. Suitable for shooting moving and dynamic subjects.
- M (manual)- a truly manual mode, in which the camera no longer interferes at all. Here all the settings: aperture, shutter speed, and ISO are at your discretion. With this mode, you can give yourself absolute creative freedom and try the most different combinations v unusual conditions shooting. Of course, it is worth using this mode already when you really understand the settings of your camera and approach the matter with knowledge.
In everyday, natural shots best and easiest to use Av mode... It is the most convenient for controlling depth of field and allows you to completely surrender to the artistic process of creating the best composition.
Flash

Built-in flash- a faithful assistant when shooting in low light conditions. But she, like other capabilities of a DSLR, needs to be used wisely. If handled incorrectly, the chances of ruining the frame is high, by exposing it. Here are some tips to help you avoid this:
- Use manual flash output control, the value of which can be reduced when taking too light frames.
- Try it switch the camera to automatic mode "Night shooting"... In contrast to AUTO, this mode softens the flash, and the light diffuses slightly around the subject, not being fixed only on it.
- Experiment with light scattering(we wrote here how to do it). To do this, you can use white cloth, paper, or any other material that will need to be fixed before the flash. But you should not use materials painted in other colors for this purpose - they can give the skin the wrong shade and, in general, have a bad effect on the picture.
- Use your camera modes discussed above - ISO, aperture and shutter speed. Having tried different variants, you will be able to find exactly the one in which your pictures will turn out to be successful.
White balance

The matrix of a camera is more sensitive than the human eye and is sensitive to color temperature. You have probably seen pictures with strange lighting effects: faces on them may turn out to be blue, green, orange. This often happens when shooting indoors with incandescent lighting. Setting the white balance on your camera will help fix the situation.
Sure take advantage of automatic tuning(AWB), but then there will still be a risk of error. The best way is to "tell" the camera what color is white, which can be done using manual mode (MWB). First, you need to select manual white balance in the menu of your camera.
After that, it is enough to take any white object, for example, a sheet of paper, photograph it, and fix the color as correct. The algorithm may differ depending on the model of your camera, but if difficulties arise, the instructions will help you out.
Choose a DSLR to start
When choosing photographic equipment for a start, a beginner photographer should know about some important details, which you should definitely pay attention to when choosing SLR cameras. It is clear that you should not start working on expensive equipment. And not only because of the high price, first of all, and because, without knowing the basics, mastering the functions of a "fancy" camera will not only be difficult, but often impossible. Inexpensive cameras have a lot of tips, automatic modes, which are simply necessary at the start.
You should especially understand the resolution of the matrix. These are exactly the pixels that are indicated in the main characteristics and on the camera body. But at the same time, remember that for beginners it is better to choose a "DSLR" with crop matrices.
If you're serious about getting into photography, opt for a manual technique. In the future, this technique will give you good experience and chance great opportunities in this area of activity. And it is better to choose the camera itself from the list of the most recommended SLR models for beginners, which are produced by well-known world manufacturers. Do not neglect to turn to those who are familiar with photography equipment for a long time and will help you in choosing the right camera to start.
If the abundance of difficult terms did not scare you, and you are still enthusiastic, ready to work and improve, go ahead! Several simple tips will help you on your creative path:
- In order to learn how to professionally photograph with a DSLR, constant practice is necessary... Try to take your camera with you wherever you go, and do not miss the opportunity to get a good shot. Develop your artistic thinking! As a photographer, you need to be able to build the desired composition mentally, to cut off interesting shots from ordinary ones, to be able to notice what another would not pay attention to.
- Explore the modes of your camera, try different combinations. Do not be afraid to squat, take different positions in search of the best angle. This will greatly increase your chances of getting the desired result!
- Draw conclusions based on the finished material. Take note of your mistakes - you can even create a special notebook for this - and try to avoid them in the future.
- View the work of famous photographers. The more time you spend on this, the more ideas you will get and make the right conclusions. In the initial stages, there is nothing wrong with imitating someone from the professionals and copying their work. Over time, you will certainly develop your own style, but at first you should not neglect other people's experience.
- Read relevant literature, watch video tutorials, attend courses, communicate with professional photographers. You need to be fluent in the technical side of the photography process, this will play into your hands. You yourself will not notice how you will become much more confident in handling the camera.
A DSLR is your ticket to the world of professional photography. By working, experimenting, acquiring additional technology - such as lenses and flashes - you can achieve the most amazing results. We hope you find this information on how to use your DSLR useful.
Get the most out of your camera, and let him become your reliable friend and assistant in the implementation of your ideas!
Once you got your first professional camera, it seems to you that now you can do everything, and ... start taking pictures in auto mode, sincerely not understanding why the professionals look at you with a smirk.
The thing is that the automatic mode, or as it is also called the "green zone", is one of the top things in the rating of contempt of professional photographers (after the whale lens, of course). It is considered the "fate of dummies", a label that turns all photographs into bad taste, no matter how talented they are. And that is why knowledgeable people, buying a camera for themselves, first of all scroll the mode wheel away from the "green zone". Of course, you shouldn't indulge the majority, and if you enjoy shooting in automatic mode, shoot as long as it is enjoyable. But if you look at it from the other side, in the auto mode there are a considerable number of disadvantages, when photographing in manual mode will give you more both for taking great pictures and for professional growth. Cons of the "green zone":
- Lack of RAW in Canon cameras.
- There is often no way to correct the exposure.
- The depth of field cannot be controlled.
- In general, all the levers, buttons and knobs become completely useless, the camera simply does not work out the money you paid for it.
But if you are just getting started with the art of photography, then it will be useful to start with auto mode. And after you learn how to compose the frame, you can climb into the settings.
Manual camera setup: basic modes
- P- program mode. This mode is almost automatic, since the camera selects the exposure couple (aperture value and shutter speed) on its own. You can only adjust the less important parameters, such as: sensitivity, jpeg settings, white balance, etc.
- A or Av- aperture priority. Here you can set the aperture value, and the camera itself selects the optimal shutter speed for it according to the data of the exposure meter built into it. This is the most commonly used mode for photographers as it allows full control over the depth of field.
- S or TV- shutter priority mode. Here you set the shutter speed you think is appropriate, and the camera sets the aperture value. This mode is rather limited and is usually used when photographing various sports events, when it is important for the photographer to capture an interesting moment, and the study of the background fades into the background.
- M- fully manual camera mode. Usually only those who are well versed in photography use it. All the necessary parameters are set manually, various restrictions are lifted, and you can set absolutely any aperture and shutter speed at any ISO value. Also, the flash in manual mode can be used by the photographer at his discretion. Random use of the flash allows you to achieve various artistic effects in your images. In addition, in this mode you will be able to take deliberately overexposed or underexposed photographs, shoot with lenses that were not originally intended for this camera, etc. Using the M mode requires a thorough knowledge of the basics of photography from the user.
Setting the manual mode in the camera: M mode for different types of shooting
1. Settings for portrait photography Manual setting DSLR for portrait photography is a science. It's important to consider the lighting and how the light hits your subject's face, so set basic values accordingly. For example, when shooting a portrait indoors with windows that create pleasant natural light, you need to open the aperture to the maximum (for a "whale" it is f3.5-f5.6, and for a fast lens - f1.4-f2.8), then on it you can determine the shutter speed. Exposure, depending on natural light and lens will range from 1/30 to 1/100. And the ISO value is best left at the minimum - 100 units, so that the image does not lose its quality. These settings rarely result in underexposed shots, but if you still get a dark shot, then just turn on the flash and it will be fine. When shooting in cloudy or cloudy weather, there is usually a problem with the exposure of the frame. If you get dark photos, and you did not plan this at all, then increasing the shutter speed to 1/8 - 1/15 will help you, it would also not hurt to increase the photosensitivity (200 - 400 units).

Sunny weather when shooting portraits is also not always on hand. You will have to struggle for shots with minimal shadows! Moreover, having set the aperture and shutter speed values only once, you will never be able to shoot from different angles and points. And therefore, throughout the entire photo session, you have to look through the resulting material every time. If you happen to overexpose the frame, then we advise you to lower the ISO value, make the shutter speed a little faster (approximately 1/800 - 1/1000). It is possible that you will have to slightly cover the diaphragm. If it is simply impossible to place the model in the shadow, then use a flash - this way you can even out the light a little.  2. Dynamic scenes in manual mode. Photos that convey the dynamics of movement always look very impressive. Let's say you wanted to feel like a magician and use your camera to stop time and capture a first-class trick of a young and promising skater. To do this, you need to set the following parameters: Shutter speed from 1/320, aperture from f4 to f 5.6. Light sensitivity: if there is enough lighting, then 100-200 units, if not - 400 units. If necessary, use a flash - it will sharpen the picture.
  3. We photograph objects in manual mode in low light Shooting in manual mode is especially useful at night. Walks around the city at night, fantastically beautiful fireworks, the romance of the starry sky, a concert of your favorite band - all this requires special camera settings.
- Concerts: ISO 100, shutter speed 1/125, aperture f8.
- Fireworks: ISO 200, shutter speed 1/30, aperture f10.
- Starry sky: ISO 800 - 1600, shutter speed 1/15 - 1/30, aperture at minimum.
- City night lights: ISO 800, shutter speed 1/10 - 1/15, aperture f2.
Manual Flash Setting (M and TV)
TV / S (shutter priority) and M (full manual) modes are ideal for convenient flash use, as they can be set to fast shutter speeds. In manual mode, the exposure depends on the shutter speed, aperture and ISO you set. You need to calculate the amount of light needed to illuminate the subject, and only then adjust the flash. Good workout for the brain, do you agree? manual mode will allow you to use a wider flash output than other modes.
It's worth noting that in any shooting mode, you may notice a flashing setting indicator in the viewfinder. This happens when the set parameters cannot be “triggered” with the flash. The main reasons are the aperture inaccessible to the lens of your camera, or the shutter speed is too fast, and is not supported by your device or flash.
Manual photography: which one to shoot?
- Aperture Priority (AV) mode is perfect for everyday shooting in our opinion. Select the required aperture value (being guided by what depth of field you want to get), and the camera will select the required shutter speed itself.
- Program mode (P) - of course allows you to change the shutter speed and aperture parameters, but it does it exclusively in pairs. Making the next frame, the values will be automatically set again, and it is possible that you will need to correct them again.
- Manual mode (M) is great, but very inconvenient because it requires a lot of manipulations, and the probability is much higher.
Be sure to match the exposure to the subject you intend to capture. If the subject is evenly lit, select evaluative metering, and if there are subjects that contrast with the general background, select spot or partial. The number of dark and bright objects is equal? Select center-weighted metering. There is no perfect “recipe” - experiment and learn from your own experience.
And one more piece of advice to follow. Work in RAW! This way you can increase the likelihood of "rescuing" good composition images that have technical problems. Good luck!
If your camera does not accept AA batteries, the first thing you will need to do after opening the box is to charge the battery.
In some cases, supplied Charger, into which you need to insert the battery, and then connect it to the mains. But there are also batteries that are charged inside the camera via a USB connection.
All necessary cables should be in the box with the camera.
# 2. Format memory card
Once the battery is charged, insert the memory card into the slot provided for it. Then turn on the camera, press the menu button and look for an option to format.

Formatting prepares the card for use and removes any existing images from the card.
If you've used the map before, be sure to download any images you want to keep from it.
No. 3. Image quality and size - Extra Fine (Highest JPEG) and Large

If you want to take the best shots your camera is capable of, select the Large image size. Then you get the most out of all the pixels.
Then set the best picture quality option. It can be called Highest JPEG, Fine JPEG, or Extra Fine JPEG.
If your camera allows you to shoot RAW files, then you can take advantage of this feature at the same time as the JPEG format, because RAW contains the most image data.
If you're new to photography, don't shoot RAW files by themselves, take photos at the same time in JPEG format. But this option will come in handy when you get a little more experience.
No. 4. White balance - automatic

Our eyes and brain are really good at compensating for the different colors of light we encounter, which is why we see white objects as white.
The white balance system of the camera is designed with the same goal in mind and in most cases setting to auto will work well.
But in some situations it is not enough. And in specific lighting conditions, it is better to choose "fluorescent lamp" (fluorescent lamp) or "incandescent lamp" mode.
Manual white balance allows you to set it by photographing a white object such as a piece of paper, but this option is worth considering later.
No. 5. Exposure metering: evaluative, matrix or multi-segment

Many cameras offer three metering modes that allow you to assess the brightness of the light and suggest appropriate exposure settings.
In addition to center-weighted and spot metering, there is a third option called evaluative, matrix, multi-zone, or multi-segment.
This mode is a good choice as it takes into account the brightness across the entire scene and tries to recommend exposure settings that will produce a beautifully balanced shot.
No. 6. Focusing: Auto-AF or Single-AF

In Singe-AF (Auto Focus Single) mode, the camera will focus on the subject according to the active AF points when the shutter release button is pressed halfway.
Once it focuses, the lens will hold focus for as long as you keep the button pressed. This is a good option for many situations, but if the subject is moving the focus will not be corrected.
Many cameras have an Auto-AF option that automatically detects if the subject is moving.
If the subject is stationary, then Single-AF is used, but if it moves, the camera activates the continuous autofocus system, that is, the focus is adjusted as needed.
No. 7. AF Point Selection - Auto

Most cameras have a setting that tells the equipment which AF points to use. it a good choice if you are a beginner.
The camera tends to focus on what is closest to the center of the frame. Therefore, if your subject is off-center and there are other objects between it and the camera, then keep an eye on what your camera is focusing on.
Switch to single-point AF (or similar) if necessary. It allows you to set the AF point using the navigation buttons.
No. 8. Shooting mode: "single shot" (Single) and "continuous shooting" (Continuous)

When your camera is in single shot mode, it takes one frame each time you press the shutter release button. Even if you keep your finger pressed.
In "continuous shooting" mode, it will continue to photograph until you release the button or until the buffer or memory card is full.
This mode is useful when shooting moving subjects, but in most cases you will want to take one photo at a time.
No. 9. Image stabilization - enable or disable

The slightest accidental camera movement can blur your images, but this can be easily remedied by using the image stabilization system in the camera or in the lens.
It works by shifting the sensor or elements within the lens to compensate for movement. As a rule, the stabilization system is very effective and allows you to use a fairly long shutter speed.
If you are shooting handheld, be sure to activate image stabilization, but turn it off when mounting the camera on a tripod.
No. 10. Color space - Adobe RGB

Many cameras offer two color spaces to choose from: SRGB and Adobe RGB. Adobe RGB has a wider color range than SRGB. Therefore, it will be the best option in most cases.
No. 11. Picture Style or Picture Control - Standard

Most cameras can process images using a number of different ways using “Picture Style”, Picture Control, color modes or Film Simulation mode.
Typically, there are several options. Including one that produces black and white (monochrome) images, another increases saturation to brighten the image, and a "landscape" that enhances blues and greens.
By default, the camera uses the “standard” option, which is generally appropriate for most situations, so make sure this is set.
I own my first DSLR Nikon D5100 for the third year already. V recent times more or less beautiful photographs began to be obtained. Of course, I do not yet have masterpieces for prestigious photo contests, but it’s not so embarrassing to put my photos on public display. From my own experience, I know how difficult it is for beginners to figure out the camera settings, to understand in which modes it is better to shoot in order to get cool images.
So I decided to write a series of articles with my explanations of the basics. I think that this photography lesson will be useful not only for novice amateur photographers, but also for me personally. After all, psychologists say: "Do you want to better learn new material? Then teach the acquired knowledge to others! "
So, you've spent dozens of hours reading reviews and tests of different cameras, beat everyone on specialized forums, asking questions like: "Professionals, help me compare Nikon D5300 and Canon EOS 750D"! "What is the difference between Nikon D5200 and Canon EOS 650D"? "Which is better: Canon or Nikon DSLRs"? And similar questions of comparing different models of SLR and mirrorless cameras. Finally, you've made your decision and bought your first DSLR. As soon as they started filming, it turned out that it was not so easy to get a beautiful card. The quality of the photos does not differ much from what was obtained with a simple soap dish. What to do?
How to learn to take pictures and improve the quality of your photos?
The answer to this question is very complicated, it will not fit within the boundaries of one article. Professional photographers write thick books of photography lessons about five hundred pages on the subject. Today I will try only to briefly systematize my knowledge of photography and give some advice to beginners.
In my opinion, the concept of "quality photography" includes two components: technical quality and artistic value.
To get a technically correct image you need:
2) Take the instruction manual into the camera and go outside with them. Carefully read each section and immediately, in practice, check how the camera settings, which you just learned about from the instructions, work. I was lucky: I bought my Nikon D5100 KIT 18-55 VR DSLR right before independent travel across China, Hong Kong and the Philippines. Therefore, I could use a variety of shooting modes every day in different conditions lighting, different genres and subjects.
3) Go to a bookstore and buy any digital photography book. Also thoroughly study it and apply the knowledge gained in practice.
As you can see from my report on a trip to China on your own, learning how to get technically high-quality photo on your Nikon D5100 or Canon EOS 650D is possible for one week of vacation. The more you photograph and analyze the results, the faster you can improve your skills. For example, during the described trip to the Celestial Empire and the Philippine Islands, I shot more than 1,500 frames.
But taking a sharp shot with the correct exposure doesn't mean getting a good shot. Here is one of the first photographs taken with the Nikon D5100 KIT 18-55 VR, which I posted for discussion on the profile forum.

That day I read a photography lesson on night photography and went in the evening to shoot with a tripod. I looked at this work and thought: “Oh, what a harshness! What colors! Super photo! " Do you know what the grades were? Not a single plus and 25 cons.
What's wrong with this photo, why doesn't it catch the viewer?
Shot at 18 mm, and at short focal lengths, if the camera lens is not directed strictly parallel to the horizon line, strong geometric distortions (distortion) occur. Do you see how much the building on the right has collapsed on its side?
Two dirty car do not decorate this photo at all.
Bad angle. It is better to photograph tall buildings from a hill, when the shooting point is located in the middle of the building or slightly higher. Then there will be less distortion and, in general, the frame will be different from hundreds of similar ones, photographed from the traditional position of "camera near the photographer's eyes at a height of 1.7 meters."
The diaphragm is too tight. Landscapes are shot at f / (8-11). I have here - f / 22, sensitivity ISO = 100, shutter speed 30 seconds.
How could such an image be better captured? For example, move farther away so that you can shoot at a greater focal length (say, 35 mm), when the distortion is not so strong. Include some object (say, tree branches) in the foreground for picturesque purposes.

Agree that this temple in the Emperor's Summer Palace in Beijing, also shot with a Nikon D5100 with a Nikkor AF-S DX VR Zoom 18-55mm f / 3.5-5.6G kit lens with the following settings (spot focusing, shutter speed: 1/100 sec, aperture: f / 11, FR: 26 mm, ISO: 200, exposure compensation: 0 eV, flash: off) looks better? Although, from the point of view technical quality, is also not perfect.
Well, and it seems to me that the first shot with the temple could be radically improved if it was not a landscape that was shot, but a reportage or a production. For example, to play in contrast: in the foreground - an advertisement for the purchase of stolen goods, in the background - a temple. Tell a story: in the foreground is an old woman praying for a temple, or a little girl with bows and pigtails admiring something on a building, etc.
In short, on a volume forum for photographers, I laid out various of my works for six months. I listened to comments and advice from more experienced colleagues. And only six months later I was able to take a picture, which, although it did not receive some pluses, still had more of them than minuses.

This photo first received the most positive ratings (18 plus signs and 4 minus signs) and, at number 82, entered the hundred best works per month.
Shooting parameters: shutter speed: 1/100 sec, aperture: f / 10, focal length: 55 mm, ISO: 100, exposure compensation: -1.33 eV, aperture priority, flash: did not fire, shooting time: October 20, 2012.
I don’t think this is some kind of masterpiece of world photography. It's not even sharp enough here. But you must agree that this work is slightly better than the first example. What makes her more attractive? Filmed during regime time, there is a clearly expressed versatility, thanks to the fog in the lowlands. It would not hurt to slightly lower the saturation of the sky and increase the sharpness. And just a candy would have turned out! ;)
Oh, something is distracted from the main topic of our photo tutorial on camera settings! At the beginning of the article, I gave advice to beginners: "To learn how to shoot quality with your brand new Nikon D5200 KIT, go to the bookstore and buy any textbook on photography." So you will quickly reach a level where your friends will not criticize your photos too much, but no one will admire either. Probably every novice photographer sooner or later comes to such a line. I have a complete blog of these pictures. It seems that everything is clear, the main object is in the "golden section" according to the rules of composition, and the work does not catch on ... photography ".
The manual was written back in 1977, when there was no “zombie language” and magazines like “Metropolitan” in circulation, and textbooks were written in order to teach, and not to force the buyer to shell out money for a dummy inside and increase the sales of the publication with beautiful headlines. ... The book methodically tells about the basic laws of photography, which every professional photographer should know and understand as our father:
The concept of the semantic center in the frame.
- Principles of filling the plane of the photographic image.
- What is composition. How to balance it.
- Rhythm in the frame.
- Light in photography.
- The influence of the tonality of the picture on its perception.
- How to convey space in a two-dimensional plane.
- Ways to emphasize the texture of various materials in the photo.
- Sharpness as an artistic device.
- What determines the dynamism in the picture.
Even by listing the sections, you feel the difference from the usual textbook on photography by contemporary authors. More often they discuss what we are talking about in today's article: what aperture and shutter speed to set to shoot a night portrait or fireworks. And much less often you will find a book in which they would try to show you how to remove art photo... Unfortunately, “Conversations about the Photography” cannot be bought in printed form now - you have to either print it out or order it on Ozon on a “print on demand” basis ...
You ask: "Why, then, this wise guy himself cannot shoot masterpieces on his Nikon D5100 DSLR?" But because I am a sinner: I have read the textbook, but to go out and work out every lesson in practice once a week in the street, I do not have enough willpower ... But, someday, starting on Monday, I will do my self-education ...;)
I think after reading this manual, you will understand how to shoot cool photos to your Canon EOS 1200D or Nikon D3300.
OK! Today we have our first photography lesson for beginners.
Exposure concept. How shutter speed, aperture and light sensitivity affect it
The term "exposure" means the amount of light that has time to hit the sensor within a certain period of time. If the exposure is correct, the photo will look great. If there is not enough light, the picture will be dark, if there is a lot of it, it will be light.

In photography, the change in exposure is calculated in steps. A change of 1 stop means that 2 times more light has hit the matrix of your camera. You can change the exposure using one of three methods: set a different shutter speed or light sensitivity at 2 times, or aperture at 1.4 times.
Usually, if we take pictures in one of the semi-automatic modes, the camera sets the correct exposure value on its own, changing the three indicated parameters. But when shooting is carried out in the "M" mode and, in general, in order to achieve the best results, we must clearly understand the mechanism for regulating the amount of light falling on the photosensitive element of the carcass.
Let's take an analogy for clarity. Let's say you want to heat 2 liters of water in a clay pot from 50 (- 1 EV) to 100 degrees Celsius (0 EV). To bring water to a boil, it needs to transfer a certain amount of thermal energy (exposure), depending on the following factors: 1) heating time (exposure); 2) the diameter of the gas burner (diaphragm) and 3) the thermal conductivity of the vessel walls (ISO sensitivity). Then the problem can be solved in the following ways:
Heat the water not for 10, but for 20 minutes with the same diameter of the burner and the material of the pan (we increase the shutter speed 2 times with the same aperture and ISO).
Place the pot on a hotplate with a diameter 1.4 times larger than usual. Then the water will boil for the initial 10 minutes (shutter speed and ISO remained the same, but the diaphragm was changed).
Replace the low thermal conductivity clay pot with a steel saucepan with high level conduction of heat (the photosensitivity was changed, but the aperture and shutter speed were left unchanged).
Using the example above, we came to the understanding that in order to obtain a technically high-quality image with the same exposure, you can change two of the three described shooting parameters: either aperture and shutter speed, or ISO and shutter speed, or light sensitivity and the diameter of the hole in the lens, and etc. But more on that later.
Yes, let's give a definition of the concepts we are talking about today.
Exposure - the period of time during which light falls on the matrix of your camera (the moment between opening and closing the shutter of the DSLR).
Light sensitivity - means the degree of perception by the camera matrix of the light falling on it. Measured in ISO (International Standards Organization) units. The standard ISO values change exponentially with a denominator of 2 (if someone did not study well at school, this means that each new value is 2 times higher than the previous one): 100, 200, 400, 800, 1600, 3200, 6400, etc.
Both shutter speed and sensitivity are technical characteristics cameras. Together they form an exposure pair (expo pair).
Aperture - is a baffle with a hole of several blades inside the lens. The design of the diaphragm allows you to adjust the diameter of this "hole". The larger it is, the more light will fall on the matrix. Even in photography they use the concept of aperture, i.e. a number indicating the size of the hole in the lens. In English textbooks on photography, it is referred to as Aperture or f-stop.

The standard values of the relative aperture are calculated based on the condition that changing it by 1 position will increase the exposure by 2 times: 1 / 0.7; 1/1; 1 / 1.4; 1/22; 1 / 2.8; 1/4; 1 / 5.6; 1/8; 1/11; 1/16; 1/22; 1/32; 1/45; 1/64. Usually, when discussing this shooting parameter, only the denominator of the fraction is pronounced. Therefore, when in a photography lesson you meet the recommendation "close the aperture to 22" - this means setting the aperture f = 1/22 and the aperture will be narrower (see the picture above). And when your friend, an experienced photographer, advises "open the hole to 2.8" for a beautiful blur of the background, he means that you should set the aperture to 1 / 2.8 or, in other words, increase the diameter of the baffle hole in the lens.
At this point in my photography lesson for beginner photographers, I need to make another big digression and talk about the fact that aperture size affects not only exposure, but also depth of field (depth of field) and hyperfocal distance. But, in order not to turn this story into a thick book, I will not discuss these terms for now.
To better understand how changing one of the discussed shooting parameters affects others, we will conduct such an experiment with you. Let's put my Nikon D5100 SLR camera with a Nikkor 17-55 / 2.8 lens on a tripod, set a focal length of 55 mm and a maximum aperture of f / 2.8 for it. Let's start by changing the photosensitivity at the same aperture and see how the shutter speed changes. Then we repeat this procedure for different meanings apertures. The measurement results are summarized in the following table (and there is no need to memorize, since at each moment of time with different illumination of the subject of photography, they change).

You ask: “Why the hell is this dude been soaring my head for half an hour with his pots, burners and incomprehensible tables” ?! “And such, - I will answer, - that the plate presented above can give you an answer to a very important question"! I mean, a lot of aspiring photographers ask, "Why are my new Nikon D5300 KIT 18-140 or Canon EOS 650D KIT 18-135 IS DSLRs getting blurry, soapy photos?" Or, for example: “Why do professional photographers buy a fast zoom 17-55mm f / 2.8G ED-IF AF-S DX Zoom for big money for shooting weddings? Indeed, at the same focal lengths, it costs 50 thousand rubles, and the price of a standard KIT lens Nikkor 18-55mm f / 3.5-5.6G AF-S VR DX Zoom is only 2700 rubles. In other words, it is 18 times cheaper.
The answer to the first question: "For what reason can pictures be soapy?"
Experience shows that on SLR cameras with a small number of pixels in the matrix (Nikon D3100, D5100 or Nikon D700, D90 and their analogs from Canon) the minimum possible shutter speed that allows you to shoot a stationary object from your hands without "blur" is calculated by the formula Vmin = 1 / FR, where FR is the focal length on the lens at the time of shooting. For more modern models DSLRs like Nikon D5200, D3200, D7100 (and similar Canon) this value is even shorter Vmin = 1/2 * FR.
That is, if you attach a standard whale glass kit EF-S 18-55mm f / 3.5-5.6 IS STM to your Canon EOS 700D, then at a wide angle FR = 18 mm it will have a maximum aperture of 3.5, and on narrow end FR = 55 mm - the largest aperture is 55 mm. Let's say you want to shoot an 18mm portrait. To make it more beautiful, you need to try to blur the background, i.e. open the aperture to a maximum of f / 3.5. From my table, you can see that at a minimum ISO of 100, the shutter speed will be 1 / 100th of a second. The result should be satisfactory, as the exposure time is less than 1/60 second (orange cell on the plate).
But for a portrait of 18 mm, you can get it on the face of the person being portrayed, since geometric distortions are strong at a wide angle. Yes, and the background cannot be noticeably blurred, since there is a lot of depth of field on such a focal point.
Okay, let's move the lens to a focal length of 55 millimeters. Now the background will be better blurred (at maximum aperture of f / 5.6) and there is no distortion: the model has a normal nose. Only here At ISO 100 it will be problematic to take a photo without smearing. It is necessary to raise the sensitivity to 125 units. If you have the latest Nikon D5300 or Nikon D5200 with a huge number of pixels, then in order to take a sharp shot handheld, you need to use the shutter speed Vmin = 1/2 * FR, which means 1 / (2 * 55mm) = 1/110 second. With a maximum aperture of f / 5.6, you need to set an ISO of at least 200 to achieve a shutter speed of 1 / 125th of a second. The quality of modern SLR cameras is such that photosensitivity in the range of 100-640 and, reluctantly, up to 1000 units does not greatly spoil the photo. Your portrait on ISO 200 will be of high quality.
Now you want to film a child playing with a dog in an apartment. The models are very nimble. The shutter speed should be significantly shorter, say 1 / 500th of a second. From the table with shooting parameters, we see that when photographing with a Canon KIT 18-55 lens, we need to set ISO 640 (at a focal length of 55 mm and an aperture of 5.6) or ISO 320 at a focal length of 18 mm and f = 3.5.
The answer to the second question: "Why do professional photographers buy high-aperture optics?"
Let's say you're photographing pageants for guests at a wedding. On a standard kit lens KIT 18-55 Nikkor or Canon, you can set a minimum shutter speed of 1/800 second at ISO 1000 and a maximum aperture of 5.6 (see the red cell of the table). In this case, the quality of the photo will be worse, as noise will appear. And if you had a high-aperture professional lens Nikkor 17-55 / 2.8 or Canon EF-S 17-55 / 2.8 IS USM, then at the long end you could set the aperture f = 2.8 and you could shoot active movements of guests with a shutter speed of 1/1000 second at a sensitivity of only 400 units (see red cell). Do you feel the difference?
Another example. I bought a Nikkor 70-300 / 4.5-5.6 telephoto lens for photography. At a focal length of 200 mm, it allows you to set the aperture f = 5.3. Those. at an operating ISO of 250, it can achieve a shutter speed slightly faster than 1 / 160th of a second. Even setting it on a tripod to prevent blurring, you won't be able to get a high-quality photograph of small birds, since they are too nimble. And for handheld photography, the minimum exposure time should be no longer than 1/200 second. If I paid 4 times more and bought a professional high-aperture Nikkor 70-200 / 2.8 telephoto lens, then with the same 200 mm focal length, with ISO 250 and aperture already f / 2.8 (not 5.3), I could get B = 1/500 seconds. 3.125 times shorter !!! The likelihood of getting a sharp photo is greatly increased!
When buying a high-aperture lens, you need to pay attention to the following nuances:
- When buying an expensive high-aperture lens, you pay not only for the ability to set a wide aperture, but also for a higher-quality glass material with small geometric distortions and chromatic aberrations, for fast autofocus and dust and moisture protection.
- We did not take into account the effect of aperture on depth of field, hyperfocal distance and background blur (bokeh) in the survey of shooting parameters.
What modes to take to get high quality photos
Okay, we spent many minutes with you to understand why in your new Nikon D5200 camera you can set the value of light sensitivity and shutter speed and aperture on the whale lens yourself. But we have not made much progress towards answering the question: "What settings should I set on the camera in order to take a high-quality photo?"
Let's fix what we already know:
ISO affects the sensor's sensitivity to light. This is the material of our pan. The higher the photosensitivity, the more light the matrix will receive in a given period of time and the noise, by the way, will also be stronger. Therefore, the task of a professional photographer is to photograph at the lowest possible ISO values.
Exposure is the time when the camera shutter is open and light enters the matrix. These two parameters control exposure and are camera-specific specifications.
Aperture - the diameter of the hole in the lens. It also affects exposure, but does not depend on the carcass, but on the lens model.
Now let's take a look at my Nikon D5100 DSLR. We see that the camera has a command dial for choosing the main shooting modes: green (automatic), creative settings (P, A, S, M) and scenarios (portrait, landscape, sports, children, macro, etc.). If you select Scene on the disc and turn the wheel, you can still select a bunch of other modes: "night landscape", "portrait at night", "beach / snow", etc.
At first, when I didn’t understand what camera settings should be set for shooting different scenes, I simply installed Scenes presets. For example, almost all of the photos in the 2011 China Self Travel Report were shot this way.
Lately, I've mostly only photographed in A, S or M mode. These give the photographer more control over the situation. The standard settings are useful when shooting in JPEG format. "Green fotikom" - I never use the fully automatic shooting mode, since in most cases it gives photos worse than with manual parameters.
Judge for yourself. You have decided to rent catamarans on a mountain river on a stormy, cloudy evening. You set the camera to automatic mode and pointed to the place where the athlete should appear in order to press the trigger in time and get a breathtaking shot. The camera's automation detects some kind of poorly lit landscape, so it sets the aperture to f / 5.6; ISO 300, shutter speed 1/15 second. But, with such settings, the image of people will be blurry. “Okay,” you decide, “I’ll put on the“ Sport ”mode. The camera sets the focusing method "tracking autofocus", aperture of f / 5.3, but realizes that for sports scenes more a short time exposure 1/500 second. To get such an exposure, you need to "lift" the ISO to 640 units. The photo is likely to be sharp.

And now, under the same conditions, you wanted to shoot the crossbowmen competition and get a frame in which an arrow flies out of a crossbow. If you select Sport mode as in the previous example, the boom will not freeze. The shutter speed should be even shorter. But the camera doesn’t know if you are shooting catamarans or crossbowmen! V this example A sharp photo can only be captured in M, A, or S mode, where you can customize the exposure time, aperture, and ISO.
Let's go over the basic settings for a DSLR camera in the Creative Zone.
A (on select Av models from Apperture Priority) - you choose the aperture, and the camera adjusts the ISO and shutter speed to get the correct exposure for that aperture. Also, in this mode, if I see that the shutter speed is too long, I can raise the ISO.
S (sometimes Tv from Shutter Priority) - you tell the camera what the exposure time will be, and the camera itself changes the aperture and ISO to maintain the exposure.
M (for Manual) - the photographer himself chooses the values of all camera settings.
S mode is expected to be more convenient for shooting sports, dancing and other active events, "A" - when photographing portraits and landscapes, "M" - both.
My favorite option is "A". Even if I shoot sports, I put "aperture priority", tracking autofocus and check if the shutter speed is sufficient at a given ISO. If the exposure time is too long, then I raise the sensitivity until I am satisfied with the shooting parameters.
Mode "P" (from Programmable Automat) - similar to "fully automatic mode", only you can interfere with some settings (ISO, change the metering method, etc.). I've never used it.
What intermediate conclusions can be drawn after reading all my previous writings, which I called the loud term "A photography lesson on choosing camera settings for novice photographers"? The conclusion is this: in order to shoot high-quality, beautiful photo, you need to correctly configure the basic parameters of the DSLR: shutter speed, aperture and light sensitivity. To take a photo of a masterpiece, you need to understand why you need other settings (white balance, correction and exposure metering mode, the way you release the shutter and focus, the autofocus area mode), be able to correctly adjust the flash and read the book by Lydia Dyko, “Conversations about photography”, recommended above. ... ;)
Now, to understand what settings to set on your brand new Nikon D3100 camera in different situations, you need to logically analyze the plate presented earlier.
To capture a beautiful portrait, we need to blur the background(open the aperture), while keeping the ISO and shutter speed in normal working values.

Nikon D5100 camera, lens: AF-S DX VR Zoom-Nikkor 18-55mm f / 3.5-5.6G, shutter speed: 1/125 sec, aperture: f / 5.6, focal length: 55mm, ISO: 200, exposure compensation: 0 eV, shooting mode: aperture priority.
If we want to take a photo against the background of a monument or some other landmark, we tighten the diaphragm a little.

Nikon D5100 camera, lens: AF-S DX VR Zoom-Nikkor 18-55mm f / 3.5-5.6G, shutter speed: 1/125 sec, aperture: f / 11, focal length: 29mm, ISO: 110
We are filming the sunset over the evening city. The subject is stationary here. The main thing is sharpness. Therefore, we also set f / 10 in priority of the aperture. At ISO 200, the picture has little noise. The shutter speed does not matter, as we shoot from a tripod.

Nikon D5100 camera, lens: AF-S DX VR Zoom-Nikkor 18-55mm f / 3.5-5.6G, exposure: 1/80 sec, aperture: f / 10, focal length: 18mm, ISO: 200
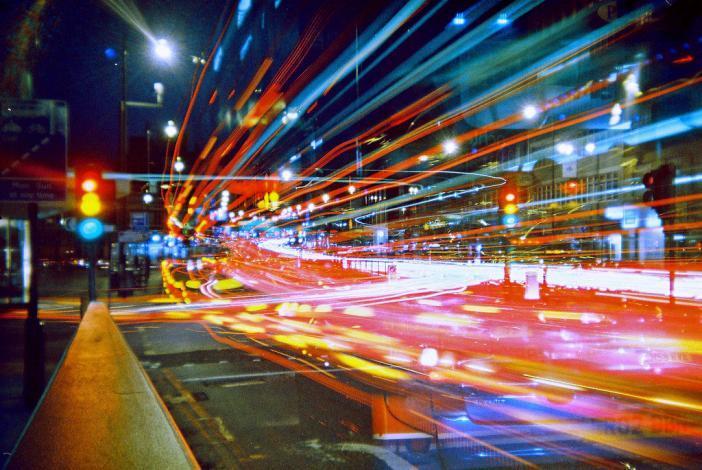
Shooting a night landscape. There is very little light. DOF needs a big one. Therefore, we set the aperture to at least f / 8. Light sensitivity for noise reduction - minimum 100 units. The exposure time the camera suggests is 25 seconds, but we don't care, since the shooting is done with a tripod. On the contrary, the traces of car headlights were beautifully blurred.

Now we also shoot at night, but this time a portrait. People can stand still for a relatively long time. We'll have to open the hole in the lens to the maximum (f = 3.5), "lift up" the ISO to ensure an acceptable shutter speed (remember B = 1 / FR?).

Nikon D5100 camera, lens: AF-S DX VR Zoom-Nikkor 18-55mm f / 3.5-5.6G, exposure: 1/5 sec, aperture: f / 3.5, focal length: 18mm, ISO: 800.
There are exceptions to any rule. For example, this photo was taken from a tripod, and we tried our best not to move. Therefore, we got a sharp shot with such a long exposure time.
Getting ready to shoot something fast moving, such as a gorgeous horseman prancing on an apple-covered mare. ;) We set the shutter speed priority B = 1/500 seconds in the camera settings, a small ISO sensitivity of 125 units and the camera will set the aperture to f / 4.5 by itself.

By the way, the photo above is an example of shooting with the Canon EOS 700D KIT 18-135 camera. And also - this is an example of a not entirely successful composition. If you are familiar with the rules of framing, you will understand that it was better to shoot this photo so that the main subject was on the golden ratio line.

In this case, there is a free space under the horse's hooves - it has where to run. There is also space on the left for the hussar to look, he does not rest against the edge of the picture. The road lines form diagonal guidelines to the main object. And the trees form a natural frame that does not allow the viewer's gaze to go beyond the image. Opening the aperture allowed the background to be blurred a little and thereby accentuate the focus on the characters in the shooting. To turn this photo into a masterpiece, there is still not enough good lighting in the setting sun.