From plastic bottles You can make a huge number of all kinds of crafts. They can be beautiful, useful, unusual, or all three.
A flight of fancy and a little ingenuity is all you need to make a good craft.
Such material as a plastic bottle is probably found in every home, which means everyone can make good craft, so let's get started.
Craft from a plastic bottle. Butterfly.

You will need:
Transparent plastic bottle (preferably light)
Butterfly stencil
Felt pen or outline for stained glass
Scissors
Glue (preferably "Moment")
Glass paints
Acrylic paints
Wire

1. Cut off part of a plastic bottle, place a butterfly stencil and outline it with a felt-tip pen.
2. Cut along the outline.

3. Color and decorate the butterfly.

4. Bend the wings of your plastic butterfly. This must be done so that the outline is on top.
6. Using glass paints or acrylic paints, begin decorating the butterfly.
7. Using beads different sizes, you can make the body of a butterfly, and antennae can be made from wire. The glue will help hold it all together.
8. You can decorate the butterfly with sparkles, rhinestones, beads, etc. on top.
This gift can be decorated with gift wrapping or placed on the refrigerator door.
Plastic bottles. DIY crafts. Turtle with candies.

You will need:
Plastic bottle
Velvet paper
Candies
Clusters from tablets
White paper
Scissors
Thick paper or cardboard

1. Cut off the bottom of the bottle - this part will be used as a shell.
2. Preparing a turtle stencil. Draw a silhouette on cardboard and cut it out.

3. Use a stencil to draw a silhouette of a turtle onto green velvet paper. Cut it out and glue it to the cardboard part.

4. Making eyes for a plastic turtle. Prepare a pill cluster and peel off the foil backing. Next, you need to cut out 2 fragments for the eyes from the cluster.
5. Prepare white paper and use it as a backing, and use black velvet paper to cut out the moving eyes. Next, simply glue the structure together.
6. We collect and glue all the details of the craft. Use glue to attach the turtle's eyes and mouth. Fill the bottom of the bottle with sweets and tape it to the turtle.
Crafts from a plastic bottle (master class). Toy "Catch the ball".

You will need:
Flexics
Ping pong ball
Scissors

1. Prepare orange flexi and cut out flower petals from it.

2. Using glue or double-sided tape, attach the petals and string to the bottle.
3. Attach a table tennis ball to the other end of the thread.
That's it - play by trying to catch the ball in the flower.
How to make a craft from plastic bottles. Vane.
For those who want to know which way the wind blows.
You will need:
Plastic bottle (preferably a pot-bellied one)
Scissors
1. Prepare a clean bottle and use scissors to cut windows in it. It is desirable that they be approximately similar to the blades of a weather vane.


2. Attach the weather vane in a suitable place - on the balcony. This can be done using an iron pole. Make a hole in the bottom of the bottle and put a pole on it.
Now you will always know which direction the wind is blowing.
Crafts from plastic bottles for children. 3D glasses.

You will need:
Transparent plastic bottle
Unnecessary sunglasses
Colored markers
Scissors

1. Cut two parts from a plastic bottle as shown in the image.
2. Take the glasses out of the glasses and outline them on the cut part of the plastic bottle.

3. Use a red marker to color both sides of the left glass.

4. Color the right glass with a marker Blue colour on one side and green on the other.
5. Insert the glass back and enjoy 3D pictures.
Children's crafts from plastic bottles. Frog.

You will need:
2 plastic green bottles (volume 2 liters)
Scissors, knife
Centimeter tape
Felt pen
Needle and thread
Acrylic paint
Brush
Wine bottle stopper

1. First you need to wrap plastic bottles with tape at a height of about 7 cm from the bottom. The higher you want to make the frog, the more you need to move away from the bottom, thereby making the box more spacious, but not very proportional. Next, use scissors to cut off the bottoms along the top edge of the tape.
2. Using a measuring tape and a felt-tip pen, make marks for the future seam. You need to mark on both parts at a distance of 5-7 cm from the edge, leaving 1 cm between the marks.
3. Make holes at the marks with an awl. Try piercing the plastic through a napkin after folding it in half, this way the bottle will not slide, which will prevent you from getting hurt. When the holes are made, remove the tape.
4. Prepare a zipper and wrap it around one of the parts of the future craft. Temporarily attach it with tape to the body.
Sew the fastener with stitches along the holes made with an awl.
When you have sewn the zipper in a circle, remove the tape. Next, tie and secure the ends of the thread and trim off any excess.
Unzip the zipper and sew the other half in the same way.
5. The frog's eyes can be made from a wine bottle cork. You can paint the cork in green color. Once you have glued the eyes to your box frog, leave the glue to dry.
Crafts from a plastic bottle (photo). Bracelets.


Crafts from plastic bottles (photo). Cherry blossom.

Crafts from plastic bottles (instructions). Casket.


Palm tree made from plastic bottles. Option 1.

You will need:
Plastic bottles Brown(1.5-2 liters)
Green plastic bottles (the larger the bottle, the more magnificent the leaves)
Thick rod (for the base of the trunk)
Awl or drill
Scissors
1. To make tree bark, you need to prepare brown plastic bottles and cut them into pieces 10-15 cm high.


3. To make palm leaves, you need to cut off the bottoms of green bottles. On one workpiece you need to leave a rigid neck with a lid, since it will play the role of fastening.
4. Start cutting out the leaves - you need to do this so that there is about 5-7 cm left to the edge.
5. Start collecting green blanks, putting them on the same blank with a neck. Screwing the lid will hold everything together and you will have a palm tree crown.

6. Now you need to make connecting holes. Their diameter must match the diameter of the base rod. Such holes can be made using a drill or a hot awl. Make a hole so that the crown of the palm tree does not fall through.

7. We begin to collect the palm tree. When you have strengthened the rod, begin to place blanks of brown plastic bottles on it. The design ends with a green crown.

From an ordinary plastic bottle you can form products that will be useful in playing with children, household, house interior. From simple material you can prepare a craft for kindergarten. Children can independently cope with basic manufacturing schemes with virtually no adult help. In addition to plastic bottles, you may need a glue gun, paints and scissors.
To make any craft from a plastic bottle, you need to prepare necessary tools and materials:
- plastic bottles are the main material;
- scissors, blade and stationery knife - used for cutting;
- acrylic paints - useful for decorative finishing;
- brushes of various thicknesses for painting;
- candle for burning sharp cuts;
- glue gun for joining parts;
- a construction stapler to attach other elements to the base.
Depending on the complexity and decorative finish, additional materials are selected.
DIY ottoman made from plastic bottles
A craft made from a plastic bottle for home improvement is the best option in terms of price and quality. From raw materials you can make a variety of furniture, in particular an ottoman.
You will need the following tools and materials:
- 38 plastic bottles of the same volume and shape;
- a roll of wide stationery tape;
- plywood sheet;
- jigsaw, scissors, stationery knife;
- rolled synthetic winterizer;
- construction stapler;
- measuring tape and pencil;
- thick fabric for upholstery.
 DIY craft from plastic bottles: step by step production round ottoman
 Algorithm for creating an ottoman:
- Arrange the bottles so that their shape resembles a honeycomb. There are 4 elements in the 1st row; in the 2nd – 5; in the 3rd – 6; in the next one - 7. The remaining 3 rows are set according to the principle of 1st, 2nd and 3rd.
- Wrap tightly with stationery tape. You need to make several layers and wind them from the top of the bottles to the very bottom in a spiral - you will get the basis of the future ottoman.
- Measure the diameter of the resulting honeycomb. On plywood, draw a sketch of a circle with the resulting diameter. Make 2 such parts. It is advisable to try on the circles so that they match the parameters of the base figure.
 DIY craft from plastic bottles: step-by-step production of a square ottoman
 - By using construction stapler nail plywood circles on top and bottom of the pouf base.
- Wrap the sides with padding polyester. Cover the circles with soft material as well. Fix the soft base construction stapler.
- Take measurements from the resulting workpiece and make patterns from textiles. Sew a cover, which is then placed on the body of the pouf.
Furniture of this type can be made in a few hours, it looks presentable, and the costs are minimal.
Flowers from plastic bottles
There are many options for creating flowers from plastic bottles.

The easiest way to create a three-dimensional flower:
- Cut off the bottom of the bottle so that the height of the resulting object corresponds to 5-6 cm.
- Divide the circle into 5 equal parts with a marker. The marking is done so that each part includes a convex bottom. Cut the plastic all the way down to the bottom at each of the marks.
- To form attractive petals, you need to round each resulting strip.
- Treat the edges of the cuts by dusting them over a candle flame.

Make a hole in the center of the bottom using a heated nail, awl or soldering iron. Thread a thick wire through it, which will become a stem. plastic flower.
Toys made from plastic bottles
A craft made from a plastic bottle can become a strong, interesting and budget toy for a child of almost any age.
Several toy options:
| Apple-box | Octopus | piggy bank |
| Cut off the bottoms of two identical bottles. The height of each element must be the same and be more than 6 cm. Make a hole in the center of one of the parts with a hot nail. Cut a strip from the canvas of a green bottle, twist it into a tube - you get a stalk. Cut a leaf from the same strip.
Glue a leaf to the cutting and thread the tube into the hole in the bottom. Everything is fixed with a glue gun. If you insert one bottom into the other, you will get a full-fledged apple in which you can store small items. | Cut the bottle in half. Measure a distance of 5-8 cm from the cut. Divide the circle into parts, the thickness of each should be 1-2 cm. When cutting the plastic along the marks, strips are obtained. Tighten the elements using the blade of scissors.
Make eyes from the lids. Use a marker to draw the pupils, and then attach the blanks using glue gun to the octopus's body. Make a hole in the bottom and thread a thread through it. You will get a toy analogue of “Y-Yo”. | Choose a bottle with a wide bottom. Using a marker, draw nostrils on the lid and eyes on the bottle itself. Cut a narrow rectangular hole in the base of the body.
Make stable legs-stands from the lids, attaching the elements with a glue gun. From thick cardboard cut out the ears and glue to the base. |


You can make any toy from bottles by creating a mock-up of the product:
- Zhukov;
- fruits;
- vegetables;
- transport;
- dolls;
- figurines.
House made of plastic bottles
From plastic bottles you can create a house that will be a refuge for children in the yard, the basis of a sandbox.
You need to make preparations:
- more than 500 bottles of the same volume and shape;
- timber and plywood;
- nails, wire, construction stapler;
- sharp knife, nails;
- 4 hemp;
- tools for taking measurements and markings.
"Construction" algorithm:
- Make the body of the future house from timber. Wooden bases are knocked down in such a way that frames are formed - the foundations of future walls. Knock down 2 more frames, which will become roof slopes. Place the body on stump legs. Place plywood underneath.
- Determine the diameter of the container. Mark the top and lower beams in accordance with the received parameter. Drive a nail into the center of each strip.
- Cut off the neck of each bottle so as to remove the narrowing areas of the element. Use a hot awl to make a hole in the center of each bottom.
- String so many pieces of wire onto a piece of wire so that they form a full strip from the upper beam to the lower body. In the process of forming a strip of wall, you need to ensure that all parts fit tightly relative to each other.
- Secure one end of the wire to a nail driven into the top beam. Stretch the metal base like a string and secure it to a nail on the bottom wooden base. Make enough stripes to form a wall.
- To strengthen the walls, you can knock bottles together with a construction stapler.
The roof is made using the same principle. The ceiling can also be made flat using a wall manufacturing algorithm. By changing the direction of the “strings” on which the containers are strung, windows can be made.
Plastic bottle doll
A craft made from a plastic bottle can be a completely functional doll that you can play with.
List of tools and materials:
- plain fabric pastel color;
- padding polyester;
- 2 buttons;
- Knitting;
- printed fabric;
- needle with thread;
- marker;
- bottle;
- glue gun
Manufacturing technique:
- Formation of the head. Cut a circle from a plain fabric. Sew along the edge with a fine line stitch. Pull the workpiece a little and fill it with padding polyester. Fully tighten the thread and secure the seam. Sew on eye buttons and draw a nose and lips with a marker.
- Making the neck. Cut a wide strip from the same textile. Sew a cut on one side, pulling the textile a little. Attach the element to the seam of the head and sew the pattern. You will get a kind of skirt at the bottom of the head.
- Creating a hairstyle. Cut the knitting thread into equal pieces. Thread each part through a needle. Make a stitch on the doll’s “head”. Pull out the needle and tie the thread into 2 knots. You get 2 hairs at once. After repeating the manipulations, use scissors to trim the hair.

- Making hands. Cut 2 strips from pastel colored fabric. Sew each strip, forming a tube. Fill the space with padding polyester and sew up the edges.
- Torso. Cut off the bottom of the bottle. Treat the area near the neck with a glue gun. Place the head on the top, and lay the skirt-neck along the adhesive part. Using a glue gun, attach the arms to the base of the container.
- Take measurements from the container and sew a sundress or dress for the doll. Put clothes on the doll. You can fix the element with glue.
You can make a more complex doll model using other auxiliary materials.
DIY bird made from plastic bottles
From plastic containers It’s easy to make a parrot or an owl, since the silhouette and manufacturing principle are identical.
Preparation:
- 2 identical containers;
- several colorful bottles;
- scissors or stationery knife;
- glue gun;
- 2 caps and a marker.

Manufacturing algorithm:
- Make a base from identical containers. From one container, cut out the middle part and connect the sections together, from the second, cut off the bottom to the expansion. Using a glue gun, connect the bottoms together. It will turn out to be unique hourglass.
- Cut out the middle parts from the remaining containers. Using a marker, draw the number of ovals that will fit on the canvas.
- Using a glue gun, attach the ovals to the base. You need to make sure that each next element covers 1/3 of the bottom one. The result is feathers applied in layers.
The ovals are laid out in a specific pattern. When making an owl, the eye circles are first formed, then the rest of the head is filled in. A parrot's feathers are distributed evenly throughout its body - from top to bottom. The lids make eyes.
Flowerbed made from a plastic bottle
A two-tier flower bed made from plastic bottles is neat, compact and at the same time roomy.

Manufacturing technique:
- Prepare a place for a flower bed, decide on the parameters and shape of the product.
- Dig a small groove that will become the outline of the flowerbed fence.
- Fill the containers with sand or soil and screw on the lids.
- Bury the filled container in the groove. Immerse the containers in the ground a little more than halfway. Bury with the neck down.
- Having formed the lower tier of the flowerbed, you need to fill inner part earth. To prevent the bottles from spreading out under the action of the soil, you can tie them together with wire. Compact the earth.
- Using measurements and calculations, determine the center of the flowerbed and make another fence of the same size, but smaller. Cover with soil and compact.
The flowerbed is ready for planting. The structure can be further strengthened with natural stone, brick, and tiles.
Birdhouse made from a plastic bottle
To make a birdhouse, it is better to take a 5-liter plastic bottle. Additionally, you need to prepare scissors and a glue gun.

Manufacturing Features:
- Cut off the bottom.
- Remove half of the bottle base.
- At the base of the neck (parallel to it), using folds, form the silhouette of a house with gable roof. You can bend the plastic using scissors.
- In accordance with the layout, bend the rest of the bottle.
- Attach the layout to the cut bottom and cut out a shape from it. Glue to the house using a glue gun.
You will get a full-fledged house, the “entrance” to which is through a wide neck.
Bird feeder made from a plastic bottle
A craft made from a plastic bottle can be a bird feeder.

Simple manufacturing option:
- Choose a barrel-shaped bottle with a volume of 1.5-2 liters.
- Cut out large arched windows at the base of the container. It is better to make 4 openings.
- In the neck area, burn 4 holes at the same level. Thread wire or threads to create fastenings.
Grain is poured into the bottom; birds can get inside the feeder through the windows.
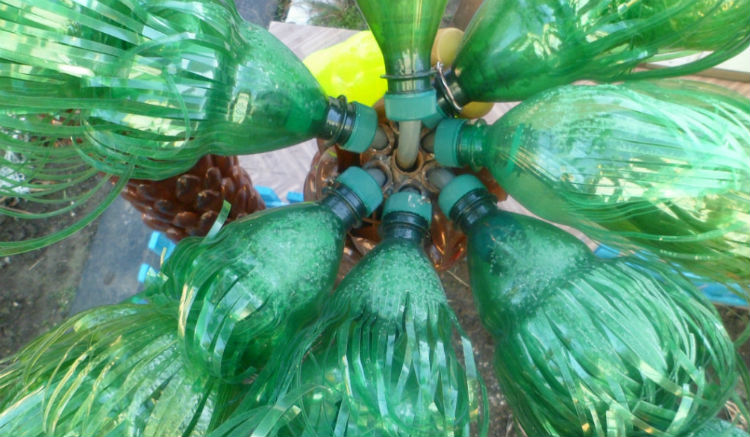
Palm tree made from plastic bottles
For creating plastic palm tree you need to collect more than 100 brown and 100 green bottles, prepare a construction stapler.

Manufacturing technique:
- Cut off the bottom of each brown container. From the container fabric, form 5 rounded petals 5-7 cm long.
- Inserting the neck of the bottle into the bottle with the petals up, fix each element with a construction stapler.
- The neck and bottom are cut off from green containers. Bend the cylinder in half along the heights. Cut the element along the fold. Use scissors to make terry along the long sides of the rectangle, cutting the edges into thin strips.
- Place the green part on half of the other and secure with a stapler. Leaves are obtained.
At the end, the crown and trunk of the palm tree are assembled. The parts must be connected tightly - it is advisable to use wire. In order for the barrel to stand, you need to thread the workpiece with a metal pin.
Crafts from plastic bottles for preschoolers
A child can make a toy or craft from plastic bottles preschool age, which is relevant for all kinds of competitions in kindergarten.
It is worth choosing simple options and schemes of work so that the child can do everything at once and minimize the help from adults.
Chamomile
Choose containers for yogurt or milk. It is desirable that the lid has Orange color, and the container itself is white. Cut the bottle in half. Divide the base of the top of the bottle into 8-10 equal parts.
Cut into strips up to the neck. Round the edges and twist a little with the blade of scissors. Bend each petal towards the bottom. Screw on the lid.

Make a hole in the center of the twist by burning the base with a hot nail. Thread the wire and you get a stem. Cut out leaves from green plastic and glue them to a metal base with glue.
Penguin
Take 2 identical shaped bottles. Cut one in half - leave the part with the bottom. Cut off the larger half from the second, leaving only the lower part. Connect the blanks, fastening them with glue.

Paint the form with black paint, the bottom with any other paint. Use white paint to paint the base for the front part. Form the muzzle. Glue a thread pompom to the colored bottom. At the transition point, tie a ribbon that will act as a scarf.
Crocodile
2 green containers will come in handy. From the first, cut off only the bottom and the hard part of the neck. Glue the edges of the smaller cut. Cut off the dense part of the bottom and top from the second container. At the narrowing point, cut half the bottle lengthwise.


Cut out 20 triangles from white paper. Make eyes out of colored paper and fix on the base. Glue the elements along the cut. Connect the bottles together. At the bottom of the mold, glue 4 lids - these are paws.
Bees
Paint a small bottle yellow, form black stripes along the entire “body” of the bee. Glue decorative eyes to the lid. You can draw with a marker. Cut an oval from a transparent or brown bottle average size(wings).

Attach the manufactured parts to the base of the container. Make legs from narrow strips cut from the same container as the wings. Make a hole between the wings through which you can thread a thread - such a detail will allow you to hang the insect.
Butterflies
Cut out the soft part from the plastic container, forming the canvas in the form of a rectangle. Select a butterfly stencil according to the size of the base. Place the plastic base on the stencil, secure the components at 4 points with clothespins or stationery clips. Trace the outlines with a marker, transferring the design onto the plastic.

Place the sketch on the board and cut out the shape using a stationery knife along the contour. Additionally, you can cut out some parts of the wing pattern. You can use nail polish to paint the product along the outlined lines. To add shine, you can use sequins, beads and rhinestones.
Hedgehogs
Prepare 20-25 brown plastic containers. A transparent base will also work, which will then have to be painted over. Cut all parts in half. Make a fringe by cutting strips to a tight place in the neck area.

Assembling is done - insert the bottles into each other. On the first container draw the eyes of the animal. The plug represents the animal's nose. You can place an apple made from bottles on the “needles”.
Helicopter
Select a table tennis ball and a container whose diameter will be the same as sports equipment. Additionally, you will need cocktail straws, glue, scissors, and a safety pin.

Procedure:
- Cut off the bottom of the container, leaving the neck closed with a lid. It is enough to use a part with a length of 5-8 cm.
- Make a cross out of the straws and fasten it by piercing it with a safety pin. Attach to the bottle cut.
- Cut a strip from the container around the circumference, divide in half.
- Glue a piece of straw to a narrow strip along the edges. Use the part of the device that has a bend.
- Glue the part to the bottom of the helicopter body - on the other side relative to the blades.
- Insert a tennis ball into the cut hole of the container.
Glue a tail, which is made from cocktail straws, onto the lid. A model of this helicopter part can be made based on the real one. aircraft.
Matryoshka
The matryoshka is made using two techniques - working with plastic containers and papier-mâché. Select the maximum shaped container. Glue pieces of white paper dipped in PVA glue onto the surface.

Cut off the tough throat. Seal the hole using the same principle as the base of the bottle. When the base is dry, smooth the surface with a damp brush. Paint the blank according to the sketch of the matryoshka doll. You can use gouache or acrylic paints for these purposes.
Fly agarics
Prepare 2 containers – 2 liters and 0.5 liters. Cut off the bottom from the larger one and paint it with red paint. Make white dots. Treat the smaller container with white paint. Cut a rectangle out of paper and form a fringe on one side.

Glue to the middle of the white bottle. Fix the “cap” of the fly agaric on the white stem. You can make an additional fly agaric of smaller sizes and glue it to a larger element.
Household supplies made from plastic bottles
From a plastic bottle you can make not only jewelry or children's toys, but also functional products that are relevant in everyday life.
Item options:
- Flowerpots for indoor and garden flowers. Cut the container in half, give original form base and color.

- Country washbasin. Cut off the bottom part. Place the container upside down. When the lid is loosened slightly, water begins to pour out.
- From 10 identical containers you can make a broom for cleaning the street. Cut off the bottom parts. Fold each element in half lengthwise and make a fringe. Thread the elements, connecting them with wire.

- Containers cut in half can be ideal containers for seedlings in the garden. If you remove the covers, the cover will be additionally ventilated.
- If you cut off 1/3 of the top of the bottle, you get a wonderful container for storing pencils, crayons and other small items.

- Plastic containers can become the basis for weaving a variety of baskets that can be used around the house.
- If there is a zipper between the two parts of the cut container, you will get an original organizer for storing cotton wool and bandages.
- Cut the bottoms from several containers, string the pieces through the center of the element onto a metal rod. Distribute the bowls evenly along the rod. You will get a stand for jewelry.

- Cut the bottle in half. Cut a square at the base. This device will become a pocket for your phone, which fits onto the base. charger, and the phone fits into the bowl.
The craft can be decorated decoratively by using paints, rhinestones, beads, glass stones, beads, and ribbons. Elements can be attached to a plastic bottle by using a construction stapler or a glue gun.
Article format: Natalie Podolskaya
Video about plastic crafts
DIY plastic bottle craft - video instructions for making:
Since Soviet times, bottles have been collected and invented use on the farm.
Today they are used to make jewelry, toys and even furniture.
Summer residents use containers to decorate their plots.
Let's look at examples of how you can make crafts from plastic bottles with your own hands for the street, cottage, garden, vegetable garden, what other components are needed for this and consider photos of the products.
We offer you step-by-step instructions for making a palm tree craft with photos.
To make a palm tree from plastic containers, brown bottles are cut to the hangers, the edges are cut into triangles and folded back. In the middle of the bottom drill a hole and string it on or a metal rod installed on the ground.

Green bottles are cut in half lengthwise. The edges of the workpieces are cut, imitating small leaves.

Plastic leaves bolted together.

For the lush crown of palm trees assembled from several levels and glued to the trunk.
Looks beautiful near the gazebos and in front of the entrance to the site.

Flowers
For flowers, prepare a trunk - a painted thick wire.
To make chamomile, you will need white containers. Most often, milk drinks are sold in this type of store. Petals are cut out of it, fastened together by drilling a hole and tightening it with a bolt. The middle is made from the bottom of a brown bottle.

The bell is also cut out of white bottles. They cut off their heads, cutting the edges with corners. A hole is pierced in the lid, where a wire is inserted and attached to the barrel.
These flowers will decorate paths in the garden or between the beds.

Thus, the variety of flowers made depends on how to cut the blanks and how to fasten them together.
Vase
Now let's look at how to make a small vase for decorating a porch or window sill on the veranda. You will need:
- 2 bottles;
- scissors;
- spray paint;
- PVA glue;
The bottom and neck are cut off from one bottle. The thread is cut off from the latter, turned over and the wide side is attached to the bottom glue gun. The upper part is cut off from the second, the thread is removed, and the edges are decorated with a wavy line. The narrow part is glued to the first workpiece.
Surface of the vase smear with glue and sprinkle her rice. After drying, the bottles are painted with spray paint in two colors.

Birdhouse
A circle is cut out on the side, it will become the entrance. To the top glue parts from disks, imitating tiles. The house is painted, decorated beautifully and straw or tow is placed inside.
To make it more convenient for birds to climb inside the birdhouse, glue a round stick or a piece of pencil in front of entrance. A wire is threaded through the lid to form a loop.

Flowerbed or flower garden
Fencing flower beds with bottles has become common. They are cut, filled with soil and arranged in flower beds, as shown in the photo.

In the ground next to the plants put upside down bottoms and paint them. The resulting figures are, for example, ladybug or flower.
Figurines for the garden in the form of animals
Animals from bottles are made as toys for children's playgrounds in the country or to decorate the garden. You can create favorite cartoon character, a copy of pets or make any fantasy come true.
Examples of such work are in the photo below.
Cat
These figures will become great decoration on the porch or in front of the gazebo. What you will need for this composition:
- bottles 1.5 l and 0.5 l;
- stationery knife;
- paints;
- glue gun;
- color package.
For stability the container is filled with earth, it will become the body of a cat. The remaining details are cut out from the second container: muzzle, ears, tail.
The cut off necks are used to make cat paws. Fasten everything with glue and paint. A bow from a bag or other decorations is glued to the neck.

Piglets
Such pigs are suitable decoration for a playground or garden beds. The container is filled with sand, the ears and tail are glued on.
Capacity painted in pink color and draw nostrils with eyes.
The photo below shows two examples of how you can make a pig.

Frog
To create such a “frog princess”, you will need:
- about 12 green containers and one yellow;
- stationery knife and scissors;
- glue gun;
- a regular lighter and gas cylinder with a lighter attachment.
First, the body is made. Two bottles cut from one side along. Remove the neck, unfold it and cut off the excess. Glue them together so that you get a body and an open mouth.
“Warts” are burned on the back.
The necks of the other two containers, along with the lids, will serve as bulging eyes.
On a yellow container, a pattern is cut out with a stationery knife on the base for the future crown. Then the container is turned inside out, connecting the neck and bottom inside with glue. The crown is ready, it is attached to the top of the head.
For the paws, blanks are cut out from seven bottles and carefully warmed up with fire from a gas cylinder so that the plastic deforms and becomes pliable. The blanks are glued together and attached to the body. All that remains is to melt the sharp edges with a lighter.

Peacock
To make a peacock, except for bottles, additional materials will be needed:
- two metal rods;
- Styrofoam;
- metal grid;
- wire;
- paint in cans;
- knife and scissors;
- lighter.
The rods will become the legs of a bird, the body is attached to them from a 5 liter canister. The neck consists of two bottles. The head is cut out of foam plastic.
For the wings and tail, use a mesh, to which feathers tied with wire, cut with scissors.

Feathers for the body can be cut similarly to the tail or make them smaller and thinner, glue to the body with glue.
Next, the beak and crest on the head are made. Before making the peacock's plumage, feathers melt with a lighter and stick into foam. At the end, the craft is painted from a balloon and patterns are drawn on the tail.

Swan
Homemade swans decorate flower beds, flower beds and ponds.
For the simplest option to make a swan you will need:
- net;
- Styrofoam;
- wire;
- thick metal rod;
- corrugated hose (suitable for a washing machine);
- paints.
A body frame is made from mesh, and plastic feather blanks are tied to it. The metal rod is bent, it will act as a neck. Cover it with a hose.
The head is cut out of foam plastic and placed on the end of the rod. The figure is painted and placed in the right place.

Hedgehog
The hedgehog's body is made from a barrel-shaped container. The middle of another bottle is cut out and rolled into a cone, this will be the muzzle.
The parts are fastened with a heat gun, and the ears are made in the same way.
From other bottles make strips and cut out needles, glue them to the body with plates, overlapping.
The eyes are cut out of plastic and painted. The nose is formed from the scraps. The toes are made from cocktail straws.
At the end the craft is painted and it is ready to decorate the garden.

Hare
One of the simplest designs.
A 3-5 liter bottle is filled with sand. From another cut out the ears and glue them to the base. All that remains is to draw a funny face of a hare.

Donkey
To make a donkey you need:
- two large containers;
- three bottles of 1.5 l;
- rods or plastic pipes for legs, four pieces;
- wire for tail;
- glue and paints.
From a five-liter container make a torso and glue the neck to it from 1.5 l.
For the muzzle, cut off the bottom, carefully shape the edges into a mouth, and attach half the bottle in the form of a head. Ears are cut out from a five-liter container and glue it.
The entire structure is placed on its “legs” and painted.

Wolf
To create a wolf, the hero of the cartoon “Once Upon a Time There Was a Dog,” additional materials needed:
- metal grid;
- wire;
- polyurethane foam.
The base of the body is a large container and a net. Wire arms and legs are attached to them.
The muzzle is made from a 5-liter bottle, and the nose from a 2-liter bottle. The main structure is tied wire to the picket fence, it is dug into the ground.
The figure is given the desired shape using polyurethane foam; after hardening, the excess is cut off and the surface is treated with sandpaper.
Final stage– coloring.

beds
Summer residents use bottles for seedlings and creating such neat beds.
Manufacturing is very simple: you need to cut a hole in the side, fill with soil and plant shift.

Round bottles cut across, we get “glasses”.
We suggest you look at the pictures below and use them as an example of making a flower bed.

Drip irrigation
For drip watering of plants in greenhouses no need to buy special equipment.
The bottoms of the bottles are cut off and holes are made in the caps. To distribute water to several plants, you can add tubes from IVs. The inverted container is placed in the desired location and filled with water.

Fence for the front garden
Plastic containers can be good material for making fences in vegetable gardens and front gardens.
Pillars are dug in and made in containers through holes, bottom and top in each. passes through them thick stretched wire, fixed to poles.

Pinwheel
A simple pinwheel, cut from one bottle. A hole is made in the middle of the workpiece, a nail with a large head is driven through it or a bolt is threaded through it.
They are attached to a vertical surface not tightly, but loosely, so that the wind turns the pinwheel.

Berries
Spectacular decorations for flower beds and beds. Select barrel bottles, cut off the neck, bottom mounted on metal rods, playing the role of a stem.
Leaves are cut out of green plastic, the structure is assembled, painted and stuck into the ground.

ladybugs
Cute bugs from painted bottoms and ping pong balls, will decorate the children's play area in the country.

Butterflies
On transparent plastic paint with stained glass paints bright butterflies, and then simply cut them out. Such crafts made from PET bottles can be used outdoors and in the apartment.
They are placed on the leaves indoor plants using double-sided tape or glued to wallpaper.

Approximate number of bottles for crafts
The table shows what can be made from plastic containers and approximately how many bottles are needed for a particular craft.
Useful video
This video presents ideas of what you can make from plastic bottles with your own hands:
Hello everyone, friends!🙌💖
Today I thought for a long time about what topic to write a review on. And after reviewing a lot of material, I came to the conclusion that the article would be about homemade products for plots and houses. It would seem like a plastic bottle, throw it away and whatever else can be done with it. And it turns out there are a lot of interesting and original things.
For example, from them you can make flowers, a feeder, a flowerpot, decorate a flowerbed with extraordinary works and much more. And in this article we will try to show you the most amazing ideas for creativity. So, we don’t throw away the eggplants, as people call them, they will come in handy for crafts in the garden or can be used as decoration country house, garden or vegetable garden. In a word, they will be one hundred percent useful in everyday life.
Tell us how you decorate your soda patches? Maybe you have original ideas for landscaping a cottage or home. We are very interested, be sure to write to us in the comments.😉😊 Show your imagination and success in any business is guaranteed to you.
Make yourself comfortable in your chair because the review will be long and exciting. 😉
Crafts from plastic bottles for the garden, garden (photo with description)
The warmth is getting closer and gardeners are already thinking about how to improve their favorite land. Let's look at the most popular ideas that are easy to make with your own hands. And as an option, we suggest first making a flowerbed with a train.
To work we will need:
- plastic bottles of different sizes;
- dye.
- scissors.
We paint the driver's cabin blue, and draw the locomotive's eyes, nose and smile. Then take the eggplants and cut one side into a rectangle. We paint it with waterproof paint and make the wheels of the locomotive from logs. We place the cars close to each other. We fix the pipes with hot glue.

We found a colorful flowerbed caterpillar. It is made on the same principle as a steam locomotive, only the legs are cut out of linoleum, the muzzle is drawn on a wooden circle, and antennae are made from plastic eggs and wire.

We liked two garden figurines. Nice, right?

We found pigs to be an interesting option. And, they are convenient because they are mobile, portable piglets - the flower beds look amazing. Making them is not difficult.

For work we need:
- 6 liter plastic bottle;
- 4 bottle of 1.5 or 2 liters;
- spray paint;
- hot glue.
Let's take 4 1.5 liter bottles and cut off the tops of all of them as in the picture below. They will serve as pig's legs for us.


Apply hot glue to the drawn circle and glue the legs. Then, using a ruler and a felt-tip pen, we draw lines to cut out the back. This is necessary so that flowers can be planted inside.

Don't forget to make small holes when watering your flowers to allow any unnecessary moisture to drain out. We cut out the pig's ears and tail from plastic, fixing them all with hot glue. We take paint and apply it to the craft.

We draw eyes and heels. The mobile flower bed is ready. We draw eyes and heels. The mobile flower bed is ready. You can put it anywhere and anywhere.

If you want the paint to last much longer, then choose waterproof, or better yet, cover it with a good varnish.

All people have different fantasies, but creative works are amazing and never cease to amaze. For the next creativity we will need a large plastic container. Let's cut her off top part, and then treat the outside with a degreaser. We paint acrylic paint imitating brick laying. The flower pot (flower bed) is ready. We plant beautiful flowers. Then you can do everything as in the photo, or you can leave it like that. It will also look very beautiful.

How do you feel about the number of swans on your property? It looks very interesting and beautiful.

In fact, all the works are wonderful; what distinguishes them is that some are easy to make, while others are more difficult.

If you have large plot and you don’t plan to plant it completely, but it’s a shame to throw it away, then the following ideas are for you.

I liked the idea with the swans on the pond. Amazing work, do you like it?

We found a photo for you with a description of how to make a lily with your own hands for a pond. All this is of course a lot of work.

From plastic containers you can make a means for watering flowers, local area where beautiful green grass grows. In addition, you will save water, which is very good. Drip irrigation from above and below the root.

From this material, there can be not only beautiful work for decorating the garden, but also useful. It’s not possible to buy a watering system for the lawn, so it’s not a problem. We will make everything you want ourselves.😊😉

Cheap and the lawn is green. Class! Since we are talking about useful things, I bring to your attention some charming feeders that will also decorate your garden. I really like them, they're just a sight for sore eyes. And by the way, they are suitable for decorating a kindergarten.

Let's take a closer look at how to make an interesting bird feeder. And so we cut off the top of the bottle, as in the photo.


Let's connect two parts and get a feeder with a roof.

We make four holes on the cork, insert a wire or rope through them and attach the feeder to the tree. We fix the roof with hot glue.

We paint the craft, dry it, add millet. We take care of the birds.

You can decorate the feeder however you like. Some people like everything to be kept to a minimum, while others like it to look catchy and make excellent DIY crafts catch the eye.
Original works from plastic containers for beginners
We often think about what to do with ourselves as a new person. We want to develop ourselves, and this is best done through creativity and no matter which one you choose. And so let’s move on to works made of plastic material, and in our case these are plastic eggplants.
We were looking for easy jobs so that a beginner could create beauty the first time. It's possible, don't be surprised. Be patient and willing. Perhaps a light one would be a bird feeder.

Take a 6-liter bottle and cut a window from the wall of the bottle. We make small holes on the side, insert two sticks and put cardboard inside. Sprinkle grain on it. You can crumble some bread or seeds into the bottom.

Let's move on to another creative work, namely, we will make flower pots.
We will need:
- Plastic bottle with a volume of 1.5-2 liters;
- dye;
- scissors
Cut the eggplant into three parts. Take the top part, circle the penny around the edge and make a wavy edge. Next, we’ll paint it in any color that suits your decor. We decorate the second part with different flowers or simply paint it.

There is another interesting option for a bottle pot. They can not only improve your dacha, but also place them at home or on the balcony. Take an eggplant and cut it in half or choose any other height. Using hot glue, glue the cork and then the eyes. The pot is ready for use. I think it's very cute.

And you can make something like this. The main thing here is time, desires and imagination.

Want to do vertical garden, then plastic bottles will help you with this.

It’s cool to grow fox lettuce, for example. Very comfortably!

What else can a novice master easily make? For the flowers, draw a leaf template. We trace around the bottom of the bottle. Cut out and turn away the leaves. We spray paint it in any color and fix the cork center in the center with hot glue. Oh, you can make a flower differently, paint the center. Two flowers look very cute.

To paint crafts, choose waterproof paint, or better yet, coat the top with varnish.
We decorate the fence with flowers, see the photo below for how it will look. What’s also good is that we make flowers from two parts of the bottle (top and bottom).

We landscape the path along the edges with eggplants. First we paint them, and then decorate the bottom in the shape of a flower.

The bells look amazing and are easy to make.

Master classes on making crafts from plastic bottles
It's time to move on to the master class. And we will create a donkey out of eggplants. You are ready? Then let's not delay, but get straight to the point.
For creativity we will need the following materials:
- drinking yoghurt bottles 4 pieces;
- one and a half shirt for the neck;
- Two-liter bottle for donkey's face;
- Three-liter bottle (you can use 5 liters) per body;
- One 1.5 l. on the ears;
- paints (gray and white).
We fix the eggplants together with hot glue or screws. The photo below shows how you should make a donkey.

We'll show you step by step photo how to make a donkey after all. We take the container for the body and cut off the top. We fix the yogurt lids to one side. Screw the containers to the lids.

We attach the neck and head to the donkey.

Here's another photo for you to see how it should turn out.

It remains to add a few details and the craft will look like a donkey. And, we make and attach the ears.

It is most convenient to paint with spray paint. When the paint dries, draw the eyes. The result is such a wonderful donkey.

How do you like this donkey?

The work process is the same, but the animal is different, including the giraffe. Everyone’s imagination is different, which is why animals turn out to be individual. And this is actually very cool!

This is what a giraffe looks like at the dacha.😊

The elephant is also a frequent visitor to many summer cottages. Don't believe me? Watch how to make it, and then we'll show you the real thing. The ears, legs, torso, tail are all made from plastic containers, but the trunk is made from a rubber hose or plastic pipe.

An elephant visiting a gardener's dacha.👨🌾

The elephants are so cute, just super. Be sure to make yourself such an unusual guest.

Most often, animals are made from plastic containers. It’s interesting for decorating the garden, and it’s much cheaper than buying garden figurines. Cute penguins look great.😉

How do you like having a big family? I love.

Palm trees, flamingos, and storks look original, but just imagine how they will show off in your dacha. Beauty!

Any activity is painstaking work, but it is worth it. Decorate your soybean plots and be the best!
Interesting ideas from a plastic bottle for children
Let's start making toys for children from plastic bottles with the simplest ones. Now our children cannot be surprised, but we will try, because it’s healthy to play with new homemade toys in the fresh air. I liked the plane, so let’s create it together.
For the toy we need:
- plastic container with a volume of 0.5 liters;
- double sided tape;
- colored paper;
Take a plastic container and remove the label completely. We wrap it with double-sided tape at the top and bottom. We tear off upper layer tape, then wrap it in White list paper. Pre-draw the tail of the airplane.

Glue the tail with glue and glue the paper to the bottle. You should get something like the photo below.

We draw two identical wings and glue them to the tail of the plane.

Don’t scold me too much, even though I have two sons, I still don’t remember what the parts of the plane are called.🤦♀️🤷♀️So we glue two cylinders of colored paper on the sides.

We glue two wings on the sides, our plane is almost ready.

We unscrew the lid, trace it, cut it out and decorate the plane. Let's not forget about the turntable at the nose of the plane. We made a children's toy easily and simply. It’s a pleasure to play with such a toy in the countryside.

You can choose any color. For example, we found such a plane. And everyone is good-looking.

Let's make a plane a little more complicated. You don’t need a lot of materials to create it, everything is the same, just add spray paint. We will also need:
- plastic containers;
- White paper;
- cardboard;
- two-way cattle;
- dye.
We measure the size of paper for the bottle, then apply double-sided tape to the edge. We wrap the container.

And we immediately form the tail of the plane.

Let's start making wings, we will make them from cardboard. To do this, we first draw according to size and then cut it out.

We still need other details. I won’t write the dimensions, they are clearly visible in the photo.

We glue it to the base of the plane with double-sided tape or hot glue. We create four turbines from paper and corks.

Then we glue the turbines to the plane.

We cover everything with paint and let it dry well. This is how it should work out for you. Choose the color to your taste.

We decorate the plane, cut out and add vents, and attach their buttons.

I liked the helicopter made from plastic containers; it also turns out to be a stunning, interesting option.

You can make a lot of interesting and fun things for children from plastic containers. You can have a tea party at fresh air. Then you simply need a service.

A house for dolls in the country is also necessary. Idea for inspiration.

For smaller kids, we’ll make these cool turtles.

It wouldn't hurt to have a piggy bank in the house. Cut a hole on the back. And you can decorate the pig beautifully. Children will put money there and learn to collect for their goals!

There are a lot of different ideas and they are all good in their own way. For those who don’t want to spend money on expensive sculptures, we suggest you decorate your favorite area with crafts made from plastic bottles. As you already understand, you can make anything from them: vases, animals, mobile flower beds, toys for children and much more. It’s simply impossible to count everything.
Now this type creativity is gaining more and more momentum, and there is nothing wrong with that. It’s nice when the garden is landscaped with your own hands and it’s really great.
Thank you for your attention!😍 Come visit us and share your impressions and works in the comments. Creative success! And remember everything you do with your hands is exclusive!👨🌾👍💖
Plastic bottles have been around for a long time and, in addition to their intended purpose, are used for a variety of purposes. Due to their durability, bottles are widely used in the country, where they are used to make crafts, vases, furniture and even greenhouses. Fantasy is not limited by anything - after all, the sizes and shapes of the bottles are varied, they bend and cut easily. Bright plastic figures will decorate your summer cottage and reduce the amount of garbage.
General principles for working with plastic bottles
If you want to decorate your dacha with crafts made from plastic bottles, you need to collect a lot of them: you will need both ordinary ones from water or lemonade, and thicker bottles from shampoo or dish soap. You can take large five-liter and small half-liter bottles - everything will go into use.
Instead of throwing plastic bottles in the trash, you can use them to decorate your garden.
First, the plastic must be thoroughly washed with soap or dish soap. This is best done by soaking the containers in a large bowl of hot (60–70 °C) water and then rinsing them with a hose under strong pressure.
To cut out any parts, you will need sharp, durable scissors or a knife. To decorate the bottles you will need waterproof, quick-drying paints:

To ensure that the paint adheres well to plastic, you can use:
- nylon brush (hair streaks may remain, you need to paint in at least two layers);
- with a foam sponge (using blotting movements, also cover in two layers).
The best way to paint plastic bottles is from a can of spray paint.
Decorating a children's playground with crafts made from plastic bottles
If garden plot it is large and there is the opportunity to organize a children's playground; plastic animals, birds and fairy-tale characters will fit perfectly into its design, because the figures will be bright and durable. Sly cats will chase nimble mice, gnomes will look after the plantings, a red fox will settle next to a cowardly hare, and an elephant will live near a fence with bright sunflowers. Bees, unlike real ones, will not sting, and a bull will not butt. A playground with such figures will be fun and interesting for children.
Photo gallery: figures made from plastic bottles for the playground
To make funny gnomes you will need not only bottles Children will not sit in such a train, but they will be able to ride toys Cute cats made from bottles will decorate any playground Bottle mice are well suited for small flowers or greenery  For crafts, you can also use thick bottles from detergents A touching baby elephant with a flower in its trunk looks beautiful against the backdrop of sunflowers. The frog princess and her friend the frog are comfortably seated among the green grass. With the help of gray, black and white paint, funny little bunny and mouse are obtained. A cunning fox can be planted in a flower garden. A bull from a plastic bottle is not at all scary. If use a little imagination, on the usual summer cottage Exotic penguins will settle in. Children will have fun on the playground with the characters of their favorite cartoons
How to make a bee from a plastic bottle
It is no secret that children are often afraid of flying and buzzing insects, although in most cases bees, beetles, and wasps fly about their business and do not bother anyone. In addition, they bring considerable benefits to the garden, pollinating trees and shrubs. To make little summer residents less afraid of bees, you can make them from plastic bottles. The smallest ones are suitable, from 300 ml to 0.5 l. Procedure:
- Pour yellow paint into a clean bottle (about a third full).
After pouring the paint into the bottle, carefully screw the cap on and shake
- Carefully screw the cap on, shake and turn over until the paint covers the entire bottle (if that doesn’t work, you can add more paint).
- Apply thin black tape (several rows) to the strips of the bottle.
For stripes we use thin black tape
- Cut two wings from a clean bottle and bend the ends with corners at the place where the wing will be attached to the bee.
To make the wings even, it is better to use a stencil
- Insert the wings into the slots on the back.
In order for the bee's wings to hold well, you need to bend the corners at the tips.
- Draw a muzzle on the lid with a thin brush and paint or varnish.
The bee's face should also be painted with permanent paint.
Decorating a recreation area using plastic bottles
Gardeners are hardworking people, but sometimes they also want to relax. Relaxation corners are usually designed with special care: after all, you want it to be beautiful and cozy. As elements landscape design You can use crafts from plastic bottles. In the relaxation zone you can place unusual animals and birds, artificial flowers and palm trees, colorful flower beds and even a plastic house.
Photo gallery: crafts from plastic bottles for a relaxation corner at the dacha
It’s not difficult to make such a hedgehog, you just need to cover an old bottle with a net and fill it with soil. An old broom plus painted in bright color five-liter bottle - now a hive for plastic bees is ready If you make a house out of bottles and cement, it will be quite durable. It will take a lot of time to lay out an entire wall of bottle caps. Simple but bright vases made from bottles can be placed on the porch or veranda. Inedible, but very bright fly agarics attract attention. With the help of red and black paint, you can lay out a bright flower bed from plastic bottles. Palm trees do not grow in our area, but why not create a paradise island for yourself with the help of skillful hands?
How to make a bird from plastic bottles: ideas and instructions
To decorate the recreation area you can make very beautiful fairy birds: swan, peacock, firebird or flamingo. The basis for all birds is the same, only the color of the feathers and the shape of the head and tail are different.
Photo gallery: birds made from plastic bottles
A cheerful cockerel, of course, will not wake you up in the morning, but will create a great mood for the whole day. Romantic swans in the pond are a real masterpiece of plastic art. Hunting enthusiasts will certainly enjoy the capercaillie. The pink flamingo looks very bright among the green grass.
To make birds, you will need bottles of different sizes: large five-liter and liter bottles, as well as wire, corrugated pipe, metal-plastic pipes or rods for legs. It is important to thoroughly wash, degrease and paint all parts before assembling the bird, since this cannot be done in finished form. Procedure:

Photo gallery: feather options for decorating a bird from a plastic bottle
To cut such feathers for a swan from a plastic bottle, it will take a lot of time. For a chic peacock tail, feathers are placed on top of each other. To make a plastic multi-colored parrot, feathers will need to not only be cut out, but also painted. Feathers for a peacock tail are usually decorated with characteristic “eyes” to give plastic bird more similar to the original
Video: swan from a plastic bottle
Plastic flowers are not a replacement, but a complement to real ones
Both real and artificial flowers will look harmonious in the relaxation corner. They will last a long time and save money on arranging a summer cottage.
Making chamomile from plastic bottles: master class
One of the most popular flowers in Russia - chamomile - is easy to make from white plastic bottles and wire. Procedure:
- Cut the bottle into two parts: straight and tapered.
- Also cut two or three more bottles into two parts and cut off the necks.
For the center of the chamomile, use a yellow or orange cap
- Pass a wire through the bottom of the chamomile, securing it through the lid.
- You can cut petals from a green bottle and attach them to the wire stem using thin wire or a lighter (if heated plastic leaves, they will be firmly attached to the stem).
Video: chamomile from a plastic bottle
Among the plastic flowers there are also guests from hot countries, for example, lotus, and the usual lilies of the valley, as well as bright tulips, multi-colored asters and fairy-tale flowers that have no “prototypes” among the real ones.
Photo gallery: flowers from plastic bottles
Before the real tulips bloom, you can decorate the flowerbed with plastic ones - you won’t be able to distinguish them in a few steps. You can make a lily of the valley from milk or kefir bottles. Bright sunflowers will create a sunny mood in the area. Red and white bells are in harmony with brick wall Houses  Plastic lotuses in a vase will serve as a wonderful decoration for your summer cottage
Bright crafts made from plastic bottles are not just decoration. They help brighten up leisure time at the dacha and save family budget, bring the whole family together for creative work and reduce the amount of waste.