The desire to decorate the house and the surrounding space has always been in the blood of creative personalities... Firstly, it is a pleasant pastime, and, secondly, you get a lot of pleasure from the result of your needlework. Flower lovers are often looking for original and beautiful pots in which to plant their plants. And it is not necessary to purchase unusual copies in stores, you can make them yourself from scrap materials. Pots are for home and garden, more precisely, for outdoor use. This article will discuss how to make your own flower pots from the materials available. Be sure to look at the photos and videos, they will undoubtedly come in handy.
Handy materials or how to make a masterpiece out of nothing
Everyone has unnecessary things in the house. The hand does not rise to throw them away. Then there is only one way out - to give objects new life! One of the manufacturing options is to use old canned food cans. Both large and small containers will do. It is enough to wash the jar, remove the sticker, bend the sharp edges with pliers and the high-tech style pot is ready. You can go ahead and apply any bright paint.
Advice. You can decorate banks different materials... For example, cloth, grains, stones, leather, fur, shells from kernels of nuts.
Plastic bottles are also considered a popular DIY potting material. From them you can make pots for climbing plants... And also make a floor pot with a stable base. To do this, you need a solid base to which the neck is attached. Completion is the decoration of the container.

Another great garden idea is old, worn shoes. Rubber boots, winter men's boots, sneakers, sneakers and even flip flops act as flower pots. In apartments, this style is inappropriate, but it is quite suitable for street decoration.
An old bucket can also be used as a planter. Just remove the handles and decorate it.
- a new trend in the field of needlework. There are no boundaries to the limit of imagination. Any project can be turned into reality.
Floor pot ideas
Floor pots or flowerpots are widely used for growing flowers both in the garden and in the apartment. There are many different options their decorations. Consider decorating a pot with cereals. You will need:
- plastic or ceramic pot;
- paper sheet;
- felt-tip pen or pencil;
- copy sheet;
- PVA glue;
- brushes;
- peas;
- small beans;
- buckwheat grain;
- beans;
- lentils;
- flax-seed;

There is nothing difficult in this method. So, start a master class on the manufacture and design of a floor flowerpot.
- Create a sketch and transfer it to the pot using carbon paper.
- Apply glue to part of the pattern.
- Sprinkle with any cereal.
- Repeat the manipulations with the remaining parts of the planter.
- Give the product a rest and in a day you can decorate a garden or a house with it.
Attention! There should be no areas on the surface of the pot that are not decorated with cereals.
Pot of cement and rags
Make a pot of unnecessary rags and cement mortar- easy peasy. From the name of the master class, it is immediately clear what materials you need.

- First, find an unwanted rag or old cloth.
- Soak it in a cement mortar.
- Place the cement-laden cloth on the bucket. Leave it on until it dries completely.
Advice. The dried pot can be covered with paint.
Pots of shells and pebbles
It should be noted that all design options flower pots do not differ in complexity. And the materials at hand can always be found among unnecessary things. Many who come from the sea bring small souvenirs for themselves - pebbles and shells (as a memory of a wonderful vacation). Of course, they can be put in an aquarium, and even sauerkraut can be sauteed in especially large specimens. But it is much better to use them, for example, for making floor planter for flowers. You will need:
- gypsum;
- plaster bandage;
- ceramic or plastic pot(can be replaced with a plastic mayonnaise bucket);
- pebbles and shells;
- colored soil for the aquarium;
- glue.
You will have a pot in a nautical style. It can be displayed in the garden or placed on the windowsill at home. But first, study step by step instructions... By following it, you will be able to create a beautiful planter the first time.

- Apply a plaster bandage soaked in water to the pot.
- It is necessary to cover the container with several layers of gypsum material.
- Make drain holes in the bottom of the pot if not provided.
- Apply a layer of plaster to the surface of the planter for strength.
- Repeat the procedure a few more times.
- Wait for it to dry completely. It will take about a day or so.
- Put pebbles, shells, etc. on glue.
- The flower pots in a nautical style are ready. Violets, cacti or aloe will look great in it. On the street, you can place roses, marigolds or lilies in it.
Outdoor, garden and outdoor pots are easy to make. Any unnecessary things will do: cans, plastic bottles, old shoes, bags, lamps, boxes, rubber tires, clothespins, newspapers, ribbons, wooden planks, vine or burlap. You need to have a great desire to decorate your home and very little free time. Making pots from scrap materials is very entertaining. This activity will appeal to both adults and children. And you can admire the result of your creation every day. Go for it and you will succeed!
DIY garden vases: video
Decorating flower pots: photo


Here is flower pot decoration can be crocheted. See the knitting pattern and photo of such a pots.

|
We knit a pots crochet with our own hands- introduces you to how to tie such a pots. To tie such a pot you will need: 20 grams of bobbin yarn No. 10 yellow color., Little Brown, hook n do-it-yourself flower pot (pots) crochet number 1 Planter size (flower pot) it turns out like this - diameter - 16 centimeters, height 18 centimeters. Knit the flowerpots in a circle using schemes 1 and 2. In scheme 2, the first row is the last row of the pattern according to scheme 1. The numbers in the diagram indicate the rows, and under the arches the number of air loops in them is indicated. The bottom should be knitted with yellow yarn, using scheme 1. First, knit a chain of 6 air loops and close it in a ring. Then you need to knit one lifting air loop and knit 11 single crochet into a ring. The row is closed by a connecting post. In scheme 1, this is the first row. When the bottom is tied, then you need to knit with a "chain stitch" and tie the 15th and last rows (look at the photo) After finishing work, the planter needs to be washed and starch very strongly. Then, while it is still wet, put it on a jar, for example, two liter and let it dry. |
Flower pots with pictures.
You will need:
Clay flower pots; paper napkins with images of flowers; acrylic lacquer(white and gray); matte transparent varnish for crafts; duct tape, paintbrush, sharp-tipped scissors, pencil, plastic bowl.
Work description.
1. First prime the surface of the pots with gray varnish and wait for it to dry. With a pencil, draw rectangles on the surface of the pots, in the center of which the flowers will then be glued.
2. Cover the outlines of the rectangles with adhesive tape so that their borders are clear and the varnish does not spread. Paint over the rectangles with white varnish. Let the varnish dry thoroughly.
3. Cut flowers out of paper napkins. In a plastic bowl, dilute the craft varnish with water according to the instructions supplied and cover with it the white quadranglenicknames on pots. Separate carefully upper layer flower napkins and stick them on each pot. While doing this, gently smooth the paper from the center to the edges, then press down to avoid bubbles or wrinkles. Finally, coat everything together with the color with varnish again so that the image does not come off or suffer from water damage. Wait for the varnish to dry well
- Any napkin you like
- Decoupage glue
- Medium Synthetic Brush
- Scissors
- Decorating item (in this case, a flower pot)
Divide the napkin into layers, for decoupage you only need the topmost, paint layer. Cut out the drawing, place it on the pot, cover thoroughly with glue so that the drawing is completely saturated. It is necessary to carefully smooth out the drawing - this is necessary so that air bubbles do not form under it. When the drawing is dry, apply varnish.
Flower pots in nautical style The marine theme in the interior is very popular. available means and why not support sea style rooms with flower pots in the same watery spirit? Moreover, unclaimed shells and pebbles brought from the sea are gathering dust on the shelves.
Decide in advance on the table with a pattern that you will lay out on the surface of the pot. Take a simple ceramic pot without glaze and use glue to attach shells or stones to it. Pieces can also be used here ceramic tiles, left over after repairs, or interesting fragments of broken dishes. Remember the harmony of color and shape when choosing different materials for the pot.
Leave the pot alone for a while for better fixing of the parts to the surface of the pot. The details can be painted on request. Then start filling in the spaces between the pieces. This can be done in at least two ways:
Method 1. In a 3 to 1 ratio, thoroughly mix the cement with PVA glue, carefully diluting with a little water to make a creamy mixture. Using this mixture, use a brush to fill in the empty spaces between the parts on the pot. Wait until the applied mixture begins to dry and, using a cloth or sponge, remove excess solution from the decorative parts.
Method 2. Gently apply glue with a thin brush between the parts glued to the surface of the pot. Keeping the pot tilted, sprinkle sea or river sand over the glue-smeared areas of the pot. Thus, you will fill the empty space on the surface between pieces of stones, shells, tiles and broken pieces of utensils.
Armed with a colorless nail polish or a special spray varnish, apply a thin layer to the surface of the finished flower pot. This will give durability to the paints, if you use them, and just add a little shine to the natural parts.
As you can see familiar objects, and the remnants of various things may well get a second life and still serve well for the benefit of beauty.

The shells can be glued around the rim or broken into small pieces, then spread the pot with glue (in small areas) and sprinkle with shell fragments (it looks very impressive.
The main rule is not to spare the glue! The shells should simply be recessed in it.
When the glue dries, it will become transparent, then cover your product with varnish.
Everything that was found in the kitchen in jars in the closet - rice, millet, buckwheat, pumpkin seeds and coffee grains - was glued to the "Moment Crystal". Rice is pre-painted with ordinary gouache. Then everything is varnished. ... For simplicity, it is done like this: it is smeared with glue, then it is sprinkled with cereals abundantly (over the dish so that different sides did not crumble), it presses a little and that's it. And it is varnished after everything has dried with the usual colorless for interior work.
Pot decorated with colored beads
Choose the beads or beads that you like, come up with a pattern, you can pour it in a mess. Only after that you spread glue on small areas of the pot and glue the beads, after drying, apply a layer of varnish.

Plain plastic pots. And regular gift paper (used). Cut and stick on 2-sided tape. The adhesive tape is glued only along 2 lines - from top to bottom. And also along the closing edges.
An ordinary plastic pot is wrapped with thread (in this case, a twine rope)
If you are decorating your pot with threads, you will need thick threads of different colors. You need to gradually spread glue on the pot and wind the threads around it. This way you can make a striped pot. You can also decorate with small artificial flowers.
Remains of ropes, yarn and ribbons for business  For lovers of needlework (macrame, knitting, weaving), after finishing work, trims of ribbons, threads and ropes of a wide variety of colors and textures remain. It is already unrealistic to make any specific thing out of them, but it is a pity to throw it away. So they accumulate in the house like Plyushkin's.
Take a simple plastic or metal pot, use a brush to apply glue (PVA, Moment, any other suitable for gluing different objects) to the bottom of the pot. Start wrapping the pot from the bottom, pulling on the material of your choice - rope, tape or thick yarn, trying to do this, pressing one row tightly against the other. Apply glue to next part pot and repeat in the same way.
Thus, you can decorate the pot by combining cords and ribbons of different color, texture and thickness. Thick ropes and threads can be used as a basis for winding, and with thin yarn or ribbons you can decorate the wrapped pots on top, laying out different patterns from them and gluing them to the base. On such a pot, buttons, bones from fruit plants, nutshell
There was a simple plastic pot, for 4 hryvnyas for a rosette, and with the help of knitting threads and a ribbon it became like this ... 

The pot is glued with colored aquarium primer or colored stones.
For this we spread small area pot with glue and
sprinkle with primer, lightly pressing. After drying, you can paint in any desired color, or leave it like that. And varnish
Even such an ordinary element as a clay pot can become a bright and interesting detail of the entire garden design.
Making a flower pot with your own hands- the process is extremely entertaining and very simple.
Materials:
- clay pot
- dye. It is best to use acrylic paint
- protective face mask
- latex gloves
- brush
- sandpaper. Use a very delicate sandpaper with fine grains of sand.
- fine tip glue gun
- seashells
Instructions:
1.Prepare the pot for painting. It must be clean and dry.
2.Using a brush, apply a layer of paint to the outside of the pot. Don't forget to paint over the top edge of the pot and a few centimeters on the inside as well.
Leave the pot to dry for 1 hour.
3. Gently sand the pot with sandpaper.
4. Use a glue gun to fix the shells. You can create a variety of patterns and ornaments.
5. When the glue is dry, paste into new pot plant (without removing it from the plastic pot) and cover the ground with a little moss.
It’s so easy arrange a flower pot with your own hands.
 You can not only decorate flower pots with your own hands, but also completely transform them, giving them the necessary brightness and originality. Agree that standard pots of white or brown are too boring, and after the transformation they can become not only a frame for plants, but also a colorful interior detail.
For a person with a fantasy and creative approach decoration of flower pots with my own hands will not be a problem, there are many ways. You can use any materials at hand - fabric and colorful beads, twine and ribbons, pebbles and seashells, use decoupage technique or paint the pots by hand. In this article, we will show you how to decorate a takanyu flower pot.
For work we need standard flower pots, pattern paper, pencils and scissors, a wide brush, PVA glue, fabric and sharp knife... The fabric should be chosen with an interesting pattern or texture, but it is desirable that it be combined with the rest of the interior details.

Share ideas with your friends
From plastic bottles you can also make interesting pots for flowers and other plants. For some reason, they are most often made in the form of pigs, probably because it is easiest. Here's the beauty:
- Place the piece cut from the fabric in a flat container and pour the thickener on top, then distribute it with a brush over the surface of the fabric. We take out the fabric and let it drain. The material is not wrung out so that it does not wrinkle.
- The fabric is wrapped around the pot, smoothing carefully and paying attention to the protrusion of the fabric near the edge of the pot.
- We trim the fabric allowances, make cuts in a circle and fold them over the edge of the pot. If necessary, you can use PVA glue. We make the same cuts at the base of the pot, bend the fabric under the edge and level it, leaving the hole in the bottom uncovered.
- If you wish, you can decorate the pot with a decorative bow. For it, cut off a piece of fabric one-third of the height of the pot and 2 times the length of the width. We cover it with hardener and bend the opposite pieces of fabric so that they connect in the middle. Then dry it for 45 minutes. Then we lay the workpiece on the table with the wrong side up and connect the short sides in the center. We press them and let them dry. Insert pieces of thick paper inside the bow to maintain its shape and let the bow dry completely. In the meantime, we cut out the central part from the same fabric and cover with a hardener. We tie its center of the bow, and then, applying PVA glue to the wrong side, we apply our bow to the pot and fix it.
Today I want to bring to your attention an idea of how to turn an ordinary old paint can into a very pretty flower pot.
We need:
Supplies:
Paint can
-Nail, hammer
- Waterproof fabric
-Glue
-Centimeter
1. Wash and dry your paint can.
2. Mark a point in the center of the bottom of the can and punch through it with a nail.
3. Measure the size of the can and cut the right amount of fabric
4. Gently glue the fabric onto the jar
5. Wait until the jar is dry and place your favorite plant... Voila!
A few examples of how a napkin applique or do-it-yourself decoupage transforms the simplest objects, namely a flower pot.
In many ways, the result of the work depends on the napkin with which pattern you have chosen.
A flower pot decorated using decoupage technique looks beautiful even with indoor flower and as a stand for pens, pencils, markers.


By the way, do-it-yourself decoupage is a way out for those who dream of equally decorated flower pots. You can decorate flower pots in the same style using decoupage technique.
Traffic jams!
Any objects and materials can be used for decoration. For example, try decorating a flowerpot with bottle corks.

Take a regular plastic planter and sand its surface with sandpaper.

Then apply to it for ceramic tiles. Place the glue in a thick layer of about 1.5 cm.

Press the plugs into the glue mass so that they fit as tightly as possible to each other.

The plugs can be glued with the convex side up or with the concave side. For convenience, do the decor in stages. Apply glue and cork to a small part of the surface, then to the next, and so on.

So that the spaces between the plugs are not empty, fill them with any small metal objects: nuts, screws, bolts, blocks, the main thing is that they do not stick out with a point outward. Press down firmly with the palm of your hand, but not firmly, being careful not to squeeze out the glue. Leave the pot for a few hours (read the instructions on the glue package) until it dries completely.

Although it is not customary to give flower pots to men, such a little thing will perfectly fit into a young man.
Designer Svetlana Barsukova
[email protected]
Do you want to apply your imagination? Amazing! What happens if you take an ordinary ceramic pot, some pasta, nuts and cereals? Can't imagine, with all this it will be possible to create a whole work of art.

And so, today we need: a pot, various pasta, seeds, spices, glue - thick and quickly drying, thin rubber gloves, toothpicks, a medium-thick brush, gold spray. 
Let's start with a rough design model. Probably, we will make it separately so as not to cause troubles while working with the pot. 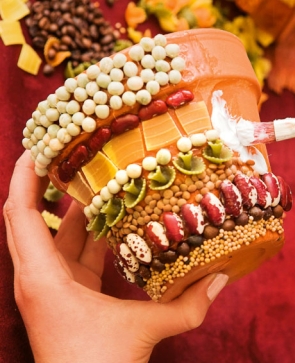
We will spread the pot with glue, not over the entire surface, but on the working one, since the glue dries very quickly. we apply a thick layer, since the decor elements will have to be pressed into it a little. 
Wait until the glue dries. For small parts you can use a toothpick. 
When the glue is completely dry, paint the necessary parts with gold spray.
My favorite topic is decorating flower pots. With the arrival of spring, it breaks out in me with new strength, especially after going to garden and flower shops, such as OBI. Of course, there are a lot of flower pots in them and for every taste, while existing flower pots can be updated and made stylish.
Idea 1. Draw a picture on the pot with stamps. The good thing about this idea is that by using one color, you can use different patterns, and flower pots will look stylish.

Idea 2. I liked the idea - to wrap the flower pot with bright threads and glue multi-colored buttons to them.

Idea 3. For lovers of knitting - knitted flower pots. It is better to use them for decorating pots so that no water gets on the threads.

Idea 4. Stylish decoration of flower pots is obtained by using volumetric scrapbooking kits - to glue the flower pots with them.


Decorating flower pots with your own hands is an exciting activity that allows you to turn banal, unnoticeable or just boring clay and plastic pots into exquisite decorative elements.
The ideal material for decoration is untreated clay pots without painting and decorations: they are inexpensive and the plants feel great in them, while plastic containers do not have sufficient porosity, and therefore do not let them into the root system required amount air. For original decoration flower pots, almost all hand-made techniques are applicable, from artistic painting and decoupage to crackle. Rich imagination, diligence and golden hands are able to create real miracles! We offer you several interesting ideas that will help breathe new life into nondescript pots and pots.
Decorating flower pots with eggshells using crackle technique
Crackle is a pattern of thin cracks on the surface of a ceramic product that is created using special means for decorative effect antiquity. Usually, craquelure varnishes are used for crackle, but we will use shells from boiled eggs... You can mix white and beige colour... If desired, the shell can generally be painted in any shade. Before work, the shell must be washed in warm water, degreased in a solution baking soda and dry. A dark base is ideal for natural white or beige shells, so if necessary, paint the light pot with dark acrylic paint.


Decorating antique pots: how to create a patina effect
A couple of simple manipulations and the most ordinary clay pot will turn into an antique rarity. How? One-two-three!
1. Degrease the surface of the pot with any alcohol-containing liquid and carefully process it with 70-grit sandpaper.
2. Cover the pot with a moisture-resistant putty with careless strokes and let it dry.
3. Apply marsh-colored paint on top of the putty. When it is dry, use 100-grit emery to lightly rub the places where the putty is too thick. Well, now your pot looks like it was dug up during the excavations of Ancient Rome!


Original decor of flower pots and pots
- Moss and cones.

- Birch bark.

- To keep your green friends always warm and cozy, knit cute blouses for them or just use sleeves from an old knitted sweater to make covers.


- A rustic "suit" made of burlap and buttons is perfect for a container with geraniums. We make a pattern, wrap the pot with sacking in several layers, mask the crumbling edges and decorate the "suit" with large decorative buttons, best of all - wooden. To firmly fix the burlap on the planter, we thread and fasten a tourniquet or elastic along the upper edge.


- We glue the pot with simple pencils with an elastic band of the same color and size, and decorate the composition with a satin and organza bow.

Decorating a flower pot with your own hands is a very interesting and productive activity. After all, from the simplest and most ordinary pot made of clay or plastic, you can create a unique piece of interior that will convey the mood of its owners.
Unprocessed clay pots are considered the most suitable pots for self-decoration, because their price is relatively low, and the plants feel as comfortable as possible in them. And here are their plastic cousins do not have high porosity which can prevent sufficient air from reaching the roots. To decorate the home for a plant in an original way with your own hands, you can use almost any kind of "hand-made", be it art painting, decoupage or more complex techniques, for example, crackle.
With imagination and skillful hands, you can create something amazing - to the delight of the owners and the envy of the guests! So, below are some fun ways to decorate a regular flower pot.
Crackle Eggshell Decor
Crackle is small cracks pattern on a ceramic surface. They create it using special tools for decorative aging surfaces. Most often, so-called craquelure varnishes are used for this, but more available material- eggshells. Shells of both beige and white... You can mix them, or even paint them in any color you like.
Before proceeding with the decor, you need to rinse the shell, and then degrease it in a baking soda solution and dry thoroughly. If the shell remains unpainted, a dark pot is best. In case he has light shade, then you will need to paint it in a darker color.

Pot decoration in oriental style
For this technique also will need eggshell , and some knowledge in the field of Japanese characters in order to select and correctly draw the desired character, with a certain meaning. In addition to the shell, it is necessary to prepare acetone, acrylic paints and varnish, PVA glue.
- It is necessary to thoroughly rinse the pot, and then degrease it with acetone. Then its entire surface is covered with an even layer of paint of the same color. When the paint is completely dry, the middle part of the pot needs to be painted in a different color (you can make it a contrasting background, or just white to make the hieroglyphs look brighter).
- Further, the selected symbol is drawn on four sides (the main thing is not to make a mistake in the drawing, because according to some beliefs they can bring happiness and good luck to the house).
- Then the eggshell is processed - the inner film is removed, thoroughly washed and degreased. Some of the shells are colored black, others can be left white or painted with the paint used for the middle of the pot if a different color was used.
- Now, around the hieroglyphs, you need to create a craquelure pattern: on small area put glue on the pot, attach a piece of shell and press on it with your finger. Then, with a toothpick, push the parts of the shell apart from each other so that there is a space between the cracks. This fills all the space between the pictures.
- The bottom of the pot also needs to be laid out with a shell of a different color.
- When everything is dry, the pot must be covered with several layers of varnish.
Decorating a flower pot with a mosaic
To decorate the flower pot with mosaics, you need to prepare: multi-colored stones, glass or pebbles, PVA glue or glue gun, tile grout, brush and varnish.

If pebbles were used for decoration, then no need to grout... Very interesting mosaics come out if you lay out the pot with pieces of broken dishes, ceramic tiles, seeds or shells. To glue the shells, you need to make papier-mâché: you need to finely chop newsprint and mix it with glue, the shells are filled to the brim with the resulting mixture, then they need to dry out for a day, after which the surface of the shells is smeared with glue and attached to the surface with light pressure.
Making a flower pot using decoupage technique with your own hands
With the help of decoupage, you can transfer a motive of any complexity to the pot, the main thing is find a napkin with a suitable pattern.

Not only napkins are suitable for decor using decoupage technique, but also lace, fabrics, and any printed products.
How to decorate a pot with sisal
Sisal is a fairly simple, but very effective material for decorating a pot. In order to fulfill decor with sisal threads, besides themselves, you only need construction glue. The entire surface of the object to be decorated must be coated with glue, and the threads must be laid in a circle. Pigtails woven from sisal look very beautiful. You can also try wavy patterns.
Rustic flower pot decoration
A pot decorated with twigs is an ideal home for modest plants that look like meadow flowers or wildflowers. By itself, this type of decoration is very simple, but it looks very unusual. This will require: thin twigs, preferably even and similar to each other, burlap, twine. Instead of a pot, you can use a straight-sided jar by pre-drilling holes for drainage in its bottom.
- First, you need to prune the branches so that they are just above the pot.
- Then, using twine, you need to tie the pieces of the branches together.
- The container is wrapped in burlap, and its edges are fixed with glue.
- Tied branches are laid on the burlap, and their ends are connected with a bow made of twine.
DIY patina effect
For fans of Provence, country style, as well as simply those who like antiquity will like this way of decorating a flower pot. The only caveat is that only clay will do.

Flower pots decoration idea


For DIY flowers. Almost all families grow houseplants or flowers in the garden. It looks very interesting if standard flower pots are placed in an unusual planter. Of course, there are a lot of bright and original models pots, but any person wants to bring individuality and some zest to their home or garden. There are a lot of options on how to make a flowerpot with your own hands, it remains only to choose the material that will look most appropriate in your or home
Advice! It is worth remembering that, unlike a flower pot, a flowerpot does not have special holes in the bottom, from which water could pour out after watering. Do not forget to drain it from the pots so that the roots of the plants do not rot. Free space between the planter and flower pot or other container in which flowers grow, usually lined with moss or gravel so that the pot does not "dangle" inside.
Do-it-yourself flowerpot: building material
Surely after the repair, any housewife has some unused materials that can be adapted to create pots:
- If you have slats, beams or other boards, you can create wooden planter ... First, you have to cut out equal parts for the walls, and then connect them with nails or glue. The walls and bottom of the planter can be designed in the form of a lattice, or they can be solid. For oblong bowls with flowers will suit pots-box in the form of a small fence... This design is appropriate in an apartment or.
- Quite easy to do do-it-yourself pots for the garden from the remains of logs , however, it is better to entrust this matter to a man. A log about 1-2 meters long can be resting on two small logs to make a kind of bench, or simply put on the ground horizontally. Then in a large log is carved interior, only the walls and the bottom remain. Inside you can put small bowls with petunias or others.
- From the remains of ceramic tiles, you can make a bright planter ... To do this, you need only 5 parts, one of which will become the bottom, and the rest - the walls. The easiest way is to connect the parts with glue. Spectacular interior items are obtained from mirror tiles, they are easy to fit into modern minimalist interior or style.
- When from construction and garden work burlap or other thick fabric, can be made pots for small plants ... To do this, you need to cut out two identical square or semicircular parts and sew them on three sides. For a more complex pattern, you will have to choose a base in the form of a wire that will shape the product. These pockets look great on a fence. country house or on the balcony.
Planters made of natural materials
What could be easier than using the materials that are given to us to create flowerpots and pots nature? In the nearest forest or by the river, you can find something that will subsequently significantly transform your interior:
- A beautiful planter will turn out from pebbles - small streamlined stones. They are glued together, giving the future product unusual shape... Similarly, you can use nut shells, tree cuts, small twigs, cones, etc.
- Can be done do-it-yourself pots from the stump ... A core is cut out in it, into which a large plant, such as a fern, is placed. If you make several such stumps at the same time, you get a whole glade in the garden.
- Eco-style planters can be woven from a vine. Weaving from a vine is a rather difficult business for a beginner, but the products are very effective. You can hang or put such pots both in the house and in the garden.