Almost everyone who acquires a piece of land first of all begins to worry about the question of how to quickly build a shed without a foundation with your own hands. After all, when the construction of a house is just beginning, you cannot do without a temporary structure in which you can store a working tool, and even wait out the bad weather yourself. At the same time, it is not at all required to build a capital structure, because it will require much more investment of time, effort and money, and also may not fit into the further interior of your site.
The best option is to make a shed without using the foundation with your own hands. At the same time, you do not need to try to build a structure for decades. During the construction phase of a residential building, the barn will serve as a storage facility for working tools and some building materials. In the future, if desired, it can be disassembled and moved to a new place, while placing it on the foundation.
What types of barns are there:
- brick;
- foam block;
- with wooden or metal framewhich is subsequently sheathed facing materials;
- boardwalk.
Usually, the construction of a structure without a foundation with your own hands is carried out from light materials that do not require a long and careful installation. Therefore, the first three types of buildings are not suitable for this. They have an impressive mass, so a solid support is necessary for their reliable installation. The board sheds are ideal option in order to carry out construction without a foundation. They are quick to install, have a relatively low weight, and also do not require the purchase of new special materials. They can be made from the usual cuttings and leftovers of boards that are available at every construction site. In some cases, for construction without a foundation with their own hands, they use an oriented strand board (OSB), insulated from the inside with expanded clay.
The main advantages of installing a shed without a foundation
- have small dimensions, due to which, for their construction, a minimum of materials are required;
- a pitched roof (the second floor is not needed in principle, the roof performs an exclusively protective function);
- minimum cost of materials (the frame is made of beams and is not sheathed edged board, and you can use the remnants of materials from the construction of the main house);
- do not require the embodiment of various design ideas;
- they can be easily disassembled and moved to a new location.
In this case, it is necessary to consider the option that a shed without a foundation can be made not only for storage various materials and storage of tools, from it you can make a full-fledged temporary dwelling for living at the facility in summer period... Moreover, in terms of quality, it will practically not be inferior to buildings erected on the foundation.
The main options for building a barn without a foundation with your own hands
Initially, it is worth noting that although such structures are called - without a foundation, they must have some solid foundation. Otherwise, in case of subsidence or heavy precipitation, it may simply "float" and fall apart. Usually this function is performed by reinforced corner posts, which are dug into the ground to the maximum.
Installing a barn on wooden posts
 Before starting construction, carry out preparatory work... The place where the structure will be erected is cleaned of debris and leveled. If possible, then it is covered with gravel and tamped. Further, the process of building a barn proceeds in the following sequence:
- the perimeter of the future structure is outlined on the ground;
- in two corners (not diagonally) three-meter wooden pillars are dug in (to a depth of at least 0.5 meters), while the part of them that will be in the ground turns into tar paper, which will prevent their rotting and rapid destruction;
- two rear three-meter pillars are dug 0.2 meters deeper into the ground (this is necessary to ensure the roof slope);
- connect all the pillars wooden beams in three places: at the bottom, at the top and in the middle;
- the resulting frame is sheathed with boards in the horizontal or vertical direction;
- cut out window and door openings;
- install a roof strap and sew it up with boards, on top of which roofing material or other similar material is laid;
- if necessary, install rainwater drains;
- install doors, windows, make interior decoration;
- an important step is the treatment of the finished structure with antiseptic agents, thus, it will not be subject to rotting and mold formation and will become more durable;
- if desired, produce the final finish and external decoration of the barn.
This design is usually very practical, pleasing to the eye and pretty neat. At the same time, it does not require serious financial costs and can actually be done in 1-2 days, and it can last up to 5-7 years.
Building a barn with your own hands using a metal-welded structure
The whole principle of building a barn is very similar to the first method. However, such structures are much stronger, more reliable and provide for a longer service life. Consider the main stages of building such a barn:
- we clean and mark on our site the future place for construction;
- then we do the same work as in the previous case, except that instead of wooden posts, it is necessary to use metal pipes that have enlarged strength characteristics and practically not subject to destruction over time;
- the pillars are connected along the perimeter metal pipes by welding, thus, the frame is gaining the required rigidity;
- all subsequent actions are completely similar to the first case, with a slight difference in the use of some materials (for example, the roof is usually covered with corrugated board or metal tiles, and polished boards are used for sheathing);
- drains for rainwater are made by hand or galvanized steel or metal-plastic.
The result is a shed almost identical to the structure, as in the first case. However, it will have a more aesthetic appearance and have increased reliability and durability. Of the disadvantages of this type of structure, it is worth noting that they will require slightly more time to install, the presence of specific skills (for example, the ability to make welding works), and also, they will have a slightly higher total cost.
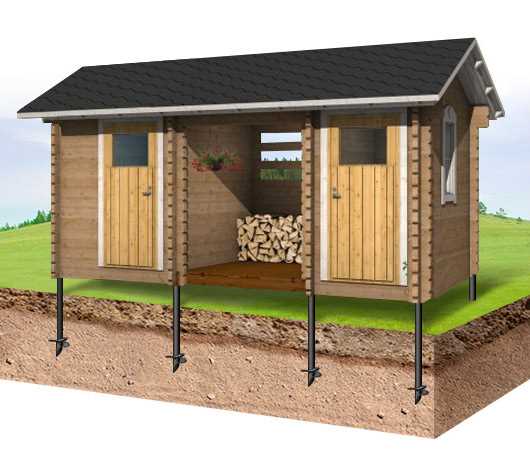
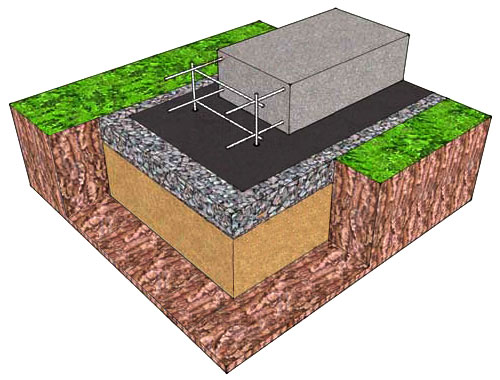
Also, the option of erecting a temporary structure on metal piles is possible. They will be a reliable foundation that can replace the concrete foundation.
As you can see, the construction of this type of buildings without a foundation with your own hands does not take much time and can be performed even by non-professional builders in a minimum period of time (usually 1-2 days). At the same time, such structures are relatively reliable, and also do not require large financial and time costs.
Many owners, after the construction of the main residential building, leave such buildings and do not tolerate them. Moreover, if the barn has lost its original appearance since time, then it can be additionally decorated with various decorative elements: sheathe with corrugated board, plant and run on the walls climbing plants etc. With a high-quality initial construction, a do-it-yourself shed without a foundation can perform its basic functions for many years.
When designing the foundation for a shed or a large utility block, the main aspect is to reduce the construction budget with your own hands and ensure the maximum possible resource. Therefore, floating slabs and belts of MZLF are rarely used, pile and columnar grillages are implemented. However, on complex soils, with a high groundwater level and steep slopes, it is necessary to take into account the SP standards and ensure the protection of underground power structures with waterproofing materials and heaters from moisture and swelling, respectively.
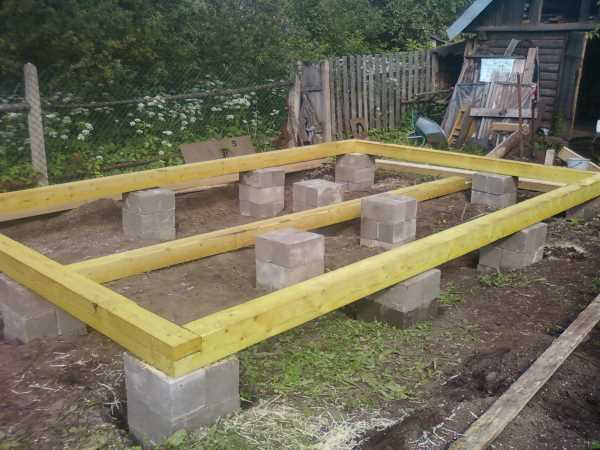
Choosing a foundation for a barn, an individual developer, construction education not having, often stops on pillars made of wall blocks of 2 x 2 x 4 dm format. He motivates this by the fact that the utility block will be small and ultralight, but no one canceled the laws of nature:
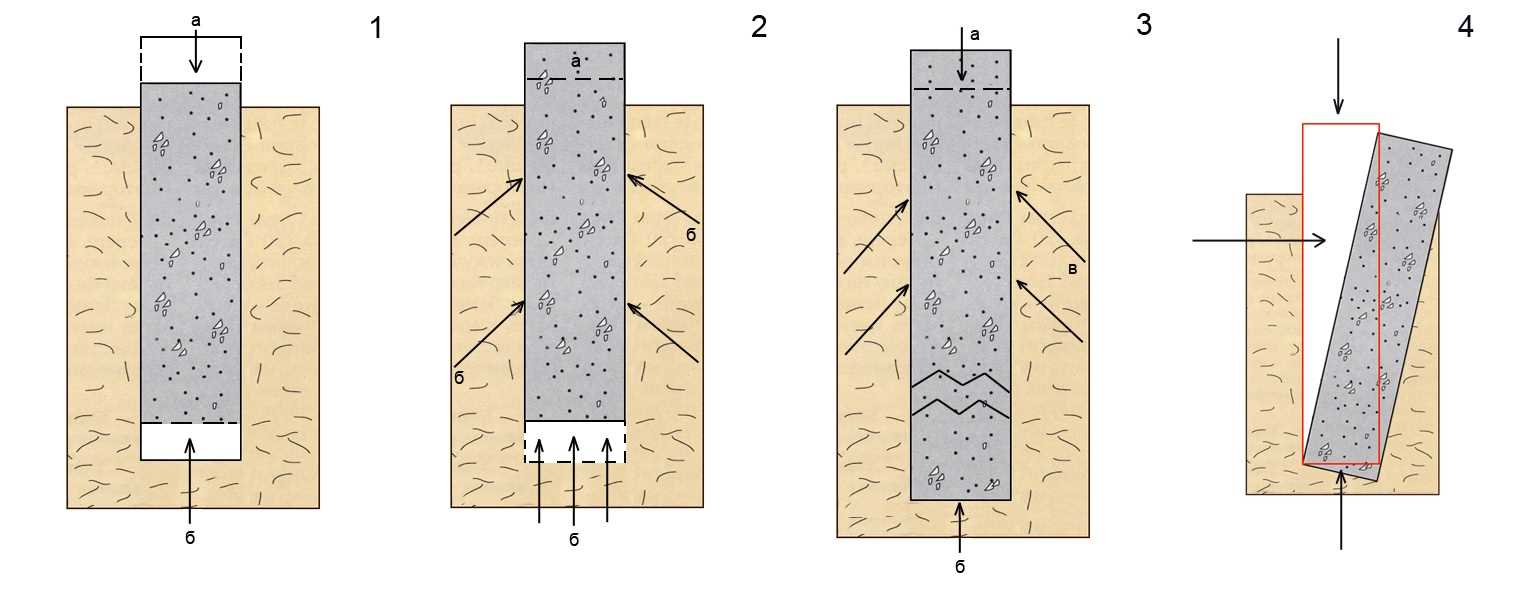
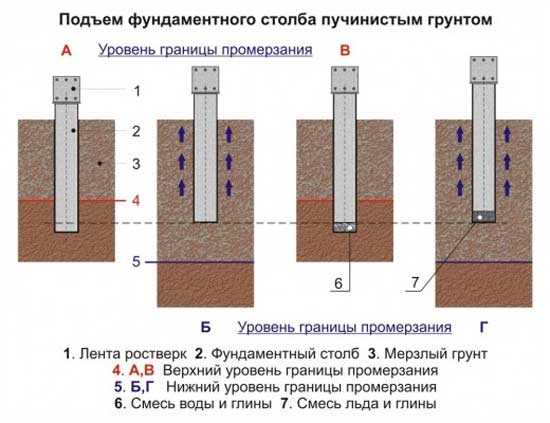
- on clay soil, the pillars will either fill up with horizontal heaving forces, or squeeze them out with the same efforts, but applied to the foot of the pillar;
- the low weight of the building is rather a disadvantage, not an advantage, since it cannot balance the heaving forces;
- rains and thawed spring waters will not bypass the structure, will destroy the reinforcement inside reinforced concrete or contribute to the opening of cracks in concrete blocks in case of freezing after the structural material gets wet.
Therefore, it is necessary to take into account the relief, find out the GWL level and the soil structure at the site. However, geological surveys will cost more than the entire turnkey building, home master it makes no sense to order this service. The option "like a neighbor's" is also devoid of logic, since the layers are unevenly deposited, quicksands are practically not detected from the surface, and the actual service life may differ.
The easiest way to independently study the soil in a building spot is to test the screwing of a screw pile. The product is submerged manually, allowing you to determine the level of groundwater and the depth of the bearing layer by the sharply increased tightening torque.
Important! The layer should lie below the freezing mark of the operating region in order to completely eliminate the heaving forces.
It is most advantageous to make a test screwing-in for any technology of building a foundation on heaving soils, embankments or dusty sands that sink under the weight of the building annually.
Barn foundation options
After independent impromptu geological surveys, the nature of the soils in the building spot should be taken into account:
- coarse sand, rock or gravelly soil - the most convenient option bases for a utility block, brick pillars or wall block, recessed into two - one rows, respectively, the bottom beam of the "frame" strapping will become the grillage;
- sandy loam - due to possible swelling, the previous option will have to be supplemented with insulation of the pillars under the sole or to pour the drill piles into permanent formwork from roofing material, rolled into a cylinder, asbestos or polyethylene pipe;

Shed on drill piles
- loam, clay, difficult terrain, moist soil (ground water is high) - only screw piles will be cheaper, for which you do not need to drill wells, lay drains, insulate structures and waterproof them.
The monolithic columnar foundation and the MZLF tape are not considered in this article in principle, since their construction will cost more than a frame shed, which is not economically viable for an outbuilding.
Due to the fact that a monolithic grillage for a utility block is too expensive, all these structures are used wooden beams on the heads of piles and poles. In this case, it is impossible to fill the floor on the ground, overlap is applied zero level along the beams.
However, when building a barn for livestock, this option is unsuitable in principle, since the wood rots and grinds off with shovels during cleaning, frequent repairs are required. Therefore, for calves and poultry houses, it is easier to increase the construction budget, fill in the ground monolithic belt, which is a modification of the strip foundation for light buildings.
Screw piles
The main problem of this technology is finding a manufacturer of SHS structures. In the presence of welding machine and the practice of using it, you can make screw piles with your own hands. Each manufacturer has a table of bearing capacity on different soils, which allows you to determine the pitch of the piles.
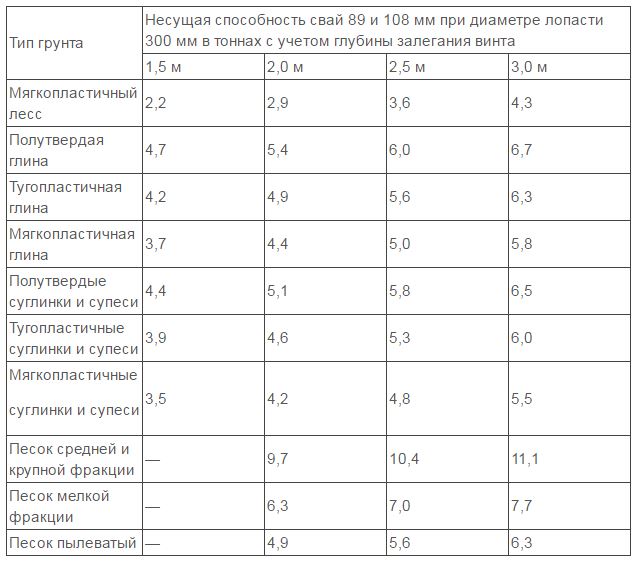
Load capacity table screw piles SHS
A frame utility block rarely weighs more than 2 tons, so calculations will show that the foundation for a shed can be based on a single pile. However, it should be borne in mind that the rolled metal and sawn timber from which the grillage beams are made sag under their own weight by 2.5 - 3 m.Therefore, piles should be installed more often, with a maximum step of 1.5 - 2 m.The technology has the form:
- - cast-offs are carried out 1 m beyond the perimeter of the walls, a string or cord is pulled along them;
- leader holes - drilled hand tool or dug out with a shovel, serve as a conductor for the pile blade, set the direction, depth 0.4 m, diameter slightly smaller blades;
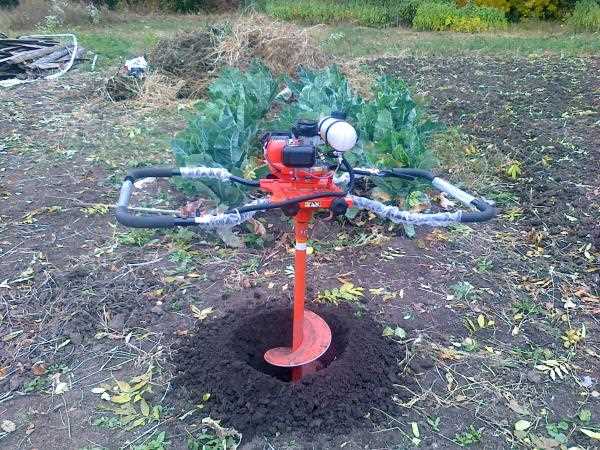
- immersion - CBCs are screwed in manually with levers or with a drill with a power of 1.5 kW (you will need a torque amplifier - a multiplier, the issue price is 3-5 thousand or equipment rental)
- alignment - a single horizontal level is marked on the body of each pile with a laser tool or a hydraulic level, pipes are cut off with angle grinders with metal equipment;
- concreting - SHS cavities are filled with lean concrete to prevent corrosion of the inner walls, the procedure does not affect the bearing capacity in any way, the next stage can be started without waiting for the hydration of the cement stone;
- heads - a steel grillage is too expensive for a utility block, and wooden beams are easier to fasten on sites with which the pile heads are equipped, fixing is done with nails or anchors, since a conventional hardened self-tapping screw can cut off with horizontal loads.
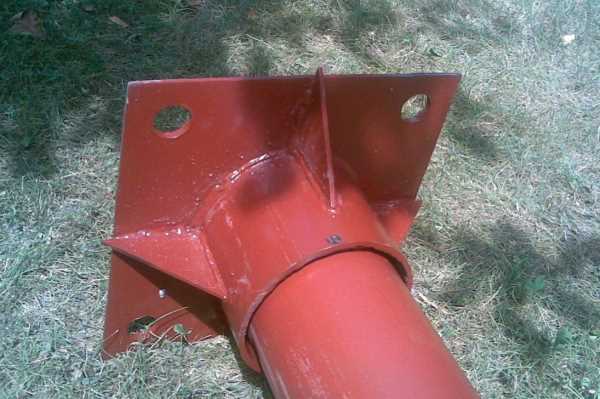
Screw pile head for fixing the lower strapping beam
Important! The heaving forces do not act on the piles, the outer edges of the pipes are protected with anticorrosive material. However, the structure of the building receives an underground, the perimeter of which must be sewn up decorative material (usually an asbestos-cement sheet, pasted over shingles, corrugated board or basement siding). To ensure ventilation of the underground, ventilation vents with a size of 1/400 of the perimeter of the underground are left in the zabirka.
Drilling piles (bored)
The next option for the foundation of the barn on clay soils drill piles become, which can be made with your own hands using the technology:
- removal of full-scale axes - the marking is similar to the previous case;
- wells - drilled with a hand tool or a motor-drill, step 1.5 - 2 m, depth as calculated;
- formwork - made of roofing material rolled into a cylinder (the edge is fixed with brackets), polyethylene or asbestos-cement pipe;
- - round or square clamps (smooth reinforcement, diameter 6 mm) are fastened with wire twists to 4 vertical rods (diameter 8-10 mm, periodic cross-section "grooved"), the protective layer is provided by round polymer washers attached to the rods;
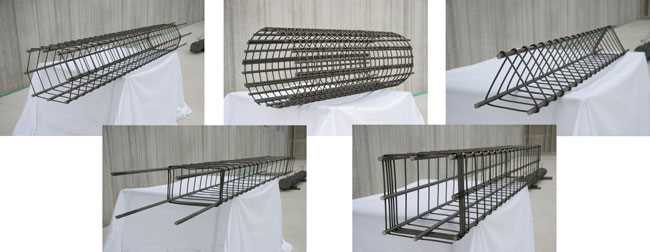
Frame options for reinforcing drill piles
- concreting - it is more convenient to pour the mixture through homemade funnels, it is better to compact it with rods or a deep vibrator.
Pillars from a wall block 40 x 20 x 20 cm
On non-porous soils columnar foundations are built in a few hours and are considered the cheapest option. If the soil is clayey, the developer has two options:
- do (the main condition for swelling is eliminated by diverting melt / soil water), insulate the sole (in view of small size buildings with high-density polystyrene foam will have to be laid around the entire perimeter and under the blind area to preserve the heat of the bowels);
- or deepen the pillars below freezing, fill the sinuses with non-metallic material (sand, crushed stone);
Columnar foundation on heaving soil should lie deeper than freezing
In the first case, the foundation for the barn will cost more, since the EPS has a high price. In the second option, the volume will increase sharply earthworks... Therefore, the technology will be considered on a flat area with a low GWL for coarse sand, rock or gravelly soil:
- full-scale axes - carried out with cords along the cast-offs, 1.5 m away from the pit;
- pits - the arable layer is removed under each pillar (usually 40 cm);
- pillow - the underlying layer 20 - 40 cm thick is poured with crushed stone on wet soil or sand on dry soil, every 10 cm is compacted with a vibrating plate or manually with a log;
- drainage - the corrugated pipes perforated in the lower part are laid along the perimeter of the blind area, drain melt and storm water, covered with rubble, covered with geotextiles from all sides;
- masonry - pedestals are erected from ceramic bricks or blocks of 20 x 20 x 40 cm, on which beams of a wooden grillage will be laid.
Zabirka is drawn up by analogy with pile-grillage foundations.
Poles from car tires
Individual builders often use exhausted machine wheels in construction and landscape design... Tires are used as a structural material for foundations or formwork. The technologies differ, they are selected depending on the percentage of clay in the soils:
- on heaving soils - pits come off in the corners and with a step of 1.5 - 2 m under long walls, the wheels are stacked inside, inner space filled with crushed stone, which is compacted with a rammer, backfilling with necessarily inert material (for example, sand);
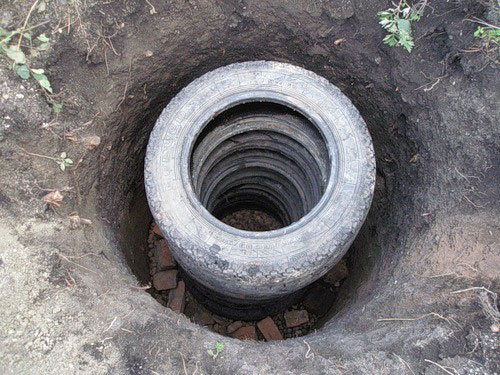
Tire posts are buried below the freezing mark and covered with rubble
- on rocky, crushed stone or coarse sandy soil - it is enough to remove the fertile layer, fill the pits with sand, compact it with a vibrating plate, make concrete of grade M15 and higher, fill the inner cavity of the tire and compact the mixture by bayonetting.
The cover serves as a formwork for concrete and dampens ground movements
A significant disadvantage is the large diameter of rubber products. The wall is supported in the center of the wheels, at the corners the rubber protrudes on two sides, on straight sections - on one side. This makes it difficult to manufacture a pick, without which moisture and rodents will penetrate into the underground. Therefore, the cladding is mounted on a frame imitating a plinth or in sheet materials cut openings and paint the wheels for a more acceptable facade design.
Important! After the concrete hardens, the structure partially loses its damping properties, therefore, if swelling is possible, it is better to use the first method.
Monolithic ground belt
This technology is the only one that allows you to make floors on the ground, optimal for long-term operation in a poultry house or barn. On the initial version, options are possible depending on soil conditions:
- non-porous soils - additional measures are not required if the land is dry, with a high groundwater level, drainage and waterproofing are required;
- clay soil - along the perimeter of the building and under the blind area, it is necessary to lay a heater to preserve geothermal heat under an unheated building, make wall drainage and treat accessible concrete surfaces with waterproofing materials to prevent swelling;
At the next stages, construction technology monolithic belt do it yourself and operations:
- marking - castoffs are removed beyond the perimeter by 1.5 - 2 m, for each wall 2 cords are pulled along the inner / outer edge of the foundation;
- earthworks - the fertile layer is removed entirely inside the center lines, since it is forbidden to make a floor screed on it on the ground;
- underlying layer - foundation cushion made of crushed stone or sand, mixture of ASM 0.2 - 0.4 m thick, perimeter more size foundation by 0.2 m on each side;
- drainage - a closed loop of perforated pipes, lying at the level of the sole with a slope of 4 degrees to one side;
- insulation - only on clay soil, the perimeter is lined with extruded polystyrene foam, the blind area is insulated at a depth of 0.4 m;
- formwork - plywood or plank shields are mounted vertically, the sides are 5 cm higher than the design mark in order to avoid concrete spilling during vibration compaction;
- reinforcement - frames made of longitudinal rods of 6 - 10 mm, tied with rectangular clamps made of smooth reinforcement 6 - 8 mm;
- pouring - laying the mixture in a circle with simultaneous compaction (bayonetting with a rod or a deep vibrator).
Monolithic tape belt for utility block with blind area
Concrete maintenance will avoid cracks opening, it consists in periodically moistening the poured sawdust. Alternatively, you can cover the concrete surfaces with a film, reducing moisture evaporation.
After stripping, all accessible faces of monolithic beams are waterproofed with bitumen mastic, coating or plastering materials, or on the surface is deposited roll material (for example, Technonikol).
Floor on the ground - floating screed cut off from the foundation damper tape... The blind area is necessary to drain melt and rainwater from the walls of the shed.
Thus, any budget foundation from the options considered can be chosen for the barn. The main criteria are the characteristics of the soil and the level of groundwater level, the relief and weight of the building, the type of floor / floor and the purpose of the utility block.
Advice! If you need contractors, there is a very convenient service for their selection. Just submit in the form below detailed description works that need to be completed and you will receive offers with prices from construction crews and firms. You can see reviews about each of them and photos with examples of work. It is FREE and non-binding.
The barn is an extremely necessary attribute for garden plot... Even if you come to the dacha to relax and not work, then you cannot do without a special structure for storing garden accessories. You can keep tools in the barn household chemicals, barbecue, preparations for the winter. If desired, in such a building, you can organize summer shower and a toilet.
A barn is a temporary structure, accordingly, the construction estimate should be minimal. The construction of the building will take several days. A frame shed will last a year, another, and after that you can think about something more capital and durable. In this article I will tell you how to build a shed with your own hands.
Tools for building a frame shed
- Multifunctional woodworking machine
- A circular saw
- Jigsaw
- Drill
- Screwdriver
- Electric planer
- Chain Saw
Materials for building a frame shed
- Logs
- Boards
- Roofing material
- Fasteners: screwdrivers, regular and roofing nails
- Oilcloth
- PVA glue
- Sockets, switches
How to build a barn with your own hands
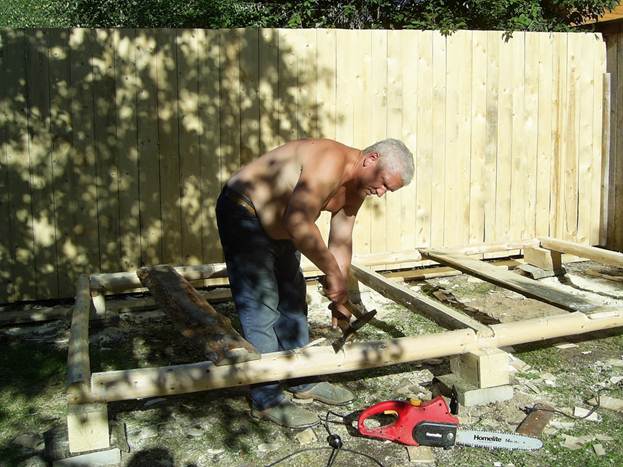
As you know, the simplest and reliable way construction - frame basis. A frame shed can be erected even without a foundation, simply by installing the frame on wide bars or blocks so that the bottom does not rot. The weight of the structure is small, and if any angle sags, it can be easily lifted with a lever and placed on something. Taking into account the strength of the wood, the frame will not crack or deform.
I used logs as a base conifers small thickness. I peeled off the bark, dried it a little. As you know, in the process of shrinkage, wood cracks, warps, sometimes bends appear, which are almost impossible to straighten. But in my case, the deformation will be minimal, since the entire frame is well tied and secured. I put the lowest harness on ordinary tiles, interlaying with roofing material, using scraps of timber. I did not raise it higher, since the building is temporary. Dampness from the ground will not hurt anyone, because no one plans to live inside. It turned out like this:
Next is the flooring. Here, too, I did not strain too much: I made the floor from ordinary untreated boards obtained on a multifunctional woodworking machine, but nailed it conscientiously, sparing no nails. Then it was the turn of the frame itself. Aesthetics worried a little, if only it was durable!
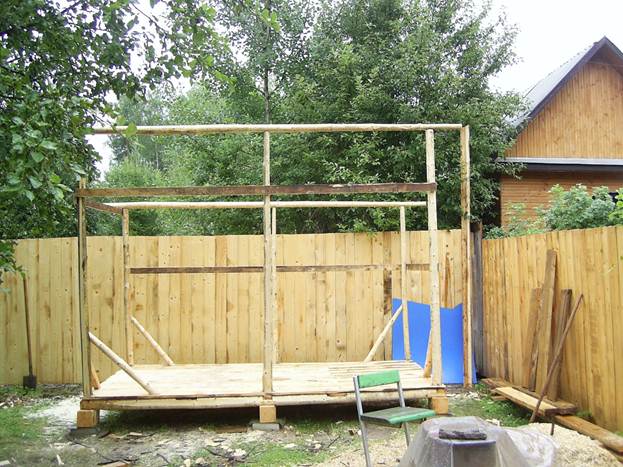
I made corner jibs from the same planks and blocks. I didn't pick it up on purpose, I just nailed what was at hand. So far I haven't bought a single piece of wood, which is good news. Only nails, some screws and corners.
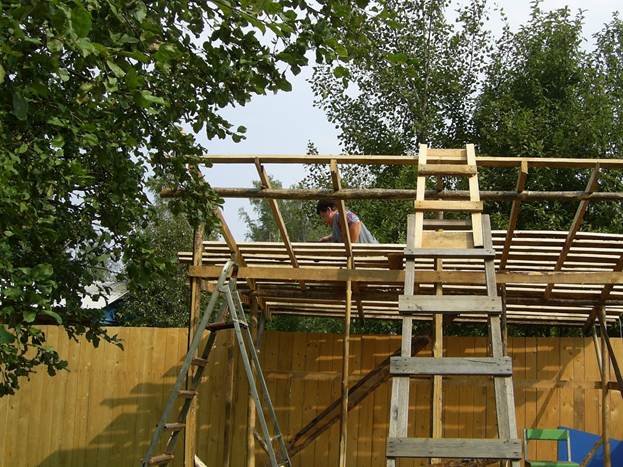
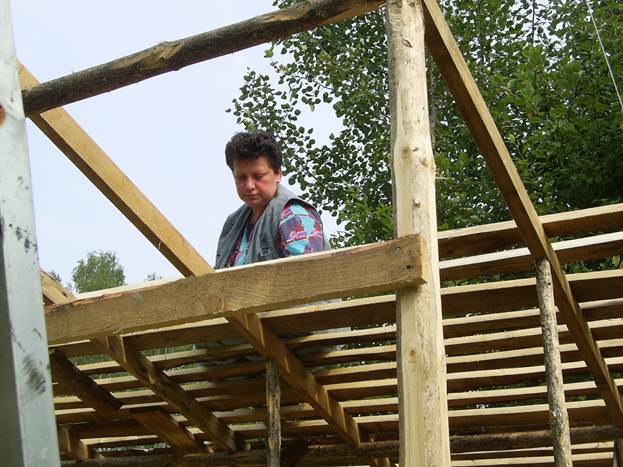
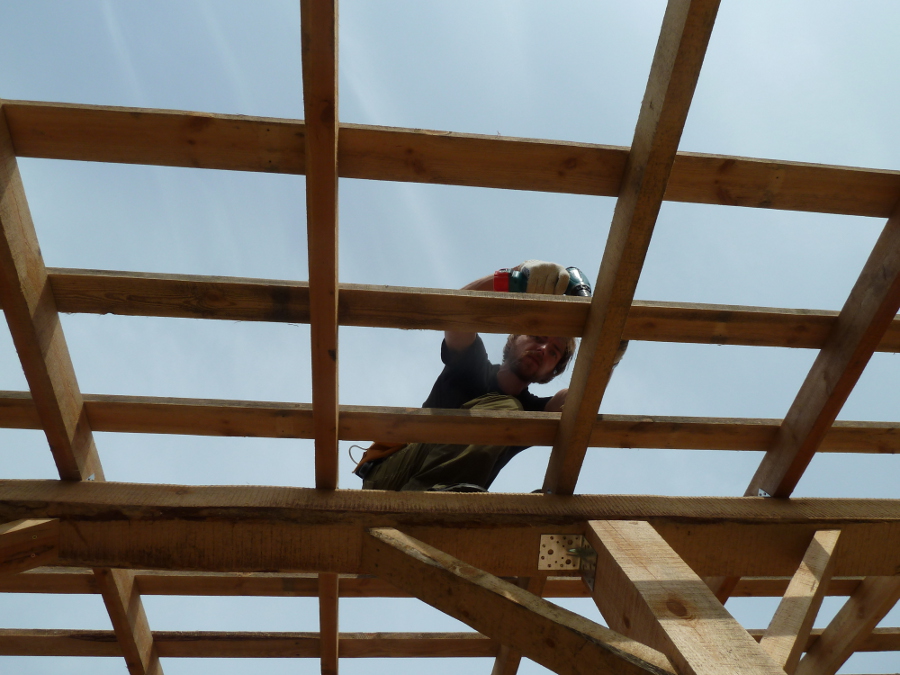
It was the turn of the roof. I decided to make the corner more abrupt, because I did not plan to lay anything other than roofing material. The frame was knocked down from the remaining logs. I put ordinary boards on the crate. My wife helped a little, we worked together: I picked up the boards, cut them off and filed them up - she nailed them. It is not very inconvenient for one to do such work.
Finally, we did it. I'll make a reservation right away, working at an average pace, without rushing anywhere, took quite a long time. If you wish and have at least a little experience in construction, it will take much less time.
It's time to put roofing material on the roof. He had to buy three rolls. I nailed it with special nails with large heads, which are called roofing nails. There is nothing complicated here.
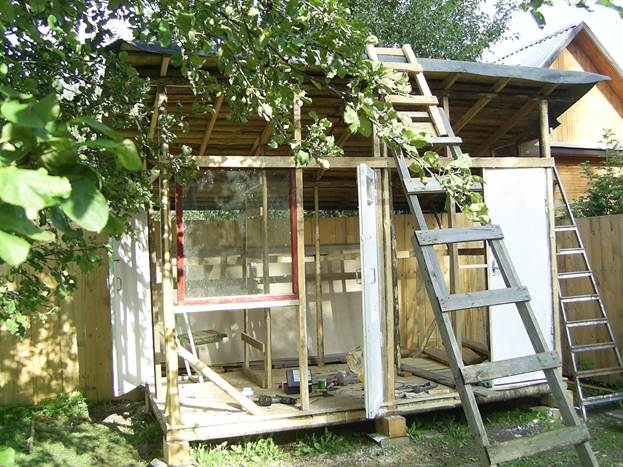
Then he began to upholster the structure of fiberboard (4 mm), the cheapest and lightest. Noted, sawed off with a jigsaw, attached in place. And so piece by piece. He adjusted the joints by sealing them with slats. It took a little too little time, except that I had to tinker in little things here and there.
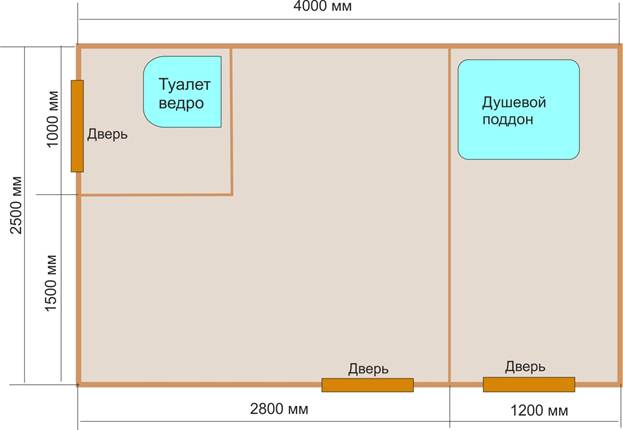
The total area of \u200b\u200bthe building is 4 by 2.5 meters, but I managed to fit a shed, a shower, and a small toilet there. From the inside, the shower room was also trimmed with fiberboard to keep warm, then glued the oilcloth on PVA glue. The toilet is tiny - just a seat and a bucket, a shelf for small items and paper.
Inside the barn, I installed tool racks and many shelves around the perimeter. Everything fit, even the fishing tackle compartment. When the room is small, the racks are the most the best option... You can walk freely in the barn, the space allows. At the same time, any tool is easy to find - everything is at hand. I made shelves and racks, from which I have to - the same fiberboard, the remains old furniture, boards.
Outside, I painted the structure, pre-impregnated with used oil. This turned out to be enough for the fiberboard sheathing to be preserved for several years. For convenience, electricity was supplied. I made a wiring for several outlets. I installed lamps with switches in each compartment.

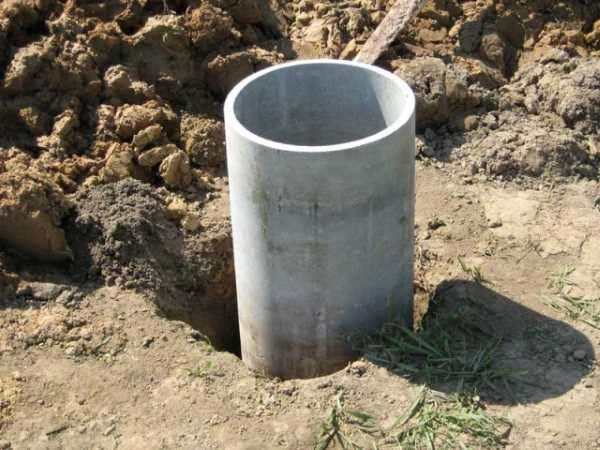
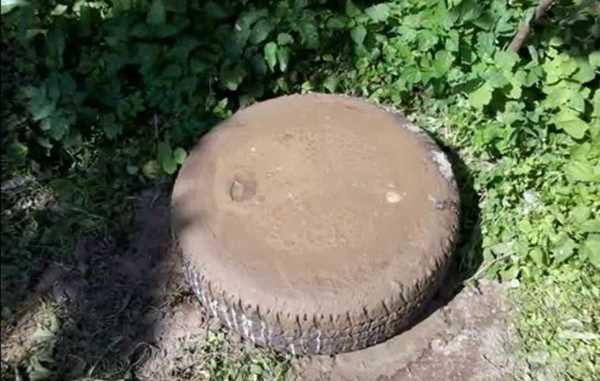
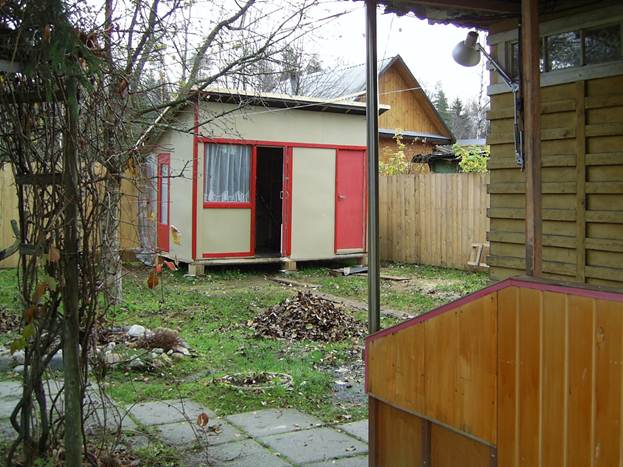
In the end it turned out like this. In front of the toilet I built an additional shed, hung a country sink, still Soviet, but simple and reliable. The drain from it was carried out into an asbestos-cement pipe large diameter... I cut off the desired piece with a grinder, dug it in half a meter so that 30 centimeters protrude outward. He poured a layer of sand around and into the pipe itself - quite enough to just rinse your hands. This is convenient as there is no need to enter the house every time. You can also use the old sink.
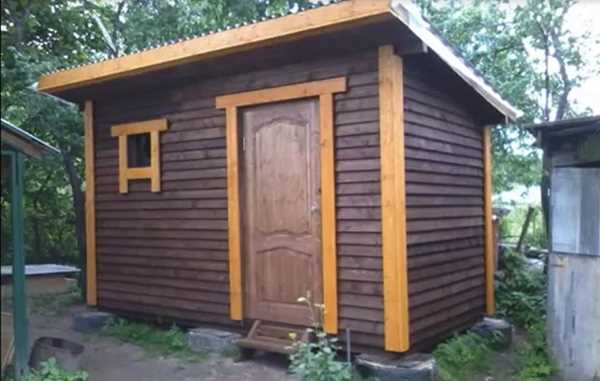
A year has passed, the shed is safe and sound. In the spring, I opened the door to the toilet - everything works. The frame, however, despite a slight skew, did not affect the door, as the structure is rigid and perfectly tied. I thought that the barn could serve more, and decided to add a small veranda. I arranged a vestibule in front of the shower so that the heat was better retained, and the extra room would never hurt. He additionally strengthened the roof and one more door, painted and impregnated everything. I did a little design - I stuffed the slats, painting it in a different color. It turned out very nice!
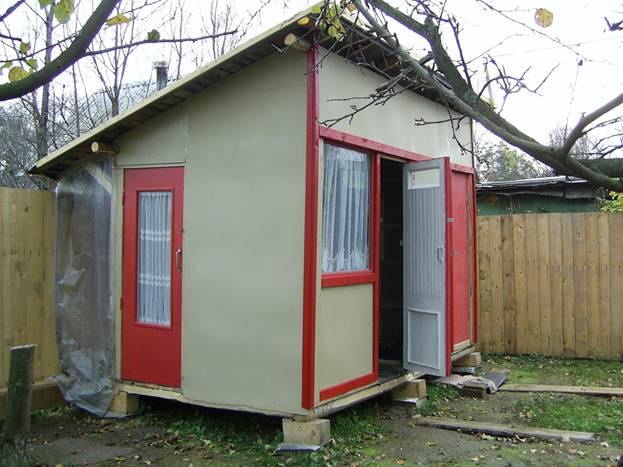
The shed turned out to be extremely functional. For the fifth year now, no problems, except that I slightly raise the corners where it sags. Of course, sooner or later, you will have to break it. When new house I will build it, it will come to this structure, but for now it serves.
As for the cost of the structure, then, as already noted, it is extremely low. 8 sheets of hardboard cost about 400 rubles, two rolls of roofing material - 800 rubles, an electrician, wires and light bulbs cost about 1500 rubles, used old remnants of boards and logs. In total, the cost of the entire structure hardly exceeded 3000 rubles.
Shed on suburban area - a thing absolutely necessary, and better not even one or two. A person lays a huge number of functions in the barn, ranging from a banal warehouse of garden tools or a poultry house with a grain warehouse, and ending with a temporary (guest) house with summer kitchen and shower.
Seat selection
We choose a high place to avoid spring flooding and the formation of puddles during prolonged rains. It is desirable that the selected site is in a sunny place, and also does not interfere with gardening work and possible redevelopment on the site.
Having decided on the place, we level it and clear it of vegetation. We estimate the size of the future structure. Reality does not always coincide with desire, so it is better not to plan the size of the building in advance.
Nuances of design
Having precisely defined the dimensions and functions of the future shed, consider the work plan. Draw a very detailed drawing, diagram (preferably together with family members to avoid conflicts in the future). Accompany the entire drawing process with notes For example: rough floor - unedged board 3000 x 250 x 40 mm 10 pcs (3 pcs are), 0.5 kg of nails 100 mm (are), 1 liter of biosecurity, an ax (is), a hammer (is) , jigsaw (available), wood saws 2 pcs, brush 50 mm). By bringing together all your records later, you will receive full list tools and materials that need to be purchased, as well as what you already have and what you don’t need to buy. And you have to go to the store only five times instead of twenty.
The fastest and cheapest option. The barn is suitable for storing agricultural implements, firewood, coal, as a simple poultry house, a pen for goats, sheep. In the instructions, I will give my measurements, but in similar type the sizes of buildings are easily adjusted to your needs.
We align, we clean the site. We mark the corners of the future barn. We take four beams 150 x 150 (logs) 3 meters each. We dig holes in the corners, the front ones are 60-70 cm deep, the rear ones are 90-100 cm (I personally prefer to drill out). We carefully process the bars with biosecurity at least 2 times.
Waste engine oil is excellent for these purposes.
That part of the pillar that will be buried in the ground, it is advisable to cover it with molten tar before burying. We install the pillars in the pits, align vertically, fill the voids with fine gravel (crushed construction waste) and fill it with liquid cement mortar.
We make three "rings" strapping:
- Bottom: if the floor is not planned, then a thick board (40 mm) with an overlap on the pillars from the outside (5 cm from the ground) will do. If a floor is planned, then from a bar between the posts, slightly raising it above the ground, and from the outside of the bar a board as in the option without a floor.
- Upper: along the top of the short supporting pillars (additionally, we connect two high pillars with the same board). Board 40 mm overlapped on the outside. After the upper strapping, decide where the door will be, and fix two thin bars (40 x 40) on the sides of the future doorway (fasten in a wedge between the upper and lower strapping).
- Central: it is carried out in the center between the upper and lower, without blocking the doorway, it is attached to the door bars end-to-end. The doorway at the desired height is wedged with a piece of 40 x 40 bar.
Roof
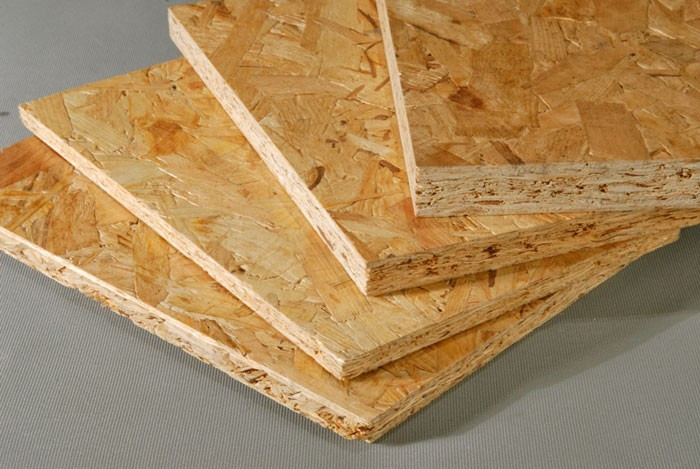 We fasten the rafters between the high and low sides of the shed, it is better - going deep into the upper strapping and making a release of 20-25 cm, we fill the crate or OSB on the rafters - an oriented strand board of 10 mm. We attach to the crate profile iron, special press washers with a drill. There is no point in saving. The slate is heavy. Roofing material is one-, two-season coating, and the simplest iron is not so expensive.
Floor
You can remove the top fertile layer and concreted (flooding with construction waste) or just leave it with earthen. If you decide to make an ordinary floor, then we attach the logs to the lower strapping (timber) and lay the material that you decided to use on them. I recommend 18mm OSB - moisture resistant by definition.
Walls
We sew up the board vertically, better with an overlap. At the corners, the last board should be straight. It is nailed flush with the harness, and another wall begins with it. This will help avoid cracks in the corners. If the shed is without a floor or with a concrete floor, then we nail the boards so that they do not reach the ground a little, and close the gap with a horizontal board from the inside (which can then be simply replaced), from the outside with boards we close the gaps diagonally between the wall and the roof.
We hang the door. If a shed is planned for poultry or livestock, then it is better to overlap and seal the cracks. If necessary, we cut through the windows.
A convenient place under the roof on the front wall of the barn, then the walls will remain free for shelves, hooks, and the animals will not reach.
Do not forget to process all the details with biosecurity. For wall boards there is interesting solution - remove wane from them and burn blowtorch, and then cover with linseed oil. It looks beautiful and will last a long time.
We equip the shed inside to fit our needs. If you keep livestock (not exotic), do not forget, adult animals tolerate cold up to -20-25 degrees, but drafts are "evil". So carefully dig in all the cracks and make a hood.
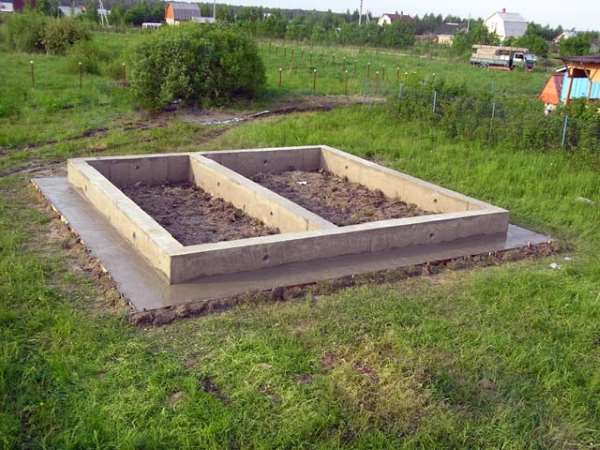
The first is the foundation. What is the foundation, you ask, because we are talking about a structure without a foundation? I do not argue, you can assemble a shed right on the ground, without any foundation, but this is an extremely short-lived structure and wasted time and effort. Therefore, I propose an option how not to mess with the foundation, but at the same time increase the service life of the barn, as well as make it mobile.
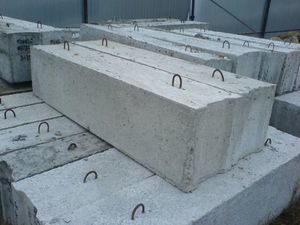
We assemble a shed on ready-made FBS blocks (solid foundation block) 600 x 300 x 200. We pull out a shallow hole 25-40 cm, the hole should be slightly more than the side of the block on which it will lie (usually 600 x 300). At the bottom of the hole, about ¼ of sand. We compact the sand, then pour fine crushed stone or gravel to the top and compact again. Then you can spill grout, but not necessary. As an option for saving and cleaning the site: down sand, then construction waste (broken bricks, broken glass, fragments of slate - grind everything additionally), it is good to spill it with a medium-liquid cement solution, when it hardens, there is a little dropout from above to align the blocks in level. Having established the required number of blocks (in our version, 8, 4 on each long side), we align them with each other in level and put waterproofing on top - roofing felt on bituminous mastic.
The proposed version of the foundation, of course, will not replace a full-fledged foundation, but with the help of a jack, you can always, if necessary, correct your structure or bring a capital foundation under it.
Also, if necessary, you can move the building to another point on the site.
On the resulting base, we assemble the support frame, it is recommended to take a bar 150 x 150, but we will use 2 boards 60 x 150. We twist the boards tightly with self-tapping screws, shave off the ends and get a bar 120 x 150. The bar is fastened in half a tree, but in our version we will fasten end-to-end with reinforced inner corners, external mounting plates, you can also use self-tapping screws with a solid depth. Many craftsmen do not attach the support frame to the base, but I personally recommend this, because no one is safe from strong gusts of wind). I advise you to do this using the same corners or plates so that at any time you can unscrew it without disassembling the structure.
 Next, we attach the lags. On the logs, a board will go along the height of the beam, in this case, 150 x 40. The logs are fastened with special brackets, but if they are not available (or expensive), it is quite possible to replace it with a pair of ordinary corners. The distance between the lags depends on the thickness and strength of the material from which you are going to make the floor. If the floor is not insulated, but a moisture-resistant OSB 18 mm is immediately laid on the logs, then the distance between the logs is 400 x 450 mm. By the way, as we collect it, do not forget to carefully process all the details with biosecurity. The support frame itself and the joists can still be processed by "working off", but then you will have to use special means... If the floor is going to be insulated, then we attach the subfloor from below to the logs (we use waste material, trimming), then insulation between the lags, then the same OSB 18 mm.
The floor can be made of boards, but it will come out more expensive.
With help circular saw we dissolve boards 60 x 150 for "spare parts". We will use 75 x 60 boards for vertical posts. You will need 20 pieces: 4 pieces. - in the corners, 2 pcs. - on short sides, 6 pcs. - on the long sides. We will use 50 x 60 boards for vertical and diagonal fastenings, we will fasten them to corners and mounting plates. We collect a typical frame, if a window is planned in the shed, then assemble a box in the frame for them. The angle of inclination of the roof is determined individually, usually 15-20 degrees.
On the roof for a shed of this size, 9 rafters from a 50 mm board are quite enough, but since no one is going to dance on the roof, it is quite possible to take a 40 mm board. Cuts are made on the rafters to increase the area of \u200b\u200bcontact with the frame. The rafters are attached to the corners or, in a simple way, to nails, screws. The removal of the rafters outside the frame is again at the discretion of the owner, but I would recommend at least 50 cm in the front and at least 30 cm in the back.
We close the gaps between the rafters with scraps of boards from which the rafters themselves are made.
 We put the lathing, the width and frequency of the lathing depends on what material will be used for the roof. 11-12 narrow boards are enough for C8 profile iron.
Before you start sheathing the barn directly with a board, decide where the door will be, and it is better to hang it right away. It is better to take boards that are wide and not thin, optimally 25 x 150, it is better to prepare them before sheathing, cut them to size and paint or process them in another way. We sew horizontally from bottom to top with a slight overlap of 2-2.5 cm (herringbone).
I always prefer a self-tapping screw when working with wood: you can carefully unscrew it, and not tear it out with the "meat". After trimming, we install windows (if necessary), refine the corners - two boards with a vertical angle, put door and window frames. That's all, you can start interior decoration.