Every master is faced with the problem of how and what to attach assembled doors. To install a finished door block, it is possible to use in various ways installations. Knowing these installation options, you can easily choose the one that suits you. You will need a small set of tools: a drill, a hammer drill, a level, a screwdriver and a hammer. Also, to directly secure the box in the opening, fasteners and polyurethane foam are needed. Depending on where you need to attach the door block, you may need screws, dowels, and anchors.
The main stages of installing a door block
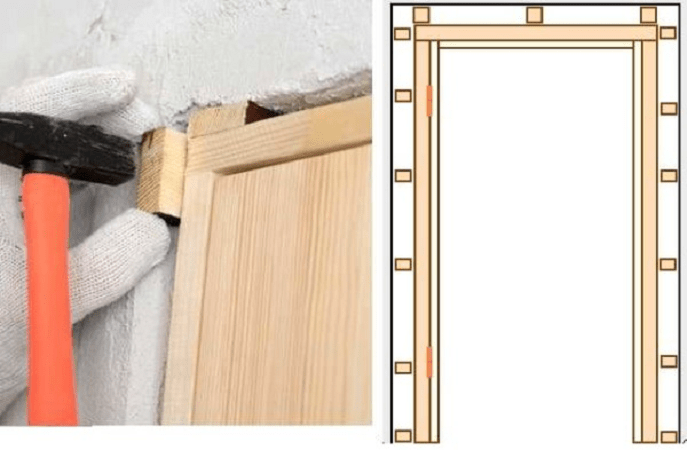
At the very beginning, the old door frame is dismantled. This can be done using a nail puller (crowbar), having previously made cuts on both sides of each vertical bar, in order to then press this structure away from the opening. If during installation old box Anchor bolts and nails were used, which are not possible to unscrew; they can be cut down using a grinder.
Before installing the box interior doors it is necessary to check the verticals of the walls and take into account differences in the level of walls and floors. The door frame must be positioned so that if there are any unevenness, the frame does not go deeper into the opening. This is necessary for the fit of the door frames. In order to correctly position the door frame, you should use building level and take into account all opening errors.
First, the installations are rigidly fixed in the opening to achieve the initial level of rigidity using wedges. After completing the fixing work, it is worth re-checking the correct positioning with a level so that the frame is level with the door.
Working with polyurethane foam
It is important to know that the foam that is intended for the gun is much better and more convenient to use due to the fact that it is more dosed and has a small expansion coefficient; it hardens much faster. Foam served with a straw big amount, it will take longer to expand. Before starting work, it is better to close door leaf masking tape and film, because foam is difficult to wash. It is important to know that you need to start foaming by fixing individual small areas. After 30 minutes you can already go through the entire perimeter. All cracks are filled with foam (50% of the total volume). Do not fill with a large amount of foam, because during expansion the foam will squeeze the box inward. We recommend using professional foams.
Since wood contracts and expands precisely due to increased humidity, the consequence of expansion is deformation of the door block. The door will simply stop closing for this reason.
Video on possible door installation methods
There are several ways to fasten a door frame in an opening, each of which involves the use of a special type of fastening. Various fastening options provide a certain level of reliability and strength of the fixed structure. We hope the video stories on options for installing wooden door frames will help you.
Hidden method of installing doors on foam
The door frame is fixed in the opening, used for fixation wooden wedges, and the correct location is checked at the building level. Foaming polyurethane foam need to be done little by little, in sections and with breaks to avoid deformation. The door frame is held in place almost thanks to foam alone.
To maintain the gap between the frame and the door itself, small 3 mm spacers are used, which are inserted between the door and the frame. They can only be removed when the foam dries. Usually the door is left overnight.
This method is convenient if you do not need to go into the room, it is fast and does not require special effort. It is important not to overdo it with foam so that you can open the door.
Installing doors using clamps or spacers
The installation principle is that we use spacers inside to temporarily fasten the door block in the opening. These can be either ordinary wooden rivers or special adjustable devices.
Both of these methods are very good for light and small doors.
Fastening doors using Knauf hangers
Direct hangers are ideal for these purposes. Knauf company, which is used in suspended ceilings.
- The plates must first be screwed to the box.
- Insert the door into the opening.
- Adjust the level.
- We mark the places for the recess in the wall.
- We make a sample for the plate.

After this, we set it level and fix the plates. To adjust, we use wedging with wooden blocks.
It is also necessary to take into account that with this method of installing the box on the outer part of the wall, the place of the recess will definitely need to be hidden under a layer of plaster. That is why this method is only good if there is no finishing.
New mounting options
This video will show you how to secure a door frame in an opening. This type of fastening involves installing an interior door frame by placing the frame on the screwed heads of the screws that are located at the ends of the opening. This happens using metal plates with a hole, which are screwed to the outside of the box.
To achieve final fixation of the frame in the doorway, conventional means of adjustment are used.
With this method, the door block pillars move freely in the opening.
The obvious advantage of this method is the full possibility of adjustment and, at the same time, rigid fixation while maintaining original form boxes and exterior finishing walls. 
Concealed installation, fastening under hinges
 As a rule, for structural rigidity, screws or anchors are used, which are hidden under the hinges. To do this, make a hole between the screws in the hinge and attach it to the wall through it. On the side of the lock, under the decorative plate, another fastener is attached. As a result, we get 3 fixation points.
After direct fastening, we place a spacer at the bottom of the doors, since the bottom is not secured, and fill all the gaps with foam.
A significant advantage of this method is relative rigidity and preservation of appearance.
Through fastening with anchors or screws
This is the most common standard option installation of interior doors. For this fastening option, holes for anchors are first drilled in the required places of the racks, then the door is fastened in the opening.
Preparation
- Marking 4 anchors on each side.
- Drilling with a 14 mm pen to a depth of 10 mm (space for the plug).
- Drilling through hole 10 mm feather (space for fixing with an anchor).
After which the box is exposed and the concrete is drilled with a 10 mm drill for the anchor. When the box is supported by anchors, it holds securely and does not require any spacers. The fastening points can be hidden by installing decorative plugs of the desired color and size (14 mm). Instead of anchors, you can use screws; this will reduce the diameter of the plug. The use of this option is most reliable for heavy doors. Using it you can straighten (tension) a crooked rail. The doors can be used almost immediately. It is possible to adjust the gap. The downside is the presence of plugs. 

Tricks for installing door panels
Conclusion
There are many options for installing interior door frames, but you should choose the one that is the easiest, most convenient and reliable, or the fastest. The choice can be made using any door installation method, but these methods may be affected by the opening in which the installation is taking place, taking into account the intensity and other factors.
An interior door serves to divide the space in a room and also provides sound insulation in a private house or apartment. In addition, the door leaf is important detail interior, therefore it must correspond to the design style. Since installation work is quite expensive, the question arises of how to properly install interior doors with your own hands. The answer is in the detailed step-by-step instructions outlined on this page.
Dimensions and equipment
Depending on the opening method, doors can be folding, sliding or swinging. The latter are the most popular because they are structurally simplest and fairly easy to install. They are presented in a large number of modifications. According to the opening method, the following are distinguished:
- double-leaf and single-leaf;
- left- and right-sided.
Step 3: Installing the box and hanging the canvas
The box must be installed in a pre-prepared opening. The hinged post must be leveled first using a plumb line or level. It is imperative to check it from all sides. Then the top crossbar and the stand must be spread apart with wedges. The stand will only be exposed when it is in a vertical position.
Next, wedge the second rack. Be sure to check the horizontal part of the box.
The old way– the side posts must be drilled through. To do this, holes for dowels are initially made in the wall.
 The box must be attached to the wall with self-tapping screws no less than 150 mm long.
 Old method of fastening In order to fix the box in the opening in a hidden way, you can use metal plates, which are usually used for installation plasterboard structures

 . Most often, such plates are used together with anchors. In this case, it is worth choosing the number of fasteners in accordance with the expected load.
 This is what the mount looks like
All that remains is to hang the door on the frame. After this, you need to make final adjustments to the box. The lock post must then be adjusted to fit the door so that it does not protrude beyond the wall. It is worth remembering that in order to maintain the integrity of the box and the canvas, you must first drill several holes for the screws.
Step 4: Foaming
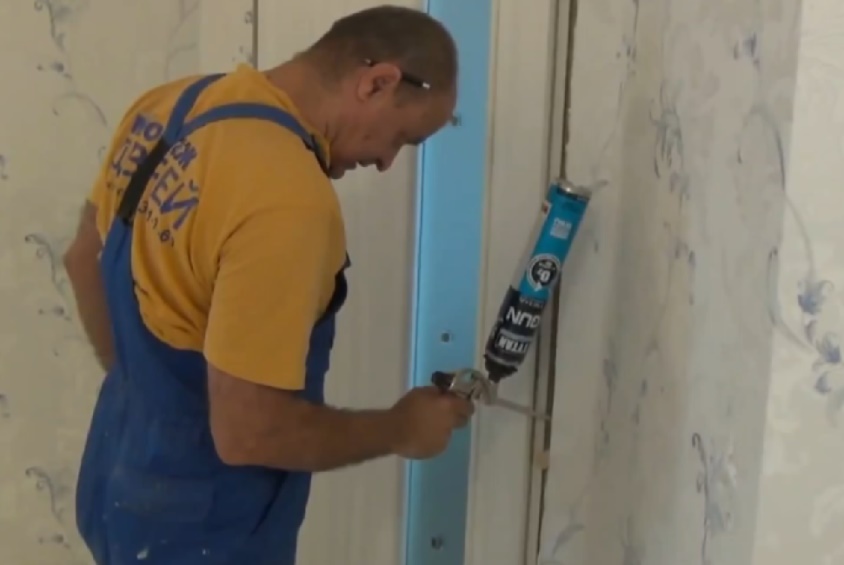
After securing the canvas, you need to foam the gaps between the box and the edges of the opening. The foam should be fed carefully, layer by layer, and fed from above so that it does not protrude out. Then the door will have to be closed and not touched for a certain time so that the foam dries. Approximate drying time is 1 day.

If the composition accidentally gets on the canvas, immediately remove it with a clean, dry cloth; dried fragments can be cleaned using effective cleaning agents.
Step 5: Installing the lock and handles in the door leaf
The most popular today are handles with a built-in lock. The work order is as follows:
- Make a mark one meter from the floor. The handle mechanism must be applied so that a mark is visible in the hole at the top.
- Drill holes in the canvas from the end. After this, the edges of the holes should be cut off with a chisel to level the hole.
- Insert the mechanism into the hole. In this case, the lock must be leveled and then secured using self-tapping screws. The bar on the lock should be traced with a pencil to cut through the veneer, then the mechanism should be removed. According to the outlined contour, you need to select a platform to determine the thickness of the locking strip. This is done by using a chisel.
- Drill holes for the latch and handles. You need to attach the lock to the canvas from different sides, align it and mark it. Holes must be made on both sides and they must not be through.
- Remove the resulting shavings and install the handles.
Step 6: Installing trim strips
An extension is a plank approximately 2 meters long, 250 mm wide, and no more than 3 cm thick. The plank should be used during the installation of interior doors if the wall is thicker than the door frame.
The timber for the box is made in a standard width - approximately 70 mm. It can be expanded according to the thickness of the opening with an extension. This will allow you to more clearly align the box and walls. The beam has a groove for the plank. You must first measure the distance to the edge of the wall, starting from the depth of the groove.

Additional can be installed different ways:
- into the groove provided in the box;
- with cutting a groove in the absence of a ready-made one;
- attaching the extension from the inside of the beam in the absence of a groove, the box is installed together with the extension;
- fastening the extension in the shape of a “P”;
- if the extension is not too wide and there is no groove in the box, the bar should be drilled and screwed to the box.

The plank is sawn into several parts using a circular saw to obtain several pieces of the required dimensions. You need to prepare one short plank and two vertical ones. Check out our simple step-by-step instructions for .
Step 7: Fastening the trim
During installation of the platbands, the box must be located level with the opening on the front side. To connect the platbands, you must first attach a vertical strip to the box and place a mark 0.5 cm higher, retreating from the crossbar of the box. This mark will act as a cutting edge. In the same way you need to mark the cut on the other side.

Self-assembly and installation of interior door units does not require highly qualified or special skills from the performer. Serial connection of parts in accordance with the instructions and careful installation in doorway will allow you to get a satisfactory result even with the efforts of a beginner. You just need to stock up on the necessary tools and patience.
Methods for installing interior doors
There are different ways to install a door between rooms. It all depends on what its design is and what material the door block is made of. A significant role in choosing one installation method or another is played by its intended purpose. If this is, for example, a door to the living room, then special strength is not required. But if the door separates the passage corridor from the server room, in which high-sensitivity devices or units with voltages exceeding 1000 volts are located, then in the interests of safety it is advisable to install a high-strength door. Accordingly, the installation method in the second case must meet completely different requirements.
There are the following methods of fastening a door block in an opening.
- Fixing the frame on the mounting foam. The simplest, but not the most reliable way installations. Suitable for lightweight doors made of small fiberboard or MDF.
When dry, the polyurethane foam firmly glues the door frame to the wall opening
- Installing the door frame on brackets. As a rule, all plastic doors (as well as windows) are installed in this way. Metal plates are used as brackets, which are used for suspended ceilings. The thickness of the direct suspension ranges from 1 to 1.5 mm, so the mount is quite rigid. The main disadvantage of this method is the need to plaster the place where the bracket is attached. The method is applicable when the walls have not yet been finished.
Ceiling hanger is used as a bracket to fix the door frame
- Hidden installation, i.e. fixing the door frame under the hinges in three places. The rest of the space is filled with foam. The result is a fairly strong and invisible mount to prying eyes. The frame suspension points are located in the following order:
- two - under the hinges;
- one is under the counter lock plate.
- End-to-end method. Installation is carried out using screws or anchors. Holes are drilled in the frame through which it is attached to the wall. Typically, two to four fixation points are used on each vertical post and one to two on the vertical bars. To prevent the holes from being visible, they are covered with plastic plugs on top. This fastening is considered the most durable and is used for heavy doors, including metal and armored ones.
With direct fixation, the frame is firmly attached to the wall and can support a heavy and powerful door
- Fixing the door frame on hinges. New way, developed relatively recently. Its essence is that the box is suspended on special hinges. Anchors are installed at the ends of the opening, and metal hinges are screwed onto the frame. During installation, the loop is placed on the head adjustable bolt. This method is good in cases where the doorway is uneven. Installation is very fast.
A set of simple fasteners allows you to install the door in a matter of minutes
In practice, several methods are often used simultaneously, and they also combine and combine fixation methods depending on the specific situation. In any case, polyurethane foam is almost always used today; it serves not only as fasteners, but also as a heat-insulating and sound-absorbing layer.
Video: technology for quickly installing doors in 15 minutes
What is required to install an interior door
As with any other installation work, for successful installation of interior doors you need special tools and consumables.
Required Tools
Getting started self-installation interior doors, you need to equip yourself with the appropriate tools:
- electric drill with a set of attachments (for screws with various slots);
- a set of wood drills (the larger the range, the better);
A distinctive feature of a wood drill is its sharp tip.
- hammer drill (if fastening is carried out on anchor devices);
- electric or hand furniture saw ( perfect option- miter circular saw);
Using a miter saw, blanks for the door frame, trim and additional elements are quickly and efficiently prepared
- Pobedit drills or drills for concrete (diameter 4 and 6 mm);
- miter box, a set of chisels of different widths;
The miter box is designed for cutting parts at different angles
- measuring instrument - hydraulic level, tape measure, square, etc.;
The accuracy of measurements during the assembly of interior doors is reflected in the quality of their further operation.
- knife, pencil, marker.
You will also need consumables:

What cutters are needed to install interior doors
If you have the opportunity to purchase or rent a router, you should definitely take advantage of it. Using a hand router, selecting hinges and locks is significantly faster. There is no need for chisels, and the quality of the grooves improves. In order to optimize the process, it is advisable to use small diameter cutters. Thanks to this, you will have to cut less wood at the corners by hand. For example, for door hinges A cutter with a diameter of 9.5 mm is ideal. To remove the lock, a groove cutter of appropriate length is used (to the depth of insertion of the locking device).
The main characteristics of a groove cutter include the height and diameter of its working part, as well as the size of the shank for clamping the router
The average installation time for one door for a professional carpenter is 2 hours. If the hinges and lock are cut manually without using a router, this time increases to 3 hours.
Box trim saw
A few words about the electric saw. When installing one door, of course, there is no point in buying a “circular”, especially an end door. You can use a regular hand saw with a fine (furniture) tooth.
Using a saw with small, straight teeth, you can make even and clean cuts of parts.
But if there is construction or reconstruction of an entire apartment in which from 5 to 15 doors are installed, you can at least think about renting tools. The quality and speed of assembly using a miter saw increases several times. Much also depends on the type of doors and trim. Some have to be adjusted to the required dimensions, others require virtually no cutting.
Preparing the opening for installing an interior door
The main task in preparation doorway is:
- removing excess materials from the end of the wall (residues of polyurethane foam, plaster, broken bricks, etc.);
- creating the right geometric shape holes in the wall (rectangle, not trapezoid).
If the brickwork is in poor condition, it must be plastered with cement mortar.
In new buildings, doorways should theoretically have dimensions close to standard ones. However, in practice this does not always happen. In a house or apartment where reconstruction is taking place, the old doors must be dismantled before installing new ones. If the opening is damaged, it must be restored - leveled and plastered.
The quality of installation of the door block is affected by the following geometric parameters of the opening.
Height
The height is measured from the “clean floor”, i.e. from the level of the finishing floor covering - laminate, tiles, linoleum, etc. It is necessary that the height is the same over the entire plane. A similar requirement is imposed on the floor - there should be no bumps or holes on it, especially if the door being installed does not contain a threshold in its design - all defects will remain visible. The height of the opening should be 6–7 cm greater than the vertical size of the door itself.
The dimensions of the doorway must take into account technological tolerances for installing the frame and the required installation clearances
Width
The width of the opening is subject to similar requirements - it must be the same along the entire height of the door. Vertical planes should be located at right angles to the floor and be parallel. If this is not the case, the sidewalls need to be leveled. The width of the doorway is determined based on the width of the door leaf - 10 cm is added to it (5 cm on each side).
Thickness (or depth) of the opening
An important condition that must be observed when preparing the opening is that the end must have a rectangular shape. In the lower part, at the intersection with the floor, a right angle (90°) should be formed. If the thickness of the walls is not the same, cracks will form under the platbands, which, in fact, is a defect.
Video: preparing a doorway before installing an interior door
Do-it-yourself interior door installation: step-by-step instructions
Since the vast majority of doors in everyday life have a swing design, let’s consider the installation procedure using the example of a typical interior door.
The most common type of interior doors has a swing opening mechanism
Rules and procedure for installing interior doors
Installation of a swing interior door is carried out in the following order.
- Development of a scheme for fastening the door frame in the opening. At this stage, it is necessary to clearly imagine (or better yet, sketch) the method of fastening. In our case, this will be fixation with self-tapping screws and polyurethane foam. It is also necessary to decide on the side into which the door will open. If there is no pre-thought-out plan, the following hint will help solve the problem: in small rooms, such as a toilet, pantry and bath, it is customary to open the door inwards. It is better to exit to the corridors from large rooms outside.
The most common way to fix the frame in a doorway is to install it using an anchor on mounting foam.
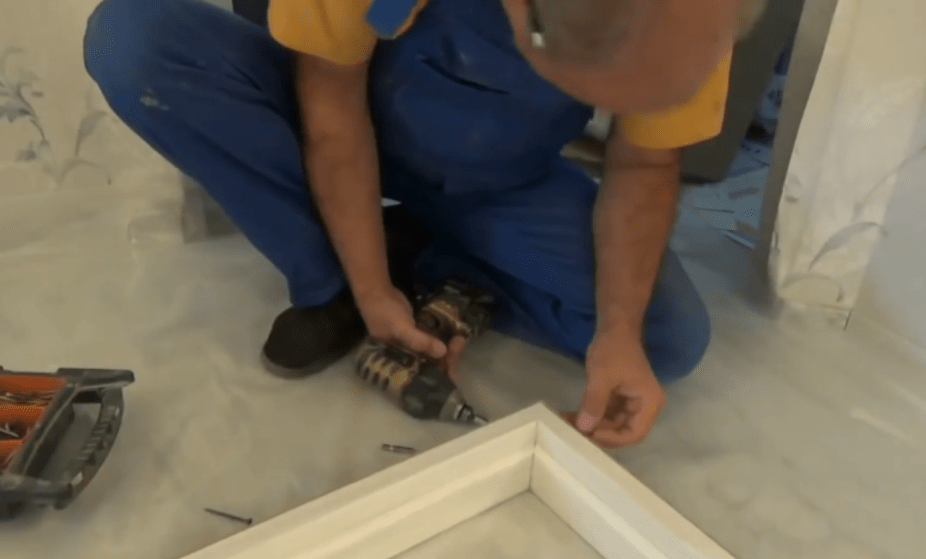
- Door frame installation. It is advisable to place the door that arrives from the store on a flat horizontal surface - a table, chairs or on the floor and unpack it. Assembly is carried out using 3.5 mm thick wood screws. Before screwing in the self-tapping screw, it is necessary to drill a hole that will prevent the wood piece (fibreboard, MDF, chipboard) from splitting. A drill of a smaller diameter is used, in particular 3 mm. For the same reasons, there is no need to screw the screws close to the edge of the parts - the standard distance is at least 5 diameters, i.e. 1.5 cm. To securely fasten the horizontal strips of the door frame, four screws are enough - two on each side.
When assembling the frame on the floor, place cardboard from the packaging under the box
- Trimming posts. Typically, a door frame is sold with a height margin of 5–7 cm. After fixing the side parts, it is necessary to measure the exact size and cut off the excess. To do this, the height of the opening is measured and transferred to the frame. It should be taken into account that there should be a technological gap of 2–2.5 cm between the frame and the wall. This gap is needed so that the frame can be aligned horizontally and vertically inside the opening.
The length of the side posts is adjusted after measuring the height of the opening
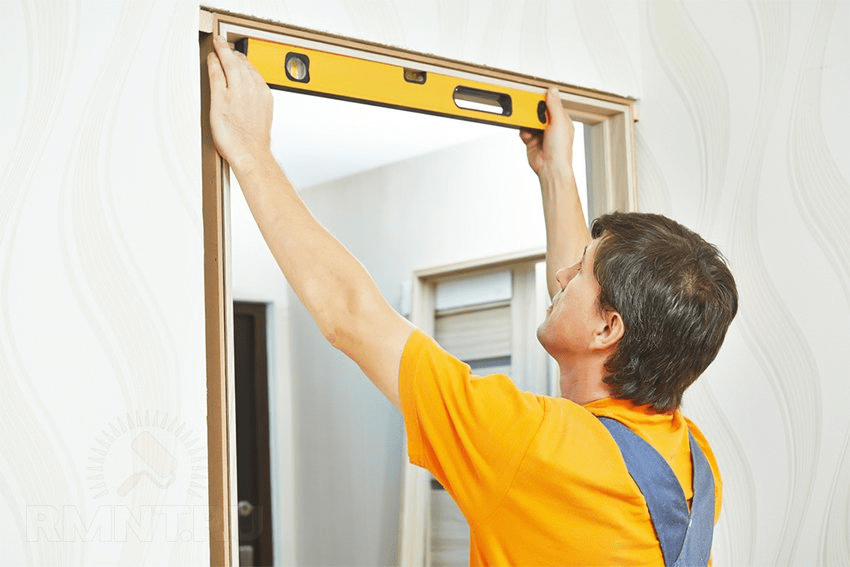
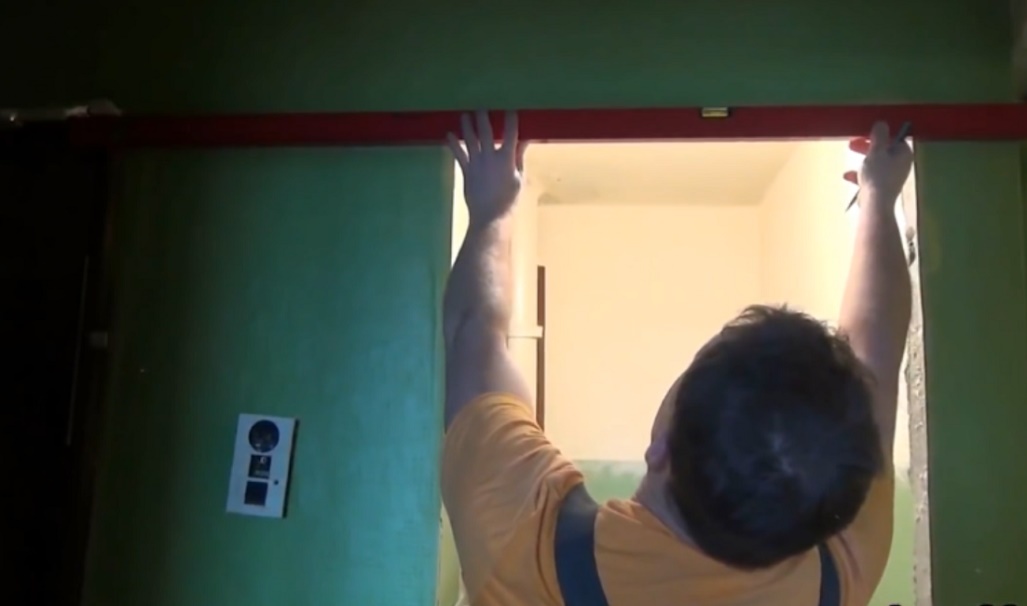
- Installing the frame in the doorway. If until this moment the door leaf was inside the frame, then to install the frame into the wall, the leaf must be removed. The frame is installed in the designated place and leveled using a level. Primary fixation is performed using plastic or wooden wedges. It is very convenient to use a set of thin wedges; with their help you can accurately align the box along all axes. It should be remembered that the racks of the box must be vertical in two perpendicular planes - on the side of the canvas and on the side of the wall. Proper operation of the door block depends 80% on the correct position of the door frame. A number of models of interior doors have a special decorative strip, which is disconnected and mounting holes are drilled under it. Upon completion of installation, the bar is put in place. To secure the frame with screws, you need to drill 3-4 holes with a diameter of 4 mm on each rack and transfer them to the wall with a pencil or marker. After this, the box is removed and sockets for dowels are drilled in the wall according to the markings. Do not forget that wood drills do not work in concrete. Brickwork drill with a hammer drill and a stone drill. The diameter of the drill is 6 mm, the size of the plastic sleeve. When the holes are ready and the dowels are inserted into the wall, the frame returns to its original position and is pre-fixed (“baited,” as the craftsmen say). Before the final tightening of the screws, the position of the vertical and horizontal parts of the box is checked again. Tightening is done in a circle, first tightening the screws half-heartedly, then with maximum force. In order not to overtighten the fasteners, during tightening the verticality of the racks is checked with a long two-meter level or rule.
The use of a construction laser level increases the accuracy of door frame installation
- Installing the door leaf on the hinges. Since we are considering a lightweight interior door made of MDF or fiberboard, one person can hang the door on its hinges. It is enough to lift the door above the awnings and carefully place the hinges on the axis. After this, the door leaf must be closed and checked for correct positioning. If the door is installed in compliance with all technological standards (3-4 mm gaps on each side), it will move inside the frame easily and without effort on the part of a person. When open, the sash will not slam shut spontaneously, and when closed, it will not open. If the purchased door does not have recesses for hinges, you will need to make them yourself. To do this, a cutter is inserted into the tool, the depth of immersion into the wood is adjusted, and a groove is selected using a translational movement according to a pre-marked size. The accepted location of the hinges is 20–25 cm from the upper and lower edges of the sash.
The hinges are placed at the top and bottom at the same distance from the edges of the door leaf
- Filling the seams with polyurethane foam. This is a crucial moment, since such important door parameters as sound insulation and heat resistance depend on the filling density. It is better to use polyurethane foam with a low expansion coefficient. To speed up the setting and hardening of the polyurethane, the walls and door frame are moistened with water (sprayed from a spray bottle). Filling is done sequentially, from bottom to top, so that there are no voids left, but at the same time foam flakes do not fall on the floor. During the operation, it is advisable to cover the door with film, since prolonged contact with polyurethane can cause stains to appear on the laminated surface. As the foam dries, it increases in volume, so the seams are initially filled by 30–40%. After complete hardening (after 24 hours at an air temperature of 20 o C), the excess is trimmed off sharp knife. It is not recommended to open the door leaf during foaming and drying. It is advisable to insert pieces of packaging cardboard into the gaps (along the perimeter). This will prevent deformation and sagging of the frame if there is too much foam.
It is better to fill installation gaps with foam from the bottom up, carefully treating the voids
- Doorway trim. Upon completion of the door installation, it is necessary to tidy up the opening. To do this, slopes or platbands are installed in it. For interior doors, finishing with slopes is rarely done (although this is also practiced, depending on the installation location and function of the door). The most common type of finishing is platbands and extensions. If the size of the wall is small and the width of the door frame coincides with it, platbands are installed on both sides and the finishing of the opening ends there. If the width of the box is not enough to cover the wall completely, add-ons are used. With their help, the plane of the frame expands, and the platbands are no longer attached to the frame, but to the extensions. It’s interesting that designers sometimes deliberately select colors for the extensions that contrast with the color of the door. Such solutions are original in nature and emphasize the door as an element of the interior. Installation of platbands is carried out in several ways, depending on their design:
- groove connection;
- gluing to the wall;
- hidden nails.
- Installation of accessories. The door handle and lock are usually included with the door. Or at least installation holes are prepared in the canvas. If they are not there, you need to mark the sash and use a router and electric drill to cut holes of the required size (for pre-purchased components). You should follow the instructions for installing the lock and door handle, which are included with the products. The approximate installation height of the door lock is 90–110 cm from the floor. The handle is mounted at the same height, 10–15 cm away from the edge of the door leaf.
The method of installing a door lock depends on its design, and it is usually located at a height of 90–110 cm from the floor
The type of connection between vertical platbands and horizontal ones can be different - rectangular or diagonal. From an installation point of view, a rectangular connection is considered simpler. For a diagonal joint, it is important to accurately cut the workpieces at an angle of 45 degrees. For this, craftsmen use an end tool circular saw. But for small volumes, you can also use a carpenter’s miter box.
The diagonal connection of the platbands requires a perfectly even cut at an angle of 45 degrees, which is carried out using a miter box or a circular saw
Many modern models of interior doors contain in their design rubber compressor. Its installation is most often carried out by gluing. WITH inside removed protective film, and the seal is carefully glued around the perimeter of the entire door leaf.
Video: how to properly install an interior door
Installation of double doors
Bivalve door blocks are a popular interior decoration. They fit especially harmoniously into wide doorways and emphasize the spaciousness of the room. Doors with two leaves are:

When assembling swing doors double doors the algorithm remains the same as for a single-leaf door. But there is one nuance associated with the door suspension. The first to be installed on the hinges is the sash with the latch, which is cut into the upper part of the leaf ahead of time. After installing the sash on the hinges, fix it with a latch and begin installing the other half of the door. In this way, the alignment of the canvases is achieved in relation to the frame and among themselves. The gaps adopted for a single-leaf door are also relevant for the double-leaf version.
The latch holds the door leaf in a stationary position
The sliding design of double doors is different in that it does not have a frame in the usual sense. The door leaves are supported by a suspended profile equipped with a rocker mechanism. Naturally, the installation of such a door differs from the assembly swing structures. Installation is carried out on straight walls with sufficient space (space is needed for opening doors).
Around the sliding door you need to provide a reserve of free space for those leaving when opening the racks
Installation begins with the assembly and fastening of guide profiles (which can be either on top or below the doorway). Next, the procedure must be carried out in this sequence.
- Mounting brackets with fittings (carriages and movable rollers) on canvas.
A diagram of fastening the door leaf to the rocker mechanism indicating the weight of the door leaf is attached to each product
- Installation of sashes on the hanging mechanism.
- Attaching stoppers (rubber opening limiters).
Using the limiter, the free movement of the door leaf is adjusted to protect it from impacts on nearby objects and surfaces
- Installation of extensions and platbands on the doorway.
- Installation of additional door hardware (brushes, seals, grips).
On preparatory stage The wall plane is marked and leveled. This is important because the door leaves are constantly moving along the walls.
The main document that you need to read when installing sliding doors is the assembly instructions from the manufacturer. It reflects the technical requirements for installation and basic operating rules.
Video: installing a double swing door
Interior doors are usually installed after installation in the room. finishing works. In particular, it is not recommended to prime, plaster or paint the walls after installing the doors. High humidity negatively affects the wood-based material - deformation and bending of the structural elements of the door block are possible.
Installation of interior sliding doors
A sliding door is one of the options for sliding interior doors. Unlike a double-leaf design, an interior sliding door can be single-leaf, three-leaf or even four-leaf. Moreover, one or two canvases can move. Installation is carried out in the same order as for a sliding door in accordance with the manufacturer's instructions.
Sliding doors save space in small spaces
Video: installation of interior sliding doors
Installation of sliding door structures
A characteristic feature of sliding interior doors is the movement of the door leaf along a support profile located on the floor. Installation is carried out after finishing the floor. The guide profile is installed in parquet, laminate, ceramic tiles or other floor covering. Often the door leaf is hidden in a wall cavity specially prepared for this purpose.
Before installing the sliding door, a false wall is built to hide the door
There are options for making a false wall or a plasterboard box for sliding interior doors. But in any case, the suspension mechanism remains identical to that of all other types of sliding doors.
Video: installation of sliding interior doors
Installation of sliding interior doors
Sliding interior doors save space in small rooms. But their installation requires certain conditions, the main one of which is the availability of space to move the door leaf. Sliding doors can be single-leaf or double-leaf. The supporting rocker mechanism is usually located on top, and a restrictive profile is mounted below, which prevents the canvas from swaying during movement.
When planning are used various options location of the leaf in the doorway
Installation of glass doors
Glass doors are very original solution for interior decoration. Like doors made of other materials, they come in swing and sliding types. In private residential construction, the swing type is usually used glass doors. In general, the principle and procedure for their installation does not differ from the standard one, but there are several features.
- The glass door leaf cannot be adjusted to dimensions; it cannot be sawed or cut. Therefore, to avoid mistakes, doors are ordered after finishing walls and doorway (when the dimensions no longer change).
- Installing a door is not something you can do alone. The weight of the glass sheet is usually from 50 to 70 kg; it is difficult and dangerous for one person to manipulate such a sash.
- A glass interior door is mounted on a wooden or metal frame.
- The durability of glass doors is limited only by the wear resistance of the hinges. Pendulum hinges are considered the most reliable.
To assemble the glass door hanger, mounting holes are cut into the door leaf at the factory.
Holes for installing hinges are cut at the glass door manufacturer. You need to drill holes for the lock and handle yourself, using a glass drill of the required diameter.
Holes in the glass are drilled with special drills at low speeds
The advantage of glass interior doors is their almost unlimited service life. Their appearance is not subject to mechanical or chemical influence, the strength of the glass block is comparable to the strength of metal. The only thing that needs to be monitored is the safety of the hinges and fittings. Timely lubrication and removal of contamination are two necessary conditions for long-term operation of glass interior doors.
Video: installation of glass interior doors
Installation of fittings on interior doors
Installation of fittings is perhaps the most crucial moment in installing interior doors. It is when performing this part of the work that errors occur, leading to rapid breakdowns. Therefore, when starting self-assembly, you need to get ready for painstaking “jewelry” work. Mistakes are too expensive.
So, the accessories include:

All elements of fittings require precise insertion into the plane of the door leaf or frame, and this presents a certain difficulty for novice carpenters. The permissible error cannot be exceeded by more than 1 mm. Otherwise, there are no firm guarantees for the stable operation of the mechanisms.
Sampling is done manually (with chisels) or using power tools. At this stage of work, a manual electric router is used.
Thanks to its high-speed operation, the router makes neat and clean cuts in wood
Sequence of work
Installation of fittings on a swing interior door is carried out in the following order.
- Marking. Before you start cutting the hole, you need to determine where the hinges will be installed. As noted above, in order to evenly distribute the weight of the door leaf, the hinges are located symmetrically 20–25 cm from the edges of the door leaf. The contours of the loop are drawn with a sharp pencil and outlined around the perimeter with a knife, scalpel or semicircular chisel.
It is advisable to outline the contour of the loop with a sharp pencil, thin awl or scalpel
- Arranging a seat for hinges. Using a chisel, wood is gradually removed from the intended contour. It is necessary to control the groove depth within 2–3 mm. The accuracy of the cut is checked with a loop - when placing it in the designated place, the front part of the fittings must coincide with the surface of the door end. When selecting hinges in MDF doors, the manual method is ineffective; it is advisable to use a router with a small diameter cutter.
The hinges should be flush with the surface of the fabric
- Preparing recesses in the frame. Having made the grooves and installed hinges in them, they proceed to the manufacture of similar seats in the door frame.
- Installing an interior door handle. The operation consists of cutting out a seat for the lock and a hole for installing a rotary handle. It is difficult to do without a router here, especially for a person who does not have carpentry experience. Using a long cutter, select a groove of a certain depth for the lock. A small cutter is used to cut out the countersunk for the lock escutcheon and the strike plate. To accurately determine the location of the locking tongue, it is smeared with a coloring substance (nail polish, chalk, paint) and released onto the frame. A hole in the counter plate is installed in the designated location.
Making grooves for door lock carried out using a router
- Installation of the latch. It is carried out depending on the design of the locking element. As a rule, installing a high-quality latch involves cutting out a masking groove. The device is applied to the edge of the door leaf, its shape is outlined and a groove is cut along it.
Video: inserting a lock into interior doors
How to check the correct installation of an interior door
Anyone who has to install for the first time interior doors, asks questions: is the door installed correctly and what needs to be done to make it last long and properly. There is a comprehensive answer to them, which consists of two points.
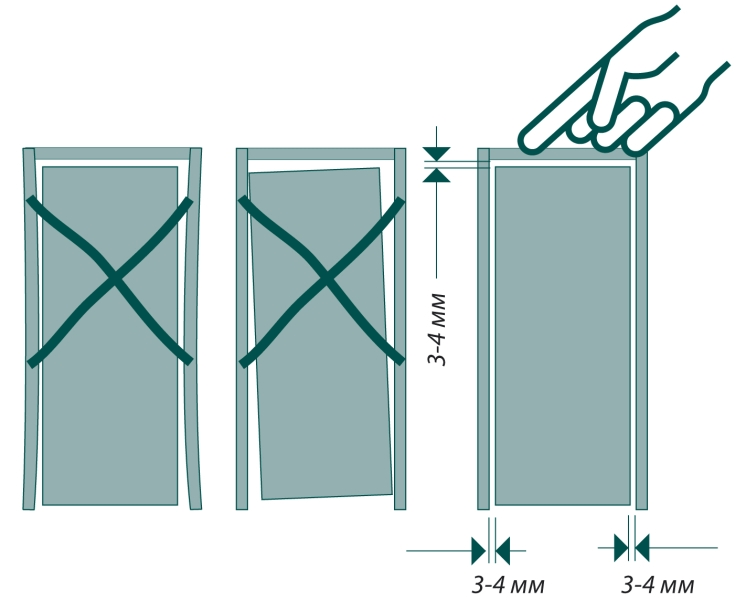
- A sign of correctly carried out installation is the same technological gaps around the perimeter of the entire canvas. This means that if the gap around the sash is the same size everywhere, the canvas is hung correctly.
- The door must pass a small test. When opening (and closing) the canvas, no extraneous sounds, creaks, or rustles (friction of one surface against another) should be heard. The sash moves easily, without any effort. If the hand stops, the canvas also stops; it should not move on its own.
If these two conditions are met, the door is installed in accordance with technical and operational standards.
Often the installation of an interior door is preceded by dismantling. Disassembly is carried out in the reverse order of assembly.
- Decorative elements are detached - platbands and extensions. To do this, use a pry bar or a large screwdriver. Decorative elements can be reused, so do not break them during dismantling. If these parts are kept intact, they can be painted, covered with laminated film and used when installing a new door.
Platbands are removed using a pry bar or an ax
- The fittings - locks and handles - are removed from the door leaf. The lock is unscrewed from the end of the door leaf. The rotary handle mount is located on one side of the door (at the bottom of the lever).
- The door leaf is removed. To do this, open the sash at an angle of 90 o relative to the frame and lift it by the lower edge using a crowbar, pry bar or other lever. Once the fabric is removed from the hinges, the awnings can be detached and reused.
To remove the fabric from the hinges, turn it at an angle of 90 degrees and lift it using a lever
- The door frame is removed. To disassemble the frame with the least effort, it is necessary to determine where it is fixed to the wall. Sometimes this is difficult to do with old doors, especially if the opening has slopes made of cement mortar. Then a regular electric jigsaw will come to the rescue. If the frame is not planned to be used in the future, it can be cut in cross section and separated from the wall in parts. This greatly speeds up the dismantling process. The top crossbar is also released in the same way.
Using power tools speeds up door dismantling several times faster
If you do not have firm confidence in your abilities, of course, it is better to turn to professional installers, because correct assembly and installation is not the only, but a necessary condition for long-term operation of interior doors. But if you have at least a little experience in carpentry, and the operations described in this article do not give you any doubt about the possibility of repeating them, feel free to start installing the door yourself. You can save money and be absolutely sure of the quality of every action.
In every residential premises there are doors. Interior structures serve to divide space into zones. Main function entrance doors consists of protecting the premises from intruders. Sooner or later there comes a time when structures need to be replaced. In some cases, during the repair process it becomes necessary to install new door where she wasn't. In order to save money, many owners decide to carry out the installation themselves. Next, we’ll figure out how to install a door with your own hands.
Manufacturers today offer various models doors. Often, almost all parts come separately. The structure will need to be assembled on site. When purchasing a door, you should pay attention to the quality of the seal. Experts recommend choosing the one that is softer. This way the closing will not be accompanied by a dull thud. It is better to purchase fittings in accordance with the color of the door. Store consultants can help with this. As for the latch, preference should be given to the part that has a protrusion on the mating side. With its help, the adjacency of the web is regulated.
Preparation
Before installing doors, they should be kept unpacked in the room for at least five days. In this case, it is necessary that the room has normal humidity and temperature. To carry out the work you will need next tool: screwdriver, chisel, hammer, circular saw. Be sure to prepare a level, preferably a laser one. It will be used to level the door frame.
Assembly
Let's look at how to install a wooden door. First you need to make markings in the opening and determine the position of the top bar. Here you should remember the need to leave a gap. Optimal distance between the box and the wall - 2-3 mm. If it is larger, the structure will dangle, and if it is smaller, it will close with force. The box parts will need to be cut to height. In this case, the difference in floor is taken into account. The racks and the top crossbar are sawn at 45 degrees from the edges and connected. Self-tapping screws are used as fasteners. During work, you need to ensure that there is no movement in the corners. The box parts must be joined flush. After this, markings are made for the hinges and a selection is made in the side stand.

Box installation
The assembled structure is inserted into the opening. Small planks (wedges) should be placed between the top beam and the ceiling. Then we perform the following steps:
- From the sides and front we check the vertical position of the structure.
- We place wedges in the areas where they are fastened to the wall (they must be of the appropriate size).
- We fix the hinged side of the box.
- We foam the gap from the inside. The pretend part is processed pointwise - it will need to be leveled later.
- Finally, use a level to check the horizontality of the top element.
Installation of fittings
Before installing the doors, you should secure the hardware. To do this, the canvas is placed on its edge. It will be more convenient to use a special stand. The areas where the latch and hinges will be located are marked on the surface. The first is located in the center. The loops will be located at a distance of 20-25 cm from the edge of the canvas (top and bottom). On milling machine(manually) the cutter is adjusted to the height (width) of the elements and a selection is made. Next, the corners are leveled using a chisel at 90 degrees. The latch and hinges are secured with screws. You must first make holes for fasteners.

Insert the canvas
Many people do not know how to install a door correctly. To make the process easier, a number of recommendations should be taken into account. You need to start by “hanging” the canvas. A stop is placed under the door. Next you should join the loops. After they are aligned, 2 screws are screwed into each element, no more. Then you need to check the closure of the canvas and the gaps. If there are errors, they are eliminated. Then the pretend side is leveled. It often happens that the canvas has a slight defect. For example, it may be slightly twisted in the plane. In this regard, you should not rush to screw the box on both sides. Otherwise there will be a gap when closing. After closing the door, you should begin leveling the frame.
When installing, you need to make sure that the box does not extend beyond external wall premises. Even if the canvas is crooked, it should not open spontaneously. In other words, the door should not slope. In this case, you should move one side of the box. If the skew is too severe, the door will have to be replaced, since even cash strips will not be able to mask the defect.
Final stage
After completing the alignment, it is necessary to drive a wedge into the latch installation area. To do this, make a notch on the block and then make a cut for the “tongue”. Here a hole is drilled for hidden fastening of the door frame. Next, the mating element of the latch is screwed on. After fixation, if necessary, the adhesive force is adjusted by pressing/releasing the tongue.

Variations
The owners of many apartments choose a sliding door instead of traditional swing doors (how to install it will be discussed below). It must be said that this option allows you to significantly save space. IN small apartments ideal solution zoning of the room is precisely the sliding door. How to install such a structure? Let's discuss the main recommendations.
First stage
As is the case with other types of structures, before installing a sliding door, it is necessary to prepare the opening. It is cleaned of dust and dirt, then markings are made. Frame elements will already be installed on it.
Installation of guides
When using the lower element, it should be deepened into the floor, leveled using a level and fixed. Next, the upper guide is installed along the control line. When installing, it is necessary to maintain horizontal position. The top element is placed at a height equal to the value canvas plus 15-20 mm for gaps. You can check the horizontal position using a level. The length of the guide is equal to twice the width of the door leaf with an increase of 4-5 cm. This margin will ensure normal movement of the door. As a rule, the guide is attached using brackets.

Installation of the canvas
How to install the door correctly? First of all, the necessary elements should be attached to the canvas itself. Settings can then be made to adjust the levels. This work is best done with an assistant. It will support the blade while inserting the carriages with rollers into the groove. If a partition door is being installed and the guide is installed from one wall to another, the carriages must be inserted into the groove in advance. For this purpose, the guide has a window. In this case, fixing the canvas will be reduced to joining the holders on it and the anchor, which extends from the carriage.
Limiters and closers
After installing the door leaf, the plugs should be secured. The limiters can be made in the form of studs or a guide profile. It is recommended to purchase plugs with special plastic or rubber stops.

Platbands and additions
Before installation, special brackets must be screwed to the wall. They can also be secured to the guide using latches. In the latter case, the fasteners will not be visible on the outside. Then the restrictive structure is fixed. The canvas will rest against it when closing. As a limiter, you can use a finished beam or a profile, which is purchased along with other accessories. It is installed strictly vertically. This is where the counter part of the locking mechanism (locking element) will be secured.

How to install a metal door
To begin with, it should be noted that such structures are used to protect the house from intruders. And quite often, home safety directly depends on the quality of installation. Let's look at how to install the front door.
Main stages of installation
Before installing the doors, you should familiarize yourself with the process diagram. The work can be divided into three stages:
- Dismantling of the previous structure.
- Preparing the opening. Before installing the doors, you should check for gaps between the frame and the opening. The surface of the walls must be clean and dry.
- Direct installation. First, holes for fasteners are drilled in the opening. The door frame is fixed with anchors. The more there are, the better. The anchors must go at least 20 cm into the wall. Fastening is carried out along the entire perimeter of the box.

Progress
The fasteners securing the box should be located as far as possible from the outside of the wall. During the fastening process, it is necessary to use wooden wedges. They should be slightly larger than the gap between the opening and the structure. When installing wedges in the side posts, it is necessary to ensure that the spacing remains constant. If the size of the gaps changes, you will have to re-align. The verticality of the structure is checked using a plumb line. Next, you need to drill holes to insert the anchors. Their diameter is about 15, and their depth is about 200 mm. Anchors are inserted into the holes, which actually secure the box. Next you need to hang the canvas itself. It is recommended to lubricate the hinges first. After installing the canvas, the gaps should be foamed. Before doing this, you need to moisten the surface of the wall with water - for better adhesion. A day after the polyurethane foam has dried, the eyelets should be plastered.
The ability to handle carpentry and measuring tools is already a reason to try to solve such a difficult task as installing interior doors with your own hands. The work is simple, but tricky in its own way. It will take scrupulousness and even tediousness in marking and adjusting, otherwise it will not be possible to install the interior door with the frame correctly.
Features of installing interior doors
At first glance, nothing complicated, but this is only a superficial impression. We are talking about not just installing the frame and door leaf into the interior opening, but doing it beautifully, without distortions, scratches or sagging hinges. If this is your first experience, then it is best to make detailed step-by-step instructions for installing interior doors yourself before starting work. This is not shameful for beginners. Even experienced craftsmen often make notes with their own hands - what not to forget and what to pay attention to when installing a door frame on a specific interior partition.
During the installation process, you will need to solve two of the most difficult problems yourself:
- Correctly assemble and install the frame of interior doors, align and secure it so that the frame does not sag under the weight of the door leaf;
- With your own hands, mark and cut out the mounting grooves on the vertical post of the frame and on the end of the interior door leaf.
U experienced craftsman It takes 2-3 hours to install an interior door; a beginner will need at least a day to completely install the frame and hang the door leaf.
Advice! It is not necessary to stupidly follow the instructions for installing interior doors, which recommend sequentially installing lock fittings, attaching hinges, and only at the very end solving problems with hanging interior doors. The main thing is to install the frame and door leaf with your own hands with a fresh mind, and you can put off the trim, locks and handles with trim for the next day.
There will be a lot of measuring and sawing. All cuts are made by hand hand hacksaw, therefore, in addition to fresh forces, you will need to stock up on quality tools.

Tools for installing interior doors
A day or two before the start of work, you will need to assemble a working arsenal for working with lumber. You can collect it from friends or rent it. Why two days before installation? Because well before starting work, you will need to check with your own hands the serviceability and functionality of each tool:
- Construction levels - small, 70-100 cm, and large, 150 - 200 cm, with a working bubble indicator. Usually they don’t pay attention to the condition of the camera and beacon, considering them to be in good working order, but in rentals you can sometimes find bent and even broken copies; this is the most important tool in installing interior doors;
- Marking tool - carpenter's corner with a ruler, tape measure and meter metal ruler. We check for the presence of angle marks at 90° and 45°;
- A screwdriver or electric drill with a bit attachment for cross-head screws. We check with our own hands how the cartridge holds, and the serviceability of the wiring - batteries;
- Cutting tool, you can cut the timber of interior doors with a jigsaw, but it is best to stock up on a pair of hacksaws - carpentry and metal. The first is used for cutting box parts, the second is used for fine cutting of platbands.
In addition to the tool, you will need a hammer, a clamp, a carpenter's chisel, foam in a can, tape and gloves. There is little dust and waste generated when installing interior doors, but you will still have to periodically remove it with your own hands so as not to spread it throughout the apartment.
In addition, it would be correct to have a hammer drill with a bayonet blade in stock, because when installing an interior door frame, problems may occur with the doorway in the wall. Ideally, the gap between the frame posts and the ends of the opening should remain 10-20 mm, for normal alignment and foaming of the cracks. In reality, the opening may be uneven, and you will need to knock down part of the concrete or stone with your own hands, a hammer drill or a hammer and chisel.
How to assemble an interior door frame
The best option would be to purchase a ready-made door kit, which usually includes:
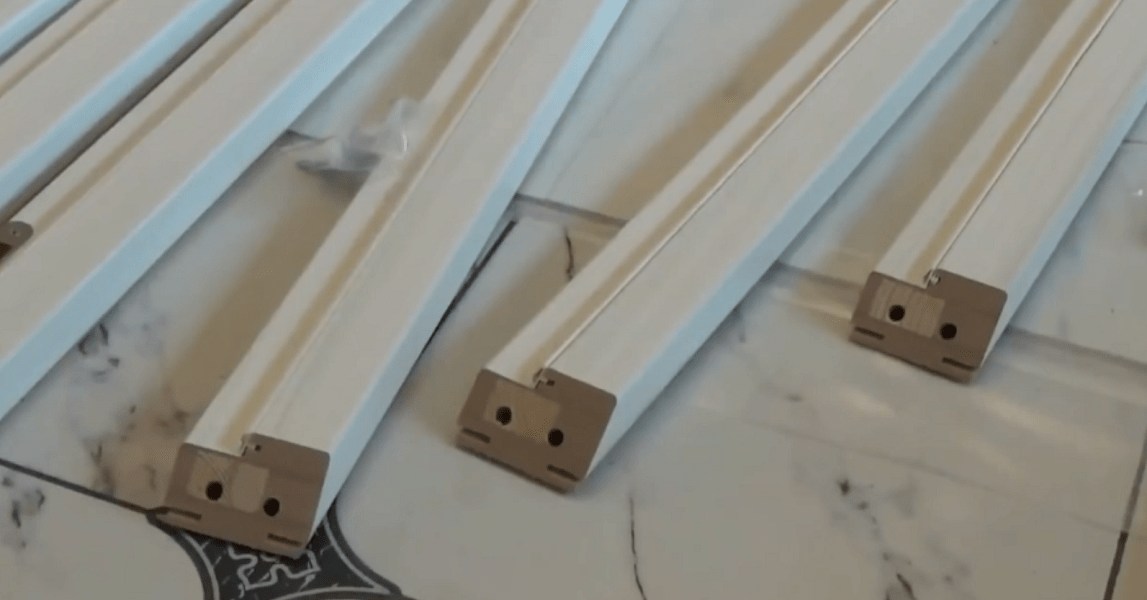
In this case, the entire process of installing the interior frame box comes down to transferring the second parts of the hinges onto the frame parts with your own hands, assembling the hinges with self-tapping screws and installing them in the opening.
The entire job will take less than two hours. One of the options for installing interior doors with your own hands in the video

The only drawback of the above scheme is that not all manufacturers of modern models of interior doors produce their products in kits designed for do-it-yourself installation. Most often, the customer buys a door leaf, and the trim and frame parts are purchased with the expectation of installing an interior door with a frame on their own.
How to install an interior door with your own hands
First of all, you need to lay out the door leaf on a level area. Next, the selected pair of beams is laid to the left and right ends of the sash. Using a tape measure, we measure the width and expected height of the future supporting frame. Then, using a building level and a tape measure, check the dimensions of the interior passage.
Important! This is done in order to determine whether the platbands will cover the edges of the hole in the wall, and what thickness of additional elements should be used.

If you “miss” the height or width of the frame, you will have to redo the trim yourself or, even worse, you will need to raise the interior door in height.
Assembling a door frame frame of any size
In order to install the interior door without distortions, it is important to choose the correct distance between the left and right posts so that the door leaf fits into the frame with a small gap, no more than 2 mm on each side. In this case, the door will open freely without jamming in the hatch.

The easiest way is to assemble the frame with your own hands using a clamp, a saw and two blanks. Vertical posts, as in the case of preparation, are placed at the ends, leveled and secured with clamps.

On the side of the upper and lower edges of the canvas, an allowance equal to the thickness of the timber is left on the workpieces. At the same time, on the left allowance, a cut line is applied with your own hands at an angle of 45° for further joining with the horizontal crossbars of the frame. Without disassembling the structure, markings are applied to cut out the grooves for the canopies, lock and handle.
If the interior door is too wide or complex shape, then usually at this stage they check the conformity of the configuration of the frame with the door to the shape of the interior opening. To do this, a pair of nails are driven into a wooden plank at a distance from each other equal to the outer width of the frame. The plank must be secured above the opening, and a couple of plumb lines are hung on the nails. If the gap between the frame and the wall is 10-15 mm, then the calculation is correct.
Installing hinges on an interior door
After all checks have been completed, it is necessary to cut out mounting grooves for the awnings in the canvas using a chisel or carpenter's knife and hammer. The easiest way to mill a niche is using a hand router, but, as practice shows, the work can be done with your own hands and without expensive power tools.

If this operation is difficult, then for interior doors you can use overhead hinges or models for drilling. For installation you only need to drill holes for screwing in the fasteners.
We fix the frame in the doorway
- We mark the level of the upper horizontal cross member of the frame with a marker on the steppe, this will help to perform the correct installation horizontally and vertically;
- Using wedges and a building level, we level the frame vertically and horizontally with our own hands. We fix the position of the frame in the opening with wooden plugs and wedges.
Advice! If the frame and door leaf are light in weight, then the frame can be fixed with mounting perforated petals to the wall of the interior partition.

Next, you need to blow out the space between the frame and the wall with polyurethane foam; while installation is being carried out on the polyurethane foam, you need to check it again and, if necessary, finally level it vertically using a long building level. We apply a small building level to the upper mark and, if necessary, we knock the frame to the desired height.

Installation of door leaf
After the loot is firmly fixed with hardened foam, it is necessary to install the mating parts of the canopies. To do this, initially the door leaf is raised with wedges so that there is a gap of 1-2 mm between the threshold and the lower edge.

All that remains is to install the sash on the awnings, and you can move on to the decorative finishing of the interior doors.
Installing trim on an interior door
Covering the frame with platbands is not particularly difficult. First of all, install the vertical trim strips. The height of the plank is measured according to the mark made earlier, after which the platband is applied to the frame and the cut line is marked at an angle of 45 degrees.
Advice! It is best to make the cut yourself using a thin hacksaw blade for metal. First stick tape onto the cutting line. The plank is nailed with wallpaper nails or placed on glue.

The second vertical casing is installed in a similar way. After the installation of the vertical parts has been completed, you can mark the cut line on the horizontal strip and install it on the door frame in the same way.
What are the sizes of extensions for interior doors?
Additional strips are used as an additional element to increase the width or thickness door frame. Most often, installing extensions on interior doors is required in a situation where the wall is much thicker than the canvas, and there is a gap between them that needs to be closed.
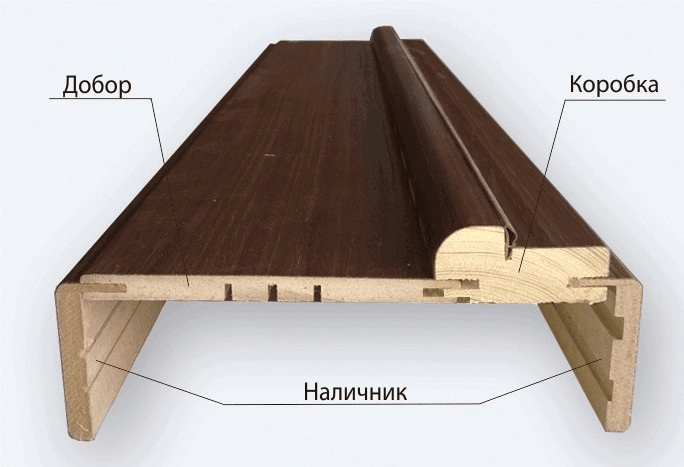
The width of the additional slats ranges from 10 mm to 200 mm; for interior structures, the most common size is 10-20 mm, and often, due to the non-standard profile of the gap, the additional slats have to be ordered or cut out with your own hands from the trim strips.

How to install extensions on an interior door
If, after installing the box, the unpleasant fact is discovered that the vertical plane of the frame is recessed into the space of the interior opening relative to the wall surface, then the only way to correct the situation is to use additional strips.
You must first determine the size of the extension; to do this, place a building level on the wall and use a ruler to measure the distance to the front edge of the box. Thin strips are nailed with wallpaper nails, wide extensions are glued to the frame.
Professional advice on how to install interior doors
Among the features of installing home doors, the following problem areas can be noted.
Before installing the trim, you need to make sure that the frame or additional strip is located in the same plane with the surface of the interior wall. Otherwise, even if you do it perfectly with your own hands, a gap will definitely appear between the platbands.
The second problem we have to face is sagging doors if installed incorrectly. To correct the position, you need to remove the door leaf, place washers, or trim the edge and install the door in place.
Conclusion
Installing interior doors with your own hands will require a little practice in installing awnings and extensions, but in general the work is not difficult, and with the right skill you can hang the door in a few hours. The craftsmen claim that with each installation, the quality of their DIY work doubles.