At the dacha we take a break from everyday worries, merge with nature, contemplate, and relax. In anticipation of the coming summer season the site offers a selection of ideas for wooden benches that you can make with your own hands or order from craftsmen.
It will be enough to simply print out the bench you like and show it to a specialist. This is quite enough, since a person who knows his business, even from a sketch, is able to understand what is required of him. So, let's see what is now in the assortment of country decorators...

A good quality classic wooden bench with a backrest. The photo clearly shows the design, which boards were used for the work. How the node elements are fastened.

Simple DIY bench
A simple bench made of boards and a metal base. This is probably one of the simplest designs. Such a wooden bench can be made with your own hands in literally one hour.

DIY board bench
Modern bench made from boards made by yourself. Pay attention to the tenon joint. From the inside, the bench should be additionally secured in the corner with a beam mounted on glue and screws so that the structure does not “walk.”

Wooden bench made of planks
Another idea for a similar connection. Only here the shortcomings of the previous version have already been taken into account. This bench is extremely stable and reliable. The legs are made of 100x50 mm boards, with 100x25 mm jumpers, the bench seat is made of 100x50 mm boards.

DIY wooden bench chaise longue
Wooden bench chaise longue. If you make a more gentle slope, you can rest reclining. The structure of the bench is made of thick plywood, cut with a jigsaw. For stability, three vertical posts are made.

DIY bench around a tree trunk
Bench around a tree trunk. Do it generously, as the trunk will become thicker over time.

DIY bench with armrests made from pallets
Bench with armrests made of pallets. After construction, a fair amount of this material remains, so it can be put to use.

Set of table and benches made of iron frame
Set of table and benches made of iron frame. If you know how to weld, then by purchasing a metal channel, you can easily make a reliable set for outdoor gatherings with your own hands.

A simple bench made from wood cuts and boards
A simple do-it-yourself bench made from wood cuts and boards. For one summer season, or for receiving a large number of guests. Such benches are common in villages; often, driving through the village, you can see such structures near houses.

Small wooden country bench
A small wooden country bench. On such a bench you can weed the beds or work in the flower garden, near the flower bed.

A bench made from a cut of dense wood. This is already a work of art - such masterpieces are worth big money. I have seen such exotic benches in Asian countries - they are held in high esteem there.

Bench with a drawer and tray for things or toys. It will require a certain skill from you during construction, but it will also serve, among other things, as storage.

A decorative bench made of slats is very airy and light.

Rustic bench made from half logs. It will look good in the lap of nature! If you have a forest nearby at your dacha, then you can easily find dry logs that you can split into an exclusive garden bench.

A swing made from crooked trunks. Very decorative and stylish!

A bench decorated with a cart wheel. The design is complex, I’m giving it just for beauty.

A bench made of thick boards with an animal figurine. If you put such a bench in front of the house, on the street side, then there will probably be people who want to take a photo while sitting on it.

Option from dies and crooked tree trunks. A bench for lovers of natural forms.

A bench made from half logs, taken in one of the city parks.

Bench - pergola. The vines are skillfully incorporated into the design of the structure.

A bench made from a cross-cut tree. I understand that it’s unlikely to be possible to make such a cut yourself, without using expensive equipment, but the idea is very original.

A bench made of bamboo with a hanging seat made of thin planks tied with strong rope.

A do-it-yourself bench made of boards and timber is also a very easy-to-make design.

Family bench with table for a large family.


Do-it-yourself massive wooden benches
Massive benches and a table made of wood. The boards are treated in such a way that they look as if they have been doused with water in the sea.

Classic bench sofa.

Rustic furniture is very popular among Western homeowners. The most difficult thing in such things is collecting branches that match the curvature.

A simple bench made from half a log. The legs are made in the form of bast shoes.

Collect your cut tree trunks and branches and use them to create decorative furniture. In a couple of filing seasons fruit trees You can accumulate material for a bench or bench.

An example of a rocking sofa. A good option for summer holidays at the dacha.

An interesting “double” version of a bench - chair.

Bench with cabinets and flowerpots on them.


Round wooden bench around a tree. The seat elements are made of thick plywood, which made it possible to make the bench round in shape.

Fun DIY bench made from boards and logs
A cheerful bench made of boards and logs. Very simple idea, the main thing is to paint everything brighter and write something original.

A very rich bench - a swing... All that remains is to lick your lips!

Like these ones original ideas DIY wooden benches and benches. This, of course, is not all! There are a lot of ideas around, the main thing is to capture the beauty in the photo, and then implement it on your site!
Garden benches today have not only a practical purpose, but also an aesthetic one. They are used to complement a pre-designed interior. Making a garden bench with your own hands is quite simple, it requires minimal skills hand tools. Optimal material For the manufacture of such items, wood is used, since it is the easiest to process.
Preparatory work
Before you start doing the work, you need to find drawings of garden benches on the Internet and select suitable option. You shouldn't focus too much on complex structures, if the skills of a professional carpenter are not available.
Tool selection
When all stages of work are planned on paper, you should prepare necessary tools. If the garden bench is made with your own hands from ordinary wood, That The following items will be required:
- screwdriver with a set of bits and drills;
- hammer;
- plane;
- Grinder;
- hand saw or circular saw;
- level with a ruler.
It is very important to use high-quality and reliable measuring instrument. Otherwise, the product may end up asymmetrical.

Material
It is equally important to choose a tree with suitable sizes. This will minimize processing - most of the time is spent on adjusting the dimensions of individual parts.
The wood must first be well dried. Otherwise, after completing the manufacturing process in the sun, the entire structure may become distorted. This will make it impossible to use the garden bench.
When all preparatory work finished, you can proceed directly to assembly.

schematic drawing of a garden bench
Manufacturing and fitting the main parts of the bench
Making a garden bench with your own hands begins with preparation main components:
- 1- front legs;
- 2 - hind legs, turning into the back;
- 7 and 4 - transverse beams;
- 6 - longitudinal beam;
- 3 - slats for the back and seat.
 It is very important to avoid using wood that has any serious defects in its structure. Such as knots and others like that. Inclusions of this type reduce the strength of the bench, especially if it is located outdoors. A breakdown can occur at the most inopportune moment, leading to injury.
 If for some reason you have to use material with defects, it is necessary to treat the illicit area as much as possible using grinding machine or a plane.
All elements of a garden bench made of wood must be made strictly in accordance with the dimensions indicated on the drawings. A discrepancy of even a few millimeters will lead to the subsequent need to redo the entire structure; the parts of the garden bench will need to be aligned.
Assembly work
When all the necessary elements are ready for the garden bench, all that remains is to securely connect them together. This stage no less important than all the others. You can make a connection different ways. The most commonly used hardware elements are:
- nails;
- self-tapping screws;
- bolts, washers, nuts;
- wooden chops.
The choice of a specific connection method depends on the load the garden bench or bench will need to withstand. If a child will use this piece of furniture, then it is quite possible to get by with ordinary nails or self-tapping screws. If the load reaches several tens of kilograms or even hundreds, then it is best to stick with bolts and nuts.

To connect the elements of a wooden garden bench using bolts, you need to prepare a drill, as well as a drill of the appropriate diameter. It should be slightly larger than the diameter of the bolts used. This will allow you to insert them without much difficulty. If the hole size is larger than the diameter of the bolt head and nut, then special washers should be used.
In cases where it is necessary to hide the presence of joints with bolts, you can use a special crown. With its help, small recesses are drilled in places where the bolt passes through the wood. The washers seem to fall into the resulting niches.
It is very important to choose a sufficient depth. Afterwards, the niche itself is carefully filled with a mixture of PVA glue and small shavings. Or made to fit round elements, pasted into a niche. In this way you can make a garden bench as aesthetically pleasing as possible.

To make all the holes as symmetrical as possible, just arm yourself with a pencil and a ruler. Using these tools, the distances from the sides of the wooden elements of the bench are measured and two segments are drawn. A hole is drilled at the intersection.
After all the holes are prepared, you should arm yourself with wrenches of a suitable size for tightening the bolts and nuts. Assembly is performed in the following order:
- a base is assembled, consisting of legs (element 1 and 2), as well as a longitudinal beam (element 7);
- cross beams are screwed (elements 6);
- beams are added to strengthen the structure (elements 4, 5);
- last of all, the beams are nailed, playing the role of a seat (element 3).
 The last step is the production of special wood plugs. A jigsaw is useful for this simple operation, but you can also use a simple hacksaw with fine teeth. To prepare such elements, you should select a small round beam of suitable diameter, cut it crosswise into pieces, the thickness of which will be equal to the depth of the niche where the bolt and washer are located.
Most often, the following diameters are used for the manufacture of plugs, mm: 15, 20, 22, 24, 30, 32, 35.
After the plugs are ready, you can simply glue them with PVA glue or waterproof sealant - if the bench will be located outside all year round.

Protecting a garden bench from moisture

The last stage of making a garden bench with your own hands is to protect it from moisture. This will extend the life of the product for as long as possible. This is quite simple to do - you need to stock up on a roller, a container for a special composition, and also a means to protect against rotting.
Impregnation with antiseptic composition
It is important to choose an impregnation, a composition that has a penetrating effect. It contains various types of acrylic resins and other additives. All this is often mixed with a special antiseptic composition that prevents rotting and damage to the tree by various kinds of insects. Which is especially important in the garden.
During work, it is advisable to use protective equipment such as gloves and goggles. Contact of various compositions to protect wood from rotting on human skin can lead to unpleasant consequences. It is also necessary to use glasses - many substances evaporate quickly when room temperature. Getting them in the eyes can lead to very sad consequences.
Painting a garden bench
Important: after impregnation has been completed, it is necessary to varnish the bench. It is advisable to use a special varnish designed for outdoor use that can withstand temperature changes.
If painting with enamel or anything else is planned, it must be done immediately after impregnation. And only when a layer of paint has been applied should the wood be varnished.
You can make metal garden benches with your own hands, as well as forged ones. But this process is quite complicated; it requires specialized tool and skills. Wooden furniture has a very large number of advantages - it is very light, durable, strong, and also easy to repair (which is especially important). Making a garden bench out of wood with your own hands is very simple. There are many different drawings and manuals on the Internet.
A bench is simply necessary in a country house or garden. Its main purpose is a place to relax. Anyone who knows how to work should also be able to rest. Some people simply install a bench, while others create an interesting corner that will certainly invite you to have a good rest. You can just relax, or you can just enjoy surrounding nature and from the results of your labor. There are many ideas worth considering. Of particular interest are ordinary designs that can be repeated by anyone familiar with wood and owning a primitive set of tools.

Everyone can imagine what the most ordinary bench looks like, but not everyone likes simplicity and most opt for original solutions. Everyone wants to have something that, for example, a neighbor in the country does not have. Almost all summer residents start by decorating their country house or personal plot, and there are just as many options here. Alternatively, you can start designing the area by installing a bench, having previously decided on a resting place. After all, a place of rest is not needed later, it is needed now. Therefore, the design of this place should be tackled at the first stages of the process of decorating a summer cottage or personal plot, and only then proceed to the design of the rest of the territory.
As a rule, summer residents are very keen on growing various green spaces and flowers. Especially, there are a lot of them near buildings. Alternatively, you can combine plantings with a recreation area by installing a bench not far from the dacha. In this case, everything will look organic: green spaces, flower beds, and an original bench.
 Two flower beds made of boards and a bench between them
 There are a huge number of options: from the simplest to the most sophisticated. The simplest option may consist of two wooden boxes, in which flowers are planted, and two boards built between these boxes. The boards must be planed and well sanded. This structure can be placed directly next to the wall of the dacha. You can attach a couple of the same planed boards to the wall, which will serve as a kind of backrest. Instead of wooden boxes, you can install concrete cabinets, which can last much longer than wooden elements.

It is very simple to build such a structure, and most importantly quickly. As for the boards, you can buy them ready-made or make them to size yourself using untreated boards. But in this case, you will have to work hard, but the bench will not cost anything, and the result will definitely please you. If used concrete flowerpots for flowers, then the boards can be secured using metal corners. The only problem is the difficulty of drilling holes in concrete. Under no circumstances should you use a hammer drill, as a flowerpot, even a concrete one, will easily split, especially if it is made independently.

You can not fasten the boards, but instead of the boards put a huge log, which does not need to be fastened if it is installed correctly.
As mentioned above, there are many options, and they are created based on real possibilities, which the owner of the dacha has at his disposal. Alternatively, you can simply install a bench for relaxation away from flowers and green spaces. After all, it’s no secret that various insects hide in flowers and between the leaves of plants, which in no way encourage rest, but, on the contrary, force you to leave behind the worst memories of your holiday.

As a bench, you can use hollow blocks, into the voids of which treated boards are simply inserted, which can serve as seats.

To make sitting comfortable, the sharp corners of the blocks should be rounded. It's good if these blocks turn out to be heavy and large. If the blocks are small, then they can be pinned together into one piece.
Log bench
The site can be decorated in any style, but almost everyone moves away from standard approaches to solving the problem. Everyone wants to have something of their own. But not everyone knows that what is new is an improvement on the old. As an option for a new, but somewhat improved old one, this is the option of using a log as a bench. You can use a log as a seat large diameter, sawn lengthwise. A log of smaller diameter, also sawn lengthwise, is used as a backrest. Or a trunk with a smaller diameter, but cut closer to the edge. Narrow sections of logs are used as legs.
 Log bench - quick and easy
 The legs and seats are connected to each other using metal pins. Holes of slightly smaller diameter are drilled for the pins. The pins must fit into the holes with force. In this case, half of the pin is driven in by hitting the pin, and the other half is driven in by hitting the wood. As a rule, they do not hit the wood itself, since marks from the hammer may remain, but with the help of a wooden point. Such a connection must be reliable, although there are many mounting options.

In the photo just above, you can see another option, in the “ethnic” style. Its organization is associated with the presence of stone, although this option is quite feasible if there is a log. Sufficiently used as a seat thick log, and as legs - part of a large diameter deck. In one and the other part of the deck, grooves are cut for the seat. An ax or grinder is used as a tool. Alternatively, you can use a chainsaw. These are not post-Soviet “Friendships” or “Urals”, which have significant weight, and are, perhaps, convenient for felling pine trees in Siberia. If you take the Calm chainsaw into service, then with its help you can make even lesser works of art.
It is possible to make a table from logs, which is simply necessary in the country. In the photo you can see the results of such actions. The tabletop is made of boards, and the rest of the ensemble is made of logs of different diameters.
 Table with log benches
 The next bench, built in this style, has a completely original design. Here, the legs and armrests are made of branches of various thicknesses, and the seat is made of processed, high-quality unedged boards.

Another bench is made in the same style. The only difference is that the boards and branches have the opposite direction. The result is a completely different look. As for execution, no special skill is required. The more careless the end result, the more valuable it is. In any case, this is how others perceive this approach. Most likely, people are tired of imaginary perfection and they prefer handicraft and primitivism.
 Wicker back - not seen often
 Alternatively, you can organize a rest area around the tree and install a bench.
 Relaxation area under a tree
 This is not at all difficult if you install a swing and a gazebo nearby. It is better to build a pergola, similar to an arch, above the bench itself. All that is missing for a complete relaxation is a pond, fountain or waterfall.
Benches made of metal and wood
As a rule, no one decided to build a bench out of metal. IN summer period they can heat up to such temperatures that it makes no sense to talk about rest at all. In case of cold weather, the picture is the same. The bench becomes so cold that it is impossible to sit on it. But benches using a combination of metal and wood are the most in demand. As a rule, the frame is made of metal, which ensures high reliability of the structure, and the seat and back are made of wood, which provides a certain comfort.
 Bench made of profile pipe
 If the design is improved and soft armrests, soft seats and backrests are made, as in the photo, then such a design can compete with the most modern options benches for rest. To make the seats, armrests and backrests soft, just cover suitable material furniture foam rubber. In this style it is possible to build a tabletop.
On a note! When using wood, it is advisable to leave gaps of up to 5 mm between individual elements. This is due to the fact that when the ambient humidity changes, the dimensions of the elements also change.
 Stylish benches made of metal and wood
 In the process of creating a recreation area, care should be taken to ensure that there are no sharp corners, especially in metal structures. This is very important if you have children. All elements of the ensemble, such as benches, tables, garden chairs, are made from round and square pipes, bending them so as to create smooth transitions.
 Table and bench made of pipes and boards
 The presence of metal allows you to bend structures of any shape, although this cannot be done so easily and you need a special device. The presence of such capabilities allows you to bend structures in one go, without using other tools, such as a grinder and a welding machine. The main thing is to think through the design down to the smallest detail. If wood is used, then only well-processed wood. It must not be allowed to wooden elements there were burrs or chips.
Benches made of boards
The most popular option is benches made of boards. There are quite a lot of execution options. There are even designs that look like sofas. If you put soft pillows on them, you can lie down.
 This garden bench is more like a sofa: if it is of sufficient size, you can lie down
 Garden furniture designs based on modern approach, assembled simply. As a rule, they consist of rectangles with partitions made of thinner wood, connected together into one whole.
If you stretch your imagination and put it to work, you can build a work of art from an ordinary bench if, for example, you install wooden wheels instead of legs and armrests.
 A bench made of boards with a back and wheels instead of sides - looks interesting
 One of the simplest designs of a country bench consists of one board, to which legs are attached in the shape of the letter “X”. Our ancestors built similar shops, although they can still be found today.
 Traditional bench design
 Using wood, you can build a bench in the shape of the letter “P”. In this design, it is very important to ensure reliable fastening of the seat and legs. Similar option involves the use of thick boards or timber for reliability. As an option, you can install the board “on edge” for greater rigidity, and for greater reliability it is recommended to fasten it using metal corners.

This photo shows an option where the cut is made at 45 degrees. By using special tool it's not difficult to do. If you connect all the parts, you get an angle of 90 degrees. If the board is thick and the seat does not sag, then the bench will last quite a long time.
In the photo below you can see another option interesting solution, which is characterized by increased reliability. Boards of different lengths are used as legs. The difference in length is the thickness of the board: every second board should be shorter. The structure is connected using nails. Moreover, through one board, the nails are driven either into the board for the seat or into the board for the legs.
 Bench in modern style
Original solutions
Along with the classical approach to the process of making benches, there is also an original one, although solving such a problem requires appropriate materials and tools.
For example, from big stone You can also build a bench if you attach an appropriate wooden platform to it.
 Bench made of stone and boards
 If bamboo is available, a seat is also made from it, which will take on a more exotic look.
 Made from bamboo, and whole
 Or a stone.
 Sitting in winter will be unpleasant, but beautiful...
 It all depends on the flight of fancy. A real owner does not have unnecessary things or materials in his dacha. With a reasonable approach, you can attach any thing, and it will not just lie around in the country or lie like a dead weight in the garage or shed.
How to make a bench: photo reports
Naturally, not every owner has a set of tools for making benches from stone, but everyone has a minimum set of tools for working with wood, especially since these are very simple and affordable tools. Therefore, it makes sense to consider wood structures. Everything that is done with one's own hands is ultimately a source of pride.
Bench without back
The design, although simple, has a rather impressive appearance due to the material used. The legs are made from timber with rounded edges. As a last resort, such a beam can be prepared independently from round logs of small diameter, trimming them on 4 sides. The result will be the same timber. Therefore, there should be no problems with the construction of the bench. The legs of the bench will be made from this material. To do this, you should lay the cut beams flat (horizontally) one on top of the other. It is this design solution that brings a certain exclusivity to the design.
 A simple bench looks interesting due to the material
 The bench without backrest is 120 cm long, 45 cm wide and 38 cm high. It is permissible to round the edges of the beam in any way. In order not to strain too much, you can already find a ready-made, profiled beam. Although it will cost much more, it is a pleasure to work with it.
Depending on the size of the bench, it is not difficult to calculate how much timber is required. If you take a beam with a cross-section of 70x70 mm, then with a height of legs of 380 mm, it is enough to place 5 beams on top of each other. We calculate: 45 cm multiplied by 5 pieces. and you get 2.25 m of timber. Since there are 2 legs, there will be 2 times more timber, which means 4.5 meters of timber. A board 40 mm thick and 90 mm wide is used as a seat. Given the width of the bench, you will need 5 boards, 1.5 meters long. If you calculate more accurately, you will need 1.2 m x 5 pcs. = 6 m of board.
At the first stage, boards are cut according to size. In this case, it is necessary to round off all sharp edges. To do this, you can take a plane or just coarse sandpaper and carefully process the boards. In order not to have to do much yourself, there is another option: you can simply negotiate at the sawmill and get a well-processed board, especially since they have all the capabilities for this. All that remains is to take them and coat them with varnish.
 Treated boards
 After this, they begin to manufacture the legs, for which the beams are cut into identical sections, 45 cm long, after which they are stacked one on top of the other in 5 pieces. The next stage is connecting the legs for stability. In this case, the beams can be fastened with metal pins or wooden dowels. The distance between the fasteners is 7-10 cm. As a rule, such a connection is made using glue, then the connection is more reliable.
 Lines where the pins will be installed
 The pin connection requires precise drilling of the holes, otherwise the beams will not be on the same line. For this, it is better to use a template. In addition, the dimensions of the leg elements must be the same, then it will be possible to accurately mark the location for drilling holes. For those who are familiar with drawing, tape measure and pencil, it will not be difficult to do everything correctly.

The pins should be installed in a staggered pattern, so it is necessary to mark with this feature in mind. In the same way, the boards are attached to the legs at the rate of two holes per board.
If you look from a technological point of view, this is not bad option connections, but it requires some skill and experience working with wood. The connection stage can be simplified if the bars for the legs are stacked one on top of the other and firmly connected them using a clamp. Then drilling accuracy will be ensured. Alternatively, the beams can be connected using long metal studs and nuts with washers. In this case, it is enough to drill 2-3 holes through.
The seats can be nailed to the legs, which greatly simplifies the entire manufacturing technology of such a bench.
 The bench was made by hand. Finishing work remains
 When using nails, it is advisable to hide the heads, as they will then rust, which is completely undesirable. To do this, hammer the nails so that the heads are hidden almost 5 mm deep into the wood; for this, you can use a guide. After this, putty is taken, a little sawdust is added to it to match the color, and the recesses are puttied. After complete drying, the areas are carefully sanded with sandpaper. So that the place where the nails are driven does not stand out against the general background, they are coated with a suitable varnish.
Varnish opening technology wooden surfaces quite simple, especially since it is described in detail in the instructions for use.
Bench for a summer house made from broken chairs
If you have two old chairs and don’t have enough imagination to adapt them somewhere, then you can make a bench out of them. Only the same ones and strong enough will do. If they are loose, they will have to be repaired. The chairs are disassembled so that the backs and legs remain. After this, two chairs, or rather what is left of them, are installed side by side and their backs are connected using slats of the appropriate thickness.
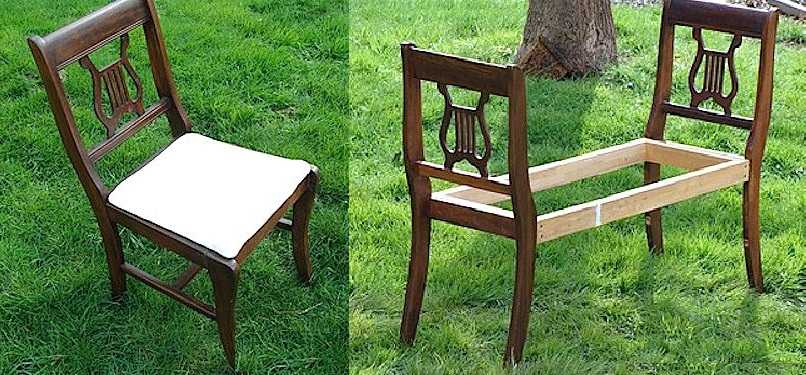 Bench made from old chairs
 To make the structure rigid, at a height of 20 cm from the floor, the structure is tied with the same slats along the entire perimeter. Subsequently, these slats will serve as a footrest, and if the bottom is sewn up, for example, with plywood, then you can store some things here.
 We paint the completed structure
 After the structure has been strengthened and sanded, it can be painted. In this suitable for this case regular paint, which can hide some flaws in the entire structure and especially in old chairs. All that remains is to cut out a sheet of plywood, lay foam rubber on it and cover it with some fabric. At the same time, one should take into account the fact that the bench will mainly stand outside until the coldest weather. Therefore, it is better to opt for, for example, leatherette. In any case, the material must be moisture resistant.
 Finished bench made from strusses
 Garden bench chair made from pallets
For a reasonable owner, any material has its own value. Garden furniture can be easily made from cargo pallets. Moreover, there is no particular need to disassemble them: the back is made from one pallet, and the seat from the other. All that remains is to think about what to make the armrests and legs from.
 This is what should happen
 One of the pallets is reinforced with additional bars, which are secured with self-tapping screws.
 Strengthening the corners of the pallet
 After this, a beam with dimensions of 100x100 mm and an arbitrary length is taken, after which 4 identical sections are cut, up to 80 cm long. They are attached in those places where the reinforcement bars, placed in advance, are located. As a result, legs 20-25 cm long will be sufficient. Self-tapping screws with a length of at least 150 mm are used for fastening. During the work, you need to make sure that the bars are screwed correctly so that you can install legs of the same length.
 Screwing the legs-supports for the armrests
 If after these steps it is not possible to obtain a completely flat structure, then the legs can be filed at the end if the bench does not sit level.
Benches and benches in the garden summer cottage is a popular holiday destination. Sometimes putting up an ordinary bench is not interesting and banal.
After all, it is possible to build a whole corner for relaxation and comfort, so that you can not just sit on a bench, but already enjoy nature, your garden, and the fruits you planted with your own hands. There are many different ideas here.

The construction of benches is usually lightweight and does not require special skills. Anyone can create a relaxation corner with a bench, if they wish.

Options for ideas
Everyone has seen the photo of an ordinary bench. But you don’t want the simplest bench for your garden; you want something more original and beautiful.
If everything in your garden is already decorated and the whole area is in order, then a bench will never become superfluous. And, if you are just starting to equip your site, then it’s time to start with equipping a bench.


Wooden bench
A DIY wooden bench will harmonize well in the garden with all sorts of flower beds of beautiful flowers.

The simplest option for building a garden bench is two wooden boxes in which inflorescences grow, and between them a couple of sanded boards. If necessary, this bench can be placed near the wall, if possible.

Many people don’t like material like wood, because it gets wet quickly and is very difficult to care for. Instead of wooden material stone and concrete come to the rescue.
In order to make a bench with a back, you need to try a little. For the backrest, they most often buy already treated wood. The easiest way to secure the seat is with metal corners.

TO concrete material they can be attached using dowels, and to wooden material using self-tapping screws from the bottom or through bolts.

Many summer residents are wondering how to make a bench on their own for their home and garden. And every year this question is gaining popularity.

Many people give preference to shop benches that are already ready, but by doing the work yourself, you can completely surrender to the process and use your imagination completely.

Metal bench
Metal benches are installed by a minority, since they, of course, are aesthetic and original products, but in the summer they are a material that heats up to crazy temperatures, and if it gets even a little colder, the material becomes icy, and it is impossible to sit on it.

If you really want to use metal in the process of creating a bench, then you should combine two materials in the work: metal and wood. At the same time, the seats and backrests are made of wooden material, and the designs of the legs and additional elements are created on the basis of metal.

There are many different original options benches in this style.

Note!

Great popularity in Lately We got benches from pipes. Rectangles are made from a profile pipe using welding, and jumpers are attached to the side walls, on which the bench seats will rest. This is a very reliable and safe option for creating a bench with your own hands.

If this option is slightly improved, then armrests are used for greater convenience and comfort. A bench in the garden with a wide seat, like a sofa, will also look elegant and original. This is comfort, convenience and luxury!

For complete comfort, you can put decorated pillows on such benches so that you can not only sit, but also take a nap in nature.

Benches made of boards
A simple bench made of boards will also look aesthetically pleasing, the main thing is to know how to make it. There are the most simple designs, like ordinary benches, but there are more complicated ones in the form of a sofa or an elongated chair.

In a modern style, such a bench is easy to assemble; you just need to connect rectangles with partitions made of thin boards together.
The main thing is to turn on your imagination. Even the most simple work can become the source of a masterpiece.
Note!


Using thin boards, you can make various shapes of benches. For example, in the shape of the letter P. The main thing here is to fix the seats and legs well and securely. This bench is easy to make, but will last a long time.

DIY bench photo


Note!


A bench in a garden or country house serves not only as a place to relax, but also as an element decorating the exterior. Therefore, the process of making a garden bench must be approached with special responsibility. We will learn further about how to make a bench with your own hands.
DIY benches photos and varieties
There are a large number of materials from which you can build a bench in the garden. The first of these is plastic; this material allows you to purchase a ready-made bench. Making a plastic product yourself is problematic. However, let’s still get acquainted with the advantages of this material.

First of all, let's note the ease plastic products. Thanks to this quality, the bench can be easily moved from one place to another. In addition, plastic products are affordable, they are easy to care for, do not require additional painting, etc. Among the disadvantages of a plastic bench, we note: a tendency to mechanical damage, instability in front of ultraviolet radiation, cheap and unpresentable appearance.
By using plastic pipes and a tool for soldering them, you can make your own bench for the garden. Liquid nails, which reliably connect plastic pipes together, will help replace the soldering iron.
The most popular, available material to create a garden bench - wood. Wooden crafts They are distinguished by their practicality in operation; they easily fit into any exterior, especially a garden, where there are so many trees. However, the choice of wood must be approached with special responsibility; you should select types of wood that can withstand adverse conditions well. weather. In addition, drying the wood should be optimal for working with it.
The next material for creating a bench in the garden is stone. Stone products are natural and stylish, they are perfect for any exterior. Stone compositions are stylish, unusual and noble. However, the stone is suitable for making bench legs; sitting on the stone for a long time can lead to health problems.

Therefore, a stone bench is either covered with additional covers and pillows, or is made not only from stone, but from a combination of several materials. Please note that a stone bench is stationary and does not move from place to place, unlike a plastic or wooden one.
If there are metal compositions or forgings in the garden or area, we recommend choosing a steel version of the bench. This bench will perfectly decorate the garden and become good place for relax. The appearance of the structure is particularly attractive, especially when using additional steel elements. It is possible to combine metal with other materials, such as wood, stone.
When choosing a material to create a bench, you should first of all proceed from its combination with other objects located on the site. A garden bench should be original, attractive and practical.
Decide on the type of bench, whether it will be portable or stationary. In addition, there are folding versions of benches that are installed on the site in spring-autumn period and put away for the winter.
The most popular are benches made of wood. Wood is easy to process, which is why benches are made from it various forms and sizes. In order for a wooden bench to serve you for as long as possible, you need to properly care for it and choose certain types of wood that are resistant to adverse operating conditions.

The initial stage of creating a bench with your own hands
Before you start creating a bench in the garden, you should decide on the location of its installation. The size of the bench, its shape and appearance will depend on this. We recommend installing the bench in a place surrounded by plants so that it is always in the shade on a hot summer day. The view from the bench should be attractive and natural.
If there is a fountain, waterfall or other source of water in the garden, place the bench in such a way that you can watch them from it. It is possible to install a bench next to a flower bed or flower bed. This way, you will have the opportunity to enjoy previously planted plants. A bench surrounded by flowers or bushes is cozy; it’s comfortable and pleasant to sit on such a bench.
In any case, the bench should be located in a shady place, so you will be protected not only from the heat, but also from strong winds. It is possible to create a cap over the bench to protect it from atmospheric precipitation, in this case, you will be able to get a whole gazebo for relaxation. In any case, the bench should be located in such a place as to provide its owners with proper rest.

DIY wooden bench drawings
Before creating drawings for a garden bench, you need to determine the requirements that apply to it. A bench in the garden should be, first of all, comfortable. Having a backrest makes you feel more comfortable, especially if you are going to spend a lot of time sitting in the garden.
The second requirement is safety; all connections between the individual parts of the bench must be strong. The bench must withstand heavy loads from several people. That's why, Special attention you need to pay attention to fittings and fasteners; they must be made of high-quality steel. If the bench is made of metal, then the welds must also be of high quality and well protected.
Since the furniture will be located in the garden, the material from which it is made must withstand moisture, solar radiation and temperature changes.
We invite you to familiarize yourself with the method of constructing a simple wooden bench back with your hands. The length of the seat with backrest will be about 145-150 cm. This bench seats three people. The back angle is about 22 degrees. The width of the seating area is about 40 cm.

When working on a garden seat you will need:
- wooden blanks, the dimensions of which are predetermined by drawings;
- blanks for making legs and holders;
- panties that reinforce the structure of the bench;
- self-tapping screws and various fasteners;
- an electric jigsaw, which is used to cut wood;
- grinding machine for processing material;
- screwdriver;
- brushes;
- antiseptic primer, paints and varnishes.
If possible, buy ready-made boards according to the size of the blanks. Otherwise, use an electric jigsaw to cut them.
After cutting the wood, it is carefully processed. Previously manufactured parts can be ground. To process the end sections, use an electric plane. It can also be used to round corners.

Next, the long legs holding the frame part of the back are processed. To do this, markings are first applied to them, and then they are processed in compliance with the slope. Initially, it should be noted that the seat height is 40 cm. This part boards do not require additional processing. Next, on the next part, the part is cut at an angle of 18 degrees. Please note that the cuts on each leg must be the same. Otherwise, the bench will turn out asymmetrical.
Initially, in the design of the bench you need to assemble the support legs. The interval between them is 28 cm. Make sure that this interval is maintained between the two pairs of legs. Use a beam to connect the legs together. We recommend using the double strapping option, which will significantly improve the strength of the bench.
After assembling the two sides of the bench, they are connected using boards. For fixing boards to support legs use self-tapping screws. Please note that the interval between the boards is 20 mm, it must be equal in all areas of the bench. These gaps significantly increase the service life of the bench, as air circulates through them and moisture is removed.

Further actions are aimed at strengthening design features benches. In order to increase the level of stability of the bench, it is necessary to perform additional reinforcement. To do this, the lower harness is performed using a beam.
Next, you install the backrest on the wooden bench with your own hands. To make it you will need two boards. The first is fixed with an interval of 20 cm between it and the seat, and the second with an interval of 18 cm from the first.
At this point, making a bench with a backrest with your own hands is completed. Next, the wood should be treated with various compounds that will protect it from moisture and insects. To improve attractiveness appearance benches, it is covered with varnish or paint. Special impregnations protect wood from the effects of fungus or mold. To achieve an ideal surface shine, wood can be polished.

Do-it-yourself bench for a summer house made of metal
In the process of working on garden bench do it yourself you will need:
- profile pipe, the diameter of which depends on the size and strength of the bench;
- boards that will serve as a seat;
- welding machine for connecting pipes to each other;
- Bulgarians;
- grinding machine;
- anti-corrosion composition;
- paints for working with wooden surfaces;
- fasteners;
- hammer and bolts.
To further decorate the benches, use forged elements that are installed on it using a welding machine.
Before starting work, prepare your own drawings for the bench. Decide on the cross-section of the pipes used in the work. The best option will use a pipe measuring 3x3 cm. In the process of working on a middle bench without a back, you will need about eleven meters of pipe. To cut parts, use a grinder or a hacksaw.
While working, do not forget about the safety rules. To create the long parts of the seat, use two blanks measuring 230 cm. For the long parts of the rectangular structure, blanks of 60 cm will be used; six of them will be required. In addition, it is necessary to prepare six parts measuring 45 cm.
Wooden boards will become the basis for making eight bars. Connecting bars with metal frame made with bolts and nuts. Please note that the fasteners must have a round and flattened cap, which in the future will not catch the clothes of people sitting on the bench.
To assemble a simple steel bench with your own hands, follow the recommendations below:
1. The long parts of the workpieces are located in a horizontal position, and the short parts - in a vertical position.
2. In the process of welding parts together, make sure that the angles at which they are connected to each other are straight.
3. It is possible to adjust the bench length. If the length of the bench increases, then the number of supporting components increases.
4. After welding the pipes, it is necessary to clean all connections and also arrange holes for fixing the fasteners.
5. The frame part of the bench must be coated with an anti-corrosion solution.
6. Before fixing the wooden parts, it is necessary to coat them with paint and varnish material or stains.
7. At the final stage of assembling the bench, the boards are fixed to the surface.

Wooden boards on the bench can be replaced with steel parts in the form profile pipes. In order to improve the aesthetic appeal of the bench, the steel ends of the slats are equipped with a metal frame that hides the cuts. Duralumin pipes are not welded together. Bolts are used to connect them.
To make a bench with a back, you will need to use large quantity material. In this case, the convenience and comfort of using such a bench will be higher.
In any case, when making a garden bench with your own hands, you should be guided primarily by the number of people who will relax on it and the materials that are available. Only in this case will it be possible to get a high-quality and optimal place for relaxation and free time.