The idea to turn the ceiling space into a masterpiece multi-level design using a tension film always comes up against the need to build a rather complex frame. Installation of a two-level stretch ceiling requires special care in performing the work. Any negligence can affect load-bearing structure in the most unexpected way. It often becomes clear how correctly the work was completed only after completion. installation work on a two-level decor.
Tension decor in two levels looks much nicer
Construction of a two-level stretch ceiling
The main idea in constructing the decor is to install several film panels on the ceiling base, creating the effect of a three-dimensional structure. It is clear that such an idea can only be realized using a special frame and fasteners.
The essence of the design comes down to the following:
- A two-level ceiling is always built using a central supporting frame, which accounts for the bulk of the load that occurs when installing the tension fabric;
- Most of the baguettes and profiles are attached to the main part of the frame, with the help of which the PVC decor is stretched at different levels;
- With the help of additional overlays, it is possible to mask the gap lines and joint lines, and close the load-bearing profile of a two-level ceiling at the inflection lines.
Important! All baguettes and profiles used to install a two-level tension fabric must be reinforced with embedded strips and slats.

The frame under the film has to be seriously strengthened
The main difficulty in building two-level structures is that stretch fabric stops on the frame with a force of at least 5-7 kg per square meter of PVC film. This ensures uniform and high-quality tension of the entire panel. But, on the other hand, it is necessary to install additional ribs and strips that strengthen the frame in order to prevent deformation and displacement of the supporting frame.
Installation options for two-level suspended ceilings
The number and variety of lines and transitions in the design ceiling decor, consisting of several levels decorative film, is limited only by the imagination of the customer and the capabilities of the craftsmen.
If the task is to build two-level suspended ceilings with your own hands, then it is best to limit yourself to one of the most popular and at the same time accessible and easy-to-arrange schemes:


- A variant of a floating two-level stretch ceiling.
Of course, the project for the future film decor is chosen based on the characteristics of the interior of the room, the experience and capabilities of the master. But even the simplest designs can look quite impressive, especially if you make them yourself.

A successful combination of a dark upper level and light boxes and chandeliers
Two-level suspended ceiling on a box
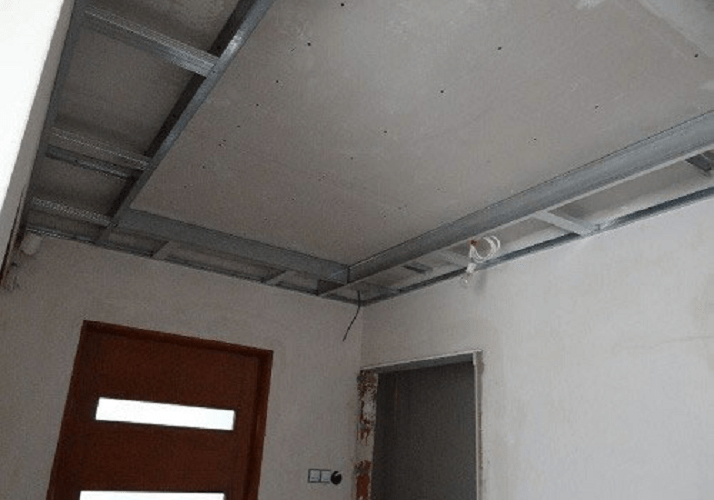
A ceiling structure with a second level installed around the perimeter of the surface can be made in several versions. In the simplest case, the second level is assembled in the form of a box installed in the area where the ceiling meets the wall, photo.
The basis of the ceiling decor from the profile
In this case, to build the base of the upper part of the two-level tension decor, a double profile or a special design is used, in which two edges, the upper and lower panels, can be simultaneously secured.
In order to reliably hold two stretched film decors at the same time, the frame of a two-level stretch ceiling must be sufficiently rigid, therefore, predominantly aluminum corners and galvanized steel profiles, sometimes timber and even plywood are used for fastening.

Prefabricated frame option
This design uses an unusual method of fixing the tension fabric, when the lower level film is installed on the ceiling frame with a bend at an angle of 90 degrees.
Scheme for a box made of timber
If the frame is made of lumber and plywood, then an additional profile with a rounded edge, also called a bumper, is used to bend the panel.
Advice! Instead of a bumper, you can install any wall molding, the supporting part of which is made with a ridge along the edge.
It is clear that the edge or outer corner of the supporting frame does not have to be straight; very often the upper level of a two-level ceiling is made in the form of a complex curve; rounded arc-shaped frames can also be used.
Soaring two-level ceilings with lighting
Tension decor can be built using more complex scheme. In this case, top-level lighting is used, which creates the effect of a floating ceiling.
More complex option with backlight
Structurally, such a ceiling is assembled on a frame made of aluminum and steel profiles. The upper level is mounted on a regular wall molding, fixed to the main frame in a horizontal position.
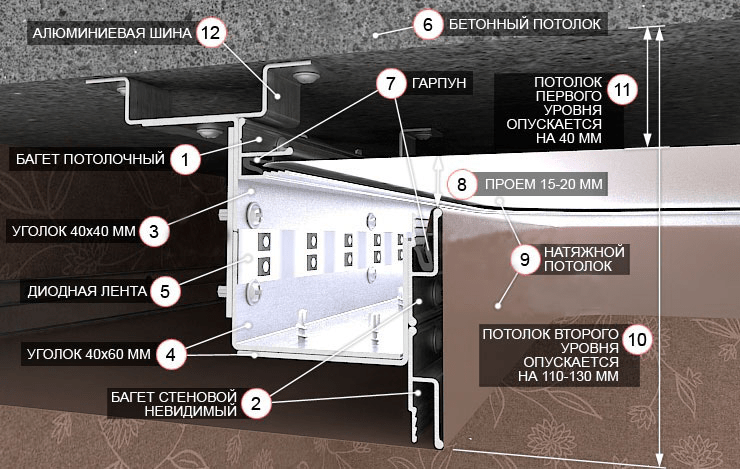
The lower level is more complex. Firstly, the attachment point of the tension fabric is shifted relative to the supporting console by 60 mm; an aluminum corner of 40x60 mm is used to carry out the system of two baguettes.
The upper level is raised above the second canvas to a height of only 40 -50 mm; a 60x60 mm niche is formed between the frame parts, into which the lighting will be placed in the future.
The bottom sheet of a two-level ceiling is stretched onto an h-profile installed at the top with a lock, tension material bypasses the second fastening element and is fixed on the wall using a standard wall molding.
A similar scheme is widely used for arranging suspended two-level ceilings with an insert or niche located in the center of the room. Technologically, the assembly of such structures is no different from conventional box-shaped schemes; the only condition is the use of split embedded slats, to which the suspended ceiling profiles are attached.
How to make a two-level stretch ceiling with your own hands
Installing a ceiling decor with two levels of vinyl film does not pose a particular problem, but you will first need to decide how to assemble the supporting frame.
There are two options for frame frames used for two-level ceilings, which are quite easy to assemble at home with your own hands:
- The wooden frame is assembled from timber and lining; to install the canvas, film baguettes are mounted in the corner and lower tier;
- They use a ready-made ceiling profile made of aluminum alloy with already built-in locks.

The simplest option on an aluminum frame
It is only possible to independently produce a complex structure for a two-level canvas with rounded edges and curved transitions. to an experienced master, in the amateur version, such designs are rarely obtained. According to reviews, even experts prefer to use standard profiles, resorting to homemade frames only in the case of non-standard stretch ceilings in shape and size.
How to make the frame of two-level stretch ceilings
If the simplest design with a box around the perimeter of the ceiling is chosen as the scheme, then the easiest and fastest way is to use a standard profile of the PL75 type.
A timber is needed to install the profile
The use of ready-made aluminum frame parts greatly simplifies the installation process, especially since the range of fasteners is large enough to produce the most complex multi-level structures. You only need to select the required type of profile and prepare the base for mounting under suspended ceilings.

Box for suspended ceiling made of plywood
If a two-level ceiling decor needs to be installed at minimal cost, then the frame under the canvas can be assembled with your own hands from pieces of plywood and boards 20 cm wide and 25 mm thick, and in addition, you will need a beam, which ensures the longitudinal rigidity of the entire structure.
Preparation for installation of a two-level stretch ceiling
Before starting installation work, it is necessary to clean the ceiling from the old finish, remove dust and debris, and treat the surface with a strengthening compound. It will be useful to coat the concrete surface once with a disinfectant solution that blocks the formation and spread of fungal formations.
It will also be necessary to seal all cracks and joints between the slabs with repair mortar. This is done in order to avoid possible sagging of the fasteners, if suddenly the installation location of the dowel or self-tapping screw falls on a defective part of the concrete ceiling.
Required tools and materials
To make a two-level ceiling, the following tools are required:
- Rotary hammer with a set of impact drills with a diameter of 6-12 mm;
- Screwdriver with a set of bits and drills;
- Marking tool, laser level, construction cord or bubble device for marking the horizon over a long length of floor;
- Metal scissors, jigsaw with a set of saws.
In addition, you will need dowels with self-tapping screws and plugs with a diameter of 8 mm, “bug” fasteners, corners, and an aluminum supporting profile if the frame for a two-level decor will be made from a standard baguette. If you plan to assemble the frame structure from wood, you will need to prepare a board or pieces of plywood 20 cm wide and 15-20 mm thick.
It is clear that you will need the tension fabric itself, a glazing bead or a harpoon, as well as glue and decorative overlays, which will close cracks and joints in the junction areas. Depending on the scheme frame structure, you will need a wall and ceiling molding; you may need to purchase a double W-shaped profile for joining several stretch ceiling panels.
Installation of two-level suspended ceiling structures
The easiest way is to install the standard PL75 profile or any of its analogues. Before installation, markings are applied to the ceiling. First of all, a backing beam is mounted on the concrete slab; its task is to level the horizon of the base of the future frame, otherwise the two-level ceiling will not be completely level.

The frame is reinforced either with wooden blocks or triangles from a profile

Trimming and fastening a wooden part takes a lot of time and effort, so craftsmen try to replace the block with washers or short fiberboard pads. In this case, PL75 is attached directly to the floor slabs using standard fasteners and embedded plugs.
Upon completion of the installation of the supporting profile, you can determine the height at which the lower plane of the two-level ceiling will be located. Only after transferring the markings to the walls can you install “n” or “h” - baguettes for fixing the tension fabric on the wall new surface.
If the frame of the future two-level ceiling is supposed to be built from wood, then first of all it is necessary to apply markings and contours of the future decor to the ceiling. The next step is to attach vertical plywood partitions using aluminum corners.
The next step is the installation of horizontal crossbars made of timber; they are secured with ordinary carpentry screws. After you have managed to align all the frame parts, you can install baguettes to stretch the decorative fabric.

The top level is put first
If the design of a two-level ceiling decor consists of curved arcs and lines, for example, the frame is made in the form of an oval or in the form of a complex rounding, then the profile for the film must be reinforced with additional supports and corners.
For example, you can use a standard profile to fasten the frame of plasterboard ceilings; just cut the material into pieces, make a cut and bend it into a mounting angle.
Installation technology for a two-level stretch ceiling
The main problem encountered at the final stage is related to correct distribution when installing the tensile force of PVC film.
Important! If a two-level ceiling consists of several sections, then the installation of tension material should be carried out sequentially, installing sections located at opposite ends of the ceiling.
This is done in order to compensate for the tensile forces on the frame.
For the simplest box-shaped structures, installation of the tension fabric begins from the top tier. After heating and sealing the edges of the first level panel, you need to proceed to installing the decorative film in the center of the frame.
How to make lighting in two-level stretch ceilings
PVC film does not tolerate heat well, so the only acceptable option for organizing lighting is LED lamps. They are laid directly in the grooves of the baguettes, or mounted in niches of the frame, specially equipped for organizing the lighting of a two-level ceiling.
In the latter case, instead of a strip of LEDs, you can use recessed lights, fixed on jumpers placed on the frame during the process of assembling the box. In this case, the wiring and fasteners are hidden on a wooden or aluminum frame supporting the ceiling panels.

Rings under the lights must be installed before installing the tension fabric
Conclusion
Installation of a two-level stretch ceiling for the simplest structures will not require special knowledge and skills; you just need to choose the right ceiling profile and conscientiously fasten the load-bearing strip and tension material. Complex curved PVC structures require experience and the ability to correctly assess the reliability of the assembled frame. Therefore, multi-level and exclusive projects are best left to professionals.
Despite the complexity, installation of two-level suspended ceilings can be done with your own hands, following the instructions and after studying master classes. Correct works installation will allow you to realize bold and bright design ideas within the allocated budget.
Two-level systems differ depending on the design, type of material used, and decor. Designs can be illuminated around the perimeter, with central lighting and spot, combined and LED - and all this must be taken into account when developing a sketch and planning the purchase of components and equipment.
The shape of the products can also be very different:
- spiral;
- arched;
- round;
- wavy;
- domed, etc.
It is important that colors, shades, shapes and decorative elements are in harmony with each other and correspond to the overall concept of the interior.
- In a room decorated in laconic colors, it is worth installing the simplest design in the same colors with a minimum of decorative elements.
- You can order PVC sheets with photo printing for suspended ceilings in spacious rooms with high ceilings and an abundance of windows.
- A canvas with a “starry sky” effect is used to create the lower level of the structure.
- PVC film for both tiers is the right and simple solution. It is acceptable to experiment with colors.
- To achieve an interesting combination, combine a matte strip with a glossy one, and also combine PVC material with a fabric base.
- The lower level in most cases plays the role of the main one and has the largest area.
- Illumination between levels will allow you to implement fashionable design solutions without compromising the functionality of the product.
If you plan to install a structure with the participation of craftsmen, you can bring something new to the interior design by using three-dimensional shapes, such as funnels, cones or waves.

Installation options - what are they?
There are several ways to install two-level ceilings. The first option involves fixing the frame on a rough base with a certain configuration and then stretching the film, fabric, or both materials in combination.
The second option simplifies the installation task: a special baguette is attached to the base of the ceiling, which is later used to fix the tension fabric.
Simplified installation allows you to save centimeters, and correctly selected colors and textures of products can visually expand the room and hide defects in the base and communications.
Technical requirements for the ceiling during installation
You can begin installing the structure only after the necessary tools and components are ready, such as a profile for two-level ceilings, for example, made of aluminum or plastic for fixing the film. Installation of products is carried out at the final stage repair work, observing the following nuances:
- the profile is mounted on the coating, ensuring its integrity with preliminary cleaning and priming;
- It is allowed to carry out installation work in a room without removing pieces of furniture from it with a distance from the top of the cabinet to the ceiling near the wall of at least 70 cm;
- Before installation, you should study the wiring and communications diagram;
- It is possible to complete the installation of a two-level ceiling if you have special equipment.
An important point is the temperature of the electrical equipment built into the ceiling. Ventilation, lighting, climate systems should not overheat the surface of the structure.

Preparation of tools - basic list
Even the most simple design for a two-level stretch ceiling will require the use standard set tools. This is about:
- hammer drill and screwdriver;
- heat gun (can be rented);
- level;
- stepladder;
- spatulas and spatulas;
- roulette;
- fasteners;
- hammer;
- nylon thread;
- mele;
- eraser and pencil;
- graph paper;
- wooden blocks;
- sheets of drywall.
The profiles are fixed using a puncher (a photo of the separator profile will help you choose the right products), a gun is used to heat the PVC film before stretching. The most difficult stages of DIY installation are taking measurements, as well as working with gas cylinder and preparation of the ceiling canvas.

Preparatory work - where to start
The quality, practicality and durability of the tension structure will depend on the correctness of the measurement procedure at the initial stage. To do this, measure the height of the corners in the room, after which 5 cm are retreated from the lowest of them, driving a bead nail into this area. The next step is to measure a uniform distance along the remaining corners using the same principle.
A nylon thread is pulled through all corners. This is important to do in order to level the room around the perimeter. Only after this can you proceed to calculating the working perimeter.
Once the perimeter data has been calculated, you can proceed to developing a sketch. A regular squared notebook sheet or graph paper will do. According to the sketch, the tension fabric is ordered from a specialized company, having decided on the color, texture, and material. Interesting option- combining several coating options, for example, matte and glossy to create a visual distinction.
The main work should begin only after the ceilings have been delivered to the premises. Retreating 5-6 cm from the level of the thread, pull the same one in a parallel plane. The outline of the second level is marked with chalk on the ceiling surface. This will be the marking for the future two-level ceiling.
Wooden blocks are screwed along the contour, according to the sketch. In case of height differences or rounded shapes of the structure, use a plasterboard sheet with high level flexibility.

How to secure the frame - the initial stage of installation
The installation of a frame for a two-level ceiling is carried out using special metal profiles, similar to the creation of a frame for plasterboard structures. A water or laser level will help you maintain dimensional accuracy.
A U-shaped profile is attached along the line prepared during the measurement process, using a screwdriver for convenience. Exactly the same profile is fixed on the ceiling surface, again, according to the markings. Considering that the shape of the box is not always correct, use metal scissors if necessary, securing the profile along a curve after making small cuts on it.
The drops made from its segments continue to be attached to the fixed profile. It is important to ensure that their lower edge is at the same level with the wall profile. Only in this case do they form the lower level of the structure.
Using an aluminum profile (two sections) and a U-shaped one, assemble a box, twisting a structure similar to a pipe rectangular section. Fasten it to fixed omissions. All work is performed for speed and convenience with a screwdriver.
The installed box is mounted on the wall using a supporting profile, ensuring that the verticals and horizontals correspond without fail. In this way, the entire frame is assembled along the perimeter designated earlier.

The next stage is wiring and finishing
When using an aluminum profile for suspended ceilings with lighting, you should remember that it will not save the situation if the lighting equipment overheats the canvas. That is why it is so important to calculate the power of lamps and sconces intended for installation in a structure at the design stage.
Electrical wiring and communications are masked inside the frame before the sheathing is carried out plasterboard sheets. Once this work is completed, you can proceed to preparing the material for finishing. Sheets of plasterboard, pre-measured and cut, are attached to the frame with self-tapping screws, after which the corners are reinforced with perforated corners, followed by putty.
Putty is used not only for corners, but also for leveling the places where screws are attached. After drying, the finished box is polished with a special grater, the mounting locations for the lamps are marked, and holes are prepared for them with a “crown” attachment. The resulting base is primed, painted, or covered with wallpaper. After all the work has been completed, the bottom layer can be considered ready.

Tension fabric - mounting options
Since we are talking about a structure that has 2 levels, the process does not end with the construction of the base. The next step will be the installation of the tension fabric. At this stage, you will need a puncher, as well as a heat gun with a gas cylinder to heat the film.
There are several ways to attach the canvas to the surface of the profiles:
- wedge;
- glazing bead;
- harpoon
The most commonly used is the last, harpoon mounting option. This method involves welding special hooks - harpoons - to the edges of the film covering for easy fastening in a tense form. The convenience of such a ceiling is that it can be dismantled if necessary without unnecessary problems, followed by the same quick and easy installation in place.
To use the harpoon method, you need to pay special attention to the correct cutting of the material. It is necessary that the canvas be 7% less than the ceiling area for finishing.
If the choice fell on the wedge fastening method, then the canvas is cut out with a margin. The excess is cut off after installation. The glazing bead method is almost similar to the wedge method, except that the film is attached to the surface of the profile with a special tape to guarantee tension.

How to fix the canvas correctly?
You can attach the tension fabric to a previously prepared plasterboard base or frame after heating it with a special heat gun or, in the absence of one, with a hairdryer. Only raising the temperature to 60 degrees will make the fabric more elastic and pliable.
It is worth paying attention to the temperature conditions in the room where installation is carried out. It is correct that the temperature is within 40 degrees Celsius.
They begin to fasten the canvas from the corners in opposite directions, continuing to fix it in the remaining corners by analogy. For convenience, spatulas are used to cut off excess film when choosing wedge or glazing bead fastening technology.
To make the canvas even and smooth after installation, it is reheated with a hairdryer. As soon as the temperature of the film drops along with the normalization of the temperature in the room, the surface of the film should become ideal.
To mask technological gaps, masking flexible tape is used. Lamps and fixtures are installed in the prepared holes, avoiding their contact with the canvas.

In conclusion, it can be noted that installing a two-level stretch ceiling is not an easy operation, requiring strict adherence to the algorithm of actions, the presence of certain tools, the presence of an assistant and, most importantly, patience and time.
The absence of even one component from the list above will, at best, lead to a violation of the composition and functionality of the ceiling, at worst, to its complete deformation, if not immediately, then over time. That is why it is so important to really assess your own capabilities, carefully prepare for the installation process not only practically, but also theoretically, having thoroughly studied the process from the inside, familiarizing yourself with video tutorials and tips real people on repair forums.
If, even after an educational program on the topic, there are still unresolved questions, doubts and uncertainty, you should abandon the idea of making such a ceiling and entrust the process to specialists. You can contribute to the installation at the stage of designing the structure, offering your own ideas, fantasizing about the decor, shape of the structure, placement of light, shades and general style direction.
Modern types of ceiling design amaze our imagination not only with their appearance, but can also surprise you with the perfection of the technologies used. The design of most hanging systems is specially designed in such a way that it would be possible to make a beautiful ceiling on your own, moreover, quickly and efficiently. Today there are quite a lot of options for finishing the ceiling part, but more and more often two-tier stretch ceilings are used for interior design. Why? The thing is that this type of finishing has high aesthetic qualities. Moreover, the installation of such a design became Lately much more accessible to the mass consumer.
A two-tier ceiling made of stretched PVC film can today successfully replace common plasterboard structures. The time spent on installing a tension two-tier system is an order of magnitude less than the time costs associated with installing a frame, installing drywall, puttying and painting a new surface.
Let's look at the question of what a two-level stretch ceiling system is. Let’s look in detail at what main technical features of this ceiling design option you should know and what to focus your attention on during installation work.
Tensile suspended structures in two tiers - a tribute to fashion or a successful technical solution
Multi-level stretch ceilings are always stylish and fashionable. Thanks to the varied texture of the film material, you can always decorate the ceiling in a living room in an original and non-standard way. The technology of stretching polyvinyl chloride fabric has become much simpler and clearer. In terms of time spent and labor intensity, such work is significantly superior to the option of finishing ceilings using plasterboard. Two-tier surfaces radically change not only the appearance of the ceiling part of the room, but are also able to modify the geometry of the room and provide the necessary zoning of the internal space.
This design is distinguished not only by the enormous possibilities in choosing colors and textures. Stretch ceilings in two or more tiers amaze with their boldness design solutions. What you can get as a result:
- combined ceiling surfaces, where the color scheme and texture of the material are successfully combined;
- curved structures, ready-made ceiling parts of any shape;
- volumetric surfaces in 3D design.
Almost any finishing option is a wealth of forms, a variety of design variations and color solutions.

In addition, modern technologies allow you to use this finishing method yourself, using a minimum set of tools and devices. The cost of repairing ceilings using stretched fabric depends on the number of elements used in the design and the area of the working surface, as well as on the texture of the fabric and the complexity of the shapes.
Two-tier stretch ceilings. Design features and functionality
A system of suspended ceiling structures made from PVC film consists of a lightweight frame and a main fabric. Unlike plasterboard ceilings, the frame for a multi-tiered tension structure looks much simpler. A non-bulky set is used here metal profiles, installed on the ceiling, and aluminum profiles reinforced around the perimeter of the room.
There are no longitudinal or transverse profiles in the frame. The canvas is attached directly to profiles attached to the walls in the upper part of the room. The canvas is made of polyvinyl chloride film. To fix the fabric in the profiles, you can use the most common technology, the harpoon method of attaching the film or other methods. All installation options are quite suitable for you to do it yourself, with your own hands.

Main difference similar option finishing from traditional, single-level tension systems lies in the configuration. The shape of the tiers, their configuration is a key factor that gives originality to the decoration of the ceilings.
On a note: Most often, several levels are achieved by creating stepped structures. Each tier has its own frame. For these purposes, it is best to use a gapless harpoon fastening system for the blade.
It should be noted that the height of each level is limited only by the technological parameters of the room. The outlines of each level can be of any shape, curved or rectangular. As for the functionality of this type of ceiling design, tension structures will give a head start to other design options.
- Firstly: Such ceilings are always much easier to care for;
- Secondly: such ceiling surfaces protect the interior from flooding;
- Third: with proper use, such surfaces have a long service life;
- Fourth: stretched fabric allows for local repairs to the ceiling;
- Fifth: If desired, you can always dismantle one or more levels yourself by changing the design of the ceiling.
This could go on for a very long time, listing the main functional advantages of tension multi-tier systems. Do not forget that in the process of installing multi-tiered film ceilings you are solving several technical problems at once. With this type of ceiling design you will be able to hide obvious flaws and defects base surface, you will achieve the creation of the necessary zoning of the internal space. Externally, such a ceiling will meet the highest requirements of aesthetics and style.

It is worth noting that two-tier or multi-tier suspended ceiling systems based on stretched PVC film are very convenient in terms of improving the internal layout of rooms. Using the features of central lighting and local lighting sources using several levels, you can visually align the walls and give a square room an elongated, rectangular appearance. Design suspension system allows you to easily equip hidden, decorative lighting.
Thanks to the combination of color and fabric structure in combination with the technical features of the room, multi-tiered tension and living rooms are irreplaceable.
For reference: Maintenance of two-tier or multi-tiered suspended ceiling systems made of PVC film is carried out using ordinary household products. detergents. Do not use chemically active substances, detergents or cleaners containing abrasive elements.
In which rooms do suspended ceilings look best?
First of all, it’s worth saying a few words about where such a surface would look best, since installing a two-level stretch ceiling can either radically change the interior of the room.
The main requirement that must be observed with these types of ceiling designs is readiness interior spaces. All repair and finishing work inside the premises must be completed. Stretch ceiling structures are the finishing point in creating original interior.

As for in which rooms ceiling structures made of stretched film will look best, there are a number of aspects. First of all - if you want to quickly finish the finishing work, two-tier ceilings are not a quick and easy technical solution. Therefore, you should be prepared for long-term work.
On a note: In comparison with the installation of plasterboard ceilings, completion of all stages takes 3-5 days, tension systems in several tiers are installed within 1-2 days.
The next aspect that you should pay attention to when choosing a ceiling design is the intended use of the room and its technological features. For example, in a children's room, two-level ceilings do not always look good. The situation is similar with sleeping quarters. Most of the levels eat up the internal volume, so this option for finishing the ceiling part is best used where the area and height of the premises are not critical.

Two levels do an excellent job of visually adjusting the interior space. An angular room, thanks to several levels on the ceiling, can become a room with smooth lines and contours. By installing a tension two-tier system, a square turns into a rectangle and vice versa. This property is typical for guest rooms, halls and hallways, where it is necessary to visually increase the volume of the premises.
Hidden lighting will only increase the aesthetic perception of the hanging part in the room. The figure shows various design options for the ceiling part, created by several levels of stretched fabric.

Two-level stretch ceiling - how to make it yourself
If you have an idea of what suspended ceilings should look like and how the installation technology is constructed, then it will not be difficult for you to create original two-tier suspended systems in your apartment.
Clean installation in this case is not associated with dirty and wet painting work. When installing a suspension system based on PVC film, you will not have a large amount of construction waste inside the room.

On a note: when all finishing work has been completed inside the room, wallpaper has been hung, flooring has been installed, tensioning the canvas in the upper part of the room will not be associated with the risk of damaging interior elements.
All work is carried out in stages:
- preparing the upper part of the room (removing old structural elements and laying wire communications);
- installation of a frame for each tier (plywood, chipboard or OSB is used);
- big square The base ceiling is covered with a stretched film of the selected color and texture (starry sky, galaxy or blue cloudy sky).
The combination of each level with a background or with a pattern on the film provides the desired effect. This option clearly conveys the method of installing a two-tier structure. With multi-level systems the situation is somewhat more complicated.

In custody
The technology that you will have to deal with when making multi-tiered suspended ceilings based on stretched fabric is not associated with any particular difficulties. It is important to remember that for the installation of such a structure it is best to use the gapless harpoon installation method. This technology is very convenient for working with multi-level ceiling systems.
All subsequent work is carried out in stages, where each stage is characterized by the achievement of certain goals and results. In order to do everything right, remember the following points:
1. Two-tier suspended tension systems are a very convenient and original type of ceiling design
2. Compared to plasterboard suspended structures in several tiers - stretched film in two or more tiers allows you to quickly achieve the desired effect
3. The main advantages of this type of ceiling design are as follows:
- quick installation;
- the ability to hide defects and communications in the inter-ceiling space;
- a large selection of colors, patterns, shapes and configurations for the design of the ceiling;
- affordable and easy care.
4. Ceilings made of stretched fabric in several levels are best installed inside large and spacious rooms
5. Installation is carried out only after completion of all finishing work
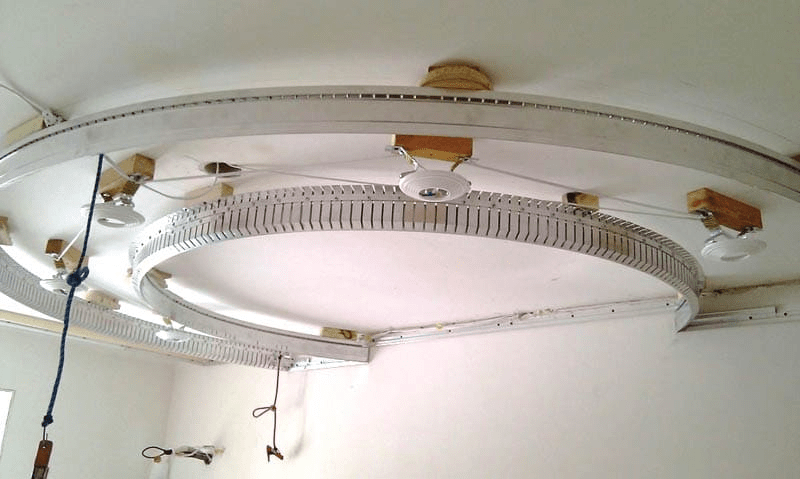
Do you want to learn how to install such complex ceilings as in the starting photo?
Then you've come to the right place! Today we in more detail Let's look at how to install suspended ceilings on two levels.
This material will be useful, first of all, to novice craftsmen who have not yet carried out such work, but they do not want to miss a good client. And it is right!
You always need to strive for more, and not at the expense of your “I”, which can often be found on various construction sites, when craftsmen “in words”, in fact, cannot do what is required of them, but by systematically developing their skills and abilities, becoming real professionals. A competent approach to business is the key to your success!
Preparation
Let's go in order, and as usual, the work begins with installing the frame, but first let's make a small digression to understand what we need to do in the end, and what materials and tools are needed for this.
Tools and materials
If you have previously stretched single-level ceilings, then it means you already have the tool, but it wouldn’t hurt to repeat it.
So:
|
|
One of the main tools in this work is a hammer drill. Moreover, they have to work quite intensively, since the profile is fastened in more frequent steps than, for example, during assembly plasterboard ceiling, so it is important to have a high-quality device from a good manufacturer.
|
|
|
You can't do this job without a screwdriver either. Get a model with good batteries and high torque. It is desirable that it be compact, light enough and with a balanced weight so that it can be confidently placed on the battery on flat surfaces. We don’t need strong traction, since the screws are screwed into dowels, or into wood or a plasterboard profile, but if you want to have a more powerful assistant just in case, then why not, but then be prepared to overpay a little. |
|
|
This belt makes working at heights much easier. You don't have to constantly bend down or go down to replenish your supply of screws or dowels - everything is at hand. In addition, you can put replacement drills, cue balls and even a screwdriver in a separate pocket. As a result, there are fewer squats and unnecessary movements, which means less stress on knee joints and leg muscles. Anyone who has worked under the ceiling will understand! |
|
|
Don’t be surprised, but we will also need a jigsaw. We will use it for cutting blanks for a multi-level frame - more on that later. |
|
|
Of course, you can get by with a merman, but it is several times longer and more complicated, which you will understand later in the course of our story. It is advisable to have a tool that hits with a cross, but a single-plane one will also work. If you don’t have one yet, we recommend getting one as soon as possible. |
|
|
and a cylinder with a reducer for it is all that is needed to heat the web during tension. Additionally, you can purchase a construction hair dryer for comfortable work with local areas. |
|
|
You can make such a tool yourself by turning it out of a hard spatula, but it is better to have a professional set with the shapes of working surfaces for various difficult places. |
|
|
These devices are needed to temporarily suspend the canvas from the ceiling to preheat it. |


As with almost any type of installation work, you will also need:
- Pencil;
- Yardstick;
- Carpenter's square;
- Markers;
- Dyeing thread;
- Stationery knife;
- Building level.
Perhaps we forgot to mention some little things, but when describing the installation, they will definitely come up, so read on.
Now we list the main materials, accessories and consumables that you cannot do without:

- The ceiling itself, where would it be without it - after the frame is mounted, the film will be stretched over it.

- Carrier wall molding– it doesn’t matter what profile it is, or what material it is made of (PVC or aluminum), we are now interested in it functional purpose. This baguette is screwed onto the walls, forming the basis for fixing the canvas.

- We will need plywood to form the base of the lower levels. If a rectilinear box is to be installed, then its thickness should be at least 15 mm, but if we are talking about curved structures, then it can be taken for homemade the base is 4-5 mm for subsequent bending and layer-by-layer strengthening, but this option is an extreme case, which we will discuss in detail below.

- Powerful and even corners made of galvanized steel - they are used to fasten a plywood or plastic base to the load-bearing floor.

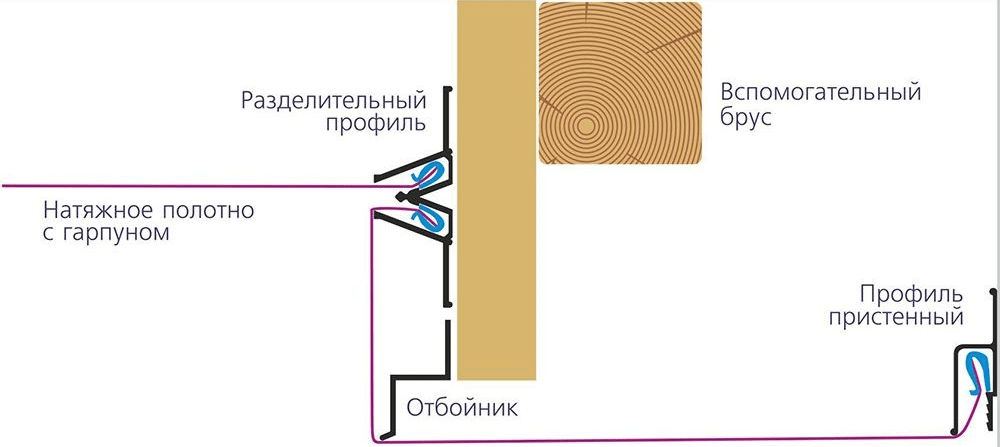
- The separator is located in internal corners multi-level structures, allowing you to connect different canvases in one line. It is mounted on plywood and, if desired, can be replaced with a universal profile along with a wall profile.
- The bumper is mounted along the bottom edge of the plywood and forms the front edge external corner lower level of the structure. In other words, the tension of the canvas passes through it.

- Lipstick - a plastic nozzle that fits over the lower edge of the chipper to protect the blade from contact with possible burrs on metal or cut plastic profile, and also make the bend at the corner smoother and more beautiful.
The consumables you will need are: plastic dowels, wood screws of the appropriate length, reinforced tape, thermal rings and glue for them (for example, “Cosmofen”), metal straight hangers and, of course, a good mood - don’t waste it!!!
Frame installation
Well, we’ve found out what it’s pointless to start work without. Now let's talk about everything in more detail.
Marking
Let's start with a simpler option, when we plan to make a straight box.

First, we need to determine the boundaries of the future structure. We will need a laser level, a pencil and a tape measure.
- First of all, we discuss with the customer the dimensions of the future structure and draw up a small drawing on paper - preferably to scale.
- We mark the ceiling - to do this, we set a distance from the wall using a tape measure that is 2 centimeters less than the agreed distance. This is done in order to take into account the thickness of the bumper and separator. If you are marking for a curved structure, make a margin of 3 centimeters to also take into account the thickness of the plastic.

- Next, using a dye thread, we beat off straight lines along the drawn marks, forming a contour along which we will install our frame.

- Next, the lower limit of the ceiling is determined. If, according to the project, the shortest distance to the ceiling is clearly defined, then you first need to find the lowest point on the ceiling - most often this is one of the corners in the room.
- We install a laser axle builder, and along the lines drawn by it we put marks in the corners of the room.
- We measure the distance from them to the ceiling, finding the smallest value that will need to be compared with the design height. If it is less, then use the tape measure to put the resulting difference down from the marks.
- If you need to check the entire surface of the ceiling, for example, you have a strict reference to height or wiring, then having secured the level under the ceiling, we methodically walk along the entire ceiling, applying a tape measure - the laser will show you all the differences, intersecting with it.

- After these simple manipulations, we draw lines with a dye thread - stretch it and beat it off, not forgetting to pour dye into the body of the device before unwinding.
With the marking of curved structures, everything is a little more complicated. They can be divided into two types: regular and irregular.
The first include figures that can be drawn using a compass, for example, a pattern consisting of circles or an ellipse. The latter can have an arbitrary shape with small waves and non-standard bends.
How long should a compass be, you ask. Yes, in fact, it doesn’t matter, we will assemble it ourselves for specific needs. To do this, you will need an aluminum profile (although any other metal profile will do), a sharpened pencil, a pair of self-tapping screws and one dowel screw.

- We take the profile and drill a hole in it equal to the diameter of a simple pencil. Then we install the pencil itself into it.
- Having retreated the required distance (radius) from this hole, we drill a second hole that will correspond to the central axis of the circle.
Advice! If it suddenly turns out that the length of one profile is not enough, then connect two pieces in length using self-tapping screws.
- We drill a hole in the ceiling in the center of the future circle and attach the profile to it through a dowel-screw.
The compass is ready - with its help you can draw a perfectly even circle.

If you need to apply a non-standard design to the ceiling, it is most convenient to proceed as follows:

- For more accurate orientation, it is worth initially marking not the ceiling, but the floor.
- At the control points we stick pieces of masking tape and mark them with a pencil. If necessary, the tape can be easily removed or moved.
- The more dots you apply, the more accurate the outline you will get.

- Next, we take a laser level and set it with the center of the cross, one by one, along all the previously drawn points. As you might guess, the tool will project a second similar cross on the ceiling, in the center of which we make a mark.
- If you have a simple level that cannot build a cross, then it’s okay - we install it perpendicular to the wall and measure the distance from the bottom point to the wall, after which we put it at the top along the laser line.

- Next, take a wall-mounted plastic baguette and bend it along the resulting control points. Make sure that there are no strong kinks or obvious geometry violations.
- Using a pencil, trace the outline along the curved profile. We do this first, pressing lightly on the pencil so that we can make adjustments.

- Check the accuracy of the line, making changes if necessary, and make the final stroke a thicker line.
At this point the marking is completed and you can move on.
Frame assembly
The straight frame is the easiest to install, so let's start there.

- After all the markings have been completed, you can accurately determine the height of the plywood blanks from which the frame is actually assembled. It is important to remember two points here: the lower edge of the plywood during installation should not reach the level of the box by 0.5 centimeters; The plywood should not rest against the ceiling.
- If you have the opportunity to do all the calculations in one day, then you can deliver the plywood to the site already sawn. Similar services are provided by large construction centers upon purchase, for example Leroy Merlin. If this is not possible, or the salespeople in stores in your city have their hair on end standing on end from such questions, then you will have to use a jigsaw and cut everything out yourself.

- When determining the width of plywood, it is worth considering many nuances, some of which we have already mentioned. The base ceiling very often has height differences at the joints of reinforced concrete slabs or has wiring running along it.
- Some of this can be taken into account immediately when sawing, making the height of the plywood different, but much of it is much more convenient to adjust, as they say, locally, for example, cutting off a corner of the plywood that rests on a hillock or making a recess for an electrical cable.

Let's start installation:
- We place a piece of plywood along the line on the ceiling.
- Apply from the edge steel angle, installing it so that the next workpiece can be screwed to it. It must be remembered that the distance from the edge of the frame to the wall should be 3 centimeters, which is required for further installation wall profile and corners.
- Make a mark on the ceiling with a marker or pencil.

- Next, we drill into the ceiling and attach the corner to the dowel, screwing several screws into it at once for greater strength. Add a couple more dowels, drilling straight through the perforation.
- We add several corners to the fixed sheet in the center so that the step between them is 70-80 centimeters - given the current thickness of the plywood sheet, this is more than enough.
- We attach it to the corners with wood screws, simultaneously adjusting the position of the edge of the frame according to the markings and aligning it vertically, for which plastic linings of different thicknesses are made in the right places. The lower edge is adjusted according to the laser level, previously set half a centimeter above the original level.

At this stage, it is worth paying special attention to the evenness of the frame, since the appearance of the finished ceiling will entirely depend on this. If necessary, increase the number of corners - ideally, the front wall of the plywood should be flush with the vertical level.
Finally, check the reliability of the frame for loosening and strengthen the structure with all kinds of stops and braces.

Let's move on to analyzing the installation of the curved frame. As you remember, we wrote earlier that marking it requires an indentation of not 2, but 3 centimeters. Now you will understand why.
- To install a curved frame, it is best to use sheet foam plastic, which can be purchased at hardware stores, from the manufacturer, or from some stretch ceiling dealers. Its thickness is 8-10 millimeters - we choose it based on the steepness of the radius of the figure being performed (thin is less durable, but bends much better).

Advice! We do not recommend using MDF panels, plywood, hardboard, chipboard and other analogues for these purposes, since you will not save much on the cost of the structure, but the final strength will be much worse. Moreover, bending these materials is much more difficult.
- So, to make the bends and turns of the box as smooth as possible, we offer this method. Instead of metal corners, which sometimes only an experienced craftsman can set accurately, we will use a guide made of a metal PNP profile, which is usually used for.
- Why such difficulties, you ask? But after seeing the final result, it will become clear to you that we have simplified the task for ourselves, at the same time making the contours of the levels perfectly even, which is very difficult to achieve when working with corners.
- By the way, precisely because it is attached to the guide, aligned along the drawn lines. plastic panel, and such an indentation was needed. As a result, we reach the required 2 centimeters.
- First, check the base for evenness. In the example from the photographs provided, reinforced concrete floors had a strong slope to ensure normal water drainage from the roof during rains.

- First of all, we take the profile and cut its side edges in increments of 5-6 centimeters (the smaller, the more accurately it can be set). You can use metal scissors for cutting, but much more faster work will go with an angle grinder.
- Next, we fasten it according to our markings, having first bent the lower edges down so as not to interfere with the work.

- Usually installation is carried out directly to concrete floor, but since we have already mentioned a significant slope, the craftsmen had to first level the plane using a simple structure made of plywood and timber of the required thickness.
- To prevent the profile from leading, we attach it step by step, starting from one side and moving to the opposite. In this case, the fixation step should not exceed 10 centimeters. This recommendation applies to a high-quality, rigid profile, for example, from the Knauf company. Try not to use thinner options, but if there is no way out, then increase the fastener pitch.
- We carefully ensure that the edge of the profile follows exactly the markings, since the evenness of the finished ceiling will depend on this. If somewhere it does not fit exactly, then you can knock it out with a hammer in this place and install an additional self-tapping screw.

- Next we cut the plastic. Pay special attention to the cutting accuracy, since this determines how accurately we will catch the level when attaching it. Use rigid aluminum profile guides and a sharp mounting knife for cutting.

- Then we begin to attach the plastic to the guide. This is done using metal self-tapping screws in small increments, while you need to constantly align the bottom edge with the level that the same laser level will kindly draw for us. It is for this reason that two people need to do this work - one twists, the other holds, orienting along the line.
- The width of the plastic is subject to exactly the same requirements as those that we took into account when cutting plywood for a rectilinear structure.
Additionally, fasten the joints plastic sheets due to a tire of the same profile.
Setting up a profile
We're done with the frame, let's move on to installing all the profiles.

- We start by installing the wall profile for the upper level - the markings are already ready. We fasten it along the already prepared holes in the baguette in increments of 12-15 centimeters using dowel screws.
- On a curved frame we use metal screws, but of a longer length (35 mm). If the profile is not securely fastened, due to its flimsiness, we reduce the fastening step by 2 times, while there is no need to drill it first.
- We monitor the level, and the work will be accurate.
- Next, we prepare the aluminum bumper - it is stronger and will not deform as a result of the tension of the canvas.

- Its lower edge is cut using a miter saw with a special blade for aluminum. The distance between cuts directly depends on the bend radius.
Attention! This work can also be done using a grinder, but due to the nature of the metal, burrs and burrs form on the sawn edges, which can ruin the blade, so these edges are polished with the same grinder. The process will take much longer, so if you are installing multi-level ceilings constantly, buy a crosscut tool, which will also be useful for other complex work.

- Next, we drill holes 4 mm in diameter on the remaining intact edge, through which we then attach the profile to the lower edge of our frame using self-tapping screws, not forgetting to check the level.

- When installing the bump stop, do not forget that the mouthpiece will be put on top, and this is another 1.5-2 millimeters in height.
Final work
The next stage will be the installation of the upper ceiling level.

We won’t go into too much detail about the process, since everything is already very clear to any installer: we hang the canvas on clamps, heat it with a heat gun, fill the corners first, then the centers of the sides, and finally go through the remaining parts evenly, not forgetting to support operating temperature ceiling at a given level (60ºС).
- Next, we proceed to install the universal profile, which will ensure the connection of the lower level to the already tensioned surface.

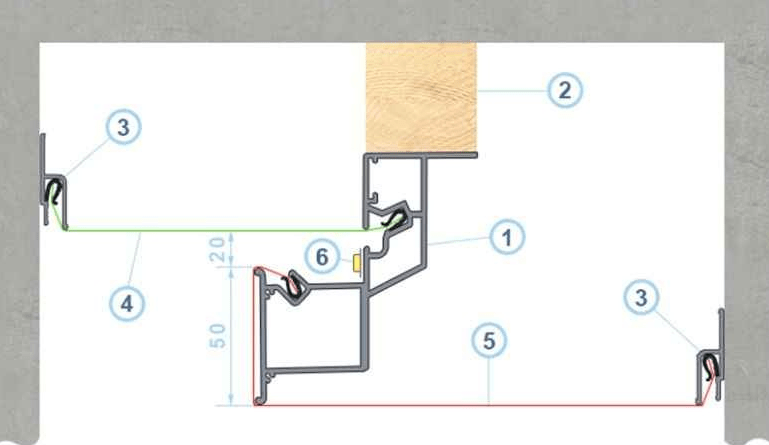
- Pay attention to the diagram above to see how the universal profile is located. Its installation site should fit snugly against the frame, while the top point should touch the stretch ceiling. This is the only way the joint will be tight and invisible.
- In this case, you should not allow it to be pressed too tightly to the upper level, as this can lead to deformations and, as a consequence, the formation of gaps between the insert and the ceiling.

- Before installation on curved sections, the profile is sawn through, similar to a bump stop, but since we are using plastic here, a grinder is enough.

- Next, we attach the profile under the ceiling according to the already indicated scheme. When approaching the wall, do not forget to leave a gap of 1 centimeter so that there is room for installing a corner from the profile.
- The next step is to make and install corners from a plastic wall profile.

- We cut the corners at 45 degrees using a miter saw or grinder, having previously made precise markings using a carpenter's square.
- Then we take super glue and glue the parts together - it’s simple.
- After gluing, do not forget to check the evenness of the corner with a square. Afterwards, the workpiece needs to be shortened, for which we put a piece of a mouthpiece near the wall and measure the distance from the tensioned level. We move it to a corner and cut off the excess.

- We process the sharp corners of our workpiece with sandpaper so as not to damage the film when tensioning.
- We drill mounting holes in it, and the part is ready for installation.

- We install the corners in place, accurately aligning the edges with the profiles and the bumper with the fitted lip. At the end, we additionally strengthen the structure with self-tapping screws so that it does not “walk” when stretched.
The next step is to install the lip along the entire length of the lower edge of the bump stop. For high-quality joints, it is recommended to process the edges of this part using a grinder. After this, we put it in place, tapping it with the handle of a spatula or something similar to ensure a tight connection.

Now all that remains is to glue all the joints and corners using reinforced tape. It is convenient to work with, as it is quite durable and elastic.
This measure will protect the film from contact with possible burrs. It is important to tuck the edges of the tape into the mounting grooves of the profile with a spatula so that it does not interfere during installation.
Stretch the fabric to the lower level
So, our structure is ready, all the mortgages are installed and the joints are taped. We begin to stretch the fabric.
If the ceiling is glossy, then do not forget to preheat it very well. We stop heating only when the canvas begins to tremble from the flow of hot air, like jelly.
This procedure is called glossing. If it is done with high quality, then in the end the ceiling will be much more beautiful (have a more pronounced shine), but do not forget that the quality of the canvas also affects this.

The tensioning procedure itself is not complicated. Everything is as usual, the main thing is that all corners are well processed.

After the canvas is installed, all that remains is to mount the decorative plug. We cut the corner joints at 45 degrees - if cracks are visible there, then coat them with white sealant or silicone.
That's all! The ceiling is ready and can be handed over to your favorite customer for acceptance. Installation of a two-level stretch ceiling video will help you understand the topic even better. We hope the material was informative and useful for you. Best wishes!
Today it is very fashionable to install suspended ceilings in your homes. And that's not a bad thing. In recent years, this option for decorating premises has grown big amount myths and legends, which in practice are not always justified. The main hook for distrustful users was the independent installation of a stretch ceiling. But this is already in the past.


Design Features
When a simple PVC film over your head was no longer enough, nimble designers decided to diversify the areas of application of this simple material. At the peak of popularity today is the installation of a two-level stretch ceiling, a combination of fabric and PVC in the finishing of such structures, options using plasterboard, and photo printing on canvases. Two-level tension surfaces play into the hands of citizens whose original ceilings are far from ideal. Everyone knows what it’s like to level and clean the existing surface for days in order to bring it at least a little closer to one that can be covered with wallpaper or paint. The tension structure allows you to get rid of such headaches and make the ceiling not only smooth, but also beautiful.


Getting started self-installation two ceiling levels, you need to understand exactly what you want. First of all, you should measure the perimeter of the surface above your head and calculate the approximate amount of material that will be needed to decorate the room. A simple diagram or hand drawing is already half the battle. When the owner of the premises, satisfied with his creative impulses, sees what he wants with his own eyes, and not in his thoughts. Only after these ritual dances with drawings can you begin to select materials and tools for installation.


Materials and tools
First, you will have to decide what exactly your two-level stretch ceiling will be made of. There are two main options: PVC film and fabric. The first is known for its water-repellent properties, airtightness, ease of cleaning and impressive appearance. It can additionally be produced in three modifications: gloss, matte and photo print. A fabric two-level ceiling is less demanding to install, “breathes”, but does not at all resist moisture, absorbs sunlight, recommended for installation in large, bright rooms with high ceilings.


Fabric sheets are much more expensive than PVC film, and at the same time they look more elegant and luxurious. Vinyl ceilings provide more light, especially if you install additional lamps aimed at the glossy surface of such a coating. Then a mirror effect will appear - and the whole room will be filled with light.
So, having decided on what to pull, let's move on to what to pull with. Among the standard set of tools, the following will be simply necessary:
- heat gun or hair dryer (with PVC film stretched);
- aluminum profile for frame and drywall (for different installation options);
- shovels and spatulas.


Depending on the material and method of installation of two-level tension structures, components necessary for the installation process may be changed and added. It is very important to remember that when tensioning ceilings yourself, you should strictly follow not only safety rules, but also carefully adhere to all stages of installation and precision in work.
Frame installation
It is better to immediately order canvases for two-level ceilings from the manufacturer of the required size and shape. So that later at home you don’t have to cut or trim unnecessary things yourself. It is better to measure using a tape measure and a pencil, which will mark the measured areas. It is very important to immediately provide for the height of the first ceiling threshold closest to the concrete floor so that you can painlessly place lighting and take them outside. We should not forget that some spotlights become very hot during operation, which can have a detrimental effect on the integrity of the membrane.


Before installing the suspended ceiling frame, it is necessary to make markings, which are based on measuring the perimeter of the room and preliminary outlining the future shape on the rough ceiling. Step-by-step instructions will help you easily understand how two-tier tension structures are made. The measurement technology is such that first markings are made around the perimeter of the room. Here it is very important to use a water or infrared level so that the two-level ceiling lies flat and beautiful. To do this, you can use a special construction trick.


First of all, the height of each corner of the room is measured. A glazing bead nail is driven into the lowest of them, and then, using a level, a nylon thread or beating cord is stretched along the entire perimeter of the room. Thus, a quadrangle of the correct shape is obtained, which will allow you to install the suspended ceiling yourself with minimal risk of curvature. Installation of the frame begins from the lower level of the ceiling. To carry out this step, wooden blocks are often used: 6 cm high and 10 cm long. They are driven in along the perimeter of the lower part of the future frame, repeating the contours drawn on the rough ceiling. Strips about 12 cm wide are attached to these bars. It is noteworthy that here you can make a choice in favor of the material that interests you:
- plastic profiles;
- aluminum profiles;
- plywood veneer strips;
- plasterboard with increased elasticity.


Professionals do not advise beginners to use aluminum, since creating such a frame requires additional tools and certain knowledge and skills. At this stage, you can get by with plastic or veneer. In the second, flexibility is achieved by first moistening it abundantly. After forty minutes to an hour, the plywood will bend in any direction without breaking or deforming.


Let's focus on strips of plywood veneer. Their length will depend entirely on the size of the uneven section of the lower ceiling level. Its width is indicated conditionally, selected taking into account the installation of lamps and a flat native surface. So, the plywood strip is attached to wooden blocks using self-tapping screws. The frame for the winding level of the stretch ceiling is ready. We return to the marks stretched along the perimeter of the room. Baguettes for the first and second levels of canvases will be installed here.


The general frame of the two-level stretch ceiling is ready. Then the fun begins.
Installation of a stretch ceiling
Assembling a stretch ceiling with your own hands no longer seems so scary if you are confident in the measurements that were made and in the manufacturer of the canvas for the new coating. To properly stretch PVC film, you need to constantly maintain the room temperature at least 30 degrees. Under no circumstances is it recommended to open windows or create a draft or airflow into the room being treated.

Start with the second level of the stretch ceiling. The canvas is laid out carefully on the floor, stretched in different corners of the required area. While heating the film, pull it in the required directions and tuck its edges into the baguette clip with a plastic spatula. If there are any folds or irregularities in the middle of the canvas, smooth them out using a hair dryer or heat gun. It should be noted that there are three types of film fastening:
- Wedge. The canvas is held in the baguette using a special wedge. With this type of fastening, it is possible to replace the stretch ceiling, but a limited number of times.
- Beading. It consists of tightly clamping the film or fabric inside the cracks. Such a ceiling can only be replaced with a frame.
- Harpoon. One of the key methods used by almost all suspended ceiling installers. This type of “lock” in a baguette consists of two main components – a hook and a paddle. When interacting, these two components tightly clamp the fabric together and, if it is necessary to replace the fabric or film, they easily part with it.


The membrane is never tensioned at two levels simultaneously. It is always preferable to process the bottom one, and then start decorating the top one according to the same scheme.
Two-level stretch ceilings are good because they perfectly zone the space and can be done with the installation of additional lighting. In order to create best combination tension structure with the play of light and shadow, you should pay attention to the basic recommendations of professionals on this issue.
So, the canvases are stretched, but it’s not clear where to make the light. The wooden beams that were attached to the rough ceiling at the very beginning of the work were precisely designed to attach the lighting of the second level of the ceiling to them. Carefully feeling required places, start making the hole. Please note that you cannot cut a suspended ceiling. To cleverly make openings in such surfaces, there are two options:
- Film melting. To do this, you need to take round reinforcement of the required or approximate diameter (it should not exceed 2-3 cm), heat it with a hair dryer or the same heat gun. Place it on the place where the lamp will be located. Make sure that the edges of the hole are melted and that the fabric does not tear.
- Using a plastic thermal ring. A unique and quite affordable item. The ring is glued to the center of the future hole. After drying, the canvas is cut along the inner diameter of the ring.


To prevent overheating of a two-level stretch ceiling, you should think about the quality of the lamps that will be installed in it. Professionals advise using LED lamps and strips that do not heat up during operation and last a long time without the need for replacement.