Master Tips
Prev Next
To oil paint during storage it does not dry out and so that a film does not form on it, put a circle of thick paper on the paint surface and "fill it with a thin layer of drying oil.
" Plastic filmcovering a balcony or a greenhouse is protected from being cut off by the wind by a string stretched on both sides with 10-15 cm intervals.
"Clay is usually added to make concrete mix easier to handle, but clay will reduce the strength of the mix. Add a spoon to the mix. washing powder based on a bucket of water. "
"To prevent the screw, the head of which is hidden behind an obstacle, from rotating with the tightened nut, you need to put several turns of thread or thin wire over it and slightly tighten the ends. Friction holds the screw well in place. The ends of the thread can be cut after tightening."
"You can cut out the birdhouse entrance without a brace. It is enough to split the front side of the board in the center and cut out the half-holes of the required size with a chisel or a hatchet, and then reconnect the halves."
Wooden screw caps will crumble and fall out of the wall. Take your time to cut a new plug. Fill the hole in the wall tightly with a capron from an old stocking. With a red-hot nail of a suitable diameter, melt the hole for the screw. The fused nylon will turn into a solid cork.
"A carpenter's level is not difficult to turn into a theodolite, equipping it with a sighting device from a slot and a front sight."
"So that two strips of linoleum lay end-to-end, it is convenient to use self-adhesive decorative film, placing it under the base of the li noleum. "
"So that the nail goes in the right direction and does not bend when hammering in deep hole or groove, you should place it inside the tube, fixing it with crumpled paper or plasticine. "
Before punching a hole in concrete wall, secure a piece of paper just below. Dust and concrete debris will not scatter around the room.
"To cut the pipe exactly at right angles, we advise you to do this. Take a straight strip of paper and screw it onto the pipe along the saw line. The plane passing through the edge of the paper will be strictly perpendicular to the axis of the pipe."
"Roll over logs or wooden beams A simple attachment will help - a segment of a motorcycle or bicycle chain, supplemented with a hook on one side and attached to a scrap yoke on the other side. "
"In order for one to be able to work with a two-handed saw, we advise you to use a simple technique: move the saw handle from the top to the bottom."
You can cut a piece of slate of the required size with a saw, but it is better and easier to punch holes with a frequency of 2-3 cm along the line of the proposed cut with a nail, and then break off the slate on the support.
" The best way glue the tile to the wall: take bitumen, melt and drip just four drops at the corners of the tile. Sticks on dead. "
Shaped holes in the manufacture of curly window frames are most conveniently cut out with a hacksaw with a turned cloth.
"Making stained glass is a long and difficult task. You can make a quick imitation of a stained glass window. To do this, take thin laths or twigs of a vine, stick to a sheet of glass, and then paint the glass and cover it with varnish."
"If you don't have a dowel at hand, you can make it from a piece of plastic tubing. The body of a ballpoint pen can also work for this. After sawing off a piece of the desired length, make a longitudinal cut, about half, and the dowel is ready."
"It is known how difficult it is to hang a door working alone. But just shorten the lower pin by 2-3 mm and it becomes much easier to work."
"A very strong, non-shrinking and sufficiently waterproof putty is obtained from bustilate mixed with any powder - chalk, gypsum, cement, sawdust, etc."
"If you need to screw a screw into the end of the chipboard, drill a hole slightly smaller than the diameter of the screw, fill the hole with Moment glue (but not epoxy!), Screw the screw in a day. The board does not delaminate. However, the resulting joint can only day. "
"Attach portraits, photographs, paintings in wooden frames with glass it is more convenient not with nails, but with the help of stationery bent at right angles. The buttons are gently pressed with a screwdriver. Compared to nails, the risk of splitting thin frames is minimized. "
"It is not so easy to wrap a screw in hard wood. If you poke a hole for the screw with an awl, and rub the screw generously with soap, then after such an operation the work will go like clockwork."
To save time, the wallpaper can be trimmed with a sharp knife without unrolling the roll. To do this, you must first align the end of the roll and use a simple pencil to circle the outside border of the Edge. Working with a knife, the roll must be gradually turned in the direction of rolling.
A wire holder with three hooks at the bottom and a handle at the top is convenient for carrying large sheets of plywood, glass, or thin iron at home.
IF you need to cut a round stick into the distance, it is most convenient to do this work using a template. It is made from a metal tube with a groove in the middle. The diameter is chosen so that the template slides freely on the stick.
It will become better to work with a hacksaw, and it will be easier if in its middle part the height of the teeth is increased by 1/3.
If you attach a load weighing about a kilogram to the front of the bow saw, it will become easier to work. The load must be made removable so that the saw can also perform other work.
"A wax-like finish can be obtained by painting the surface with diluted PVA glue. To obtain the desired color, dilute the glue with water tinted with watercolor."
"Making a cover for an ax blade is as easy as shelling pears. Take a piece of rubber tube, cut it lengthwise and put it on the blade. It is protected from jumping off by a ring cut from old car mobile camera. "
"A linen cord will help to dispense with clamps when gluing wooden frames. You should put four short loops on the corners of the frame and pull the frames diagonally with two long loops. The corners are adjusted with sticks that twist the middle loops."
"How to silence a creaking floorboard? Between the floorboards you need to drill a hole at an angle of 45 ° with a diameter of 6-8 mm, hammer in a wooden pin, greased with wood glue, cut off the protruding end with a chisel and putty the floor surface."
"To make it easier to scrape a floor covered with varnish or paint, iron it through a damp cloth - and the job is a hundred percent easier."
"A slight decay on wood can be eliminated as follows: the affected wood is removed from the healthy layer, and then impregnated with a 10% formalin solution. After drying, the area is putty and painted over."
" Door hinges they will not creak if they are lubricated in time - this is a well-known rule. But you can do without lubrication. To do this, you need to make a washer from a polyethylene cork and put it on the hinge pin. "
"Out of order door latch due to a broken spring, it can be repaired as follows: the role of springs can be successfully performed by a cut of a rubber tube with a diameter of 15 mm or a piece of elastic rubber installed between the bolt and latch bodies. "
We offer a simple device for fixing the window frame in open position: a piece of wood or plastic with a row of bolt holes drilled into it. The plate is attached to window box screw.
"Cut in sheet material big hole can be done in a simple way: clamp a nail in a vice (it will serve as an axis) and a piece of a drill (this will be a cutter). The circle is cut by rotating the sheet around the axis. "
The old wooden floor has large cracks, irregularities, and it looks somehow not attractive. Therefore, many in the process of renovating an apartment prefer to make the floor, using, for example, laminate, parquet, and much more. A wooden floor, as a basis for laying other types of finishing materials, is in no way suitable. The surface must be carefully leveled. Suitable option in this case - laying OSB on a wooden floor and correct preparation surface.
Particle boards are a versatile building material and one of the most popular floor finishes.
Varieties of plates
From OSB sheets it is carried out by pressing wood chips with an adhesive mixture, and shaping the product into a flat sheet of specified dimensions and thickness. When gluing several layers, the technology of stacking sheets consists in the fact that each layer is placed with fibers across the previous sheet. This, in turn, makes the products durable and resistant to mechanical stress.
OSB boards
There are three types of chipboard on sale, differing in size and technical characteristics. Sheets are classified into categories:
- OSB - 2;
- OSB - 3;
- OSB - 4.
Products included in the OSB 2 list are sheets of pressed shavings intended for finishing floors in dry rooms. Slabs 3 are characterized by increased resistance to moisture, therefore they are better suited for flooring or partitions in the bathroom and kitchen. But if you need to do bearing structures, then it makes sense to purchase an OSB 4 slab, the thickness of which reaches 25 millimeters, and their installation is applicable in various areas of decoration.
Leveling the wood floor
There are many materials for leveling floor defects, and you can choose any of them. But, it is necessary to determine the choice taking into account the curvature of the floorboards. In this case, it makes no sense to install thin sheet plywood. Compared to chipboard and fiberboard, wood-based panels are highly durable, maximum thickness, depending on the product category. Correcting the curvature of a wooden floor yourself is not difficult. They are easy to install, do not require special technologies or devices.
OSB sheets are suitable for rough work on finishing floors, both concrete and wood, and preparing the surface for laying laminate. In addition, the material has a number of other functions, such as:
- strong foundation of the future floor;
- rough alignment of surfaces;
- soundproofing.
The presence of several layers of overlap prevents the penetration of extraneous sounds into the room and softens the impact with the floor when walking, and the room is also insulated. Modern production of OSB boards fully complies with environmental requirements. Manufacturers have completely abandoned the use of toxic substances.
Installation of OSB sheets
Laying roughing sheets is an easy way to create a reliable and even subfloor. If the main wooden floor has a large drop or unevenness, you will have to level the level using small lags, onto which OSB will be nailed from above. Fixing bars are mounted at an equal distance from each other, with the calculation of the joints. For greater reliability, the underside of the sheets is covered with waterproofing.
If you plan to later lay the laminate, then you will need to make steam insulation over the OSB sheets with a special foam film. This will prevent moisture condensation, which destroys the structure of the wood.
To fix the OSB to the floor, it is nailed with nails of the required length, or screwed to the supports with a step of 30 centimeters from each other. You can calculate the fastening length by multiplying the sheet thickness by 2.5. This optimal length will allow you to reliably fix the material to the base.
So, for the installation of canvases and leveling the floor, you will need the following tools:
- a hammer;
- nails;
- screwdriver;
- self-tapping screws;
- roulette;
- hacksaw;
- thin timber for the formation of a lag.
The joints should fit snugly against each other, and the fasteners are driven to the end into the surface of the sheet. Installation of chip material is not very difficult, the main thing is to adhere to the accuracy of the technology and be careful. Then the floor will be both even and durable.
Two types of laying are used: on logs and using a point support. The actions are not complicated, you can do it yourself. Lags are wooden beams, laid from one wall of the room to another, in one direction. Point fixing is the installation of small cobs, in the form of a grid throughout the floor, with a mesh size of up to 35 centimeters. With a sheet thickness of 20 millimeters and above, you can increase the distance of the cobs up to 40 centimeters. The frequency of the supports will provide resistance to dynamic surface stresses.

Installation of OSB to logs
In the corners of the room, holes are made in the floor sheets so that air can pass under the floor and mold does not occur. All joints with walls and between canvases, as well as air ducts, must be glued with gauze with PVC glue so that insects living under the floor do not go up.
Preparing the old coating
Before placing the pressed chipboard on the floor, it is necessary to prepare old surface... Special equipment will help clean the paint from wooden boards or even remove them if possible. This is followed by a step-by-step process:
- the old coating is removed;
- the floor is treated with a primer;
- oSB sheets are mounted;
- strengthened with nails or self-tapping screws.
When there is a need for a raised floor for communication, for example, in an office, then a good option - this is laying OSB on a wooden floor with a pre-engineered frame. Sheet floor material is placed on top of it.
Another problem that home owners face is the creaking of the old floor. Here, no matter how you align, the sounds when walking will not go anywhere. In order not to redo the repairs in the future and prevent the creaking of the boards, they are nailed to the logs, each individually. Self-tapping screws are twisted at an angle towards the log.

Floor installation
Processing slabs for finishing
The floor is leveled, the wood sheets are laid. Now we process them to finishing... Of course, if the natural pattern of OSB suits you, the floor can be left as it is, varnished, installed a baseboard and that's it. Or you can put any other type of finish on top. The surface of the slabs and the peculiarities of their processing are determined by the type of finish used that will cover them.
- Clean finish. Chip blades are used in their original condition, but the surface must be protected from destruction and wear. On top, several layers of varnish or a special substance are applied to prevent the appearance of bark beetles and other insects.
- Linoleum or carpet. Roll materials require a perfectly flat floor. Any differences at the joints and gaps negatively affect the operation of linoleum, and on appearance it will not look very pretty. Under the elastic carpet, cracks and other bulges from drops or screws will be felt. The floor is best looped to reach one level.
- Ceramic. The base should be stationary, especially if the sheets are laid on logs. The surface is sanded with emery paper or a metal brush, and the tiles are placed on a special glue that connects ceramics and wood.
- Laminate. This is a rather tough and durable material, equipped with a special mount, so there are no special requirements for the floor. The main thing is that everything is smooth. These recommendations will help make the interior beautiful and practical, functional and durable.
Advantages over other materials
Despite the simplicity, OSB boards are multifunctional. They are used in various areas of the construction industry, in rough and fine finishing, construction of structures and floors. This material has a lot of benefits useful to the consumer:
- Simplicity. There is no need to buy special equipment or tools for installation. Anyone can do this work.
- Convenience. Due to its dimensions, one OSB board is leveled big square rooms. The length is designed for installation of lags with a step of 56 centimeters, which allows you to insulate the space under the floor.
- Cheapness. The cost of OSB is optimal, and the price-quality ratio will delight consumers.
- Durability. Plates are well fixed with popular fixing elements, do not deform, do not loosen and withstand stress perfectly.
OSB is one of the newest and most practical flooring materials that is gaining popularity every year. Now you do not need to think long about how to level the floor using OSB. Compared to other similar products, they are resistant to moisture, wear and tear and mechanical stress. An excellent specimen for its price category, meeting the requirements for building materials, and, importantly, multifunctional.
Very convenient and multifunctional material for different construction works - oriented strand board. Since the production technology of these slabs is not complicated, for interior finishing work, the master can choose a specific option from four types of OSB slabs, or consider special types of these slabs.
What are the sheets of these products made of? It's simple - wood chips are used (flat fragments are used), shavings: these materials are glued together and, in fact, an excellent finishing material is obtained. Three or four layers of chips or shavings - these are the indicators that can be called optimal. Installation of OSB on walls is more preferable than using the same chipboard.
However, oriented strand boards are a kind of modification of wood fiber material, a kind of modern analogue of it. If finances allow, it is better to choose OSB for facing work (plywood or particleboard is increasingly being abandoned today).
Scope of OSB, classification of plates
Before considering the classification of slabs and deciding what is the best way to decorate walls from OSB, it is important to pay attention to the characteristics of such material.
Types of OSB boards
Here everything is as follows:
- First class OSB boards - they are usually chosen for such premises where the level of humidity is low;
- Type two - the material can be safely chosen for dry rooms, it is even used as structural element during construction work;
- 3 type of OSB - these boards are used in those rooms where there is a high level of humidity;
- The fourth type of such products is used for cladding structures that are able to cope even with significant mechanical loads. Moreover, we are talking about conditions where there is a high level of humidity.
Application area

One thing can be said about the field of application - the installation of OSB is a really urgent task, since such plates are used in many construction aspects.
It's just that this material has such a manufacturing technology, due to which all internal defects are simply excluded (at the same time, Chipboard sheets they quite often appear - voids, uneven fillings). Due to all this, OSB is more preferred option - it does not deform, does not shrink.

And now in detail - where exactly can such material be used?
- Often for walls, OSB cladding is a very profitable solution. Due to this approach, the house receives reliable protection from dampness, while also acquiring additional insulation. The nicest thing here: in additional finishing works there is no need after OSB installation;
- In the construction of frame-panel houses, OSB plates are usually used, which have a high level of moisture resistance;
- Since the material has such a valuable quality, a decent reusable formwork is obtained from it;
- It is used as a base when doing outer cladding walls as well as internal works - if finishing of wooden country houses, cottages (from a bar, rounded logs) is carried out;
- OSB boards are yours faithful assistant, if you are making crate, roof rafters. This material can work even under a serious load - it will definitely withstand the weight of not only the roof itself, but also all the accompanying loads (wind, snow) - even if natural tiles were laid on the roof (material that weighs a little);
- If in the house you need to level the floors or lay them from scratch - here again you can pay attention to the installation of OSB. It's just such a stove - perfect option to create a very solid, even base. Better not to find under plank floorboards, carpets or other coverings;
- Pay special attention to the process when it is necessary to fit the joints of the plates along the plane. If necessary, they must be equated - there is no way without it.
An interesting point - not every manufacturer can use OSB boards as underlying layers - in the case of organizing floor coverings... And the panels are laid so that the smooth side is up.
What else does the master need to know? Following:
- It is not necessary to apply an additional protective coating in the form of paint or varnish to the plates - the material initially has excellent protection in the form of a special impregnation;
- It is not that difficult to process boards - just like ordinary wood. Screws, nails adhere perfectly to the surface. OSB boards are not afraid of rotting, fungal influences, decorative qualities such material at a height;
- OSB panels today are often used in furniture production - after all, this is a great alternative to natural wood mass (but in terms of cost - it is significantly more profitable);
- The material does not weigh so much - therefore, it is perfect for finishing, construction, painting and more.
How to finish a house faster

It is quite logical that any owner wants to move into his house faster - especially if the construction is being carried out independently. Private cottages are located separately from neighboring buildings - so in such a design you don't have to worry about your neighbors.
Here a well-grounded question may arise: maybe not to make a rough sheathing - but to immediately attach the finishing OSB materials directly to the frame racks?
Is this approach acceptable, or is it excluded?
If you pay attention to the instructions drawn up by professionals, it will immediately become clear: you cannot do this. There will also be reasons for this conclusion. Simply, it is important to insulate the house - only in this situation it will be comfortable in it (especially, in the Russian Federation, winters are cold - almost throughout the territory).
Why are frame cuts required at all - lower and upper? Everything is simple here: they form spatial rigidity - together with the skin. They can also be called mandatory elements, if we consider the design of any frame structure.
A frame that does not have slopes, even with cladding, will retain its mobility - as in the case when there are any. However, if there is no cladding, you can imagine what the consequences might be.
External rough wall cladding

For rough plating, they use a lot today different materials... There is definitely a choice - everyone will agree with this. Pay attention at least to the following options:
- Board;
- OSB plates.
Any of these surfaces needs a final finish: it can be plastering - with a mesh or a layer of foam. It is believed that even boarding can be left as a final finish - but in this case, the wood will need to be processed additionally. Hydro-wind protection of the walls is also arranged under the boards.

You should take into account the following: it is not recommended to trim the frame with a board - without rough, preliminary lining of OSB plates. Otherwise, there is a risk that the boards will unscrew in the fall or spring. In addition, it is important for the spatial rigidity of the frame.
You will get fewer joints due to the area of \u200b\u200bOSB sheets - which cannot be said about working with other materials. OSB trim is usually done with a material whose thickness is 11-13 mm.
Let's consider in more detail:
- The OSB boards are fastened to the racks so that there is a joint in the middle. And a small gap should remain between the plates - three to five millimeters are quite enough;
- The sheet completely overlaps the lower strapping;
- The upper harness is closely connected with the number of storeys of the house. It will be completely hidden - and the edge of the OSB slab will be aligned with the edge of the strapping if the structure has only one floor;
- When a building consists of two floors, the sheet is arranged as follows: it must go onto the racks of both floors at once. But somewhere in the middle of the sheet, the upper harness overlaps. This condition cannot be called mandatory, but if it is met, the rigidity of the structure increases significantly, which benefits the structure;
- Sheathing with OSB plates, when fastening to a window opening in two-story houses, should be made with a solid sheet - this is what professionals advise. Then all the joints can be taken out to adjacent posts outside the opening posts. A window opening is simply cut into the slab - there is nothing complicated in such work;
- When horizontal or vertical bridges are made in the frame, a very convenient joining of plates is obtained. In the event that these jumpers have the same section as the racks - and this happens often;
- Spiral nails are selected for fastening. Self-tapping screws are also suitable - 0.5 or 0.45 cm long. It is also not worth giving up the combined fasteners (both nails and screws) - such a solution is considered very high quality.
Remember that basic rules performing fastening work must be observed.
Namely:
- It is customary to fix the finishing of OSB plates in intermediate sections every 300 mm;
- After 150 mm, fix the places where the plates are joined;
- After 100 mm, the outer edge must be stitched.

So that a crack does not go through the material due to too zealous fasteners, a distance of 1 cm is maintained from the edge of the plate to the place of fixation (a little less is possible).
- A gap of 4-5 millimeters is left between the plates so that they do not warp. Fasteners are 4-5 cm driven into the rack;
- The part of the OSB board that is vulnerable (you can say this is the "Achilles heel" finishing material) - ends. To ensure the protection of these areas, gaps are provided, which are called expansion gaps (between the crown beam and the upper edge, also between foundation wall and bottom edge). Here the gap will be 10 mm. And between those slabs where there is no groove-ridge, 3 mm is quite enough;
- To seal these expansion joints, apply a sealant on acrylic base... It is important that he carefully fills all cavities - and that this work is done evenly;
- Wind protection, waterproofing - all these tasks will be performed by a superdiffusion membrane, which also has the property of vapor permeability (this figure is 750 g / m² or more).
Using polyethylene, various films, glassine - the masters do not recommend. It's just that these materials have a low vapor permeability level, all excess moisture must be reliably eroded.
Also, you should know:
- The superdiffusion membrane is set depending on what the rough material is, what is fine finishing... For example, the membrane is often attached close to the insulation - to the frame racks;
- They make a crate (here they use wooden slats, the cross-section of which is 2 by 5 or 3 by 5 cm. Thanks to this design, the required gap will be achieved. Then you can finish the surface of OSB with plates, LSU, DSP or sheathe boards;
- From inside the room, using the film, you can make the vapor barrier of the walls. The material is installed in such a way that it fits snugly enough to the insulation. A construction stapler is used for fastening. An overlap is made of joining - 150-200 mm, the joints must be glued with tape.

For such work, you can choose the simplest adhesive tape - there is no need to use construction material... Vapor barrier tape is also suitable.
- To perform vapor barrier, foil-clad polyethylene can be used, which will not thicken the wall insulation (main). Foam material is also often used for this task - this practice is common in our time.
Finishing the structure inside

Which is better: OSB cladding or plasterboard cladding? Many are unequivocally in favor of option number one - when it comes to interior finishing work in the house. It is quite difficult to keep the frame racks in an absolutely level state - when work is in progress, the same applies to drywall.
It's just that the sheets of this material are softer when compared to the osb plates. They will easily repeat all the irregularities - so then you have to work hard to get a completely flat surface - more layers will need to be applied to align.
The OSB board is an order of magnitude harder in structure than drywall sheets, so that all flaws can be smoothed out to a certain extent. After that, they already begin to perform work related to finishing.
Watch a video about how OSB plates are used for interior decoration. This material will definitely be useful if you don't have a lot of building experience.
OSB-3 boards and roofing works

Roofing work is a very popular way to use material such as OSB boards. By the way, to cover the roof with OSB-3 slabs, a material thickness of 0.18 cm is quite enough.
In order:
- Both the locking and the flat edge can have products. The first option is preferable;
- Between load-bearing beams the distance should not be more than 609 mm - this applies to both the organization of sloping and flat roofs;
- Whether the slabs are able to expand is of great importance. For every running meter it is customary to leave a gap: 2 mm is quite enough (believe me, this is enough);
- When plates with even edges are laid, the gap is already made a little larger - 3 mm. Leave it around the perimeter of each plate - this is the only way to achieve optimal results;
- To fasten the OSB to the roof, choose nails. Attached to supporting supports. There must be a distance between them: 10 cm or even more;
- Finishing OSB boards is attached with nails - they must have a length that exceeds the thickness of the board two to two and a half times (or even more) - this is quite normal.

If the interior is finished using OSB panels, then the following can be noted: a slab of polished panels will look better if appearance is very important in your space. For finishing such plates it is better not to use ceramic tiles or wallpaper - this is what the manufacturers themselves recommend. And it's best to listen to their opinion!
OSB (OSB) or OSB (oriented strand board) is a modern structural material that has become a serious alternative to plywood, chipboard and is widely used in construction frame houses and decoration of buildings and structures. Internal and external walls, floors and roofs are sheathed with OSB boards. Wall cladding with OSB plates takes place in frame construction, when the plate acts as a structural material and serves to strengthen the walls of the building, or when it acts as a facade material for concrete, brick or wooden houses, which is caused by the low price and high strength and durability of the material. In this article we will consider the question: how to fix OSB slabs to the wall from the outside.
For cladding external walls, it is necessary to use boards with the OSB-3 brand, specially made for an environment with high humidity.
When installation of OSB slabs to outer walls, lathing are used for the following purposes:
- alignment of the wall plane;
- creating a ventilation gap for insulation under the OSB slab;
- prevention of deformation of the slab caused by base movements is especially important for OSB slabs with a thickness of 9 mm or less.
Fastening OSB slabs to the wall over insulation using lathing
Fastening the slab to the wall is carried out using lathing, which is made from wooden block, or a metal profile. The technologies for mounting OSB boards on a wall with wooden lathing and metal profile lathing do not fundamentally differ. When choosing a bar, it is advisable to choose a dry, planed bar of 40-50 mm, then it will not turn out and will not lead after drying, which will positively affect the evenness of the entire wall.
To attach the bar and profile to the wall, special metal plates (suspensions) are used. Before attaching the hangers, you must draw on the wall vertical stripes, the distance between which should be half the width of the sheet, which subsequently, will ensure the joint of the slabs right in the middle of the bar or profile and will make it possible to fix the OSB slab in the center along its entire length. After the lines are drawn, suspensions are attached along them in increments of 30-40 cm.
The metal hanger is used to fasten the battens.
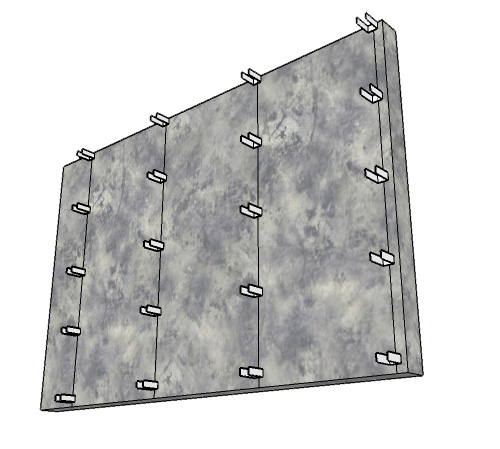 Suspensions are attached along the marked lines. Hangers allow you to fix the crate over the insulation.
After that, the insulation is laid and covered with a membrane that protects the insulation from moisture, after which the crate is mounted.
It should be noted that vapor barrier is not needed outside the building, since it prevents moist air from entering the insulation from the inside of the room, and from the outside of the building, excess moisture should freely go outside.
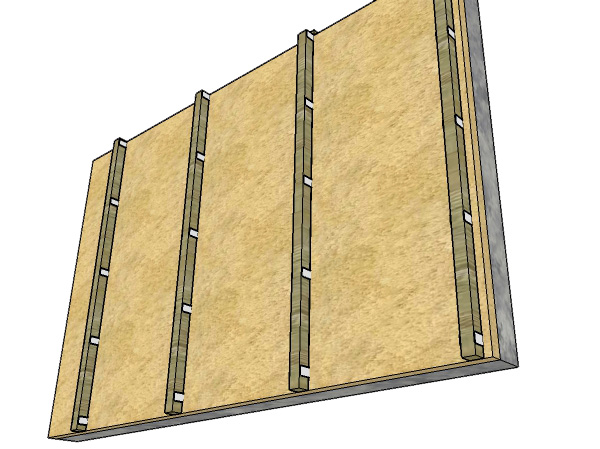 Wall with lathing. Insulation is installed between the crate and the wall.
 After fixing the lathing, you can proceed with the installation of OSB boards. For wall cladding, a 9 to 12 mm thick slab is most often used. If a facade is not mounted on top of the slab, then the slab must be moisture resistant. To the crate of wooden beams OSB boards are fastened with nails at least 2.5 times the OSB sheet thickness. To the crate of a metal profile - on self-tapping screws for metal 10-15 mm longer oSB thickness sheet.
With this installation, the crate weighs over the insulation, and does not create cold bridges in the insulation between the wall and OSB boards. Thanks to this solution, the maximum efficiency of the insulation is achieved. In addition, there is an air gap between the battens of the sheathing through which moisture is removed from the insulation, which also increases its characteristics. For more information on ventilated facade technology, see the article: ventilated facades, types of ventilated facades.
Fastening OSB boards to a wooden frame
When building frame houses with timber frame two main approaches are used: fastening OSB sheets to the frame through the lathing and fastening the OSB sheets directly to the frame without lathing. Consider the case of fixing OSB boards using lathing.
When with inside walls, strong slabs are attached to the frame, ensuring good rigidity of the wall structure, then a crate can be made from the outside between the frame and the OSB plate. The lathing forms air cavities for ventilation of the insulation and reduces deformation loads from the frame to the OSB board.
Insulation is placed between the frame posts. On top of the racks and insulation, a wind and waterproof membrane is attached, which easily permits moisture. Next, the crate is attached and the OSB slabs on it.
 Installation of OSB boards on a wooden frame with lathing.
 With this design, the slabs can be left without finishing, you can paint them, plaster or fix almost any facade material on them.
When fixing OSB boards without using a crate, the maximum rigidity of the wall structure is achieved. In this case, it is recommended to fasten the wind and waterproof membrane behind the OSB plate, then mount the crate to create a ventilation gap and front material, such as siding, boards or decorative panels, on it. OSB boards are attached to the timber frame with nails at least 2.5 times the thickness of the OSB sheet.
The advantage of using nails over self-tapping screws when fixing OSB from the outside of the house is justified by the fact that nails better tolerate deformation of OSB sheets under atmospheric influences.
 The technology of fastening OSB sheets to a wooden frame without the use of crate.
 Fastening OSB boards to a metal frame
Fastening is carried out in the same way as with a wooden frame. When fixing boards directly to metal frame use self-tapping screws for metal 10-15 mm longer than the thickness of the OSB sheet.
General rules for mounting OSB plates to the wall
Regardless of the chosen method of fixing OSB sheets, there is general rules, compliance with which will ensure maximum strength, reliability and durability of the skin structure.
- Self-tapping screws should be screwed in at a distance of 10-15 cm from each other and at least 1 cm from the edge of the plate.
- A gap of 10 mm is required between the bottom plate and the foundation to prevent water accumulation.
- Plates cannot be joined close to each other, a gap of 2-3 mm is required between them, so that the plate can expand unhindered by changes in humidity.
- All door and window openings are cut with a jigsaw or circular saw, but if you need perfectly smooth joints and cuts, then you can come to the furniture shop with ready-made dimensions and OSB sheets, where for a small fee they will saw your sheets on a panel saw exactly and exactly to size.
Oriented strand board or OSB is an indispensable attribute of any modern construction site. The material is used for both outdoor and interior decoration, can play the role of a supporting or connecting element, for example, in a roofing cake, or maybe independent decision, say, in the role of interior walls or ceilings.
What self-tapping screws to fix OSB depends on design features structures and places of direct installation of particle boards.
 OSB's versatility is truly unmatched. It is used with equal success at any stage and cycle of construction.
In order to consider everything possible options fastening OSB plates, it will be convenient to divide their installation into several main groups:
- roofing;
- wall;
- floor.
OSB fastening methods for roofing works
Installing OSB boards as one of the layers of the roofing cake requires increased attention to strength characteristics, both the material itself and the fasteners used in the work.
Considering significant wind and snow loads on the roof plane, as well as the fact that roof structures are not static, rigid structures, specialists are advised to pay attention to the following points:
- when laying OSB on the roof, priority should be given to special "ruff" or ring nails;
- phosphated self-tapping screws used in the OSB installation are more fragile and have less strength when the structure moves;
- the final choice of which self-tapping screws to fasten the OSB to the frame is up to the craftsmen and depends on the climatic conditions in the construction area;
- the length of nails or self-tapping screws used in roofing works is calculated using a simple formula: OSB sheet thickness + at least 40-45 mm at the entrance of fasteners into the frame;
- that is, if OSB dimensions of 9 mm, 12 mm, 15 mm are considered standard, then, therefore, the length of the self-tapping screw will be in the range of 50-75 mm;
- the fastener card looks like this: along the rafters, the pitch of the screws is 300 mm, along the joints of the plates - 150 mm, along the cornice or ridge cut - 100 mm and the indent from the edge of the sheet - at least 10 mm.
Conclusion! When installing OSB on the roof, you should give preference to special nails, due to their greater shear strength!
Vertical or wall installation of OSB
What screws to fix OSB in case wall mounting? The question has an unambiguous and very specific answer. If the recommended standard thickness used for vertical installation oSB sheets, is equal to 12 mm, then, accordingly, adding to this value the minimum required by the rules of 45-50 mm of the self-tapping screw body in the rack or frame, we get the answer -50-70 mm.
The fastener card is the same with the roofing one: in the middle of the sheet, the fasteners go with a step of 300 mm, at the joints of the slabs, the step is reduced to 150 mm, the sides adjacent to the ceiling or floor are fastened every 100 mm. The distance from the edge is standard - 10 mm.
The choice of the shape of self-tapping screws for vertical mounting is due to the need to hide the head flush with the wall plane. That is why self-tapping screws with a poppet head are used on the facades and external planes of buildings, which, when screwed, not only sits in the sweep, but also does not prick the wood, preserving the appearance of the wall.
Self-tapping screws for wall mounting can be replaced with spiral or ring cut nails. Their length is determined by multiplying the OSB thickness by a factor of 2.5. In our case, this is: 2.5 * 12 mm \u003d 30 mm. This is the minimum length allowed.
Installation of OSB sheets in a horizontal plane: floor / ceiling
It is not worth dwelling in detail on the choice of self-tapping screws for mounting OSB on the ceiling. The scheme, number and size of self-tapping screws used for these purposes repeats the above examples exactly.
The choice of screws and the drawing of fasteners when floor laying OSB are determined by the basis on which the material is laid.
If it is girder or rack framethen phosphated self-tapping screws with a body length of at least 50 mm and a countersunk head are the ideal choice.
When stacking osb on a rough, solid floor, galvanized self-tapping screws with a double thread are suitable. The procedure for determining the optimal length is indicated above.
 If you read the article carefully, you have already noticed that regardless of the location of the OSB installation, the fastener card remains the same. Accordingly, the number of screws required for work will generally coincide.
The average consumption of self-tapping screws when installing OSB is about 30 pcs. per m². Accordingly, for the installation of a standard sheet, you will need about 75-100 pcs. self-tapping screws.
Now you know which self-tapping screws to fasten OSB for high-quality and durable use of plates in combination with other building and finishing materials.
Advice! When buying, do not chase low prices and check the quality of the screws. There are enough cases of marriage. And at the construction site there are no trifles!