You need to build a fence on suburban areabut you do not have the financial ability to hire workers. How to be the most unique and refined and at the same time spend the minimum amount of money?
To build a fence in the country, you need pillars and crate. The posts can be metal, concrete, wood or brick.
What you may need during construction
With such a construction, it is necessary for high-quality work to have such a tool:

- shovel;
- roulette;
- lacing;
- construction wheelbarrow;
- (depending on your preferences and capabilities);
- hammer;
- screws or nails;
- brush and paint;
- concrete mixer.
Fences separate your land plot from neighboring properties, from the street, from the penetration of third parties.
In addition to its functional qualities, the fence must be strong, durable, and the part facing the street must be attractive.
How to make a fence yourself - many summer residents ask themselves this question. First of all, you need to study what parts the fence consists of. Then purchase all the parts you need and only then start building the fence.

The crate for the fence can be made of any material: chain-link, corrugated board, boards, willow, etc.
- The fence consists of load-bearing parts and lathing. The role of load-bearing structural elements is performed by pillars, on which sledges, wire, frames are attached.
- You can make the lathing from any material available to you. It can be brick, metal, slab, slats, boards, willow, any material suitable for this.
You have decided to make a fence out of wood. To do this, you need to make pillars. For their manufacture, use logs or timber. Treat its lower end with an antiseptic, you can cover it with resin or wrap it with roofing felt, roofing felt - this will extend its durability. Make the upper end on a bevel, then rainwater will drain from it to the ground, and not fall inside the tree, you can cover it with decorative roofs. With the help of cuts or overlays, the legs will be attached to the posts.
The legs are fastened to concrete and metal posts with clamps, brackets and brackets.
Back to the table of contents
If you want to make the fence cheaper, you can make concrete pillars yourself. To do this, make molds from boards, inside they must be sheathed with sheet metal. It is best to make several molds and fill them with concrete at the same time.

Scheme brick pillars for the fence.
- It will take some time for the concrete to dry. Frame concrete pillars must be made from 6-8 mm wire. It is inserted into a mold and everything is poured with concrete. Do not forget to provide staples to which you will then attach the sleeves.
- You can drill holes for pillars with a hand drill 70-90 cm deep.If the pillars are of large diameter, then prepare pits with a depth of 70 cm for them. Be sure to fix the installed pillar with broken brick or crushed stone, fix the boot concrete screed or a clay castle.
- Brick pillars are placed on a foundation made of concrete, brick or rubble.
Fences made of wood are still the most popular, despite their relative fragility. Optimal term their service is 12-15 years. Sleighs for wooden fences are made from timber, thick boards, poles. They are attached to the posts with nails and staples.
One of the main advantages of wooden fences is the ability to make them from a cheap improvised, local material: brushwood, sanded poles, willow.
A picket fence is easy to erect and does not require large labor and financial costs.
- You clean the perimeter of the future fence from all unnecessary items, as well as from bushes and other plants. Drive in pegs at the edges and pull a string between them.
- Dig in the pillars at a distance not exceeding the length of the bed. Check the verticality of the posts with a level or plumb line.
- Fasten your legs to the poles, nail a picket fence onto them. You can nail it horizontally, vertically or in a checkerboard pattern. Cut the upper ends of the picket strips into a bevel, then the water will flow from them to the ground. A wooden fence must be covered with paint, which protects it from decay and wear.
The metal mesh can serve as the main part for making a fence. It is mounted on metal, reinforced concrete or wooden posts. The lower edge of the mesh is located at a distance of 10-12 cm from the soil. If you need, then this gap can be closed with stone, rubble or boards.

The scheme of the gate made of corrugated board.
Pull two supporting wires between the posts, on which you will then attach the metal mesh. It is better to do this together. Unwind the net and lay it along the perimeter of the future fence.
Connect the individual pieces of the net to each other soft wire... Insert a piece of reinforcement into the edge of the mesh and fix it on the corner post. Lift the mesh fabric and temporarily fix it on the upper supporting wire. When there is m left to the second corner post, insert the reinforcement into the mesh and pull it, then fasten it to the post. Tie the net to the supporting wire at a distance of 30-40 cm.
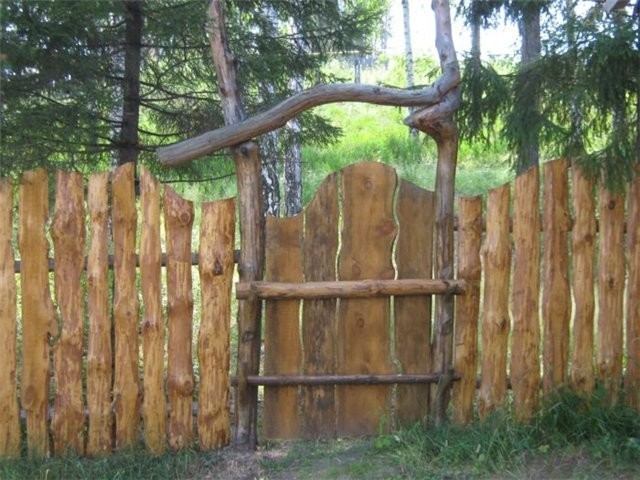
Making around suburban area fence, you need to install a wicket or gate in it. They should be comfortable and durable. Usually wood or metal is used for their manufacture.
The arrangement of a summer cottage necessarily involves the installation of a fence. It has an important function to protect adjoining territory from the penetration of unwanted guests, animals and prying eyes. Also, the fence clearly marks your entire territory. Today fences are of various types.
Country fences can be made of a variety of materials that have their own distinctive features... In this article, we will divide all existing structures according to the classifications of their structures and materials used. We will present to your attention the main types of fences for summer cottages. After that, it will be much easier for you to make your choice.

Classification of fences by design
There are 3 types of design classifications:
- Open.
- Deaf.
- Combined.

An open fence in the country is used very often. He has many positive sides... For example, its construction will be quite cheap. In addition to saving on building materials, the pace of its construction is greatly accelerating. In literally a short period of time, you will have a new open fence at your dacha. Open does not give much shade. This allows a variety of plants to be planted, especially those that require sunlight.

As for deaf structures in the country, such structures are mainly built with the aim of protecting their territory from prying eyes. Plus, less dust penetrates through the solid fence in the country. There are plants that are unpretentious and can be planted along a blank fence, even if there is a lot of shade there. Some summer residents even plant fruit trees.
The last type of construction is combined. These can be both the simplest structures and complex ones. There are no special rules here. For example, a part can be deaf, and some elements are open. In this case, you can use various building materials and technologies. It all depends on your vision of the whole situation. This article provides many options for fences for a summer residence in the photo. This will help you make your choice.

Advice! When choosing a fence design for a summer residence, consider who your neighbors are, the landscape, financial capabilities and personal preferences.
Material classification

Now we come to a more voluminous section that requires serious research. Modern market offers a wide variety of building materials that allow you to build a simple fence in the shortest possible time. We suggest you consider the following categories:
- Wood.
- Metal.
- Polycarbonate.
- Concrete goods / brick.
Wood

If we talk about the availability of material, then wood the best option... The wood fences built in the country house are distinguished by their durability and beauty. However, such a structure requires special and regular maintenance, for example, from time to time to paint and replace rotted elements of the fence. Plus, it is recommended to treat wood with fire retardants and other antiseptics in order to protect it from negative effects. environment... As for the other disadvantages, it is the likelihood that, under the influence of atmospheric phenomena, wood can crack, change color, and so on.

Today there are many varieties of what fences can be built from wood in the country. For example, a log house is often used. Beautifully laid horizontal beams will give your cottage a beautiful and unique look. Some set the bars vertically. This is a more time consuming process, but the result is worth it.

Among other things, a picket fence is used. This is a classic option for building a wooden fence for a summer residence. In this case, the structure can be open or deaf. Using a picket fence allows you to grow different flowers near the fence. Light can penetrate through the picket fence, which will have a beneficial effect on the development of plants. So if you want beautiful fencethen the tree is not a bad solution. However, remember that before installing it, it is necessary to make high-quality preparation and processing.

Metal
Today you can find many original metal fences for summer cottages. This includes forged fences, from a chain-link mesh, corrugated board, reinforcement, and more. Let's consider some of the features of these materials.

Profiled sheeting is often used for the construction of a deaf structure. Its main distinguishing features are durability and reliability. On the market, corrugated board is presented in different color solutions.
Attention! Installation of a fence made of corrugated board in the country is a troublesome business. It is important to be careful not to deform the decking during installation.

For such a fence, it is necessary to build a columnar foundation with metal supports... During work, it is necessary to use a welding machine to weld the crossbars, on which the sheets of corrugated board will be attached directly.

You can also make a metal picket fence. This is a good alternative to the corrugated board structure. By appearance, such a fence looks much more beautiful. You can also do it yourself. As a basis, it is necessary to install metal support posts and weld the crossbars. The structure of the frame is the same as that of the corrugated board fence.
Advice! For a more attractive look, the support posts can be laid out from natural stone, and fill the spans with a metal picket fence.

Mesh fence also falls into this category. The metal mesh-netting will last more than one year. This is the kind open building... To install it, you need to install the support pillars. They can be metal and wood. On the market, the netting is sold in different colorssolutions. Although we are talking about a metal mesh, this material is also made from plastic.
Concrete goods or brick
If you want to build a capital fence, then, by the way, reinforced concrete structures or bricks are suitable. These materials are durable. Their construction requires a lot of financial investments and labor costs. But the end result will allow you to long years and even more than one generation to use it. There are many construction technologies. You can see the fences for the summer cottage in the photo below.

Polycarbonate
This type of fence looks pretty original. Polycarbonate is available in different colors, which allows you to build a beautiful fence for a summer residence. It is worth noting that this material is quite fragile. Therefore, there is always a risk of damage. Plus, polycarbonate can be combined with other materials. For example, build pillars of bricks, and fill the spans with polycarbonate.
Fences made of scrap materials

This type of fence can be built from the very different material, which is in your country house. We invite you to consider several options. For example, a hedge can be wicker. For this purpose, willow rods are collected and a fence is woven from them for a summer residence. It is very cheap and does not take a long time to build.
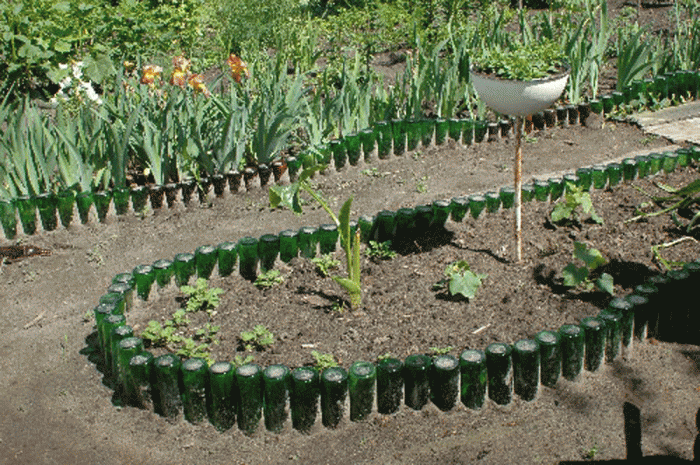
There is an idea for using plastic or glass bottles different colors. Also, some craftsmen build fences in the country from old car tires... They can be staggered. Beds with fresh flowers are often planted near such fences. In a word, there are many options for making fences for a summer residence from scrap materials. The main condition is to connect your imagination and creativity. You can use the remains of building materials, combine them with each other. The end result is a beautiful combination.

Conclusion

So, we have considered with you the most different variants fences that can be built in the country with your own hands. Certainly, some of them require large financial investments and labor costs. Some fences can be made quickly and relatively cheaply. The choice is only yours. On the Internet, you can also find a lot of ideas from scrap materials. This article has several photos on this topic.
Features of installing a fence at a summer cottage
The design of any fence includes supporting supports and cladding. The load-bearing supports are often vertical posts and horizontal spans, on which the cladding material is mounted, as well as gates and wickets.
Before creating a fence around your garden, you need to learn some rules and subtleties:
- According to building codes, fences between two adjacent areas should not exceed 1.5 m in height, and should not be deaf. This means that a solid fence with no gaps can be built only on those sides of the garden that face the street or adjacent to the road.
- When choosing the type of country fence and building materials for its execution, you need to take into account the type of soil on the site. The density and other characteristics of the soil will determine its ability to hold the structural supports in itself, which means that the foundation for the fence will also be selected taking into account this feature.
- Another important indicator is the wind load on the fence. In open and heavily blown areas, the wind load on the fence will be significant, so the sheathing and supports must be strong and reliable. In such conditions, it is recommended to trim fences sparsely, leaving gaps, as well as to create a powerful and well-buried foundation.
- The style of the garden also plays a role when choosing a fence, because the fence must fit into overall design, emphasize its features and beauty.
- Sometimes the height of the fence blocks the view and does not allow you to see what is happening outside. In this case, you should take care of installing a video surveillance system.
The choice of material for the construction of the fence
For the construction of a summer cottage fence with your own hands, many materials are suitable. Let's consider in more detail their characteristics, advantages and disadvantages.
A cheap, affordable and beautiful material is wood, about its positive characteristics we will tell further:
- It is quite simple to build a wooden fence and you can do it yourself, without resorting to the help of special equipment and craftsmen.
- Wood is relatively lightweight and does not require a massive foundation. The light weight also facilitates the installation of such a cladding.
- A solid wood fence protects the site well from dust, noise and prying eyes from the street.
- The wood is environmentally friendly, harmless, looks natural and aesthetically pleasing. It is easy to work with it, creating original decorative details.
- Solid sheathing perfectly protects from the wind, thinned - reduces the speed of the air flow.
- Wood can be combined with other materials: metal, brick, natural stone.
In addition to positive qualities, such a fence also has disadvantages:
Metal fences are considered popular types of country fences. As a cladding, corrugated board or chain-link is often used. TO positive qualities chain-link fence include the following:
- Ease of installation. It is easy to work with the mesh, it weighs little, it can be cut into the required fragments without any problems. It will not be difficult to make such a fence on your own, moreover, big square chain-link allows you to quickly enclose a significant area.
- Metal mesh is more durable than wood and will last at least 20 years.
- Such a fence transmits sunlight well, but prevents animals from entering the site.
- The metal does not burn, which can also be considered a plus.
Among the disadvantages of the chain-link are the following:
- The mesh does not protect the site from noise, dust, wind and prying eyes. But you can partially solve this problem if you plant with inside fence plants.
- The chain-link will not protect your home from intruders.
- Metal can rust over time, especially if it is not galvanized, painted or protected by a PVC layer.
- Galvanized wire mesh is a hazard to the environment as the zinc layer is gradually washed away by the rains and absorbed into the soil.
- Poor-quality polyvinyl chloride coating does not tolerate temperature fluctuations well and becomes unusable after several seasons.
Another popular type metal fence sectional fencing is considered. It has quite a few advantages, among which are:
- Duration of operation, which is at least 15-20 years.
- High strength, hardness, resistance to shock loads, endurance in front of temperature fluctuations.
- Good light transmission, the ability to protect the site from animals and uninvited bystanders.
- Fire safety.
- A variety of types, shapes, designs.
Sectional metal fences are not without drawbacks:
- They do not protect the site from dust, noise, strong winds, they are clearly visible from the street side, so that anyone passing by can look into the yard.
- The metal needs to be processed because it corrodes when exposed to moisture and water.
- Installing such a fence is not an easy task, it requires skills welding works and the availability of certain tools and devices.
A forged fence is considered a prestigious and expensive type of metal fence. It has practically the same performance characteristics as other metal fences: strength, long service life, hardness, light transmission, non-combustibility, the ability to protect the site from animals and intruders. But the main advantage of a forged fence is its aesthetics and high decorative effect. Such a fence emphasizes the status and prestige of the owner of the house, his well-being. Such a fence is quite expensive, requires professional installation, does not protect the area from noise and street dust, and also corrodes over time.
A stone fence is considered reliable and one of the most durable. It has the following positive qualities:
- Durability, the service life of the stone fence exceeds 50 years.
- Good strength characteristicsas stone is considered one of the hardest building materials. He is not afraid of frost and heat, easily tolerates temperature fluctuations.
- The stone is not destroyed by moisture, therefore it does not require any special protection.
- This material is environmentally friendly, safe for health, non-flammable.
- The variety of types and shades of stones is the reason for their high decorative effect. A stone fence can fit into almost any stylistic design of the garden, moreover, the material goes well with wood and metal.
- A stone fence will reliably protect the garden plot from noise, dust, wind. People passing by will not look into your yard, and even intruders are unlikely to overcome such protection.
Stone fences also have some minor disadvantages:
- The severity of the material suggests that a powerful and deep foundation will have to be laid under such a fence.
- The work of installing a stone fence takes a long time, requires significant physical effort. Putting such a fence alone is problematic.
- A stone fence will not cost so much to its owner. A massive foundation, materials for the fence itself, the cost of their transportation and the possible help of hired workers will require a lot of investment.
Cottage fences with their own hands, photo:


DIY construction of a summer cottage fence
Wattle: rustic romance
The vine wattle in the summer cottage looks very colorful, thanks to which in last years he gained considerable popularity. Despite the seeming complexity, creating such a fence with your own hands is not only realistic, but also not too difficult. The structure of the wattle fence includes wooden supports, the space between which is filled with rods. As supports, you can use beams, trunks, thick branches. The diameter of the supports, as a rule, is 8-10 cm, and willow or willow vine, poplar or birch branches are used for weaving.
Those who have on their site suitable trees and annually pruns them, they can use unnecessary rods to create a fence. But making a wattle fence from freshly cut vines is still much better than from last year's branches.
The process of creating such a fence can be described in stages:
- First, measure the perimeter of your site where you intend to install the fence. Calculate how many support bars you need for the wattle fence, given that they need to be placed at a distance of about 50 cm from each other. This indicator can be less or more, depending on the thickness of the posts. The larger the diameter of the timber and the stronger the wood, the larger the step between the supports can be.
- Prepare required amount grounds adding a small margin to them.
- All wood that will be used in the construction of the wattle fence, process protective compounds... Antiseptics will extend the life of the material, protect it from insect attacks, mold and mildew, and partially protect it from moisture.
- Then the tree for the wattle fence must be tarred, paying special attention to those parts of the supports that will be dug into the ground. As a rule, the length of these segments is calculated depending on the height of the summer cottage fence. If the height of the wattle fence is 1.5 m, then the stakes need to be deepened 50 cm into the soil.For lower fences, 30 cm will be enough.
- Drive the support stakes into the ground at an equal distance from each other, but first mark the location of the supports on the site. Short pegs can be driven in with a hammer, for high beams it is better to pre-make indentations using garden drill... The thicker the supports and the deeper they are installed in the ground, the greater wind loads the wattle can withstand.
- With help building level or a simple rope, check the evenness of the stakes and trim them all to the same height.
- When weaving a fence, you need to consider some rules. First, the thickest rods should be placed at the bottom and top of the fence. A thinner vine will work well for filling in the middle of the spans. Secondly, the rods begin to weave from the thick end. Thirdly, the thick and thin ends of the vine must be evenly placed around the entire perimeter of the fence.
- As soon as you weave the first few rows of twigs between the supports, fix the lower branch with a self-tapping screw or screw. This will prevent your fence from sliding down the stakes.
- If the wattle is planned to be made high, the upper row of rods must be fixed on the supports in the same way. So the structure will be reliable and will not move anywhere. In addition, the high fence also needs to be additionally secured with wire. Having stepped back from the top 20 cm, wrap the stakes with wire and wrap it between the supports. Such protection will allow the hedge not to bend under the pressure of the elastic vine. Steel wire will subsequently be masked by further weaving.
- Place the final row of rods a few centimeters from the top of the supports and fix with screws. If in the process of work there are protruding sections of the rods, cut them off with a hacksaw.
- The finished wicker should be protected from moisture by covering it with transparent varnish. Such processing will make the fence more beautiful and aesthetic.
The hedge can be decorated alive climbing plants, small pots with flowers and other accessories such as clay pots, straw hat, etc. Beautiful boulders can be laid out at the bottom of the fence, which will decorate the structure and give it additional strength.

American style wooden fence
The so-called "ranch" fencing, characteristic of American culture, can often be found on summer cottages in our country. A fence of this style is easy, the most important stage of the work is to select high-quality material and process it in the right way. Let's take a closer look at the stages of creating an American fence:
The finished American style fence can be painted or varnished with clear varnish.

Country fence made of corrugated board
A fence made of corrugated board is good because it has an affordable cost and is mounted quickly enough. The material itself is distinguished by good strength and long service life. Structural parts of such a fence are metal pillars and profiled metal sheets. A fence made of corrugated board is built in the following way:
- As in the cases described above, first you need to calculate the required amount of materials by measuring the perimeter of the territory and marking the places where the supports for the fence will be located. These points can be marked with small wooden pegs. The supporting elements should be spaced from each other at an equal distance, which can be 2-2.5 m. In the process of marking the territory, it is also necessary to indicate the places where the gates and wickets will subsequently be installed.
- It is best to use metal pipes with a cross section of 60x60 mm as support pillars. Their length will depend on the estimated height of the fence, taking into account the segment that will be dug into the ground. If the terrain at the summer cottage is uneven, has pits and elevations, pipes of different lengths can be used. The main thing is that the top of the fence turns out to be even, all the pillars are on the same level.
- The easiest way to bury the supports into the ground is in pre-prepared holes, which can be done with a garden drill or a shovel. The depth of the holes must be at least 60 cm.
- Having dug out recesses, pillars are placed in them and fixed with temporary struts. The verticality of the supports is checked with a building level.
- The free space between the pillars and the soil is poured with concrete mortar, the verticality is checked again and the mixture is left to solidify. This will take at least 3 days.
- Crossbeams are made of pipes of a smaller diameter, welded to the support pillars. If the height of the fence is not more than 1.5 m, then such girders are fixed only from above and below. For taller structures, you also need to make an intermediate beam in the center.
- After the construction of the frame, the metal elements are opened with a soil composition, dried and painted twice with enamel. This will protect the metal from corrosion.
- When the enamel dries, the fence can be sheathed with corrugated sheets. To do this, the sheets are adjusted to the desired size and screwed to metal framemaking a small overlap. The step between the fasteners should be approximately 25-35 cm.
It is advisable to additionally strengthen the finished fence made of corrugated board with a so-called dropper - a cornice bar U-shaped... Such a detail will give the structure additional strength and protect the fence from precipitation and moisture.

Picket fence in the country: simple, inexpensive and neat
A picket fence is one of the varieties of a wooden or metal fence. This simple structure is not difficult to create with your own hands, the materials are relatively cheap, and the installation process will be simple and quick. As support elements for the picket fence, you can use both wooden beamsand metal shaped pipes 6x6 cm in size.We will describe the process of building the fence in stages:
- In pre-marked places, supports for the fence are buried in the ground. To do this, holes are made in the soil, bars or metal pipes are inserted into them, and the free space is concreted.
- After the concrete has hardened, transverse logs are attached to the supporting elements. They are welded to metal pipes with an overlap. Then the structure is primed and painted.
- In pre-provided places, gates and a wicket are mounted on the support posts.
- The upper parts of the pipes are closed with plugs so that water does not get inside and the structure does not deteriorate.
- When the frame is completely ready, they begin to sheathe it with a picket fence. Picket elements can be metal or wood. They are screwed to the frame with self-tapping screws, observing the distance between the individual parts of 30 mm.
- The upper part of the fence is closed with a ridge-like bar, which makes the fence more decorative.
Fences for a summer cottage, photo:


Deaf fence on the site
Many people prefer to hide their everyday life from prying eyes, therefore, deaf fences are installed as a summer cottage. Such fences are not blown by the wind, they are not visible from the street, they are well protected from noise, dust, uninvited animals and even from intruders.
One of the varieties of a blind fence is a log palisade, for which trunks are used conifers... The cost of such a fence is quite democratic, especially if the foundation is not used to create it. The log palisade looks great in those areas where the frame is built. The fence can be installed on a pre-created foundation, or you can simply dig the trunks into the ground at 1/3 of their height. Depending on the chosen method, the required length of the logs should be determined.
In order for the palisade to look neat and stylish, the material must be selected of high quality. It is desirable that the logs have approximately the same diameter, belong to the same tree species, and have a smooth treated surface. The diameter of the beams can vary from 10 to 25 cm, but a palisade made of thick logs will be more reliable. To make it easier to drive the trunks into the ground, one end of them is sharpened in the form of a cone, using an ax for this purpose. Working with any type of wood also provides for its mandatory processing with anti-rotting antiseptics. Wood impregnate necessary formulations even before the installation of the fence, after which it is thoroughly dried.
The fragment of the trunk, which will be in the ground, is additionally covered with resin or creosote. Before installing the picket fence, they dig a trench along the perimeter of the site. Its depth should correspond to 1/3 of the length of the logs. At the bottom of the trench, crushed stone is poured with a layer of 10 to 15 cm. Then the bars are inserted with a sharpened and tarred end into the crushed stone, tightly joining them together. Having placed 3-4 logs in this way, the free space around them is filled with earth, moistened and tamped as carefully as possible. Then proceed to the installation of the next group of logs.
Having placed a picket fence around the entire perimeter of the site, it is painted in the selected color or simply covered with transparent varnish to preserve the natural beauty of the wood.
Please note: it is not recommended to pour concrete mortar into the pillars in the ground. Under the influence of temperature and humidity, wood and concrete will change their dimensions; a gap may form between the materials, into which water will enter. Soaking into the logs, moisture will gradually destroy them, so that the fence will become unusable in just a few years.
So that the palisade is more durable and does not move anywhere, it is advisable to strengthen the bars with transverse beams. Stepping back 20 cm from the top and bottom of the structure, cross bars nailed to wood.
Instead of digging logs into the ground 1/3 of their length, they can be installed on a pre-prepared foundation. In this case, the fence will last longer, since the material will not deteriorate from the moisture contained in the soil. In addition, in such a case, it will be possible to install the logs not only vertically, but to lay them horizontally, and this will look quite stylish.

A simple and cheap option is a chain-link fence
Many owners of household plots use a mesh netting to install a country fence. This fencing option is considered the cheapest, although it is not highly reliable. Nevertheless, the chain-link is able to protect the garden from the penetration of animals, and you can hide from the prying eyes of strangers using a hedge planted along the perimeter of the fence.
It is very simple to put a fence from a chain-link, the low weight of the material and the simplicity of working with it will allow you to do this in a short time. We will consider the process of installing the fence step by step:
- Along the perimeter of the garden, where the fence will be located, places are marked for future supporting elements.
- In these places, holes are dug and metal pipes are installed in them. Rubble and earth are poured around the pipes, they are carefully tamped. Hollow structures are closed from above with plugs so that water does not destroy them from the inside.
- Then, between the spans, the chain-link is tightly pulled. So that it does not sag, a thick wire is pulled in the upper and lower parts of the mesh, which is fixed on the posts with the help of anchors.
For a fence from a chain-link, a foundation is not needed, since the structure has a very low weight. In addition, the absence of welding work greatly simplifies the installation process.
Country fences, photo:


Country fence with your own hands. Video
First of all, the happy owner of a summer cottage wants to make a fence in the country with his own hands in order to protect his possessions. If you are puzzling over how to make fences, you need to know some of the nuances.
Types of fences: metal, corrugated, brick, slate, mesh, concrete, stone.
Why do we need fences and why are they erected? Everyone knows the main task of the fence - defining the boundaries of the territory's property. Second, the fence serves as a fence for your garden and garden from wild animals and prying eyes. The fence is an integral part of the interior in the country. It should be in harmony with your hacienda design.
How to put a fence in the country with your own hands? Some turn to specialists for help, others want to build a fence in the country with their own hands. Doing the installation yourself will not take much time and effort. It will also help you save some money. Before proceeding with the installation, arm yourself with all the necessary tools and materials.
Assembling a wooden fence

One of the common types of fence is wood. It attracts with its natural origin, availability and reasonable price. Of the shortcomings stands out short term service requires attention and processing. To build a homemade wooden fence you will need:
- support posts (asbestos, brick, iron, wood);
- bars (5-10 cm wide);
- boards (85 to 145 mm, height optional),
- self-tapping screws;
- screwdriver.
Prepare recesses 100-150 cm in size at a distance of 2 m, install stands in them. Next, fix the crossbars to the posts and screw them to the resulting board structure. Watch out for the door too. Now that the country fence is assembled, it must be treated with varnish or paint.
Fence in the country from profiled flooring
Another type of fence that you can make yourself from profiled flooring. Its exterior is not particularly pretty, but it is distinguished by its durability and does not require special maintenance. You can put up a fence yourself within a few days, for this you need to prepare:
- profiled pipes or racks with a diameter of at least 50 mm;
- flat profiled pipes for logs 40 * 20 mm;
- profiled sheets;
- roofing screws;
- hammer, drill, level, drill and so on.

If the inventory is ready, you can get down to business. When assembling a fence from corrugated board, you can concrete the racks for strength.
The process of installing a fence at a summer cottage:
- Holes are made in the ground with a depth of at least 1 m.
- The grooves are filled with crushed stone 20 cm in height, then determined in the resulting niche of the rack and adjusted to the level.
- Pour a pre-prepared concrete mixture or use a ready-made solution.
After the cement hardens, you need to weld the transverse pipes to the racks and fix the profile sheets with roofing screws. The profile decking can also be fixed with a special pistol. To riveted the deck, use a rectangular profiled tube for the crossbeams. Drill holes equal to the rivet diameter. Get a rivet and rivet gun.
A fence in the country from a chain-link
You can often find a country fence made of chain-link. It is convenient for those who grow vegetables and fruits, as it does not shade the area. Country fences made of chain-link mesh will last a long time. To put a fence from this material with your own hands, you need the following:

- chain-link;
- iron pipes (with a zinc layer and a section of 70 mm);
- intermediate pillars (wood, iron, etc.);
- wire (3 mm);
- soft wire;
- connecting bolts;
- concrete solution.
To get started, you need to make markings for the main and intermediate posts: the distance between the main posts should not exceed 9 m and no more than 3 m between the intermediate ones.
- Dig holes for the main posts 60 cm and 40 cm for the intermediate ones.
- The pillars are immersed in the prepared pits and poured with concrete to the middle of the pit.
- After all the posts are in place, make the required number of holes for the wire.
- When the concrete solution in the pits has completely solidified, they can be covered with earth, and then pulled and secured by the chain-link with connecting bolts.
Hedge structure
A hedge is the same fence made of evergreens. They are very beautiful, but they demand to themselves special attention... Let's start building a hedge for a summer residence.
Berry plants or shrubs are planted in the first row of the hedge, in the second - tall trees or bushes. When choosing plants for planting in the form of a hedge, it is best to plant those that have been tested for survival in the climatic conditions of the region.

They must be frost-resistant, unpretentious, with a dense crown quickly recovering after cutting and an excellent ability to form shoots.
Shrubs are planted at a distance of about 30-50 cm, and trees are 75-150 cm. Hedges made of lilac, jasmine, etc. look spectacular. Before planting, you need to outline the line of the future fence using a stretched rope. A trench 50 cm deep is dug along the line. The bottom of the trench must be loosened and mixed with peat, humus and compost. Plants are planted in spring or autumn.
During the season, you need to look after and monitor the plants, water, fertilize and trim on time. Nowadays you can often see such hedges in dachas. Fence on personal plot do it yourself from the hedge blends well with the landscape.
How to build a wicker fence in the country?
A wicker fence looks very original in the country. To build it yourself, you need:
- pegs;
- losin or thin flexible twigs (willow or hazel);
- wooden or iron racks.
We build a fence in the country and prepare equipment:
- They choose even, well-dried vines with a thickness of 2-3 cm.
- Dig a trench 50 cm deep and hammer in pre-processed stakes or posts. So that they do not stand out, they can be painted to match the color of the selected vine.
- Next, mark the line and drive the branches to the entire depth of the groove. This is necessary for the fence to be strong.
- Secure the outermost branches at their top with wire. Before weaving, soak the vines in water beforehand: this will make them flexible and pliable.
To make the structure pleasing to the eye for a long time, it can be treated with wood preservatives.
Brick fence for summer cottages
Who is not limited in financial plancan afford to build a brick fence. This species has very, many advantages: it is quite strong, reliable, wear-resistant, does not need special care. But there are also disadvantages: its cost is quite high, it is difficult to put a fence alone without helpers.
It is possible to design such a fence with your own hands, but in this case it is better to contact the master of this business. Let's look at the main and necessary components for the construction of a brick fence:
- Make an estimate and calculate the cost of material and the cost of the services of the master.
- Prepare the required amount of raw materials, bricks, cement, gravel, sand, rebar, etc.
- Mark the required area with a tape measure, level, nylon rope and drive in the pegs.
- Prepare a trench for the foundation, fill in sand and gravel, water so that everything is compacted.
Build a form from the boards and lay the reinforcement. A concrete solution is poured into the formwork and left to harden. After a week, you can remove the formwork, and process the foundation with a waterproofing compound. A brick is laid out on the foundation in several rows, orders are placed in the corners with the help of nails. Fix the bricks with concrete.
Above are all the key options that an amateur summer resident can build with his own hands. When planning the construction of a fence, try to find a middle ground based on your desires, capabilities and budget.
It is not difficult to come up with a fence design, it is more difficult to realize the idea of \u200b\u200bhow to do exactly what you want. But when there is also a desire to make money on this, then you need to evaluate the attractiveness from the very beginning consumable... After all, the general design is often assembled from everything that is idle or is sold for a penny.
From scrap materials
Now, precisely on the territory of the Russian Federation and the CIS countries, here is what you can choose from:
- Pallets;
- Used slate;
- Plastic (various containers);
- Production grid;
- Cutting from a sawmill (the most budgetary rural option);
- Bush branches (do it yourself, if there is one near the building site);
- (for a fence or a barn, budget option no);
- Disassembled wooden barrels (a rare case, but sometimes in production shops they are forced to sell by self-collection already broken barrels made of strong wood);
- Scrap metal (if you have transport, you can visit retail outlets and collect poles, crossbars and even some handmade decor by weight);
- Professional sheet. The most inexpensive;
- Concrete, cement and decorative.
How do you make a cheap fence out of all this? Let's analyze in detail.
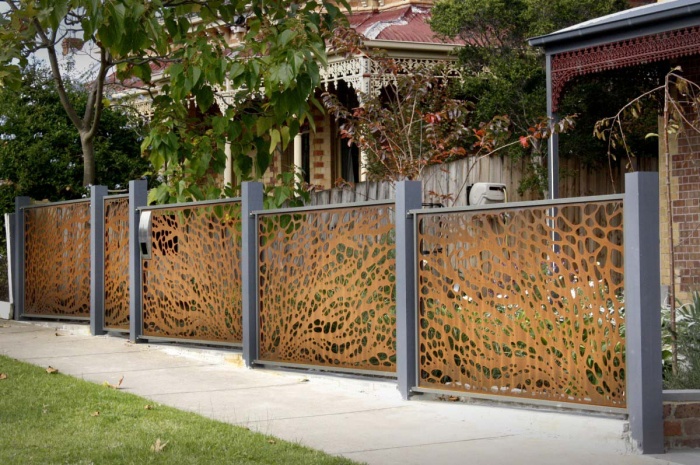
Designer novelties
Beautiful photos with original ideas: 
The layout is simple. In the photo - a homemade picket fence from wire, hazel, willow... You don't even need to nail anything on a simple fence made of branches with your own hands, it is enough to make turns between the supporting parts, and the low fence will be ready very soon. It is a pity that such structures do not last very long because of strong winds and precipitation.
The garden option is decorative fence in a private house assembled on their own. And the more paint residues are used in this version, the brighter the garden itself will look. Planks can be selected from pallets as well, creating a simple decoration element. 
It's worth noticing! Such a garden fence is also an impromptu bird feeder and drinker. Very original and inexpensive.
Brick, cement and glass. American novelty. The materials are not cheap and available, but it looks great. Unfortunately, such a design will most likely not stand for a very long time due to intense interest. In total, there is someone who cannot repeat this. 
Copper or other metal at work. Of course, an element for everyone. And there is a lot of welding work. But if you make, for example, from the iron beds of past eras, it will be original, free and forever. 
Plastic. Even greenhouses have been made from containers for a long time. And they don't forget about fences. It is desirable, of course, to make small pieces from empty containers. smooth material, with which buildings or fences are then sheathed. But the above method will work, just prepare a strong frame in advance. 
Euro pallet... Suitable everywhere: firewood, building a barn and a fence. Interestingly, the technology for creating the pallets themselves has a drying stage. It turns out that pallets from the warehouse are ideal construction material for an inexpensive fence. And often, unloading pallets are sold simply by weight. Small-sized boards should be free from knots and defects. 
There is no need to disassemble pallets to build a fence. The most correct thing to do is as in the photo above - to expose and fix each of them in turn.
Branches, tree and croaker
Quite inexpensive, example in the photo: 
You can't think of anything easier - they insert or drive in something for support, and then weaving is done as the soul desires. Everything that lies under your feet goes into work. Even dry, crooked and heavy oak branches can be the completion of the composition.
Below in the photo is a fence-fence. From a thin branch such a design, of course, does not differ in strength. But you can fix a ready-made homemade fence with a grid over the entire area. 
So (next photo) is much stronger, more economical and more beautiful. Livestock, pests from the forest or abandoned dogs will not violate your territory. Moreover, the grid can be installed not very shallow, and it is enough for one meter from the ground. Above, such protection is no longer needed.
Mesh combined with timber frame, made according to the correct technology (wood under a cone, pillars processed with bitumen). Modest, not particularly expensive and reliable. It's not worth sinning on a tree, because a fence made of absolutely any material will not last forever. And even monolithic structures are destroyed by atmospheric changes.
Carved grace... This is a small piece of art. Although earlier, when most of the population of our country lived in private lands, there were carved elements in every courtyard. This had several meanings: wealth, accuracy, skill and respect for tradition. 
Below - pallet garden fencetreated with protective compounds. 
Fence boardvery nicely combined with concrete base and pillar.
By the way, it is the "fence board" that can be of several varieties (1-3 grade). If there is a lot of crooked wood on the sawmill, then the 3rd grade of fence boards will accumulate in cubic meters. Outwardly, there are, of course, differences, but this is the same wood that is used in construction. With her more trouble, but for such a low price it forgives her. And if grade 1 costs from 3 thousand per 1 cubic meter, grade 3 will cost 1.5-1.8.
It is also interesting that cheap lumber is not bought quickly, so it is easy to find a dried up inexpensive fence board in warehouses or squares.
Original wood processing
By Japanese technology now you can burn fence boardsgiving brown tint... Similar processing for natural material only needed once. Moreover, a thin layer of fired wood is resistant to dampness, and natural processing can only be replaced with expensive paint, the service life of which leaves much to be desired. Burn several dozen boards with oxygen or blowtorch convenient, practical and original.
Slate, profiled sheet, concrete and mesh
If you take a new slate into work, it would be better to order a flat version designed for 1 span. Such material is easy to replace in the event of a breakdown, and it looks inconspicuous, solid, more solid. 
Used slate more often with a wave. On the front, it is rarely used, except for the visors. However, the back side of the site, closed from the eyes of everyone and everything, also needs a fence. This is where the old slate from the grandfather's house or barn is used.
Interesting fact! Slate produced in the 70-80s of the 20th century is very fragile, but durable. If during the transportation and installation process they did not make cracks, then it will stand in the fence for more than one decade.
Classic rules for working with your own hands on a profiled sheet and a metal frame. As shown in the figure, for a high fence (above 2 meters), it is more correct to make 3 logs. Well, the span is not more than 2.5 meters. 
Patterned Grids... Long and painstaking work. Should be carried out according to the project or pattern. Of course, you will have to work hard, but you can also sell such works. Or get hired for registration, if there is interest in your ideas. 
Cheap, beautiful and original. You can use everything in decorative elements: from forks to car hubs... And it does not matter how it all will look exactly in the overall picture, because different elements of iron or other material cannot be assembled into one structure ugly. 
Professional sheet or professional flooring on wooden frame ... Option for those who do not own the welding craft. It is better to make the frame itself more stable, although sheets arranged horizontally will give the necessary rigidity. It is desirable to treat wood with linseed oil-based protective agents.
Concrete or brick fences. There are tons of shades here decorative elements and, accordingly, costs. It is more profitable to make only the base from stone, placing it in the center of each span wood, forging, flooring sheets or even factory plastic.
Estimated cost
Let us analyze using the example of a standard 6 hectare suburban area:
| Fence type | Materials | Number of materials | Unit cost, rub. | Amounts, rub. |
| Wooden fence with concrete base | Cement (concrete); | 11 cubic meters; | 3 thousand; | 33 thousand |
| pillars (logs); | From 50 pieces; | 450; | 22 thousand | |
| lags (timber); | 40 pieces; | 150; | 6 thousand | |
| fence board (2-3 grade). | 200-250 pieces. | 60. | 15 thousand | |
| Result: 76 thousand for building materials. | ||||
| Mesh with concrete base | Concrete; | 11 cubic meters; | 3 thousand; | 33 thousand |
| Frame pipes; | 89X40; | 1500; | 78 thousand | |
| Logs made of wood; | 50 pieces. 200-250 pieces; | 108; | 3.7 thousand | |
| Grid. | 170 square meters. | 60. | 9.4 thousand | |
| Result: material without delivery 124 thousand. | ||||
These are prices for the central region. And if you call to count the fences of the above turnkey materials, then you need to add up to 50 thousand for work and delivery.
Outcome
Fences made of stone, brick and decorative components cost twice as much as a fence made of mesh or wood.
It is easy to guess that it is most profitable to do what you have planned with your own hands, using the same euro pallet or used pallet... Indeed, with high-quality installation, they look much more original. The price of the work is cheap, the material itself can be ordered from 100 rubles apiece. 1 element is a whole meter of an almost assembled fence. Consider for yourself what is best for a conventional fence.
Video instruction
Ivan Galkin talks about how to make an inexpensive fence.