Heating radiators. Methods for connecting radiators. Properties and parameters.
In this article you will learn:
Go...
When I see different radiators my eyes widen...
I will help you quickly understand the types and tell you about how to connect certain types of radiators.
We will not consider convectors and cast iron radiators...


You can learn about them from this article:
Let's continue...
Today the most popular radiators- these are sectional: Aluminum and bimetallic.
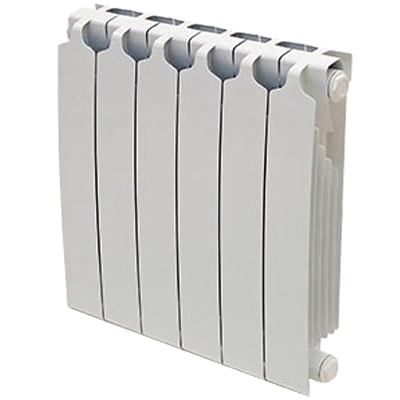
Aluminum radiators

Working pressure up to 16 Bar.
Bimetallic radiators

Working pressure up to 20-40 Bar.
What is the difference between aluminum radiators and bimetallic ones?
Some bimetallic radiators in appearance very similar to aluminum radiators.
Since bimetallic radiators conceal a steel one covered with an aluminum shell.

Many people write in their articles that there is no point in installing more than 10 sections, but I say the opposite. It makes sense, heat transfer from the radiator with big amount There are many more sections. Law of Thermal Engineering.
20 section radiator. An example from life! It warms up great!
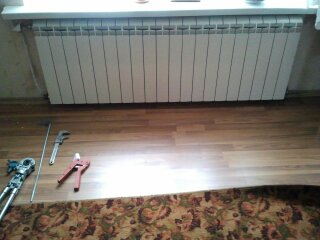
If you decide to install up to 20 sections, then pay attention to the fastening elements; four may not be enough. There are two types of fastenings in nature:
1. Corner bracket

2. Pin bracket

The corner bracket is suitable for smooth plastered walls.
Pin bracket - for any walls. The only drawback is that the pin bracket will not hold well in hollow brick.
The best corner bracket is the one on which the wall with the mount is the largest in area. This corner bracket holds the horizontal position better without deforming by bending downwards.
Of the pin brackets, the best are those with a thicker pin diameter and better expansion in the plug. At the moment I like the ones from Omec.
Methods for connecting radiators.
Let's look at a variety of connections. Below we will consider which connection is suitable for various schemes. For example, for apartment buildings with one-pipe systems and with two-pipe systems.

Advantages and disadvantages of each scheme.
1 place. Diagonal connection. Most effective method, at which the maximum consumption of thermal energy from the coolant occurs. The disadvantage is the inability to change the number of radiator sections.
2nd place. Lateral connection. Doesn't lose much in terms of efficiency from a diagonal connection. If the question is between options 1 and 2, I choose the side connection. Since if, for some reason, I am not satisfied with the power, then I can add (or reduce) the number of sections without alterations to the connection nodes.
3rd place. Bottom connection. There are a lot of myths about this connection. And now I will tell you the disadvantage of this connection.
Flaw. For a private home. When you start pouring anti-freeze liquid into the system without thoroughly mixing it with a portion of distilled water, a layer of height (water/anti-freeze) appears. And, since non-freezing liquid is heavier than water, it is located below ordinary water. Therefore, a layer cake appears in the radiator by mass in the form of two different media: water and anti-freeze. This unstirred puff pastry is obstructing the inside of the radiator. This phenomenon is similar to when you try to mix oil with water and, naturally, due to different densities, these two media (water and oil) will be on top of each other.
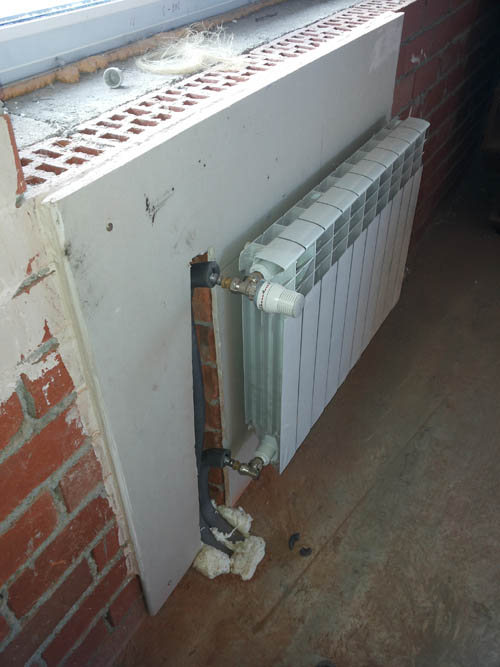
The incoming non-freezing liquid in the radiator cannot rise up and mix with water, since it goes in a straight line. See image:

Very often, I personally encountered such a problem that the upper part of the radiator remained cold. Even water cooled by 100 degrees will not become heavier than the antifreeze.
Eliminated this problem in the following way.
You need to pour out all the upper (light) water through the Mayevsky tap. And, at the very end, you will see when the anti-freeze product comes in its specific color (blue, pink or green).
As for smooth heating in a radiator with such a connection, this is complete nonsense. And you shouldn’t focus on this.
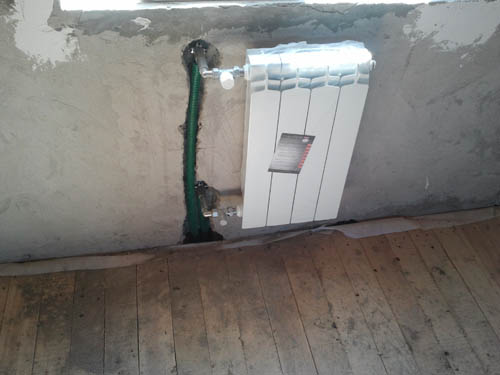
Radiator connection from top to bottom
This is the best thing for a heating system. Believe me, my experience as a hydraulics and heating engineer.
In our company, when it came to laying out systems central heating, we used only steel pipeline for piping. And this was not discussed, as they are being laid down.
Advantages of steel pipelines for central heating.
For those who don't know. The steel pipeline is an ordinary iron one. There is a galvanized pipe - it is steel (iron), coated on the outside with a thin layer of zinc. Zinc is harmful to the system, that is, to our health. Zinc protects steel from corrosion, but even zinc has deposits. Chemical washes are available to remove deposits.
Try to find a plastic pipeline with these parameters!
And in central heating systems, collapses such as:
Therefore, for central heating systems it is necessary to install a steel pipeline.
Plastic does not like temperatures above 80 degrees. Polypropylene even more so. By the way, it holds the record for resistance to high temperatures. You can, of course, choose copper, but problems have also happened with copper. Copper can be destroyed by stray currents in the pipeline with the touch of certain metals. An example would be steel reinforcement in a wall. Contact of copper with aluminum and steel is also harmful. Tin solder at the joints does not like alkali, which is present in central systems. In practice, things have happened where holes have formed in copper piping due to touching copper pipe with steel reinforcement. Therefore, whatever one may say, a steel pipeline is better suited for central heating. Plus it's cheaper.
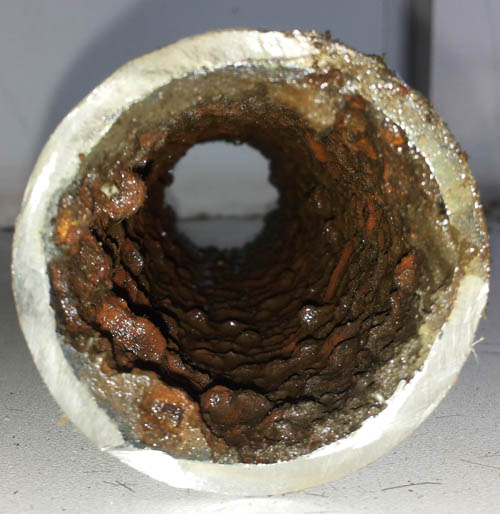
To ensure that there are no deposits in the steel pipeline, various additives are added.
But everything is not as scary as it seems!!!
Above I told a story about all the advantages of a steel pipeline.
For central heating systems, cross-linked polyethylene, polypropylene, and copper can be used. However, you need to know their features fully.
There are houses that have their own with a private closed system. Therefore, if you decide on a plastic or copper pipeline, you need to consult with your housing management company. In addition, many boiler houses have automatic equipment that will prevent high temperatures and high pressure in the heating system.
Life does not stand still, and automation makes our lives easier. But there is always a risk that the automation will not work.
Therefore, when installing plastic into a heating system, you act at your own peril and risk. Although, with each decade these risks become less and less and are gradually reduced to zero.
How to change old radiator for a new one in central heating systems?
If this is a single-pipe system, then it is better not to touch the riser with a jumper and leave it as is!
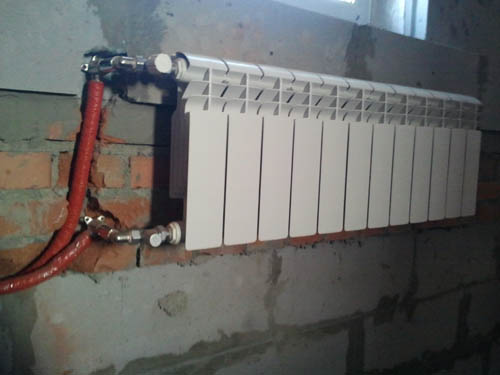
On the steel pipelines running from the riser after the jumper, you need to install repair valves to repair the radiator. These can be ordinary ball valves. After the taps, continue with steel or other pipelines until. It is better to install thermostatic valves on the radiator to regulate the temperature in the room.


Thermostatic valve on the radiator.
A thermostatic valve with a thermal head provides climate control to the room. That is, the thermal head itself, sensing the temperature in the room, changes the position of the rod of the thermostatic valve, the rod, in turn, closes or opens the passage of the valve. If it gets hot, the valve closes the passage of the coolant. If it is cold, the valve opens the passage for coolant inlet.


Radiator installation
As for installing the radiator, the minimum distance from the floor according to the standard is 10-12cm.
2-3 cm from the wall.
All these gaps affect the heat dissipation from the radiator. The farther from the wall, the more heat. If you recess it into the floor, this will also reduce the heat generated by the radiator. The minimum distance from the floor should be 10 cm. The maximum should be 15 cm. Also, there should be an opening for ventilation from the top of the radiator to the window sill.
And you don’t need to push the chair and beds with a backrest onto yourself - this reduces heat generation.
If your home is cold, then in your case, close the radiator decorative grilles contraindicated.

This system creates an equal length of pipeline to the radiator. This condition helps create uniform distribution flow between radiators.
The fact is that there are resistances along the length of the pipeline that affect the flow rate.
If you want to better understand what resistance is in a heating system, then you should familiarize yourself with the following sections:
A collection of photographs to ponder:
All schemes are working, there are some drawbacks. These diagrams are for thought only...


| Comments(+) [ Read / Add ] |
The above review describes methods for installing radiators in apartments, private houses, office and commercial premises. The article is useful for both project customers and installers. After reading carefully you will be able to do right choice diagrams, draw up an accurate estimate and assign a clearly defined task to installation specialists.
The type and model of heating radiators become unimportant if they are incorrectly connected to the heating system. To achieve efficient operation of radiators and heating comfort, it is necessary to competently use the existing technical capabilities of a particular room.
IN apartment buildings with a centralized heating system, the connection is made into a common riser, which limits the possibility of autonomous regulation of the temperature and pressure of hot water. In private homes, the possibilities are wider, but the costs are also higher. heating equipment. To make the optimal choice of scheme, you need to understand the basic concepts and general terminology of this issue.
Single-pipe
Standard type of system in multi-storey buildings with centralized heating. The most economical option requires laying one pipe around the entire perimeter. At single pipe system Radiators are connected in series. It is possible to regulate the heat level only throughout general assembly. Each radiator is powered from the previous one, respectively, the water temperature decreases in each subsequent connection.

The circulation of hot water in such a system usually occurs naturally. But given the difficulty of water passage in series connections, it is possible to use a booster pump. This system is quite suitable for heating small (up to 70 sq. meters) apartments.
In a two-pipe system, each radiator is fed hot water through one pipe, and the cooled water is transported to the heating equipment through the second. Such a system is more efficient than a single-pipe system, since each radiator is supplied with hot water autonomously. With this connection, it is possible to regulate the temperature of each radiator individually.

But the material consumption for installing such a system doubles. Suitable for both heating systems various schemes connecting the radiator itself. How it will be served hot water, will determine the efficiency of the radiator. Eat various ways With varying efficiency, we will describe each of them in detail.
Methods for connecting radiators
Correct connection of heating radiators in single-pipe and two-pipe systems. Systems, in turn, are divided into vertical and horizontal. With a vertical connection, the radiators are connected from top to bottom, with a horizontal connection - sequentially from the riser.
There are only three connection diagrams:
- lower
- lateral
- diagonal
The rest are derivatives from them.

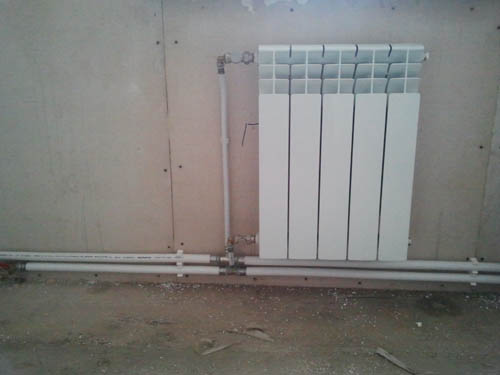
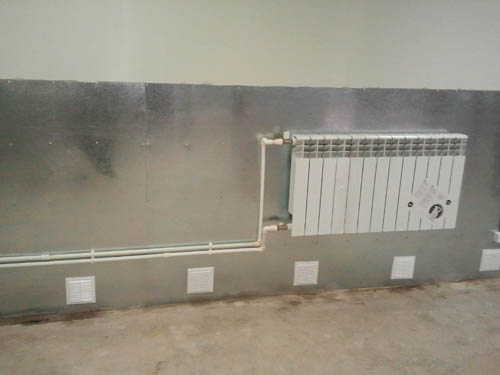
Bottom connection
The bottom connection is the simplest and does not raise any questions. On the one hand, the radiator is fed with hot water, on the other hand, cooling water is removed to feed the next radiator or return to the heating system. This connection of the heating battery is considered the least efficient. The advantage of this scheme is that only one pipe is used, which can be easily hidden in the wall or under the baseboard.

The figure shows how to connect a heating battery in an apartment with a single-pipe system using the bottom connection.

A jumper at the bottom of the battery (bypass) allows you to drain air jams on a separate battery and facilitates the movement of water in the general circuit.
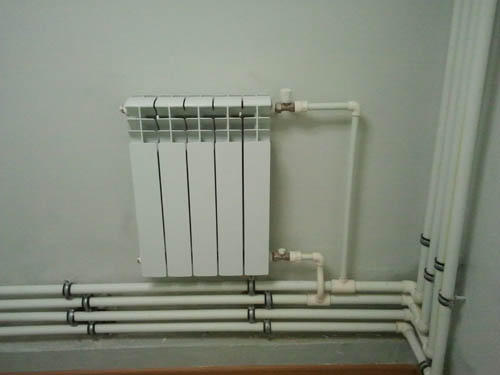
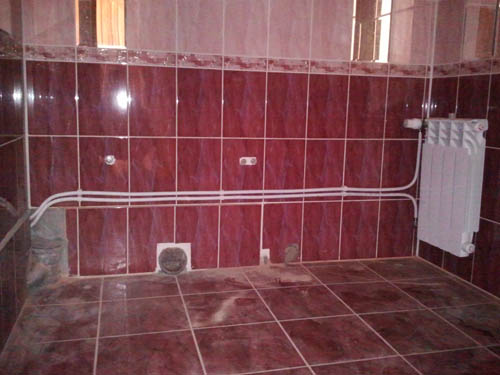
Side connection
Lateral, or one-way connection usually produced for ease of installation to vertical riser pipes in multi-storey buildings. This method should be used as a last resort since there is a possibility of heating only the part of the radiator adjacent to the pipes. In a radiator with a side connection to a single-pipe circuit, the top connection is used for hot water, and the bottom connection is for discharging cooled water.

The figure shows how to correctly connect a heating radiator in an apartment with a single-pipe system using a side connection diagram.

The bypass jumper device will also allow air to be released and stabilize the water pressure in the general circuit.
Diagonal connection
When connecting diagonally, manufacturers conduct test tests of radiators. Water passes throughout the radiator evenly and as intensively as possible. Due to this, all zones warm up equally quickly. This is one of the most effective schemes. Diagonal connection of a heating radiator with a single-pipe system.
In a diagonal connection diagram for heating radiators, hot water enters through the upper inlet and uniformly heats the entire battery. You can use a bypass (jumper) in this case as well.

How to connect a heating radiator in an apartment in a diagonal pattern to a one-pipe system is shown in the figure.

Below is a diagram of how to correctly connect heating batteries in an apartment to a single-pipe system with maximum efficiency. The Leningradka circuit has been tested by long practice, and as time has shown, this is the most effective connection in this case.

The connection diagram for a heating radiator to a two-pipe system differs only in that the heating radiators are connected via two parallel circuits, one of which supplies the radiator with hot water, and the second delivers cooled water to the heating system.

As can be seen from the figure, fundamental differences not in the installation.

The choice is determined by financial capabilities and the desire to give the installation more or less aesthetic appearance by hiding the tubes in the floor or wall.

Conclusion
Knowing the basics and existing schemes installation of a heating system, you will be able to make the right choice and monitor the proper execution of the work. With some skills, it is possible to assemble any circuit with your own hands.
Connecting heating radiators in a private house allows you to use any of the above schemes. The main advantageous difference from connecting heating radiators in an apartment building is the ability to regulate the temperature and pressure of the incoming hot water.
The heating system for a private home using radiators and boiler equipment has two main connection methods: one-pipe and two-pipe.
Both schemes have their advantages and disadvantages.
When choosing it, you should take into account the area of the room, the number residential floors and region of residence.
The choice of pipe layout depends on the connection system: single-pipe and two-pipe, and the method of water circulation in the pipes: natural and forced (using a circulation pump).

Single-pipe— based on serial connection of radiators. Hot water, heated by the boiler, passes through all heating sections through one pipe and goes back into the boiler. Types of wiring for a one-pipe circuit: horizontal(at forced circulation water) and vertical(with natural or mechanical circulation).
When installed horizontally, the pipe is installed parallel to the floor; the radiators should be located at the same level. The liquid is supplied from below and removed in the same way. Water circulation is carried out using a pump.
With vertical wiring, the pipes are located perpendicular to the floor(vertically), heated water is supplied upward and then flows down the riser to the radiators. Water circulates independently under the influence of high temperatures.
 Two-pipe the system is based on parallel connection of radiators to the circuit, that is, hot water is individually supplied to each radiator through one pipe, and water is discharged through the second. Types of wiring - horizontal or vertical. Horizontal wiring is carried out according to three schemes: flow, dead-end, collector.
Connecting convectors to the heating system is carried out using the following methods: bottom, top, one-sided and diagonal (cross). The circulation of liquid inside it depends on the installation plan of the battery.
For one-pipe and two-pipe systems, vertical wiring is primarily used for houses containing two or more floors.
Single-pipe

Operating principle of single-pipe heating system – circular circulation of liquid along one line. The heated coolant leaves the boiler and passes sequentially through each connected convector.
Each subsequent one receives water from the previous one; as it passes through, part of the heat is lost as a result of cooling. The further the battery is from the boiler, the lower its temperature. If one element fails, the operation of the entire circuit is disrupted.
Installation is carried out horizontally or vertically, in the second case, it is optimal to install the boiler at a lower level to ensure natural circulation of liquid.
Advantages of a single-pipe scheme: ease of installation, low costs Supplies, aesthetics (when laid horizontally, the pipe can be hidden, for example, mounted under the floor).
Flaws:
- Interconnection of circuit elements— failure of one radiator leads to disruption of the entire system;
- High heat loss;
- Inability to control heat individual elements of the system;
- Limited heating area(up to 150 m2).
However, for a one-story house with small area It is more rational to choose this type of heating.
Two-pipe

In this system, liquid circulates through two dedicated lines: supply (coolant outlet from the boiler) and return (to the boiler). Two pipes are connected to the water heater. Installation is carried out using vertical or horizontal wiring method. Horizontal - performed in three schemes: flow, dead-end, collector.
In a flow-through design, water movement occurs sequentially, first the liquid comes out of the first convector, then the second and subsequent elements are connected to the line, then the water returns to the boiler. The coolant in the supply and return pipes, in this case, moves in the same direction.
Dead-end wiring is characterized by the opposite direction of water in the pipes, that is, water leaves the first battery and rushes to the boiler in the opposite direction, similarly from the remaining heaters.
With radial or collector wiring, the heated liquid is supplied to the collector, from which pipes extend to the convectors. This option is more expensive, but is distinguished by the ability to precisely adjust the water pressure.
Advantages:
- Parallel connection of convectors, the failure of one element does not affect the operation of the entire circuit;
- Opportunity installation of thermostats;
- Minimum heat loss;
- System operation in rooms of any size.
The disadvantages of this scheme are more a complex system installation, high consumption of materials.
Connection options

Methods for connecting the radiator to the pipeline:
- Upper. The coolant enters the heater from above and exits the same way. This type installation is characterized by uneven heating, since the coolant does not heat the bottom of the device, so using this method in homes is irrational.
- Lower. The coolant enters and exits at the bottom and has a small heat loss (up to 15%). Advantage this method- Possibility to install the pipe under the floor.
- One-sided or side. The supply and return pipes are connected to one side of the convector (top and bottom). This ensures good circulation, which reduces heat loss. This type of installation is not suitable for convectors with a large number of sections (more than 15), since in this case the far part will not heat up well.
- Cross (diagonal). The supply and return pipes are connected from different sides of the radiator diagonally (top and bottom). Advantages: minimal heat loss (up to 2%) and the ability to connect a device with a large number of sections.
The way radiators are connected to the pipeline affects the quality of heating of the room.
Radiator installation

radiator installation
Radiators should be installed in areas with the greatest temperature difference, that is, near windows and doors. It is necessary to place the heater under the window in such a way that their centers coincide. The distance from the device to the floor must be at least 120 mm, to the window sill - 100 mm, to the wall - 20-50 mm.
The battery is installed to the pipeline using fittings(angle, coupler combined with thread) and an American ball valve, by soldering or welding. An air outlet (Mayevsky valve) is installed on one of the other holes, and the remaining hole is closed with a plug.
Before filling the system, carry out the first test run to clean it and check for leaks. The water should be left for several hours, then drained. After this, fill the system again, increase the pressure using the pump and bleed air from the radiator until water appears, then turn on the boiler and begin heating the room.
Common installation mistakes: incorrect placement of the convector (close location to the floor and wall), mismatch in the number of heater sections and type of connection (side connection type for batteries with more than 15 sections) - in this case, the room will be heated with less heat transfer.
Liquid splashing out of the tank indicates its excess, noise in the circulation pump indicates the presence of air - these problems are eliminated using a Mayevsky tap.

Equipment price
Approximate calculation of equipment for the heating system of a house with an area of 100 m2.
The cost of installation work by a master will cost approximately 50,000 – 60,000 rubles.
Results and conclusions
The choice of radiator connection diagram is influenced by the area of the room and the number of floors. For a small one-story house the best option there will be a choice of installing a single-pipe horizontal system. For houses with an area of more than 150 m2 with two or more floors, it is preferable to install a two-pipe vertical distribution with a diagonal connection.
Connecting pipes to the radiator from below is one of the best solutions in plumbing installation, providing high level aesthetics of heating devices. There are, however, a number of rules, the observance of which will ensure the correct operation of the entire hydraulic system and facilitate the connection process.
Which radiators are designed for bottom connection?
It is not without reason that the diagonal radiator connection scheme is considered the most effective. This is how maximum heat removal, uniform distribution of coolant and optimal temperature gradient are ensured, promoting intense convection. Even with a lower supply of pipes to the radiator, one of the mandatory requirements is to ensure water flow diagonally from the upper edge to the opposite lower edge. But not all radiators have a device that allows you to achieve such a distribution of coolant.
 Design of a panel radiator with bottom connection
The most common type of heating devices, in which the required conditions are provided for by the design, are steel panel radiators. Another type can be called sectional radiators with a bottom connection, although only the first two sections have fundamental differences in their design, all the rest are the most common. Both of the mentioned types of heaters have a pair of pipes located in the bottom part, that is, oriented towards the floor. In both cases, the specificity of the device is such that the supply pipe is connected directly to the channel through which the coolant is directed to top part labyrinth
 Sectional radiator with bottom connection
It is also possible to retrofit conventional sectional radiators for the purpose of connecting them with the lower side supply. For this purpose, special fittings are used, due to which the configuration of the circulation channels changes. The lower connection can be double-sided; in this case, on the supply side, instead of a fitting, a valve is screwed in, the end of which rests against the nipple of the first section and shuts it off, while the outlet is directed strictly upward.

A one-way connection is also possible, which requires the installation of a valve with a tubular probe designed for the outflow of cooled coolant.

The described range of fittings can be used for most models of sectional bimetallic and aluminum radiators. The exceptions include such exotic representatives of the world of heating devices as the Rifar Monolit, which do not have nipples, although in their model range There are modifications for lower pipe supply. IN plumbing practice There are also examples of bottom connections cast iron radiators, although the possibility of such installation is always determined individually depending on the model.
In which heating systems is bottom supply used?
It is obvious that the supply of coolant from the bottom up is unnatural, because it is directed against the action of gravity. For this reason, the lower supply of radiators cannot be carried out in open heating systems with natural circulation. But this is far from the only limitation.
Even with a two-way bottom connection, where the return pipe is connected according to the standard scheme, a special valve is installed on the supply. Its throughput is lower than that of a conventional fitting with a screwed-in fitting, so the coefficient local resistance In this case, the radiator will be at least twice as high as the nominal value. This forces the use circulation pumps with more intense pressure and radically revise the hydraulic calculation procedure.

With a one-way bottom connection, even more difficulties arise. Firstly, the local hydrodynamic resistance of the radiator increases even more, because now two opposing channels with a fairly small nominal bore pass through one outlet. In addition, there are difficulties with installing shut-off and control valves. High-quality components for the bottom connection of radiators with a built-in thermostatic head are a rarity in domestic market. Most of the range is represented by Chinese-made products that do not provide sufficient flexibility and accuracy of adjustment. Another nuance lies in the method of regulating coolant flow: instead of a rod that limits the throughput, most injection units have a built-in bypass, which radically changes the balancing method. At the same time, installing an injection unit with a separate throttle and thermostatic head is often unacceptable due to lack of free space, and if such a configuration is still possible, it will be extremely cumbersome and inconvenient to manage.

It can be said that the most in the best possible way Suitable for bottom connection of radiators two-pipe systems with parallel movement of the coolant or radial isolation. Due to a significant reduction bandwidth For radiators, there is no obvious reason to abandon thin PEX pipes with tension fittings, which look much sleeker than other power systems. Not the most good idea will use a bottom connection for single-pipe circuits; in this option, it is quite difficult to balance the system and ensure its stable operation.
Pipe supply to the radiator
Of course, the use of cross-linked polyethylene in the heating junction is not at all necessary, although it is preferable for reasons of reliability and aesthetics. You should definitely stop using steel pipes. The reason for this is simple: traditionally, when connecting from below, the pipes go into the floor and run either under the covering or along the ceiling of the lower floor. If heating pipeline passes through the ceiling, the passage needs to be lined, which does not have the best effect on appearance flooring. Otherwise, the choice of material for decoupling the system is quite free; polypropylene, the aforementioned PEX, and even copper can be used.

Separately, it is worth touching on the topic of use pipe insulation. There are three positions on this issue:

At the time of installation of the wiring, the installation position of the radiators must be known exactly. The height may vary, but horizontal movement is generally not acceptable. This is due to the fact that the rotary fitting is not located on the surface, that is, only a straight section protrudes above the coating and is connected to the radiator outlet. You can deviate from this rule only if lower side connection units are used; in this case, the pipe outlets are located at a distance of about 100-120 mm from the end of the radiator liner.
Fittings and consumables
The installation of radiators with bottom connections does not imply any particular complexity, but this requires preparing in advance all the necessary fittings, fittings and packaging. Depending on the type of radiator, the list may differ.
For radiators whose bottom connection is provided by the design, a set of adapters corresponding to the pipe material is required. As a rule, these are straight press fittings or sleeves for soldering; when using polypropylene, it is recommended to install threaded “American” ones. In such cases, control valves are extremely rarely installed directly under the radiator; its optimal location is on the distribution manifold. The situation is exactly the same when installing injection units.

With a lateral lower pipe supply, it is possible to install thermostatic and control valves on the radiator. In this case, all fittings are installed on the “metal” part, that is, they are packaged on threaded connections with fittings or threaded fittings of the lower connection valves. In any case, each radiator is equipped with two shut-off ball valves to allow the radiator to be removed without stopping the system. You will also need one or two radiator plugs and a Mayevsky tap. Sealing of threaded connections is traditionally done with tow and Unipak sealing paste.

Installation rules
Before connecting the radiator to the system, it is assembled in a lying state with the installation of all fittings. Ultimately, only two straight press fittings or union nut connections should remain: on the supply and return lines.

The lower connection valve replaces the radiator liner. Its sealing occurs in the standard way for this unit - using an o-ring seal. It is advisable to mark the position on the valve nut through hole on the shank so that after twisting it is positioned strictly vertically. To adjust the position, you can use seals of different thicknesses and adjust the degree of tightening.
The injection unit is connected in a similar way, but quite often it does not have a nut that replaces the fitting. With a one-sided bottom connection, the outlet with reverse side it is plugged with a plug, like one of the upper ones, and a Mayevsky tap is installed in the remaining one. The further assembly scheme is simple: all the necessary shut-off and control equipment is packed onto the threaded fittings of the valve, injection unit or lower outlets onto tow with sealing paste. Ultimately, the radiator is installed in place as an assembly and fixed using a wall or floor mounting method, then it is connected to the system.
Any modern batteries, be they aluminum, cast iron or bimetallic, are supplied with four open pipes for connection to the heating main. In accordance with design features wiring, a scheme for connecting radiators with supplied pipes is selected, and the remaining holes are closed with plugs or air vent valves.
In this article we will study possible options installation of batteries and tell you which scheme is better in terms of heat transfer efficiency.
It is believed that best results The operation of your radiator can be achieved using a diagonal connection. In order to correctly implement this method, you need to connect the inlet pipe to one of the upper inlets, and the return pipe to the lower one on the opposite edge. Then the coolant will circulate along the optimal route, capturing the largest part of the surface of the heating device.
This combination is especially effective if the radiator consists of a large number (more than 10) sections. All other types of connections in this case will be noticeably inferior.
Therefore, the diagonal connection is considered a reference, and all manufacturers indicate the parameters of their equipment regarding this version of the heating device.
The disadvantages of this method include:
- high pipe flow in the system;
- inability to hide communications in a wall or box;
- complex wiring geometry;
- inconvenient installation.
Applicable diagonal pattern in cases where the main requirement is maximum heat transfer, and considerations of aesthetics and design fade into the background. Due to the inefficiency and complexity of wiring, this method of installing radiators is practically not used in multi-storey buildings.
Bottom connection
In contrast to diagonal, bottom method connecting batteries does not allow optimizing the heating system in terms of performance, but it does provide the opportunity to make the radiator almost invisible.

Such a connection (sometimes called a Leningrad connection), due to the peculiarities of the passage of coolant between the input and output manifolds, reduces the efficiency of the system by 10-15%. Moreover, these losses become so noticeable only in apartment buildings with a long highway length.
If you plan to install the radiator in own home(especially one-story), the lower connection diagram would be an excellent option.
The upper part of the battery warms up worse than the lower part, this becomes especially noticeable when the internal cavities become clogged or airy. In these cases, cleaning and air removal using Mayevsky taps is required.
Side diagram
Most often, heating system radiators, especially in apartment buildings, are mounted sideways. Its essence lies in the fact that both lines approach the battery from one side.

Advantages of side connection:
- high efficiency;
- convenient installation;
- savings on pipes;
- the possibility of organizing a bypass between the mains for installing control valves.
If we compare diagonal and lateral wiring, preference should be given to the latter, since the difference in efficiency is only a few percent, and the benefits of lateral connection are obvious.
The diagonal circuit begins to win if you need to connect a radiator with a large number of sections or organize a sequential arrangement of several powerful batteries. A correct understanding of these features will help to optimally distribute radiators in the system.
Radiator location
The radiator is best installed under a window. This well-known rule can be explained very simply: it is there that the heating battery will create best conditions preventing cold air from entering the room.

In a city apartment, windows and doors are the most important sources of heat loss. In private houses, as we have already noted, a roof and floor are added to them. The battery under the windowsill will create a curtain of warm air, which, as you know, tends upward when heated and will not let the cold in.
If there are several windows in the room, it is better to distribute the radiators between them and connect them in series. Experts also recommend installing several heating points in corner rooms.
The following tips will help you position the radiator correctly:
- The distance of the battery from the floor and window sill must be at least 10 cm. Otherwise, its operating efficiency will decrease, and it will be inconvenient to clean under it;
- You shouldn’t push the radiator too far towards the wall; it’s better to leave a gap of about 5 cm;
- When using decorative protective screens The efficiency of radiators is reduced by 10-15%.
- From the point of view of heat transfer, aluminum radiators have an advantage, but in city apartments it is better to install bimetallic products.
And one more important point: it is prohibited to independently change the connection diagram of radiators, their connection to each other, or install shut-off valves in the absence of bypasses in apartment buildings. All alterations to the heating system must be agreed upon with the Management Company.
Radiator installation
Self-installation of radiators will not cause problems in the heating system in the future if all the requirements for such work are correctly fulfilled and all connections are ensured to be tight. In addition, some types of batteries require careful handling: aluminum and bimetallic radiators have a rather soft outer casing that can be easily dented upon impact.
The installation process is carried out in the following order:
- Removing the old radiator(if necessary). Naturally, the heating line must be closed;
- Marking the installation location. Radiators are usually hung on a special bracket that is attached to the wall. The fasteners included in the kit are most often designed for concrete or brick walls. If you want to hang the radiator on soft wall, for example, from plasterboard, it is necessary to use special dowels. Aluminum and bimetallic batteries will not create dangerous loads for such a wall, but cast iron version It's better not to use here. The bracket must be installed so that the radiator is positioned taking into account the requirements described in the previous section;
- Now you need assemble the battery. To do this, screw the adapters included in the kit into all four mounting holes. Usually two of them have left-hand threads and two have right-hand threads, so you need to be careful. Next, depending on the connection diagram, we plug the unused collectors, one with a Mayevsky tap, and the other with a special shut-off cap. All joints are carefully sealed;
- To prevent water leakage We lay plumbing linen at the joints. It is better not to use fum tape here. Flax must be wound correctly: for the right thread, clockwise, and for the left thread, in the opposite direction. In this case, when screwing the connected elements onto the threads, the flax will not be knocked out from under them. For reliability, the connection can be additionally sealed by special means, for example, Unipak paste;
- We screw ball valves to the main pipe supply points. They will allow you to later remove the radiator for cleaning and maintenance without stopping the operation of the entire system;
- Now all that's left is hang the radiator on the bracket and connect the supply pipes to it. We seal the joints according to the above algorithm.
So we've covered everything possible types heating battery connections. If you are just planning the structure of the system for your own home, then you can choose the most suitable scheme. If you live in a city apartment, you do not have such freedom. In any case, understanding the principles and features of connecting radiators will allow you to independently service and install heating devices in your home.