stain
In retail sales there are stains in the form of dry powders and alcohol solutions. Majority base natural compositions- humic dye, which is extracted from brown coal or peat. It dissolves equally well in alcohols and water, and penetrates deeply into the structure of wood. Humic acid gives wood a rich and smooth nut-like Brown color, impact resistant ultraviolet rays. Another name for this dye is “walnut stain”.
The color density can be varied by changing the concentration of the drug or the number of layers applied. An important distinguishing feature of stains and etching solutions from paints is transparency. Absorbed into the structure of the wood, they do not form films on the surface and retain the texture pattern, giving it a more noble color.
Decorative stains on water based prepared from dry powder dissolved in water to the desired concentration. They are convenient to apply manually and mechanically; they lie smoothly on the surface of the wood. The disadvantage of an aqueous solution is the formation of lint on the surface due to swelling of the fibers. Therefore, light intermediate sanding is necessary before final finishing varnishes. The diluted composition is not stored for a long time.
Alcohol based stains produced in the form ready-made solutions with a wide color scheme. It is more difficult to work with such solutions than with water ones, since they dry very quickly and have a pungent odor. The surface can be properly painted with alcohol stain only with a paint sprayer (it is better to work with a respirator and gloves). The brush can only cover small surfaces. Layers that have had time to dry, overlapping each other, create an uneven, dirty color.

Alcohol-based stains are not water-resistant and require a protective varnish coating. The advantage over water-based stains is the absence of lint.
Salts
Metal salts also give wood different shades. They are called mordants. For example, inkstone changes the color of the tree from green-brown to almost black depending on the concentration. Copper sulfate colors the material a delicate brown color, and if treated with an aqueous solution of bleach, it acquires a bright red tint. Chromium dioxide, called chromium, turns wood bright yellow.
All mordants are good antiseptics. Like water stains, they raise the pile on the surface of the wood, which means that intermediate drying and sanding are indispensable.
Hair Dye
If you take a very amateurish approach to painting wood, you can use permanent hair dyes. They contain ammonia, which fixes the color well, and an ultraviolet filter, which prevents the mordant from fading. The color range of these paints has many natural shades - from mahogany to wenge. The solution is prepared according to the instructions, with the only difference that a little of it, for ease of application with a brush, must be diluted with water.
The waiting time for the final color concentration is about 1 hour. After complete drying (after 24 hours), the surface must be coated with a protective layer of transparent polyurethane varnish.
Common Mistake
Often a solution of iodine and potassium manganese is used as a dye. Of course, these substances give a very beautiful and rich shade, but do not meet the most important requirement for coloring pigments - light fastness. Under influence sunlight solutions quickly fade and lose their decorative effect.
Artificially aged wood is a unique finishing material. Practical, inexpensive, completely retains its strength characteristics, but at the same time possessing original beauty and antique charm. The scope of application of such wood is wide: interior design, furniture manufacturing, finishing of facades, gazebos, stairs, even fences are made from it. The most important thing is that wood processing does not require special knowledge or experience, and anyone can do it. Let's take a closer look at how to age wood on your own, and what you need for this.
There are three effective ways age wood - mechanical, chemical and thermal. Depending on the chosen method, the end result has certain differences.
The mechanical method includes two types of processing - brushing and patination. Both types can be used together or separately, depending on the material and the desired result:
- brushing - the surface is treated with a wire brush to remove soft fibers and expose the annual rings. As a result of such processing upper layer acquires a pronounced relief, which is further emphasized by the application of glazing compounds. This method is the most labor-intensive and is used mainly for hard wood - pine, larch, spruce, oak, walnut;

- patination – surface treatment with coloring compounds followed by polishing. It is used for soft species, as well as wood with a weak texture - maple, cherry, beech and others. Wood wax and stain can be used along with paint to give a brighter pattern.

The chemical method involves treating the top layer of wood with various compounds that change the color of the fibers. Ammonia and products containing alkali, such as stove or drain cleaner, are suitable for this. This method can only be used for species containing tannins, that is, deciduous. Chemical treatment coniferous wood will not give the desired effect.
The thermal method involves burning wood with a gas torch or blowtorch. The type of tree does not matter. They do not burn it too much, just so that the texture of the fibers appears more clearly, and then remove the carbon deposits with a metal brush. Next, cover the surface with stain or varnish to give the wood more decorative look. In general, the process is not complicated, but it requires caution and compliance with safety precautions.

Brushing technology

Tools and materials for processing
During the work you will need:
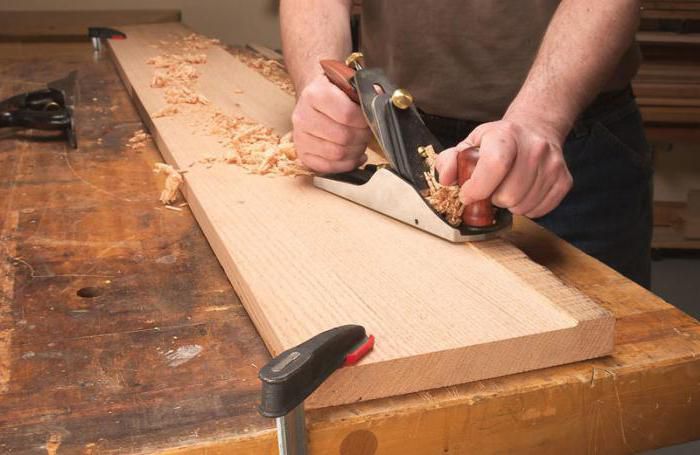
- hand plane;
- chisel or small hatchet;
- steel brush;
- Angle grinder with brush attachments;
- sandpaper, coarse and fine;
- paint brushes;
- dense sponge;
- tinting antiseptic for wood (for example, Pinotex);
- white azure;
- soft bristle brush.


Prices for cordless drill/driver
Cordless drill/driver
Rough cleaning should be done with a steel bristled nozzle, but for finishing would be better suited nylon and copper. There is a special attachment called “Piranha”. It is a polymer-abrasive brush that can effectively remove soft fibers from the surface and leave hard ones. The grinder can be replaced with a drill; such attachments are also available for it. As a last resort, you can get by hand tools, but it's long and tedious.

Piranha brush
The wood should be dense, strong, not damp. Resinous boards should also not be taken, as the resin makes processing difficult. The presence of knots is welcome, as they make the design more pronounced and decorative. If you have no experience in such work, take a small piece of unplaned board or timber, up to half a meter long.
In the process of such work, a lot of fine dust is always formed, so it is best to do it on fresh air. If the weather does not allow it, take care of the possibility of ventilating the room and be sure to prepare a protective mask or at least goggles.
Step 1. The workpiece is laid on a flat surface and processed with a hand plane. Electric tool It is better not to use it, as it leaves small transverse stripes, which reduces the naturalness of the design.
Step 2. Using a chisel or the corner of an ax, you need to make random, shallow and shapeless chips across the entire surface to give the material a rougher appearance.
Step 3. Now you need to remove the soft fibers with a wire brush. The brush should only be moved along the grain, pressing the tool firmly against the board.


Advice. To reduce dust formation, it is recommended to slightly moisten the surface of the workpiece with water. But before sanding and impregnation, the wood must be dried.


Step 4. When the relief begins to appear, the manual brush is replaced with an angle grinder with a metal brush, and work continues. The nozzle should be positioned perpendicular to the surface being treated, movements should be made strictly along the fibers. If you don’t need too rough a texture, immediately take a Piranha brush or a nylon-bristle attachment and do not press too hard on the tool while working. Go around the perimeter of wormholes and knots in the tree to emphasize the contours.


Step 5. Use a soft brush to sweep away the resulting dust, and then begin sanding. You can sand the wood manually or using a grinder, the main thing is to remove protruding fibers and sharp protrusions. Finally, clean the workpiece from dust again.
Step 6. Now the material needs to be given color. To do this, the surface is first coated with Pinotex primer, which is applied with a brush along the grain. You can use both stain and dark azure - any coating with color that will not hide the texture.

Step 7 After applying the composition to the workpiece, give it a few minutes to absorb, and then carefully wipe off the top layer with a sponge. There is no need to rub hard, just smoothly move it 2-3 times along the fibers. After this, all the recesses will remain darker than the protruding edges, and the relief will appear more clearly.


A distinctive feature of good quality stains is that they reveal the texture of wood


Then there are two options: leave this color and cover the wood with a transparent varnish, or add another layer and give the material the appearance of old bleached wood. The second option is suitable for processing elements in the Provence style. To do this, you need to wait until the impregnation is completely dry and apply a very thin layer of white glaze with a brush. After it has dried, the wood is lightly sanded with the finest sandpaper, cleaned of dust and coated with colorless varnish.

This method is also used: after brushing, the workpiece is covered with a dense layer of white glaze, dried and brushed again with a metal brush, but now not so intensively. Finally, a layer of clear varnish is applied.

Applying white paint


To make dark wood rather than bleached wood, instead of white glaze, the surface is thickly covered with stain or Pinotex, and the layer is made uneven. Next, use a brush or sandpaper, depending on the finish you want. Sanding produces light, blurry abrasions, but after brushing, rough grooves remain and the wood looks more brutal.

Prices for different types of stains
How to make patination
Primary processing is carried out using the technology described above: soft fibers are removed, relief is given and the surface is polished. Only after this the workpiece can be patinated.
Step 1. Take any wood primer and carefully apply it to the wood with a brush. The primer should penetrate well into all grooves and recesses. Allow the workpiece to dry.

Step 2. Apply the first coat of paint. Best fit acrylic paint, since it is not prone to peeling, fits well on the surface, and does not leave streaks.


The choice of color depends only on your preferences; you can take any shades, the main thing is that they are rich and contrast with the patina shade. The paint is applied with a brush, evenly distributing the composition in a thin layer. The base coat must dry completely, so take a break from working for a day.

Step 3. Sand the workpiece with fine sandpaper. Wipe off the dust and apply a layer of patina with a brush. It is best to choose a patina for wood in the color of bronze or gold, with a metallic tint. Here it is not necessary to distribute the paint evenly; on the contrary, the difference in coating density will only emphasize the aging effect.


Step 4. When the patina begins to set, you need to take a dry cloth and rub it separate areas. After the paint has dried, the wood is coated with clear varnish.


Types of patina for wood
| Type of composition | Characteristics |
|---|---|
| Water-soluble composition, characterized by slow drying, odorless and a wide variety of shades. Easy to apply and shade, ideally highlights the surface texture |
| A very thick composition with a pearlescent sheen. Apply to protruding areas with a dry brush, and into recesses with a sponge. Easy to rub and gives maximum antique effect |
| The composition is dark brown, most often used to shade relief. Easy to apply with a brush, does not smear, wipes well with a soft cloth |
| Has a paste-like consistency, applied with a dry brush or thick fabric. It is considered the most the best option for patination of wood |


Thermal aging
First of all, take care of safety precautions. When burning wood, there should be no flammable objects or liquids nearby, and it is better to generally carry out such work in the fresh air. Be sure to check the serviceability of the burner or blowtorch.
Prices for various types of gas burners and blowtorches
Gas burners and blowtorches
Step 1. The workpiece is placed on a non-flammable surface or placed vertically, after which it is fired with a burner. The material is processed as evenly as possible, the top layer should be charred approximately 2-3 mm in thickness.


Step 2. After cooling, the charred carbon deposits are removed manually with a brush or using a grinder. The intensity and duration of this treatment depends on the desired texture.

Step 3. Having formed the desired relief, take the grinding attachment and process the workpiece again. Here it is important not to overdo it and not remove excess, otherwise the aging effect will be insignificant.
Step 4. Since the color of the wood changed during firing, dark and light areas appeared, there is no need for painting. Now all that remains is to coat the material with colorless varnish or protective impregnation.

The use of chemically aggressive substances requires special care and precision in work. Protective gloves must be used and the room must be well ventilated. The workpiece is pre-treated with coarse sandpaper and wiped from dust. Then apply alkaline agents or ammonia with a brush and leave for several hours. To slow down drying, you can cover everything on top with film. Under the influence of ammonia and alkalis, the surface acquires a gray tint, characteristic of old weathered wood.

When the color of the workpiece has completely changed, it is rinsed with water and then wiped with a vinegar solution (a tablespoon per glass of water) to remove the remaining alkali. If ammonia was used, a vinegar solution is not needed. After drying, the wood is brushed, sanded and a protective coating is applied. There is no need to paint such material, because then the point is chemical treatment disappears, and it’s easier to do everything mechanically.

External use of aged wood
Such decorative material excellent for decorating facades in rustic style. First of all, this is the German half-timbered style: the original wall decoration involves the use wooden beams rough texture, giving the building a characteristic appearance.
Country-style finishing also allows for the use of aged wood: the cladding itself, shutters, and entrance doors, as well as decorative elements.


Railings, steps, support pillars at the porch - all this can also be made using the described wood processing methods. After practicing on small pieces, you will be able to special effort cope with any surfaces. Of course, large-volume elements, such as house trim, are not so easy to process manually, but there are special machines on sale for this purpose. The most important thing is to have the desire, and then everything will definitely work out.
Video - How to age wood
Video - Patination of wood
Video - Aging wood by firing
Video - Chemical method of aging wood
Aging wood is becoming increasingly popular among antique furniture lovers. Russian manufacturers have noticed this trend. Many large factories in the Russian Federation have special lines that produce furniture using brushing or artificial aging. Not everyone can afford such furniture, but even fragile people can turn wooden boards into an antique masterpiece at home. female hands. Today we will get acquainted with 4 methods of artificial aging of wood and learn how to use them in everyday life.
Brushing - analysis of the basics of popular techniques
Take wooden board, put it in front of you. What do you see? Wood pattern. Each breed has its own unique pattern, which consists of a combination of light and dark lines. They are created over the years as the tree grows. In winter, dark fibers with a dense structure grow, and in summer, soft fibers grow. light colors. Under the influence of moisture, sun, wind and weather conditions, the soft layer with light fibers gradually wears off, and the board takes on an antique look. To achieve the natural effect of aging wood, you will have to wait for decades. Fortunately, there is a simple and quick brushing procedure. As a result of thermal, chemical and mechanical effects, the wood acquires a convex texture with worn edges and chips, characteristic of a “living tree” with a centuries-old history.
The brushing technique comes from English word"brush", translated as brush. A wire brush is actually used for aging. However, this is not the only tool that allows you to achieve the effect of antique wood.
After brushing with abrasive materials, the wood is coated with paint or stain, and varnished. Paints and varnishes highlight the new texture and extend the life of the wood. Standard paints can be combined with shades of bronze, gold, and silver. To achieve maximum effect, it is important to choose the right wood. Suitable wood species for brushing include larch, merbau, wenge, alder, ash, oak, metoba, and kempas. Spruce and pine look especially good in this technique. But beech, maple, teak, juniper, birch, alder, pear, and cherry are poor examples for brushing. After processing, the pattern should be expressive and not merge, which cannot be achieved with the above-mentioned breeds. So pay attention to the peculiarity of the pattern. The more expressive it is, the more interesting the result will be. The presence of chips, hollows and knots on the surface will be an additional advantage. Depending on the chosen brushing method, the work takes from several hours to days.
What to age in the interior - let’s look into the issue in more detail
Aged wood in the interior is the main attribute of country and Provence style. It creates a rustic, country atmosphere in the house, close to nature. To emphasize this style, the brushing technique can be applied to the following interior elements:
- "pot-bellied" or regular chest of drawers;
- window sills and doors made of natural wood;
- solid wood for flooring and wall cladding;
- floor beams;
- garden benches;
- shelves, tables, chairs;
- log houses for wells;
- wooden fences.

Natural wood with an aged effect goes well with other natural materials(stone, leather, metal). Brushing is often used by craftsmen who create handmade products. Here are some more ideas from this series: a designer lamp, a notebook with rough leather and wood trim, forged furniture For garden plot
Method No. 1 – wire brush and translucent glaze
The simplest option for aging wood is to use a stiff metal brush with a handle. After intensive movements on the surface of the wood, the texture of the material appears on it, which is then emphasized finishing. Before aging the wood, we sand the surface with 150-grit sandpaper. Then we take a wire brush and run it along the grain line until characteristic stripes and bulges appear. It should be noted manual process Brushing takes a long time, so be patient. Vigorous movements have borne fruit, soft fibers have been removed and texture has emerged on the surface. We remove the resulting wood shavings with a soft brush, not with your hand, otherwise you may drive a splinter.

The tree is transformed before our eyes. To emphasize its relief, cover the surface with 2 layers of translucent glaze. This material already looks attractive. After a couple of minutes, remove the excess layer of glaze with a sponge and open the wood with varnish. If you feel like something is missing, you can do it in Provence style. Use white glaze, applying it after the first coat of translucent glaze. Remove fresh glaze with a sponge after 3 – 5 minutes after application in a chaotic manner. The final stage is coating with varnish or transparent glaze.
A simplified option to the minimum is to use a metal brush and white glaze. We go over the surface with a brush, cover it with white glaze and again, after drying, brush off the thick areas with the finish. Thanks to this simple method of aging wood, the result is a whitewashed board with a slight long-term patina.
Method No. 2 - multi-layer painting
To age wood to look like real antiques, you need to work hard. One way to do this is through multi-layer painting. We’ll find out what we need for this a little later, but for now let’s work a little on the wood by hand. Take an awl, a hammer, a file, screws, rods and leave a mark from each tool. Small chips, cracks, scratches and abrasions will give it a natural antique look. The main thing is not to overdo it.

Now let's move on to the paints, you will need:
- primer for Pinotex wood;
- tinting paint;
- white glaze;
- white spirit for dilution.
For the first coat, take Pinotex wood primer and spread it over the entire surface. Pinotex primer is thicker than glaze. It is used in cases where it is necessary to create a thick base layer. After the first layer has completely dried, apply tinting paint (antiseptic). We wait until everything is dry and move on to the next step. We take fine and coarse sandpaper and a metal brush. We work with all the tools one by one, creating a natural patina of time. Next, take the white glaze, dip your brush into it, remove the excess and spread it over the wood. There is no need to apply the glaze tightly and evenly. The bottom dark layer should be visible through it. Again, take a metal brush and go over the dried surface, creating more visible gaps. This aging of wood looks contrasting. To bring it closer to natural, next layer needs to be made more muted. This can be achieved by diluting the white glaze with white spirit in equal parts. Apply the diluted mixture to the surface and wait for it to dry completely.
Method No. 3 – electric drill with an attachment and paint-varnish
The mechanical method with a hand brush is reliable, but time-consuming. To quickly age wood with your own hands, use an electric drill or grinder with an attachment made of hard nylon bristles. We begin the work by preparing the wood. Take a hand plane and make notches along the edges of the material. We do not recommend using the electric version of the tool; the result will look unnatural. Before proceeding to the next step, put on glasses and a respirator to protect the mucous membrane of the eyes and nasopharynx from wood shavings. Thick gloves won't hurt either. Take a drill or grinder, put on a stiff brush attachment and practice small area tree. Move strictly in the direction of the grain, do not press the nozzle too tightly to the surface. If you are sure you are ready, move on to the main part. With light movements we move along the wood, removing the soft fibers.
To speed up the process and enhance artificial aging, before starting work with a drill or grinder, you can scorch the wood with a gas burner. It is important not to hold the torch in one place for too long to prevent the resin from burning.
If you do not process the wood with fire, then after using power tools, wet the board with a brush and let it dry for 2-3 minutes. Next, sand the surface with fine-grained sandpaper and collect wood dust. It is better to do this with a vacuum cleaner to completely prevent drifts from getting under the skin, or carefully walk over the surface with a soft bristle brush. Before finishing, you can make holes 1–2 mm deep in the board with a blunt nail.

The last stage is coating paint and varnish materials. Use paint and varnish at your discretion. The advice is to make artificially aged wood look as realistic as possible, paint the recesses in light shades, and the convex parts in darker shades. If you decide to paint the board in one light shade Once dry, sand the surface to bring out the dark details. After finishing the work, we fix the finish with varnish. To enhance the result, you can use craquelure varnish instead of regular varnish. After drying, it cracks and the bottom layer of paint is visible in the voids.
Method No. 4 - exposure to fire and a hard brush
Aging wood using a gas torch or blowtorch is widely used among craftsmen who want to get a deep effect. Besides, this quick option, which depending on the use additional tools has its own characteristics.
If you simply want to highlight the grain of the wood, do not pre-treat the surface. Burn the board with a gas torch in certain places or completely, and then sand with fine-grit sandpaper. But it will help to make the surface more convex and embossed Preliminary processing. Remove soft fibers by hand using a wire brush or with a drill attachment. Carry out firing. After processing, such wood looks noble and more advantageous than the previous version due to a deeper effect on the material. Also, a special effect is obtained by completely burning the material with a gas burner and subsequent processing with a hard hand brush.

When working with fire, remember: bring it close gas burner or blowtorch not worth it to the tree. Do not hold the device in one place for too long, work quickly to avoid fire and be sure to follow safety precautions. Before starting work, put on thick gloves, overalls, goggles and a respirator. After cleaning the surface, coat it with varnish.
Due to the fact that wood has been used for the construction and decoration of housing almost from the very beginning of time, many different, at first glance even strange and illogical, methods of wood processing are known today. Different processing methods have different goals: in one case it is necessary to protect the wood from rotting, in another - to make it more fire-resistant, simply change the color or give it a more expressive shade.
Important points
IN Lately This type of processing, such as wood aging, is becoming more and more common. It is quite simple to artificially age wood, and this is usually done solely for decorative purposes, since after aging the wood, the internal or exterior finishing, a house or furniture made from it looks like antique, ancient and worn out by time. In the eyes of connoisseurs and aesthetes, the aging of wood gives buildings and decoration greater value.
A sample of furniture using the wood aging technique.
Several are known more or less simple techniques, according to which artificial aging is performed. You can make them yourself, having a basic set of tools and substances for finishing wood.
Materials and tools that will be useful to age wood yourself: a brush with metal bristles (or circular), sandpaper, antiseptic and solvent, as well as dark and white glazes, sponge or foam rubber.
Painting after removing soft fibers
This is one of the most simple methods aging wood with your own hands, which consists of first treating the required surface with a wire brush. The wood has a structure that is processed unevenly, because in winter, spring, summer and autumn, when the corresponding annual rings are formed in the pillars of wood, its plant vessels develop unevenly.
The wire brush thus removes soft fibers, while the harder fibers remain because they are more resistant to mechanical stress. This causes a change in the relief surface of the wood, which is emphasized with further painting.

One technique for aging wood is called casting.
Before treating a wooden surface with a wire brush, sandpaper is first passed over it. Only after sanding is brushing done.
Instead of a regular metal brush, you can also use a circular brush, which will require a special attachment from a sander. It is important to remember that brushing wood is carried out along the fibers, so they are easier to remove.
The formation of wood dust when processing wood is inevitable, so it must be removed with a special brush or brush, being careful not to injure your hand or introduce a splinter under the skin.
After this, the wood is coated with two layers of glaze. A translucent dark composition is applied to the surface and then removed by soaking with a sponge. After this, the surface can be varnished, left as is, or treated with a light translucent glaze and also blotted with a sponge.
In the second case, a pattern is created in the “a la Provence” style, which is often used for ceilings and floor beams, for example, in basements or attics, thus creating an atmosphere of antiquity.
Multilayer processing
To give the wood an even more antique look in the interior and at the same time look as if it is already quite worn out, multi-layer painting is best suited for aging.
Even before painting the wood, they try to make the surface as textured as possible, damaging it different instruments, for example, with screws, hammers, saws. This creates the effect of highly worn wood.
Already with a relief, the wood surface is covered with a layer of primer paint until completely dry. When it dries, a fairly thick layer of dye is applied on top, which can be used as tinting paint or antiseptic colored compounds, which gives the wood even more protection.
It is better to use for applying paint liquid formulations, which spread well and provide an even layer. After the paint has dried, a second stage of mechanical aging is carried out using tools.
At the second stage, the damage must be applied carefully so that it is small. This damage layer is also covered with a white translucent glaze, which, unlike primer, can have an uneven layer to create desired effect relief.

The varnish gives the aged surface an even more noble appearance.
Then, after drying, the top layer of white glaze is completely removed with a metal brush. This allows you to give the wood a relief look with a fairly contrasting color pattern.
The quality of the aged surface depends on how well the white glaze was diluted. Before aging the wood, it is recommended to mix it with white spirit in a 1 to 1 ratio.
Other methods
Most quick way How to age wood at home, which does not require much effort - this is aging wood with a brush and one type of glaze. First of all, a metal brush is used again, with which you need to scrape the grooves on the surface in the longitudinal direction.
Covering with white glaze allows you to give this surface an antique look. Finishing the surface is carried out using a brush.
Using this method, you can obtain a bleached wood surface, for which the aging effect is ensured by treatment with a stiff brush.
Video: master class on aging wood
Using wood in interior design is always a win-win. This is the most beautiful natural, aesthetically perfect, breathable material. In addition, it has a beneficial effect on human energy and has bactericidal properties. Looks great in any room: furniture, floors, doors, ceiling beams, various decorative elements made of natural wood, which is easier to process than other materials.
Why artificially age wood?
It is difficult to get a definite answer to this question, but there are three main answer options:
- Personal preferences.
- The processed material allows you to create one of fashion styles: vintage, shabby chic, retro, Provence, country style.
- If you don’t have enough money to buy antique furniture, you can age the wood yourself. Subsequently, nothing will prevent you from passing off a table or chair made of such material as a product with history.
How to age wood. Master Class. Brushing

There are several ways to achieve the desired result. The most interesting and most used of them is the texturing or brushing method. Its name comes from the English word brush, which means “brush”. The essence of this method is that soft fibers are removed from the top layer of solid wood. As a result of processing, the surface becomes embossed. During the natural aging process of a tree, the same changes occur, but this takes a very long time. Brushing is considered the closest to reality method of simulating antiquity. It is used to give wood a distinct textured texture.
What types of wood are suitable for brushing?
Convert wooden surface antique, using the brushing method, is quite easy and at home. But not all wood can be processed in this way. In order to age wood, you need to use species with a clearly defined texture: pine, oak, larch, ash, walnut. And maple, beech, cherry, pear, teak and some exotic trees are categorically not amenable to mechanical aging. It is useless to use this mechanical method and for products made of MDF. But how to make aged wood from these materials if others are not available? For this case there is chemical method. If it is necessary to age the wood coniferous species, then it would be more rational to use the mechanical method.
Mechanical restoration

Brushing is a rather labor-intensive process. The main tool for this is a stiff metal brush. Since it is not possible to quickly age wood in this way, the process can be accelerated. To do this, you will need a drill or grinder equipped with a special wire brush.
Processing wood with power tools is a rather unsafe process, associated with characteristic vibration and the risk of tearing off wood chips and metal rods. Therefore, you need to know how to artificially age wood without getting damaged. It is recommended to carry out work in a protective suit. To prevent small debris and dust from getting into your eyes, you must wear special camouflage goggles or cover your face with a shield, and use a respirator to protect your respiratory tract.
Chemical treatment
How to age wood with your own hands without using special tools? To do this you will need stiff sandpaper. It requires cleaning the surface and then applying an ammonia solution ( ammonia), which causes a noticeable darkening of the wood. As a result, the structure of the wood will be able to appear especially clearly, and the noble darkening will give the finished product an antique look.
Depending on the desired degree of aging, such treatment can be light, superficial, using a coarse polymer brush, or deep, when growth rings become visible. At the same time, it is very important not to overdo it, since you can get not the desired textured noble product, but spoiled, loose wood.
After the initial rough cleaning, regardless of the processing method, the workpiece must be brought to the desired aesthetically pleasing. To do this, burrs are removed from the surface, then the product is polished with a polymer abrasive brush. After this, the wood must be additionally carefully lightened with sandpaper and given a final gloss.
Patination

To obtain the desired antiquity effect, mechanical processing alone is not enough. Next, you can simply coat the product with varnish. But it is also recommended to perform the so-called patination. This will allow you to better emphasize the relief surface of the product. Patina is a characteristic luxurious gloss that wood acquires over the years. Recreating it at home is done in several stages and requires a lot of effort.
Patination is the process of applying special compounds and stains to the surface being treated. They are selected depending on the desired color and shade of the finished product. The compounds are applied in such a way that they get into the pores of the wood that open during mechanical processing. It is important to achieve a patina effect, in which the wood's deep pores would look a little darker and more contrasting than more light surfaces. At independent execution For such treatment it is recommended to use paint desired color. To do this, the surface is first painted completely, and then the top layer is removed with a sponge or cloth without waiting for it to dry. As a result, the tree appears more ancient and noble.

But patination is not necessary at all. Products painted with antique enamel also look great. With the help of such materials, you can create a real masterpiece that can only be distinguished from a real antique by a true connoisseur of antiquities. One layer of enamel should be applied to the surface. Then the wood needs to be dried and another layer applied. When re-painting, the enamel must be chosen more liquid and of a different color. When the wood is completely dry, you need to wipe the surface with sandpaper so that the bottom layer shows through and creates abrasions.
Toning. Varnishing
After patination, more toning should be done. For this process, compositions based on natural oils and resins are used. At the last stage of processing, the wood is coated with 2-3 layers of varnish. Then rub it with a soft cloth to add extra shine. Varnishing consolidates all previous stages and gives the product a finished look. Although the process is labor-intensive, anyone can master it. The main thing is to follow technology. Then it will be clear how to age wood with your own hands.
Brushing secrets
How to age wood to get the best effect? To do this you need to know some subtleties.

- The main surface is painted with the following colors: white, red, black, blue, yellow, purple, brown, orange. For pores, use blue, red, yellow and white colors.
- If you look at a board tinted with paint at an angle, you will notice uneven application.
- Manual brushing allows you to do the work more artistically, although the process will be very lengthy, unlike the automatic method.
- The more defects (knots, curls, eyes) the wood has, the better the product made from it will look.
Where can treated wood be used?

Not in every home you can find treated material, since simply aging wood is not enough. It is very important to use it wisely in the interior. Thanks to the brushing method, you can create exclusive, almost antique products. For example, pieces of furniture: exquisite bookshelves, chests of drawers, cabinets, kitchen sets, country furniture, picture frames or mirrors, candlesticks and other decor.
This method is perfect for processing parquet and floorboards, as well as for making doors, partitions, and various wooden elements. Antique-treated wood is often used to decorate the walls of a home bath or sauna, non-standard rooms or an entire house, retro cafes, bars, and billiard rooms.
Today it is no secret to anyone how to age wood. There are many other methods besides brushing. They differ in the complexity of the technology and the amount of time spent. But regardless of the choice, aged wood helps to create a unique spiritual atmosphere in any room, connect eternal values and the spirit of modern times, and fill the house with the atmosphere of noble antiquity.