Happy are those whose garden is filled not only with flowers and all kinds of decorations, but also with children's laughter. Children are the main connoisseurs of country adventures. We try to take them away from city noise and smog so that they can enjoy nature and breathe fresh air. But it’s not enough to bring a child to the dacha; he needs to be occupied with something. A do-it-yourself sandbox built in the garden is an excellent place for children to play.
When creating a sandbox for your child and his friends, you must be guided by the basic principles of its placement:
- Forethought. Children should be within sight of adults, so the sandbox should be placed so that it is clearly visible and accessible.
- Hygienic requirements. There is no point in placing a place for games under trees, otherwise not only falling leaves, but also bird droppings will create unnecessary problems.
- Protection. Direct sunlight does more harm than good, so sun protection is a must.
- Ease of use. When calculating the size of the structure, it is necessary to take into account the approximate number of children who will use it.
There are standard standards for children's facilities. The structure is made of wood, as the most environmentally friendly material. Usually this is a square, the side of which is from 2.5 to 3 m. Approximately 2 m³ of sand is needed to fill such a structure. If you make a standard sandbox, then you need to take pine boards 25-30 mm thick as the material for it.
It is important to follow the basic principles of placing a sandbox so that your child will play with pleasure, but under supervision and in a place protected from the sun and debris
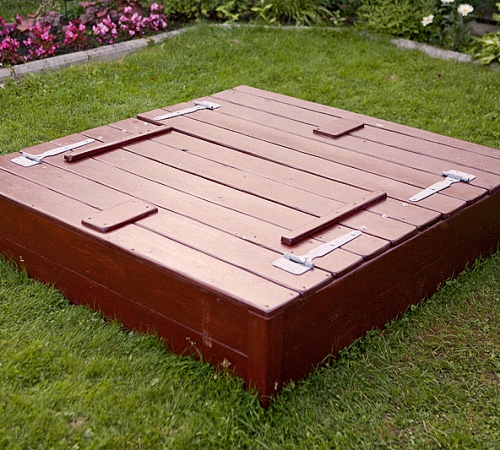
The sandbox is quite standard in appearance, but it has everything you need: the child is under the mother’s supervision, the surface of the structure is treated, and the sides make the playing process more convenient
The process of constructing a standard sandbox
When thinking about how to make a sandbox with your own hands, you should initially determine the type of future structure. If the design is standard, then it is enough to select an area of approximately 2x2 m in the garden, free from overhanging tree branches, and you can begin to create a future place for games.
Preparing the site for installation of the structure
Let's be realistic and choose a structure with dimensions of 1.7 x 1.7 m. For two or even three kids, such a sandbox will not be small, but it will take up little space in the garden.
Marking the area for the sandbox is not at all difficult; you need to have four pegs, several meters of twine and a tape measure to correctly measure the distance
The site for the future structure must be prepared. For this purpose we take a cord and pegs. We mark the perimeter of the sandbox and dig a hole 25 cm deep inside the fence. The fertile layer that we removed will be very useful in other areas of the garden. So, we got a platform 170x170x25 cm.
Sandbox base
You can limit yourself to digging a hole, but the earthen foundation of the sandbox will create problems in the future: the sand will quickly lose original appearance, will be dirty and will have to be changed frequently. It is better to think in advance about how to make the garden sandbox as clean as possible. A dense base that will prevent soil and sand from mixing is an excellent way out of the situation.
A sand cushion will help level the soil surface. Pour sand into the bottom of the hole. A layer of 5cm will be enough. The sand must be compacted well, after which it is covered with special material.
In principle, paving slabs can also be used as a base, but sand covered with geotextiles is no worse, and there is less hassle with it
Geotextile or agrofibre – modern materials, with the help of which a quick and elegant solution to the problem is found. If we take, for example, polyethylene, the protection will be airtight, but after the first rain, the structure will have to be dismantled due to accumulated water. Geotextiles allow moisture to pass through perfectly: all the water will simply go into the ground. But neither moles nor insects that live in the ground will be able to get to the top. If you use film or plywood, you need to make drainage holes in them.
There is little left: start and finish
We prepare bars 450x50x50 mm. They will be located in the corners of the structure. Considering the fact that part of the 15cm long bar will be in the ground, these parts must first be treated with an antiseptic. Bitumen is perfect for this purpose. We hammer the bars into the ground at the corners of the future sandbox.
For each of the four sides of the structure we construct a shield from pine boards. Its width will be 30 cm, and its thickness will be 2.5 cm. You can take one wide or several narrow boards - it doesn’t matter. It is much more important to thoroughly treat the surface of the shields so that there are no knots, protruding chips, or nicks. We definitely don't need splinters and scratches!
The sandbox is almost ready, and the sides give it a completely finished look; There are only a few final touches left, which we will discuss below.
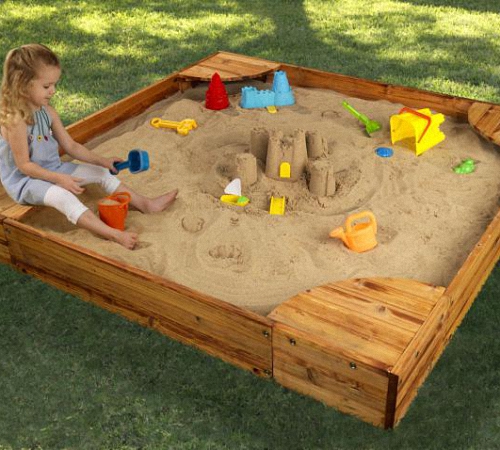
It should be comfortable for children to play; for this purpose, sides can be made into the structure. We lay 4 boards along the perimeter of the structure, which we also carefully plan and inspect. Children can use the sides as seats, as display cases for Easter cakes or stands for buckets, molds and spatulas.
Small but useful additions
Cover - a measure of protection
Let's modernize it a little standard option and add a lid to the finished structure. A sandbox with a lid is an option for prudent parents. Why is such an unusual detail needed? It's simple, using the lid we:
- protect the sand from rain;
- we will not allow the wind to carry leaves and other possible debris here;
- We will not allow cats and dogs into the building: let them look for another place for the toilet.
So, we came to the conclusion that a cover is necessary, so we will make a wooden shield by securing several boards to the blocks. It will need to be picked up and put away before the game. But the baby will not be able to do this on his own. It is worth thinking about a door lid, which can consist of two parts. For it you need to make two shields of appropriate sizes and fasten them on hinges. Equipped with handles, such doors can be opened even by a child.
This creative structure is equipped with a convenient lid: even a child can open it, and it can also be transformed into benches
If the procedure for constructing a lid turns out to be impossible for some reason, you can limit yourself to an awning or film. Fixed with an elastic band or simply with bricks, these canvases will perform the main function - protective.
Canopy or fungus
Fungus is an element without which the creation of the sandbox of our childhood was indispensable. This rather decorative detail also has a certain protective function. Under the fungus you can wait out sudden rain, and it protects babies well from the sun. Often a table was attached to the base of the fungus, which performs the same function in the structure as the sides.
A sandbox with a fungus is a safe and easy-to-play structure, in which there is nothing superfluous and has everything you need
Let's choose wood as the most reliable material for children's structures. For the fungus stem, take a 100x100 mm beam. Approximately 3 m of beam length will be enough. Indeed, for greater stability, the stem of the fungus must be dug into the ground to a depth of at least a meter. Do not forget to treat the leg of the structure with an antiseptic. For mushroom cap We make triangles from boards in advance. They should be nailed from the inside to the stem of the fungus, and sheathed on the outside with thin plywood. The width for a cap within 2.5 m will be quite sufficient.
Of course, this type of canopy is not the only one that can be built over a sandbox. Human imagination is limitless, and you can come up with other options that are no worse.
Choosing the right sand
Usually river sand is chosen for children's games. It is considered to be the purest and contains the minimum of foreign impurities. Store bought building materials quartz sand not bad either. Any sand requires sifting. You never know what can get into it and ruin the child’s fun.
By the way, there are even special sands for children’s structures, from which it is more convenient to sculpt figures: they have a higher clay content. Special fragrances are added to this material, which can repel unwanted visitors to children's sandboxes - cats and dogs.
We could also talk about all sorts of ways to decorate a sandbox, but let the parents’ imagination complement this article original ideas. Now you know how to make a cozy children's sandbox. It is quite possible that the structure in your garden will become the real highlight of subsequent publications.
When there are children in a family, it is important to properly organize their leisure time, especially at a summer cottage, when parents are busy in the garden. Improving a children's play area begins with an idea for decorating a sandbox with your own hands.
Today there are many offered interesting options– from multi-level structures in the form of ships with sails to the simplest circle of tires. But not only the original design and convenience are important, but also the safety of the place for children to play excitingly.

What materials are used for the construction of country sandboxes
A dacha is a place where, in order to save money, everything that was waiting to be used in the garage, shed, on the balcony and mezzanines is used.

Much of what was put aside “just in case” is also suitable for a playground with a children’s sandbox:
- bricks and foam blocks;
- wooden blocks and bars;
- cutting boards;
- old skis;
- pieces of tarpaulin and camouflage netting;
- plastic bottles;
- bald tires.
The presence of suitable material determines the shape, size and height of the sides of the sandbox being constructed.

For maximum convenience and hygiene it should have:
- lid;
- awning, canopy or “mushroom”;
- planes for laying out “pasochki”;
- bench or seat;
- storage space for scoops, rakes, molds and buckets.

If necessary, some materials are purchased in addition. Special attention It is worth paying attention to the quality of the paint used to open the sides of the sandboxes. It should be non-toxic, odorless, dry quickly and not stick to your fingers.

It is advisable to carry out the painting work in the absence of children, showing the finished result as a gift, like a photo of a sandbox in bright colors.
A sandbox is needed not only to keep the child busy, it is useful for his development.

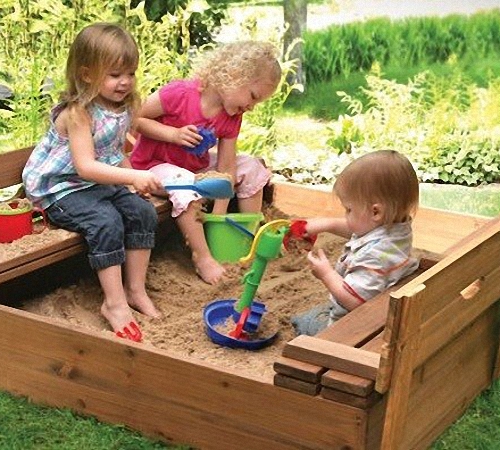
The construction of figures develops spatial thinking, fine motor skills and creativity of the baby. Two or three companions in one sandbox - an opportunity to communicate and learn to build relationships.

If children have too developed possessive ambitions, it is advisable to build several departments with sand and give them their own equipment.

The quality of sand in sandboxes at the dacha, as well as preschool institutions, there are special requirements. The best choice is fresh river or quarry sand, which must be sifted to remove large fractions, glass and debris.
During play, it gradually crumbles and spreads throughout the area, becoming clogged with dust and garden vegetation. Over time, it is not only replenished, but also changed 2-3 times during the summer.


The children's sandbox should be closed from unexpected “visitors”, and the soiled sand should be taken outside the site. A convenient lid for sand can be easily built from leftovers. old furniture, inflatable boat and other available materials.

Choosing a site for a children's sandbox
It is advisable to improve the favorite place for children to play with sand. Lawn or paving slabs much better than a neglected lawn with roots and branches.
Ideally, a cultivated place with a green lawn, but gradually it will be covered with sand. A sandbox can be built among the flower beds, right next to garden path in landscape design when there is no other place.

Note!

The best location for the playground is opposite the kitchen windows, where mother and grandmother often cook. The baby will be visible, but no one will distract him from the exciting game.

Tip: If there is no suitable place at all (around the garden), a mobile sandbox in the form of a box on wheels can be moved under a window or removed to another place along the hard surface of the patio.

But you need to be very careful when a car or motorcycle drives into the yard.
Attention: It is not advisable to build a sandbox under a tree from which flowers, branches, leaves and ripe fruits are falling off. Wasps and flies flock to rotting fruit, which are unsafe for children. Caterpillars may fall from branches. When processing trees from garden pests Toxic chemicals may enter the sandbox.

How to make an inexpensive country sandbox with your own hands
The simplest round-shaped structure is made from a large tire. In this case, sandbox drawings and additional costs are not needed.

- On the prepared site, mark the place where the tire with sand will stand.
- The bottom is secured to the ground or paved area with metal pins; the tire can be partially buried.
- The bottom of the “loose tank” is covered with a tarpaulin so that living creatures from the ground do not crawl into the sand.
- The surface of the tire can be painted at your discretion, but can be left uncoated.
- It is advisable to install a bench and an awning nearby, but a beach umbrella is sufficient if the child rarely visits the dacha.

Note!

Another option is a classic square or rectangular sandbox with wooden sides. It's made from leftovers edged boards 20-30 cm high. For the simplest design, you need a drawing to accurately calculate the consumption of materials and mark the cutting of boards.
It’s convenient for children when there are benches or triangular bars in the corners on the sides, and a sun awning or “mushroom” on top, as in the photo.

For 2-3 kids it is better to make a spacious sand box. Any structure is secured at the corners with pegs. It is better to pave the bottom with hollow bricks - excellent drainage and a solid base.

Children love free-form colorful sandboxes made from stumps or attractive objects.

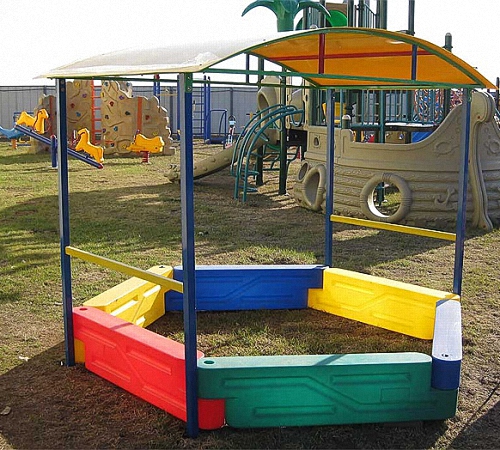
There are also more complex ideas for decorating a sandbox in landscape design - a whole children's playground with slides and houses. For a structure, a rocket, a boat, a car or a tower, a lot of expense and the hands of a master are required.

If there is no grandfather or father in the family who can make a real country masterpiece under the sand, you should not deny your child such joy. You can invite a specialist from a specialized company by showing him a photo example from our gallery.
Note!

DIY sandbox photo


Older children will always find something to do at the dacha, but younger children need something to entertain them. It is important that babies are visible and in a protected place. Therefore, you should think about creating a children’s sandbox with your own hands on the site. Model options differ, as does the material for construction. The main thing is to take into account not only safety and comfort, but also the wishes of the children themselves.
Closing sandbox
A well-maintained children's sandbox with your own hands at the dacha will help decorate the area and give parents the opportunity to take a break from constantly supervising their children. It’s hard to imagine a well-groomed and tidy place for kids to play without a sandbox. If desired, such a design can be supplemented with swings and benches, or a sports complex. Creating a children's sandbox with your own hands does not require much time, and you do not need expensive material. The simplest models can be built with virtually no experience in construction. Well, if you have skills, for example, wood carving or drawing, the site can be turned into a real work of art.

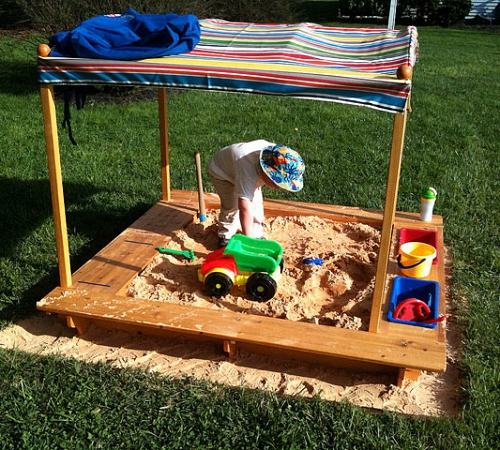
Square sandbox with protective awning
What is important to consider before starting construction of a sandbox.

What places are not suitable for a sandbox?
You cannot place a children's playground in the far corners of the site and behind various buildings, bushes and trees. Obstacles will make it difficult for parents to keep an eye on their babies. If the sandbox is not visible from the window, it should be visible from the yard.
 Folding sandbox
 Wet, dark areas in the country are not the place for a sandbox. It should not be located in lowlands - these are the coldest places. Soil and sand in shady areas retain moisture longer, especially in spring when the snow melts, and during rainy periods in summer and autumn. Playing on wet sand can cause children to catch a cold and get sick. The lowlands are constantly in the shade, and the sand, even if it dries, does not have time to warm up enough in the sun.
 Sandbox made of linear polyethylene in the shape of a crab
 There should be no old diseased trees in the area of the playground, which consists of a sandbox and other structures. Firstly, while playing, dust will constantly fall on the children’s heads. Secondly, in strong winds there is a risk that branches will fall on someone’s head. If there are no open spaces in the garden, then the trees must be checked annually for the presence of dry branches and constantly pruned.
 Sandbox truck
 Too much open place also not suitable for the sandbox. In the heat, children can get hot on their heads, which can lead to heatstroke or sunstroke. It is better to choose a space that is protected from the sun at noon, but fairly well lit at other times of the day. For creating an easy For shade in the area of the children's sandbox, you can use man-made canopies to protect from the sun.
 Wooden sandbox with roof
 Which material to choose
To build a children's sandbox with your own hands, you can use both new material, as well as what is found in garage stocks. These can be objects that can be simply processed; in this form they can be conveniently used to create a sandbox or decorative elements.
 Sandbox with protective awning and seats
 What can you build from:
- bars and logs;
- boards;
- summer tires;
- plastic bottles;
- nets and various awnings.
In addition to the sandbox, from scrap materials on the playground you can build slides, trampolines, ladders and turnstiles, playing tables with a bench, etc. This is especially convenient if children of different ages- everyone will find something to their liking. Children need movement and active rest, they constantly play, run, climb wherever they can climb. Therefore, it is important to arrange the playground so that the games are safe.
 Bright sandbox with seats
 A sandbox, built with your own hands at the dacha, can emphasize the landscape design without being distracted from it, or be an independent bright object. Often playgrounds for children are supplemented with awnings, which are simply necessary in the summer in hot weather. The canopy is made of tarpaulin or awning. If possible, you can build a full-fledged roof with slopes and tiles.
 Sandbox boat
 The same material can be used to create a sandbox with a lid. It is necessary to protect the sand from rain and animal activity. The sandbox lid can be transformed into comfortable seats for children that fold out when lifted.
 Sandbox with a mobile lid-house
 How to decide on the size of the sandbox
It is necessary to choose sizes based on the age and number of children, the area of the yard and the shape of the sandbox itself. When choosing the necessary parameters, it is important to consider several factors.
 Small sandbox with sides
 - Age and height of small players.
The length of the legs of three-year-old children is still not enough to cross the side above 20 cm. For older children, this is not an obstacle, so you can make the side of the sandbox higher - 30 cm. - Amount of children.
If the child is alone, a 120x120 cm sandbox with sides 20 cm high may be enough. Their friends will come to visit the children and play together in the sand and build castles or play with shapes. A sandbox 170x170 cm is enough for three children under 5 years old. This standard sizes, but nothing prevents us from making the structure even larger. - The depth of the sandbox for the game.
There should be so much sand that children, while playing, cannot get to the ground. Typically, a standard sandbox requires at least a ton of sand, which must be periodically renewed over time. - The height of the entire structure.
If there is a canopy or roof, it should be high enough so that a child standing on the side cannot hit his head or reach with his hands. Otherwise, he may try to climb onto the roof, which creates some risks.
So, the dimensions of a children's sandbox in the country should allow children to sit and stand comfortably, and the height of the sides should not interfere with play.
 Small sandbox in the yard
 Preparing the base
So, let’s say the size chosen is 170x170 cm with a side height of 30 cm. Such a sandbox is quite enough for two or three children from 3 to 5 years old to play. Before erecting the sides, seats and roof (if required), it is necessary to prepare the foundation on the ground.
 Small sandbox with lid
 To work you will need pegs, a strong cord or rope, and tape for marking. The cord is necessary to mark the perimeter of the construction site on the ground. Now dig a hole 170x170 with a depth of 30 cm. The center (diameter about 50 cm) of the sandbox must be deepened to 70 cm. The resulting hole must be filled with crushed stone or small pebbles, this is drainage so that excess water can drain out.
 Transformable sandbox unfolded
 The pit for a children's sandbox should have sloping slopes towards the center. This configuration will allow the sand to dry out faster after heavy rains or melting snow. Drainage well in the center of the structure will drain excess water into the ground.
 Sandbox fungus
 Construction of sandbox sides
To build the sides you will need:


Do I need to make a sandbox with a lid?
A cover made of wood or tarpaulin is not a necessary attribute of a sand structure, but it can be beneficial by protecting the sand from debris, tree branches, animals, etc. In addition, it reliable protection from animals that decide to shit where children play. The sandbox can be covered at night with a regular awning made to fit the size of the structure. You can put together a lid yourself from the remaining boards, it’s very convenient. It is enough to knock down a simple wooden panel to fit the size of the structure.
 A do-it-yourself sandbox will give your child many pleasant moments
 A double-leaf lid is even more convenient, but more difficult to manufacture. The easiest part is to make two shields instead of one. You will need to install hinges to the sides and doors, attach handles and, possibly, a latch. When opened, the shields are located behind the side, resulting in comfortable benches with a backrest, so there is no need to purchase additional items. Even children 4-5 years old can open the hinged lid without the help of adults.
 A simple square sandbox made from several boards with a sun umbrella
 Benches and tables
To prevent children from catching a cold while sitting on cold sand and earth, they should be taught a healthy lifestyle from a young age. Sitting in the cold can provoke various inflammatory diseases of the pelvic organs, which, of course, does not go away without leaving a trace. To seat children, you can put together a bench right on the side or make separate seats. A full-fledged wooden bench, complemented by a table, looks good next to the sandbox. If desired, such a table can be in the sandbox itself - it is convenient to lay out sand from molds on it.
 Simple square sandbox with corner seats and sunshade
 If the structure is not square, but polygonal, the seats are usually located on two or three opposite faces. It would not be a bad idea to arrange a place nearby to store toys - scoops, buckets, small rakes and molds. This will keep the site tidy.
 A simple square sandbox with wide sides and seats
 Sun protection
A classic umbrella or “mushroom” will protect playing kids from the sun. A full square-shaped wooden roof is comfortable - it is high enough so that adults and children do not hit their heads on it, and it protects from rain. But such a roof has a drawback - during a sunny day, the shadow is cast in different parts of the children's sandbox. At the dacha or in the yard country cottage There is no need for such an attribute; it is enough to place a light folding umbrella on the south side of the site or use an awning. Unlike a roof, such canopies can be easily removed and moved to any place; it is convenient and practical.
 In the absence of children, the sandbox can be used as a corner of the sandy beach
 Where to get sand
A sandbox filled with river sand with your own hands is the most best option. River sand grains are quite small, there is no debris or sharp objects in them. In addition to sand from the river, quartz is suitable. This sand is further processed by special means that repel insects and animals. The impregnation is safe for children, however, eating shortbread “cakes” is still not recommended. To fill a standard children's sandbox (170 by 170 cm) you need at least one ton of sand.
A do-it-yourself sandbox is an easy way to diversify your summer cottage and entertain the children. If desired, you can build entire play towns with turrets, walls, and multi-level structures. For decoration use paints, carved figures of animals or fairy-tale characters, bright soft pillows on benches, etc.
Video: How to make a sandbox with your own hands
To paint the sandbox in a color suitable for you, you need to select high-quality paints and varnishes. This can be done most conveniently and quickly on the company’s website http://www.promolak.ru/lkm
50 photo examples of sandbox design ideas:


Landscaping a children's playground in your yard is not only useful way improve the area, but also the opportunity to free up a lot of time for childcare. A well-groomed place for children to play is unthinkable without a sandbox and funny decor from plastic bottles, benches and swings. An original do-it-yourself children's sandbox is available to everyone home handyman, and the ideas and secrets of the structure are worth discussing in more detail.
How to decorate a playground with your own hands?
No matter how much parents wait for a kind uncle to come and arrange a place for children to play near multi-storey building, it’s much faster to do it yourself. The warm season passes quickly, and there is no need to waste time at your summer cottage or in the garden of a country house. Moreover, it is not wise to leave children or grandchildren without such an exciting game as the construction of fortresses and “paskas” from sand. The choice of parents depends on the general concept of the playground:
- sandbox design;
- its size and shape;
- materials for manufacturing;
- type (closed or open sandbox).

For landscaping a playground and a children's sandbox with your own hands from scrap materials, many of the things you were planning to throw away will be suitable. Some materials were gathering dust in the garage or on the balcony, some had long been wanted to be given to someone, but then put aside. Some items awaiting recycling will be excellent material for beautifying your yard. Suitable:
- plastic bottles;
- bald tires;
- awnings and nets;
- edged board;
- wooden blocks and other lumber.
Labyrinths, crossbars, slides, horizontal bars, trampolines, play tables and benches are mandatory attributes of a landscaped area. Children grow and develop, and every day is filled with new achievements, which they willingly demonstrate to each other, parents, grandmothers or nannies. And for the sake of healthy mental development You cannot compare children with each other; it is better to praise them for their current successes. Let this be the first neat “paska” made of sand on the side of a children’s sandbox with your own hands - there is a reason for praising the baby and a tasty treat for his efforts.
A sandbox can be a self-sufficient object on a site or fit organically into the overall landscape design. But much more important is how comfortable the children will be in it. In summer, the bright sun is blinding, and well-designed shade is half the success, since children's entertaining games and their heads must be protected from the scorching sun.
The lid for the sandbox can be made of thick polyethylene, tarpaulin or awning. You can also adapt a ready-made large cover, for example, from an inflatable pool. A shield made from the remains of a board will also work, but The best decision- do-it-yourself sliding seats at the children's sandbox, photo:

What is important to consider when creating a children's sandbox with your own hands?
The sandbox is perhaps the most important attribute For summer games children. It is not so important what idea will become the basis of the design on local area, the main thing is that the playground and sandbox should not be dangerous for children and beautiful for everyone.
1. Sand quality.
Clean sifted sand is a guarantee of children's safety. Do-it-yourself closed children's sandbox for a summer residence - the most suitable option, although the most labor-intensive. Coarse river sand should be sifted and should not contain fragments of freshwater shells or glass, so that children do not cut themselves.
The sand gradually mixes with street dust and spreads from the main place. It is advisable to replenish the sandbox's reserves at least once a summer. It is better to completely replace it with a new and clean one, and fill the paths or playground with dusty sand.
2. Alley to the sandbox.
The site where it is located favorite place children's games, must be well compacted. But it is better when there is a path leading to the sandbox, so as not to have to get to it through mud after rain or thickets. If this is a private household, then the sandbox should be part landscape design, and when the child grows up, you can make a flower garden in this place. In an ordinary courtyard, it is better to arrange a sandbox next to a path or paved area.
3. Benches and tables.
Children should not constantly sit on cold and wet sand, and they should be taught to take care of their health. Therefore, the side of the sandbox is made wide enough so that children can sit comfortably and lay out sand figures from molds next to them. But it’s better to make a well-appointed bench and table. There are other ideas for a children's sandbox with your own hands, for example, with triangular crossbars in all corners. In a polygonal sandbox, benches are made on 2-3 opposite walls.
Advice: It is advisable to arrange it nearby separate place for scoops, molds and buckets, so that the equipment does not “sink” in the sand without a trace.
4. Sun canopy.
This is a mandatory attribute of the classic “mushroom” sandbox. But square wooden roof on a high pillar in the center of the sandbox is only partially convenient. It should be made above head level so that children and adults entering the sand do not worry about hitting their heads. But the high roof casts a shadow during the day different places sandboxes. Make a stationary one in the courtyard of a private house wooden canopy not necessary. It is enough to install a folding beach umbrella on a tripod on the south side of the sandbox or pull up an awning while the child is playing.
5. Sandbox location
If there is not enough space in the courtyard of a private house, but the choice is small, and the sandbox has to be built right under the window or opposite the threshold. Children in sight is much better than a sandbox located behind outbuildings, which is difficult to observe while doing housework. It is better to place a large box of sand near a high, blind fence, which will additionally create shadow. And the fence itself over the sandbox can be turned into a board for drawings with colored chalk. The side sides are equipped with benches.
A tall, spreading tree creates a ready-made shadow over the sandbox, but dry branches, inflorescences and leaves, as well as caterpillars falling from it, will not add comfort when playing. Such a sandbox has to be frequently cleared of plant debris. If the tree above the sandbox blooms profusely and is pollinated by bees, this can be dangerous for the kids. Sweet fruits falling from the tree, near which wasps often swarm, will also create inconvenience. If the tree blooms in early spring“earrings” and does not “litter” until the fall, then this option is quite acceptable.
6. Ready-made or purchased sandbox?
Children's sections of hypermarkets offer anything, including swimming pools and ready-made plastic sandboxes. Such a purchase will attract children with a fairly bright island. The finished colorful product with a children's design remains to be fixed on the site and filled with fresh sand. However, synthetic materials cannot be considered environmentally friendly, but bright colors When heated, chemicals can evaporate. And a broken sandbox is unlikely to be repaired. But if there is no man in the house who can build even an ordinary children’s sandbox, then they give preference to a purchased model, which is attractive and quite convenient.

Attention: When painting wooden sandbox The same problems may arise - evaporation of volatile substances in the sun. It is advisable to complete all work and painting in early spring or in the absence of children.
7. Sandbox paint.
If you decide to make a children's sandbox with your own hands from wood, then carefully choose varnish or paint. In construction supermarkets there are harmless, quick-drying dyes, and there is eco-paint - based on natural resins. Check the instructions for drying time, and until it is completely cured, you should not allow children to play in the sand. Most paints stick to your hands after application, and children tend to lick their fingers. The same applies to the construction of a sandbox from large tires, which are painted with bright colors.
8. Sandbox dimensions.
If you have enough building materials to build a favorite place for children to play, then you shouldn’t make it too big. The sand gradually spreads, it has to be removed and new ones brought in. The dimensions and shape are arbitrary, there are no standards, and for young children there is enough space of 1.75 x 1.75 meters. And if there are several children, then “proprietary” disagreements often arise between them, and it makes sense to make a multi-section children’s sandbox with your own hands by drawing up a drawing.
9. The bottom of the sandbox.
Parents often lose sight of the fact that sand poured into open ground, worms and other orgasms come from the natural environment. This is what they did in Soviet times in kindergartens and courtyards. Today there is an opportunity to purchase thick film or agrofibre. Stretching and securing it to the bottom of the sandbox construction stapler, the easiest way is to isolate your rectangle.
But there is one drawback - if there is no canopy, then a heavy rain will quickly fill it. Such a system requires a slope and the ability to drain water, for example, through holes at the bottom of the sandbox walls or in the corners. The bottom of the protected sandbox is filled with crushed stone for drainage or lined with hollow brick.
10. Sides of a homemade square sandbox: the simplest option.
They are usually made of wood - from timber or edged boards. With a minimum of building materials, 4 identical boards, 4 corners for fastening, 2 or 4 boards for a side in the form of a seat, plus reliable bars in the form of pegs are enough to fix the structure. An important condition is that all boards must be carefully sanded so that children do not get splinters. Before painting, cut boards or finished design treated with an antiseptic against rot and fungus and coated with drying oil a couple of times. It is better to paint it in any cheerful color.
11. Design and decoration of the sandbox.
This is the most interesting part of building a sandbox, where you have the opportunity to use your creative talent and give free rein to your imagination. The finished sandbox and the fence next to it can be repainted and drawings can be applied in a general manner:
- stenciled prints of children's hands;
- funny people in colorful clothes;
- emoticons or animal faces;
- geometric figures;
- letters and numbers.
With proper design of the sandbox, it can become not only a comfortable place for children to play, but also a worthy decoration of landscape design.

Fantasy sandbox options
The sides of the sandbox do not have to be made of wooden board, processed bars driven into the ground with a picket fence - great idea. They can be made of different heights, like steps that children willingly step on or run on. With this design, the size and shape of the sandbox can have variations in size and configuration, as when implementing the idea of a children's sandbox with your own hands in the photo:
A polygonal sandbox is not so common, but in the yard there are 3-4 apartment buildings Often they make several sandboxes. Another option is to make several different colored polygons with sand.
There are many others interesting ideas How to make a children's sandbox with your own hands. Caring parents understand that children do not just spend time in the sandbox, but here their creative inclinations develop and skills are formed. Sand - excellent material for creation, but aesthetics environment shapes their taste and craving for beauty. The most complex option is a round, rotating sandbox in the form of a transformer, consisting of several sections.
Wide pallets are used as containers for sand, wooden frames, heavy truck tires and other materials. The most popular solution is an original sandbox made of tires, which is laid out in a polygon and painted in different colors.
The most labor-intensive thing, but interesting solution- build a sandbox with a mobile lid in the form of a tower, which moves to reveal the sand. In this case, the rear legs should be on wheels, and the top side will serve as a guide.

You can place a table in the center or side of a large sandbox, and build benches on the sides. In this case, it will be easier for children to work with sand, collecting it under their feet and laying it out on the table. A children's sandbox with a do-it-yourself lid in the form of a bench is convenient for children to play for long periods of time.
The most ineresting design option- multi-level sandbox. It’s easy to make it from an old boat, design it in the shape of a ship and add comfortable seats. Then there will be sand both in the lower pan and in the upper part of the boat. A sail-shaped awning will protect playing children from the sun.
Children are also interested in structures in the form of recognizable objects:
- rocket;
- mansion;
- car;
- train;
- a slide or maze with landing in a sandbox.
More detailed master class on how to build a children's sandbox with your own hands - video: