Glk, he is a hyposprict sheet, pretty cheap Material Based on cellulose and gypsum. It has a low weight, easily mounted on any plane (using aluminum profiles). Directly when it is installed, it is not a big indentation from the base of plaster. If necessary, the lines are aligned around the perimeter, which makes it possible to hide the visual defects of the main ceiling without its analysis.
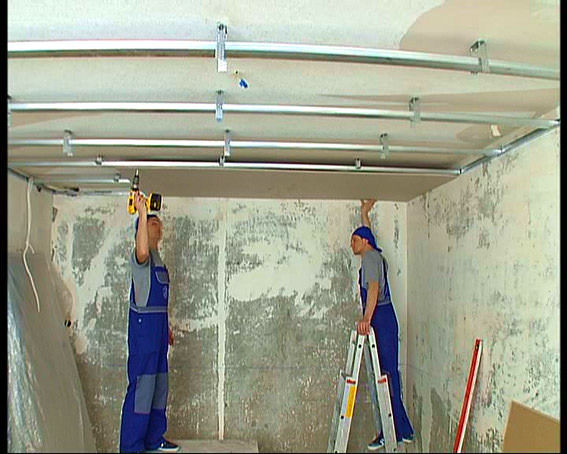
SAMI best technology Montaja sheet plasterboard The ceiling is the use of the KNAUF system. That is, the mounting of each sheet separately on the pre-mounted aluminum profile. He, in turn, can hardly be fastened both to the walls and the main ceiling.
The suspensions on the belts are made if necessary (for example, if the length of each span is more than 4-5 meters).
It is necessary to mention that GLC is allowed:
- paint;
- finish;
- clog the PVC film;
- blind.

Mounted box of GLC on the ceiling
What will the mounted box? The ability to create a two-level. One of the parts (the basis of which will be below) can be installed all the necessary lighting. There, without problems, there are other communications (the cable for the Internet, the conclusion of the counter). The most difficult thing is the calculation. Installation implies that the first level will initially be fully fixed. From above - kobobov on new guide profiles are attached.
It should be borne in mind that the final mass of the design will be quite large, so you need to provide an additional fastening in advance.
But for this purpose it is best to fit:
- partitions (in compliance with SNiP);
- fake facing, behind which hidden hats of selflessness;
- rigid second level liner.

Which of the options will be ideal for a given situation? It is better to trust professional builders or designer.
Painting GLC Ceiling: Options
Ceiling staining based on sheet cabarton sheets is best to perform paint on water based (emulsion). Its key advantage - absorption into the cellulose basis. Accordingly, in the future it will not burn out under sunlight, do not increase surface roughness. Similar properties possesses acrylic paintbut it is still not to use it indoors. To all other things, painting should be performed from the spray gun, and not traditional rollers. After the latter, visually noticeable dents will remain.
Do I need to generally paint the GLC ceilings? Advantages it gives several:
- large mechanical stability;
- insect protection (if such in general are found in the house);
- waterproofing from steam.

The disadvantages include only the fact that re-painting will have to do every 3-5 years. And if there will be no problems with the usual ceiling, then on two levels they will have to tinker.
GLK or GVL for ceiling: distinction
GVL, he is the same gypsum - this is the most plasterboard, but also produced by several different technology. Its thickness is almost similar, but use it mainly in those rooms where there are increased requirements for fire safety. And them exterior finish Not recommended. However, many manufacturers still in factory conditions decorate such sheets with figured sharp and carvings.
Detailed differences in moisture-resistant GWL plates are presented in the article :.
Advantages of GVL:
- reliability;
- higher moisture absorption coefficient (up to 12 liters per square meter);
- absolutely smooth surface.
Mounting GVL sheets Also performed on the predetermined metal carcass From profiles. Device fastening is identical to what is used with plasterboard (KNAUF).

Installation of GLK on the ceiling with your own hands
Mounting the GLC is not difficult to install. The main task in front of the specialist is to determine the nominal level of fastening profiles. As a rule, the indent is from 3 to 10 centimeters. If you plan to put lamps or equip all this with backlight, then the distance is allowed to increase. If at the top is wooden ceiling, It is recommended to sweep it with a layer of fiberboard.
Even if it is planned to make a two-level - the first level is fully set (solid web). The box is cut on this layer. Simple calculator and several mathematical formulas Let learn how much it is for all this material it will be necessary.
Detailed instructions for creating two-level ceilkov In the material :.
The installation order of the ceiling from GLK:
- markup;
- plaster main ceiling;
- installing aluminum profiles that will hold the design;
- alternate installation of sheets;
- installation of eaves at the base of the walls.
This process can be considered in more detail on the photo and video below.

Option: Ceiling from GLC on technology Knauf
With the help of the KNAUF system, you can create another so-called soaring ceiling, that is, which is not attached around the perimeter to the walls. On the sides, as a rule, the LED backlight is attached there.
Fastening a soaring ceiling keeps on:
- profiles with elongated edges;
- belts;
- beams (if necessary).
Suspended ceiling from Knauf-sheets (video)
What is the advantage of the Knauff system? In what is suitable for any home, while after installing the ceiling will not be noticeable at all. This applies to the installation of GVL sheets.
Knauf is a German company that produces and implements construction Materials. Brand is famous all over the world. Products of the organization are famous high quality, ecology, durability. One of the new products - hinged ceilingsMade from drywall. The material is recommended for use for the ceiling space. Ceilings Knauf have a number of advantages over other similar products, so they are in demand at the finishers.
Design features
Ceilings from german companies Knauff - These are sheets of plasterboard and components for mounting. All items are developed by the Organization to facilitate the assembly of the design. The company produces several options for the assembly of decorating elements of different configurations:
- KNAUF SYSTEM SYSTEM SYSTEM SYSTEMS P 112. The base of the structure consists of two parts collected from profiles that are made of metal.
- System P 113. For such a design used single-level framewhich is assembled from metal guides.
- System P 212. This is a two-level suspended ceiling. The kit includes metal profiles for the base, plasterboard sheets.
- System P 213. This is a single-level construction consisting of two types of guide and sheets of the main material.
- System P 211. The frame of such a design is made from bars that are fixed on the ceiling. They are attached to the sheets of plasterboard with the help of various elements included in the set.
Advantages and disadvantages
Ceilings from the company Knauf possess the following advantages:
- Align the surface. This allows you to create a flat, aesthetic base.
- Masked flaws - cracks, differences, other disadvantages. Gypsum hide communications - electric wireshooding.
- Allow multi-level structures with attractive design. Such elements will decorate any interior.
- Suitable for installation point lamps. Plasterboard allows you to equip the lighting system of any complexity.
- Improve sound and thermal insulation of the room. Plasterboard itself prevents heat loss and penetration into the premises of extraneous sounds, and in addition, it makes it possible to establish an additional layer for sound and thermal insulation. This is especially relevant in those rooms where bad acoustics and high heat loss.
- Allows you to highlight functional zones premises miscellaneous destinationlocated on one area. For this use different colors, lighting or design.
- The design device does not cause problems. All items are selected in such a way that there is no problem with the installation even in a person who has no experience in construction. At the same time, the mounted ceiling will be high-quality and attractive.
- You can use any finishing material For decorating. However, before these sheets are ground, put off to increase strength, protection against negative influence Environment.
- The possibility of staining. It is recommended to use paints and varnishessuitable for drywall.
- The possibility of partial restoration. If some part of the plasterboard will be damaged, this sheet can be dismantled and fix new ProductIf this allows you to make decorating material.
- Fireproof and moisture resistance. Material from the company Knauf is saturated with substances that protect drywall from fire and the negative impact of moisture. For this reason, the design can be erected in rooms with high humidity.
- Deliver from the so-called dirty work. To equip the ceilings from drywall, the construction base does not need to be aligned with the help of plaster, other similar means.
- Durability. If the ceilings correctly establish and ensure full-fledged care, the element will last for several years without the need for restoration.
- Easily dismantled. When you want to update the repair, there will be no problems with the analysis of the design.
Despite the dignity, the material has both disadvantages:
- it is impossible to equip the element in the rooms with low ceilingsbecause structures reduce the distance between the floor and the ceiling;
- high price;
- it is difficult to secure sheets without the help of another wizard or lifting mechanism.
When arranging the ceiling space GLC, it is recommended to follow these rules:
- the design is erected only after the completion of the reconstruction of the room, since the material is fixed on the smooth walls;
- it is impossible after the ceiling space arrangement to the plates to carry out water-related work, since this, despite the special impregnation, will negatively affect the material;
- sheets are installed at a temperature of 15-20 0 s;
- marking for the design is performed directly on the walls, the ceiling;
- communications are equipped before mounting plates.
Required tools and materials
To decorate the ceiling space with plasterboard, materials will be required:
- set for installation stretch ceilingwhich includes sheets, fasteners, suspensions, other elements;
- roulette for measuring materials, markings;
- scissors for metal;
- screwdriver;
- building level;
- primer, putty on plasterboard;
- brush or roller for applying primer;
- set of spatulas;
- paintwork material on plasterboard.
Before mounting the material, mark on the ceiling and walls. Usually sheets are 10-12 cm below concrete base. In between the plates and the surface of the ceiling, the suspensions are fixed, installed communications and lamps. This space can be filled with sound and thermal insulation.
Plasterboard sheets are fixed at one level. To understand where the material will be attached, a smooth line is carried out around the perimeter of the walls. Do it with a laser, water or construction level.
Next make marking for a frame that is trimmed by plates. Longitudinal guides are installed at a distance of 20 cm from the wall and 60 cm from each other. Transverse profiles are fixed with the same step. The distance can be increased or decreased, depending on the carrying load of the structure and other factors.

When the markup is made ,. Guides are attached on the walls and ceiling. Method of installation of the base depends on the type of frame. Wooden frame fixed as follows:
- the timber is mounted on the basis using suspension;
- the guide bar is attached to building groundUsing lining that help avoid the occurrence of ceiling curvatures.
Metal frame mounted as follows:
- Profiles are fixed on the suspension. Between the guides make a small gap of 10 mm. This will protect the surface from curvature when temperatures drops.
- Under the guide profile fix the compacted tape.
- Whole profiles are fixed on long Walls. For short walls Guides are cut using metal scissors for this. It is not recommended to use another tool in order to avoid damage to the layer, which protects the surface from rust formation. Guides are fixed with fasteners, which are installed every 30 cm.

Perform independently problematic due to large size of the material. The fact is that the sheets are difficult to raise the ceiling to one person. At the same time, the plasterboard will have to not only hold, but also fix with the help of self-tapping screws. For this reason, the assistance of another person will be required. One master will keep sheets, another fix the material.
If you have no help to ask for anyone, you can use a special lift. Automatic device It has high cost, so buying the device for one-time use is inappropriate. It is recommended to take the lift for rent or independently build a design. This requires several bars to make the T-shaped element. Top to the lift are plasterboard and fixes sheets to the base.
GOK Mounting Technology:
- The material is cut to the desired sizes using the corresponding tool for this. From the outside performed a chamfer. After installing the design of the SCOS close with putty.
- Sheets are attached to the frame at a distance of 5-7 mm from each other. When temperatures drops, this gap will help to avoid deformation of the material. Sheets fix across the carrier profile.
- Plasterboard is fixed on profiles with self-tapping screws. Fasteners are installed at a distance of 20-30 cm from each other. However, a step may be different, depending on the load of the ceiling. Self-tapping cooking should drown in sheets by 1 mm.
Finish finish

To increase the strength of the design, protect the surface from moisture and close the seams, perform such manipulations:
- all seams and joints close up with a spacing with a spatula;
- on the seams fix the sickle and put a putty;
- make a break to frozen composition;
- the surface is covered with primer using a roller, brush, or a spacing, then interrupts again so that the primer is dried;
- all fasteners are smeared with putty;
- make a break for drying the means;
- the putty is treated with sandpaper to remove the irregularities left by the spatula;
- on the outer corners, the corners are fixed;
- between sheets I. inner angle Fix the tape, and the space is filled with putty;
- to the entire surface put a putty;
- interrupted to dry the means;
- the base is covered with paintwork or finish with another decorating material.
Ceilings made of drywall from the German company Knauf help beautifully arrange the ceiling space and hide all communications available in this area. Install the design may even unprofessional, carefully studied the instructions. If the work is performed correctly, the element will last for several years without the need for restoration.
Today, the plant is actively in demand. Zhby plant on the site predstavitelstvo-gbi.ru. We have wide customer base and more positive feedback, thanks to an individual approach and a reasonable price.
If you decide to make repairs in the apartment, fixing the irregularities of the walls and the ceiling, insulating the room, create elegant design with various multi-level designs and backlit, then certainly you need to pay attention to such material such as plasterboard. He gives the opportunity to create new look Your apartment, and, which is very important, with your own hands. Working with him is a pleasure, even a newcomer will cope with it, who has no experience in construction. Another important advantage - all this will cost rather cheap compared to other finishes. But when you come to the store, you see many kinds of plasterboard sheets of various manufacturers. Namely, the quality, durability and reliability of repair depends on the choice of GLC. Plasterboard Knauf. - A good option, acceptable by price, which will pay off a long service life. In this article you will find information about the products of this manufacturer and, most importantly, how to build, observing the technology of KNAUF, plasterboard walls and partitions, as well as hinged ceilings from the GLC of this manufacturer.
Requirements KNAUF to frame frame and ceilings
"Knauf" provides a huge part of the construction market. It produces plasterboard of many species, profile, various construction mixes, Materials of thermal insulation. Therefore, it would be good to buy all this in the kit. It will simplify and speed up work, increase the reliability of the structure. If there is no possibility to purchase a set, then you need to take care of the proper quality of materials purchased separately so that they are in their characteristics to be as close as possible to KNAUF products.
PNG "Alt \u003d" (! Lang: Technology knauf plasterboard Walls and partitions "width \u003d" 606 "height \u003d" 311 "srcset \u003d" "data-srcset \u003d" https://remontcap.ru/wp-content/uploads/2017/10/01-3..png 300W "Sizes \u003d "(Max-Width: 606px) 100VW, 606PX"\u003e 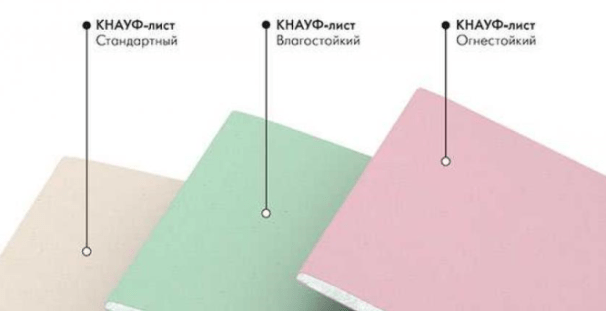
The basic requirements that are needed for the long service of drywall KNAUF, such:
- It is necessary to install using the KNAUF GKVL. This prevents the material damage when freezing the frame profile
- To prevent deformation or saving a frame under the mass of GLCs, long profiles should be installed in a checker order.
- For fastening, special screws Knauf or LN9 screws are used, you can also use a gypsum coaster for drywall
- Over the doorway, the docking of sheets is prohibited, this is done so that the vibration and weight of the door itself do not damage the connection of sheets
- After assembling the frame, it is necessary to protect its surface with thermal insulation ribbon to protect against freezing
Under the guidance of these rules, observing all the instructions and recommendations of the KNAUF on the installation of plasterboard, you will achieve best resultAnd repair does not have to update for many years.
Installation of drywall on technology KNAUF
Installation plasterboard sheets Knauf is not very different from working with HCL of other manufacturers. The difference is that Knauf releases almost everything that is needed to cover the walls and ceiling by drywall, and all this is a complete system, which will simplify and improve work, because all parts are ideal for each other, you do not need to suffer with non-standard fasteners and other trouble.
Wall Facing Technology and Mounting Gypsum Country Parts Knaf
Under GOL. Knauf Wall prepare the same as for other brands. First, purified from the remnants of last repairs (old wallpapers, framework elements). The surface is ground, processed by special compositions to protect against corrosion. If there are cracks in the wall, they must be elapsed by plaster.
JPG "Alt \u003d" (! Lang: Technology Knauf Plasterboard walls and partitions" width="620" height="627" srcset="" data-srcset="https://remontcap.ru/wp-content/uploads/2017/10/Rigips_povodne_7-1013x1024..jpg 297w, https://remontcap.ru/wp-content/uploads/2017/10/Rigips_povodne_7.jpg 1200w" sizes="(max-width: 620px) 100vw, 620px">!} 
Instructions for mounting drywall Knauf on the walls and when creating partitions:
- A frame plan is thought out, a doom is created on it - first the vertical guides, they are horizontal. The more horizontal, the greater the strength and rigidity of the structure. The frame is mounted from the steel galvanized profile, it is desirable that it also was brand Knauf. But you can also use wooden bars To create a frame;
- The frame is two species: static and mounted. The first is attached directly onto the wall, it is considered more reliable because of this, and the second is attached to the designed suspensions specifically for this. It takes out the square in your apartment, but it happens very convenient to hide communications;
- The emptiness between the profile is filled with mineral wool or other similar material for best thermal insulation and protection against external noise;
- If you need to cut off the sheet, use the hacksaw to mark all over the surface of the sheet, and then gently shake. Ends are processed by primer;
- Plasterboard is attached to the profile or screws Knauff or self-drawing. The step should not be more than 25 centimeters, by calculation on each sheet accounts for 8 screws;
- On the seams of the sheets of sheets glued a special tape, which, after coated with plaster;
- Of finishing Gypsum Carton requires only primer, then you can lay it on it decorative tiles or stick wallpaper.
Mounting technology of drywall Knauff on the ceiling
Build a frame for plasterboard KNAUF is made in several ways, depending on structural features Ceiling and room itself. Use for this and wooden brushes, and metal profile. Most often apply five types of structures:
- "System 111". Used for wooden bars. Two-axis frame. The material is a tree coniferous rocks, humidity no more than 12%, otherwise after drying the frame is very deformed
- P 112. Made from metal profile Knauf, also two-axis
- P 113. The same frame as the previous one, but is executed in the same axis. For these two types, an ordinary galvanized profile for ceilings is applied
- P 131. A significant difference from the rest - the profile fastening is not made to the ceiling, but to the walls. Must provide even greater rigidity, so used reinforced profile Knauffdesigned to create plasterboard partition systems
- P 19. Sophisticated multi-level construction is a bright representative of architectural and decorative ceilings
Data-Lazy-Type \u003d "image" data-src \u003d "https://remontcap.ru/wp-content/uploads/2017/10/04-77-600x338..jpg 600w, https://remontcap.ru/ WP-CONTENT / UPLOADS / 2017/10 / 04-77-600x338-300x169.jpg 300W "Sizes \u003d" (Max-Width: 600px) 100VW, 600PX "\u003e 
Installation wooden carcass Comes in several ways:
- With direct suspension or speed. Using the second, you need to change the side of the attachment
- Straight on the ceiling by self-drawing
Metal profile frame mounted with multi-level suspensions. P 113 is used where heavy ceilings will be, so the material for it serves wall profile, and the distance between the dowels should be not more than 30 cm.
You significantly reduce the time spent on repair and save force if you follow some Tips and Recommendations:
- Fastening sheets worth starting from the corner or from the center, in order to protect the sheet from deformation and cracks
- From the edge of the sheet, the plasterboard should be removed the chamfer. But for different species at different angles (45 or 22.5)
Technology KNAUF on the installation of plasterboard provides for seams with a special tape:
- First, the seam is filled with putty;
- Then laying ribbons for seams;
- Putty tape coating with a thin layer.
Also, the special separation tape KNAUF is installed between the GLC leaf and an outer angle.

class \u003d "Eliadunit"\u003e
From the author
I continue a series of articles on the technology of the company Knauff on the device plasterboard structures. Today there is a suspended ceiling on a single-level frame of metal profiles, under the brand P113 (P-113, P113).
The ceiling P113 differs from the ceiling P213
The suspended ceiling on a single-level framework in the designations of complex systems of KNAUF is indicated as P113 or P213. I will explain what the difference between these labels.
Frame of both systems is the same. This is a single-level framework, from standard metal profiles Knauf weighing on the suspension. The frame crossing is connected by a single-level connector of the crab type. The difference between P113 and P213 systems, lies in the types of sheets used to cover the ceiling.
- Ceiling P113 uses drywall Knauff-sheets.
- In the ceiling P213 for the trim, gypsum fibrous Knauf-Superlists are used.
Important! The design of the frame of both types of ceilings is the same.
Ceiling design P113 (P213)
Let's look at the Ceiling Scheme P113. In the listing of structural elements, I will indicate the need for materials for one square. The meter of the ceiling, which weighs 13 kilograms.

- Knauf sheets NEW MARKING: GSP- A / or H 2 / or DF). Thickness is 12.5 mm;
- Metal profile PP (ceiling) 60/27: 3 meters need;
- PN profile (guide) 28/27 - Metage around the perimeter of the room + 10%;
- Extension for profiles (if needed) 60x27;
- Connector "Crab" 60 \\ 27 - 2 pieces;
- Ceiling suspension with clamp 60 \\ 27 - 1;
- Suspension craving or straight suspension - 1;
- Screw tn 25 -23 pcs;
- Anchor - 1 piece;
- Dowel K6 / 35 for fixing the guide profile (2 pcs per 1 meter profile);
- Paint ribbon - 1200 mm;
- Putty - 400 grams;
- Primer - 100 gr.
Mounting scheme

class \u003d "Eliadunit"\u003e
The largest amount of questions in the mounting of the suspended ceiling is the distances between the fasteners of the suspensions and as a result, the technological distances of honey profiles in the framework of the framework. To this question, such an answer:
- Maximum suspension height (lowering) ceiling: 1.1 meters;
- Max. gap between carrier profiles: 0.5 meters;
- Max. The gap between the main profiles: 1.2 meters;
- From the wall to the first main profile of the frame: 1.2 meters.
Note: The main profile is short profile segments between long carrier profiles. Bearing profiles, profiles that are attached plasterboard sheets.
Where the designs of the ceiling p113 apply
The complex system "Ceiling P113" is used in any premises. Depending on the view of the room, the type of sheath sheet changes. So for normal premises, the GSP-A sheet is used, in the humid room, the GSP-H2 sheet. In the flammable room GSP-DF.
Stages of mounting
I will list the main stages of installation (briefly):
- Clean the ceiling from old structures;
- Make marking for mounting suspensions;
- Secure the suspensions on the base ceiling;
- Collect the frame, constantly checking the frame level;
- Attach to the carcass Knauf Sheets (GLC) Observing the offset of the sheets;
- Seams between sheets are sweeping;
- If necessary, the ceiling surface is completely sweeping in 2-4 layers;
- By readiness, the ceiling is painted or decorated.
Wiring performed behind suspended ceilings is considered hidden. Performed according to PUE standards for hidden wiring With the ability to replace it without dismantling the ceiling, in pipes or corrugations. For access to sawn boxes, technical hatches are equipped. Recommended WGng cable or imported analogs (NUM). Installation of electrical wiring is carried out before mounting the ceiling.
You can download the instructions (Yandex.Disk)
Ceilings Knauf are considered the most popular in our time, because with their help you can seriously convert the ceiling surface of any indoor room. In this article we will try to adequately answer questions about how the installation of the ceiling on the KNAUF system is installed, as well as what is routing Knauf and tell about its purpose.
Installation instructions
By installing a plasterboard ceiling, you need to adhere to some instructions that will help to do the work qualitatively and correctly. They differ little from the requirements for the standard installation plasterboard CeilkovBut have their own characteristic features.
Features of the mounting of suspended ceilings from GOC on the Knauf system:
- Ceilings can be installed on an unprepared ceiling surface.
- The ceilings of the KNAUF system are installed on ready-made ceiling floors, decorated with plasterboard.
- The use of the system is possible on a metal, wooden and already closed materials Frame.
Marking of the plane of the suspended ceilings
Deciding Materials and Tool for Mounting decorative finishWe need to correctly marking the ceiling plane. According to the requirements of technology, it is necessary to retreat from the finished ceiling at least 10 - 12 cm, because this distance is necessary for the installation of special support of suspensions, gaskets, installation of decorative lamps, so on.
Marking is made around the perimeter of the walls, with the help of water or laser level, as well as painting shoelaces, which will put even lines on the surfaces.
After marking the walls, we understand at what level the plasterboard ceiling can be located, but now we need to make marking under the carrier metal profile, on which the sheets will be fixed.
The longitudinal bases of the frame are placed in a step that depends on the load of the ceiling, but they are most correctly positioned at a distance of 60 cm from each other. The transverse carrier profile is placed with the same step, but the distance may vary, depending on the requirements of the technology, the weight of the ceiling, subsequent finishes, decorative finishes and other parameters.

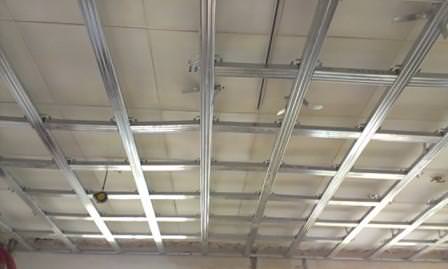
The frame for GLC ceiling made of metal profile is mounted on the walls and the ceiling. Initially, on the lines marked by the walls, we set the carrier profile. Further, on the ceiling markup, with the help of thrust and suspension, set the basic bearing ceiling frame. It is very important to work correctly with a length of the profile, its uniform stacking in relation to other parts of the frame, as well as its level. To do this, you can use leveling threads, laser or magnetic level.
It is very important to know that the profile can always be cropped or lengthened, tighten or omitted from the ceiling, the main thing is that the framework is in a single plane, which will allow to further work to build a really smooth and beautiful ceiling.

The ribs of stiffness, or the cross-carrying profile, is installed on the main carriers using a single-level connector, which is very simple, as the special fastener is easily snapped on profiles. After its installation, it is necessary to check all levels, and if the work is high quality, copper the longitudinal and transverse profiles Between themselves for metal screws.
Sheaving
Ceiling Technology KNAUF implies not simple trim, but for the required requirements that will increase the quality finished designAnd also will provide its reliability.
- So, each piece of plaster must necessarily cut with special tool. It is necessary to make a chamfer from the outside, which will be further covered.
- All sheets for plasterboard ceiling Knauf are installed in the disintegration in the transverse fastening of the profile. Most often, this is a standard pitch of 60 cm. It is necessary to strengthen the plane and to avoid cross-shaped joints, which can be said, even forbidden when installing HCL sheets on the profile.
- Mounting plaster on the frame follows with a specific gap between pieces, which should be 5-7 mm. This will help to remove the mechanical load from the sheets and warn the cracks and chips, which often manifest themselves with the incorrect decoration of ceilings and walls by plaster.
- The sheath occurs with standard self-drawing, with a step of 20-30 cm, depending on the requirements and loads of the structure. It can be performed by a mechanical, electric or pneumatic tool, depending on which one you have access.

Suspended ceilings made of drywall Knauf can be laid by special materials from the inside to ensure energy saving and increase the noise insulation of the room in which the finish occurs. For insulation, you can use special materials or standard mineral WatWith which we are already accustomed to work. It can also perform the soundproofing of the ceiling of Knauf, but the sealing tape for a metal profile will help to provide it.
Finishing work
Suspended ceilings of the KNAUF series are provided under a variety of finishes, and therefore they can be placed with wallpaper or painted the paint chosen. Also, the ceiling plane can be finished and other materials, but the possibility of this should be provided before the start of installation, because not only the requirements of the room are important here, but also the conditions for the production of the ceiling, which directly depend on the size of the finishing material, its weight and Weight subsequent scenery.
Decorative finish occurs necessarily after plastering or putting the plasterboard ceiling.

Technological map Knauff
Typical technological card on finishing work With the use of complete systems, KNAUF was designed for convenience in compliance proper technology Devices ceiling structures. Complex systems help installers in the calculation need quantity The material for the ceiling from GLC, drawing a card - drawing and proper assembly Designs.
The purpose of a typical technological map is to develop projects of work with GLC, organizing construction of structures. In addition, the technological map is an information guide for professionals engaged in the device of suspended ceiling structures from drywall.
The KNAUF technological map has a number of certain requirements that must be observed in the work of work, indicates the consumption of materials for different sizes There are erected structures and accurate order of work when installing.
Suspended ceiling on the KNAUF system - interesting job And the ability to qualitatively diversify and provide the most exclusive projects, because you can always work not only with single-level and multi-level ceilings and planes, but also to use an interesting architecture in the work. If you are working with plasterboard regularly - a technological card developed by the KNAUF system will become an excellent assistant in your actions and endeavors.