The dacha is a pleasant place not only for work, but also for relaxation. In stores, you can find many offers for summer cottages, but a more economical option is to make country tables and chairs yourself.
Country table with your own hands
Making furniture requires a serious approach, certain tools and skill. But you can make a simple and very economical option from wooden pallets.

Necessary materials:
- Sandpaper
- Self-tapping screws
- Pallets
- Wood primer
- Varnishes and paints for wood


Pallets need to be cleaned grinder(you can use coarse sandpaper for this). Then process with fine-grained sandpaper, in order to facilitate the work, the paper can be fixed on the block. Next, you need to cover the pallets with a primer, paint and varnish if necessary.

If the finished furniture will be on outdoors, the workpieces must be varnished. So it will last longer and will last several seasons. Before you start connecting pallets, you need to decide on the type and size, we select a photo of the table for the summer residence on the Internet and make it according to it.


Two or three pallets can be stacked on top of each other and fastened with self-tapping screws. If the table will be used at home, you can attach wheels to it for easy movement.

You can also attach ready-made metal legs to the pallets and thus make a full-fledged dining table. You can also make budget chairs, benches and veranda sofas from pallets. This material is the most affordable, you can buy new pallets, or get previously used ones for free.

Folding country table
Required materials and tools:
- Hacksaw
- Screwdriver
- Roulette
- Hammer
- Drill
- Pencil
- Wooden lath 5 m long
- Wood plate for countertop (board, plywood or OSB)
- Screws and nuts

When using plywood, it turns out to be a completely inexpensive option. If you have tools for woodworking at hand, it is better to use them, so the process will go faster.


To begin with, we cut the blanks according to the following dimensions:
- 4 pieces 70 cm each
- 4 pieces of 45 cm
- The table top measures 45 cm by 65 cm.

In order to properly assemble the folding mechanism, you need to find on the Internet drawings of country folding tables, or step by step photos.


On 70 cm parts, measure 40 cm from the edge and mark with a pencil, then drill the holes. We connect the two legs with each other with a screw, on the other side we tighten the nut, we also do with the second pair.

We divide the tabletop into two equal parts of 32.5 cm and cut it. On parts of 45 cm (for a folding mechanism), we retreat 1 cm from the end of the rail and drill holes. Parts for the folding mechanism must be rounded off so that they do not cling to each other.


According to the diagram in the photographs, we collect all the details together and get a folding table. Next, the table must be primed, painted and varnished. When using these sizes, a very compact table is obtained, it will be convenient to take it with you to nature and carry it in a car.

Additional Information
The design of the folding table can be adapted to your size and you can make drawings yourself. To make the table look better, the table top can be smoothly rounded.

Wood primer helps protect wood from insects, so don't neglect using it.

When painting tables and chairs, new brushes must be used, during the process, care must be taken that the paint does not bubble. Usually they are painted in two stages, you can proceed to the finishing stage after the first layer of paint has dried.


Outdoor tables must be varnished so that dampness and mechanical stress do not affect the wood. This should be done in a well-ventilated area; it is better not to take the product outside until it is completely dry.

If the structure is large and it is not possible to bring it into the room, you can varnish it on a covered veranda, where moisture cannot harm.

Varnishes differ in the degree of protection, some protect only from moisture, others will help to avoid small scratches, they can also be with the addition of paint.

When making tables from wood, it is necessary to observe safety precautions, use cotton gloves for work, be careful when working with tools. If the work takes place on the street, you need to make sure that moisture does not get on extension cords and sockets.


Diy photo of a country table


A wooden outdoor table for a summer residence can be made with your own hands. For this, ready-made or independently developed drawings are used. To do it yourself beautiful table made of wood for outdoor use, you need to purchase high-quality material, and follow the manufacturing rules.
Buying a wooden outdoor table for a summer residence: types and selection criteria
A beautiful and comfortable country table is an indispensable attribute of a summer vacation. When choosing a finished product, you need to decide on the dimensions, and also following parameters:
- using a piece of furniture outdoors or indoors;
- the maximum number of people able to sit at the table;
- the budget allocated for the acquisition.
The table top and body of an outdoor piece of furniture can be made of different types material:
- plastic models are ideal option for operation in the country. The advantages are affordable cost, relative compactness and lightness. They are usually round or oval in shape and can accommodate about six to eight people. Despite the stylish appearance, are characterized by not too long service life. The disadvantages include the tendency to destruction as a result negative impact direct sunlight. Also, a lightweight structure can turn over in case of strong gusts of wind, the need to use the most flat surface for installation and susceptibility to damage, which is accompanied by quick loss initial aesthetic appearance;

- wood models look very organic even in modern suburban landscape... Such pieces of furniture perfectly complement the garden plantings. Such models belong to the category of rather expensive ones. The disadvantages of natural wood include the ability to collapse and be warped under the influence of water and temperature differences, and the legs pressed into the soil can rot, therefore, it is required to regularly carry out treatment with antiseptics;
- graceful metal models are of high quality and incredible durability. Such furniture looks especially beautiful against the background of forged fences and decorative elements. Such tables are distinguished by considerable weight, and also very high cost... Often modern models are a very successful combination of metal with wood or glass countertops.
If you plan to use the table in suburban conditions all year round, then the best option would be a metal structure, which is very resistant to any unfavorable external factors. Legs metal structure can even be concreted, which will give additional stability to the piece of furniture.

How to make a wooden table for a summer residence with your own hands
Tables from wooden planks very often they are made independently. Of course, this option will require sufficient care throughout the entire period of operation, but it will give adjoining territory in the country bright style and identity. Among other things, you can build the simplest models with your own hands with little time and money, even in the absence of professional skills and special tool.
Making a drawing of the table with dimensions
The self-assembly diagram may already be ready, but in order to get original table with the most suitable sizes and the shape of the countertop, you need to complete the drawing yourself. When drawing up a drawing, it is recommended to focus on standard dimensions such an item is 178x95x77.5 cm.

Required tools and materials
To make beautiful and practical table made of wood for a summer residence, you need to prepare:
- roulette;
- pencil;
- saw;
- drill or screwdriver;
- building level.
Work must be carried out in standard goggles and gloves. When making need to use Construction Materials presented by:
- a pair of boards with dimensions 85x10x2.5 cm;
- a pair of boards with dimensions 153x10x2.5 cm
- four boards with dimensions of 168x10x2.5 cm;
- four boards with dimensions of 75x10x5 cm;
- board 95x10x2.5 cm - 17 pcs;
- fastening tools in the form of nails, screws and bolts;
- glue for woodwork.
It is also necessary to purchase antiseptic compounds for wood processing, varnish for wood or special paint and brushes.
How to make a table with your own hands (video)
Getting Started: Making Wooden Outdoor Table Parts
All elements in the form of wooden boards must be even, natural moisture, from quality wood hard rocks. If necessary, before assembly, the boards must be aligned and, if necessary, sanded. To obtain durable construction, you should make a thorough processing of wood with antiseptics.
It is not recommended to impregnate wood with oil compounds., which have proven themselves very well when used in conditions high humidity, but increase the level of flammability and give the structure an unpleasant and rather persistent odor that persists long time... After applying water-soluble impregnations, it is imperative to apply a layer of a special glazing antiseptic, which makes it possible to impart high decorative properties to the product and promote additional protection.

Assembling and fastening the main elements
At the first stage of the independent manufacture of a wooden outdoor country table, the frame base of the piece of furniture is assembled. It is to the frame base that the boards will subsequently be fixed to create the table top and, as well as the table legs. The frame base traditionally consists of four rounded and even, longitudinal boards measuring 168x10x2.5 cm and a pair of end boards measuring 85x10x2.5 cm.
The assembly must be carried out on the most even surface, fixing the end elements to the longitudinal boards with the help of galvanized self-tapping screws and adhesive. Very important prevent the base from skewing during assembly and fastening. After checking diagonally, additional boards of 153x10x2.5 cm are necessarily fixed, which will make it possible to give the assembled structure additional rigidity, as well as hide the areas of attachment of the legs.
The table top is assembled from boards measuring 95x10x2.5 cm. The boards can be fixed with either galvanized nails or self-tapping screws. It is imperative to leave a gap of 0.5 cm between the elements of the countertop. The legs are attached with self-tapping screws or bolted connections. The second option is more preferable and allows you to get a removable model, convenient for transportation and storage.

Installation of amplifiers - a guarantee of the durability of the table
If there is a need to obtain the most massive and durable structure, then amplifiers are used. To install such parts, you need to turn the product upside down. The transverse reinforcements are nailed down in the middle of the tabletop, and the corners of the reinforcements are sawn off to save space. A pair of reinforcements with a notched cutout that follows the shape of the countertop crossbars is nailed to the sidewalls.

How to protect a table from external factors
Unfavorable weather presented by the sun, rain and temperature extremes are an aggressive environment for wooden structure operated in a street environment. To protect wooden crafts and extend their service life, special film coatings and a variety of impregnating compounds are used. Most often used protective films based on polyurethane. The disadvantages of such a film coating are loss of appearance, decrease in efficiency and wear after a certain time. Impregnants for wood protection are represented by a mixture based on oils and repellent solutions. Both options for protection from external adverse factors have proven themselves well, but they require periodic updates.
Wooden outdoor table: drawing (video)
We make a wooden country table from what is at hand
As a material for creating a wooden country table, a variety of improvised means are very often used. Incredibly stylish and very reliable slab tables - an option that you can make yourself with some woodworking skills. In this case, you need to be prepared for the fact that the technology for making a tabletop based on saw cuts is distinguished by its characteristic specifics and is quite time consuming, but the resulting ready product will be unique and unrepeatable.
Very original in garden design the designs look:
- from wooden beam for true fans of natural materials;
- from several stumps or bobbins;
- of old window frames with glass top;
- from boxes, complemented by various decorative elements;
- from an old wooden chest with forged items.

Tables made from pallets are also widely used. The fashion for such products came from Asia, where such furniture items are very often made for lack of free funds. When creating such an option, you can show all your imagination, but it is very desirable to replace the nails from the pallets with self-tapping screws, and all fastenings of the frame and boards must be reinforced with special furniture corners. If desired, the structure can be supplemented with ordinary furniture wheels, which make the table mobile and convenient to use.
How to make a metal table with a wooden top
One of the interesting and durable options for garden furniture. For self-production you will need:
- metal pipe or high-quality rolled metal of sufficient cross-section;
- primer for working with metal surfaces;
- paint on metal surface and brushes;
- chalk or light marker;
- flat surface for the stencil;
- wooden table top;
- bars and adhesive for fixing the countertop.

The tool can be presented welding machine, grinder, metal saw, hammer, screwdriver, screws and bolts. The metal is pre-cleaned from rust and dirt with a steel brush, after which a frame is created in accordance with the stencil.
Welding must be done carefully to avoid the formation of welding build-up. The entire structure is cleaned with a metal brush, after which it is primed and painted. After the paint has completely dried, the tabletop is fixed, which also needs to be treated with special antiseptics, and then varnished or painted.
Diy log table (video)
Self-production country furniture made of wood is a very interesting and creative process, accessible even to beginners. Such natural material goes well with metal, glass, and plastic, which allows you to create original, unusual and very decorative solutions with your own hands.
if you have own dacha or garden plot, then it must be done on it garden table do it yourself. It will be a place where you can relax in the shade of the trees with your family or friends.
You can buy a ready-made garden table, but it is much more pleasant to make it yourself, it is better to use environmentally friendly materials for this.
The best material for making such a table, of course, is wood: it is pleasant and easy to work with it, anyone can make such a table with their own hands.
Manufacturing options
There are a large number of options for making the specified garden furniture, and each owner chooses the one that he likes and that he can make.
To make a table, you will need to make the legs first. To do this, you can take two blocks or dissolve a 50 mm thick board into two parts. In order to use the table conveniently, its height should be 74-76 cm. Therefore, the height of the legs will be equal to the height of the table minus the thickness of the table top. If the table top is 3 cm thick, then the legs are 73 cm high.
The blanks for the legs must be well processed using an electric planer, chamfers are knocked off the edges, and the ends and borders are polished.
For a structure to be strong and reliable, a frame is needed. It is made from a board 10 cm wide, the frame is connected to the legs with self-tapping screws, the joints are also lubricated with carpentry glue or PVA, after tightening the screws, the remnants of the glue must be removed.

Now we move on to creating the tabletop. To do this, you can use grooved boards or take a solid chipboard sheet... The frame of the table should be at each edge less than the table top by about 20-30 cm.
For a garden table, a size of 80x100cm is considered normal, while the size of the frame will be 60x80 cm, it will be enough for 2-3 people. If more people will gather at the table, then its size must be increased.
Materials needed for work:
- dry boards and bars;
- glue;
- screws;
- sandpaper;
- water-repellent impregnation.
Tools required for work:
- hacksaw, plane;
- drill;
- thickness gauge, clamps;
- hammer, chisel;
- mallet, paint brush.
A garden table is an integral part of any country interior. On modern market this product is presented in a wide range - these are metal, plastic, natural stone and, of course, the classic version, wooden garden tables. In this article we will talk about positive qualities common options and give an accessible instruction on how to assemble a table with your own hands.
The tree is always relevant
Most garden furniture has always been made of wood. Almost everyone can make a table for the garden with their own hands, at least superficially owning a hacksaw and a plane. The whole process comes down to connecting a small number of curved planks and giving the furniture a presentation.
A few words about the choice of material
If you want your product to serve you faithfully long years, then the table for the garden is best made of strong hardwood. By far the most the best option is oak, but the price here, even at cost, will come out considerable. Therefore, as a rule, more available wood larch, aspen, birch, linden or acacia.

Advice: conifers can be used for manufacturing, but they must first be well prepared and covered protective compounds... Otherwise, the abundance of resin can negatively affect the quality of the coating and your clothes.
For the countertop, the quality and type of wood is especially important, therefore, experts recommend not to save money and buy a good grooved board, the increase in costs will be minimal, but the appearance will pleasantly please you. It is advisable to collect a wooden garden table from a well-dried forest, so that later the details do not lead.
In addition, the tabletop and some individual parts can be made of thick waterproof plywood or YUSB board. Chipboard (chipboard) is less suitable, since this material is afraid of high humidity and will not last long in the garden.

Self assembly
Assembly instructions can be very diverse, everyone chooses what he likes best.
In the photo and video in this article, several interesting and accessible technologies are presented, but we will tell you about the simplest, in our opinion, installation option.
- As mentioned earlier, it is better to assemble the tabletop from a grooved board, so it will be completely monolithic... In this case, the joints should be glued with the usual furniture glue on wood. In this case, we will talk about a solid product designed for a family of 6 - 8 people.
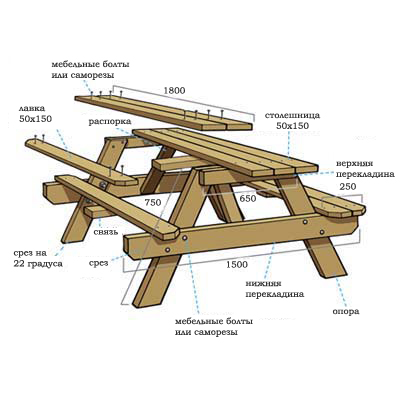
- Comfortable construction height for standard dining table is 700 - 750 mm... We will make the dimensions of the top plate 930x1450 mm. For a table top, a board thickness of 20 mm is sufficient, but a table top with a thickness of 40 mm will look more solid and solid.
- The boards are joined on a flat, horizontal surface and knocked down with nails or self-tapping screws, two or three perpendicularly spaced bars of 50x50 mm... The bars are fixed at a distance of 300 mm from the edge.

Advice: since the wood is quite dense and thick, it is better to lubricate the self-tapping screws with soap before screwing in. Then they will enter the array much easier.
- Next, we move on to the arrangement of the legs. As legs, boards with a section of 50x150 mm and a length of 650 mm will be used. They will dock at the ends, therefore, in order to reduce the length of the fixing bolts or self-tapping screws, 1 sample is made in the middle on each leg about 70 mm deep and about 150-200 mm long.
- The legs are joined by their ends, and the selected grooves should be on the same level from the outside. A stiffener is inserted between two pairs of legs, the function of which is performed by a 50x150 mm board, about 1 m long.
- From above, the legs are attached to the strips that fix the tabletop boards... In the lower part, to increase the support area, two boards are knocked to the legs, all of the same section 50x150 mm. Long, slightly less than the width of the table top.

Important: the entire structure, with the exception of the tabletop, can be made collapsible; for this, furniture bolts with a diameter of 6 mm are used. Or collect everything on long self-tapping screws, but then the table will not be disassembled.
Do not forget that wooden garden tables will be used outdoors, so all wood must be covered with protective compounds. Often one coat of stain is used to bring out the beauty of the texture and two coats of waterproof varnish.
Important: all wood, even before assembly, needs to be scraped and cleaned with a grinder or using sandpaper. Bevels should be removed from sharp corners, so as not to drive a splinter later.
Alternative constructions
Light coffee table it is quite possible to assemble from wooden pallets. For this you need 2 pallets. The top row of boards should be ripped off, complemented by the missing ones and knocked down end-to-end, more tightly.
Thus, you will get monolithic table top... To increase the height, 4 bars from the same pallets are inserted between the pallets. It is advisable to install furniture castors from below.


Plastic garden tables are used everywhere, their price is quite affordable. They are durable, have a neat appearance and can usually be disassembled quickly. But plastic rarely fits into natural interior country cottage. Artificial materials, for the most part, have already had time to get bored in the city, in addition, such products cannot boast of durability.

Garden wrought-iron tables are quite another matter; they are often true masterpieces of furniture art. Of course, only a narrow circle of real specialists can make such beauty with their own hands, therefore, the price of such products, frankly, bites.
It is quite problematic to make tables for a garden made of stone with your own hands. Alternatively, you can fold brick cabinets and install a countertop purchased in advance on top. A large piece of slate can also be used as a tabletop, but such an installation will require remarkable physical effort.

Table making option.
Output

It is often not so important that you have a wooden stone or metal garden table installed. Any design can be successfully entered into landscape design cottages, the main thing is to do it with love, because you are doing for yourself.


You can make a garden table with your own hands from scrap materials that will seem to many to be absolutely useless. We offer you unusual ideas for giving, which relate to the creation of various garden furniture and tables as well. Look at the photo of the garden tables and choose for yourself the best option... When implementing any idea for a summer residence, you can show imagination and make the changes you need.
How to make a wooden garden table with your own hands: photo
A wooden garden table is the aesthetics of the natural landscape of the cottage and ease of manufacture. Photos and photos will help you make a garden table with your own hands. detailed instructions... Before you start making a garden table with your own hands, prepare everything necessary materials and tools. Be sure to look at the photo of how to make a garden table with your own hands: they show the production process.
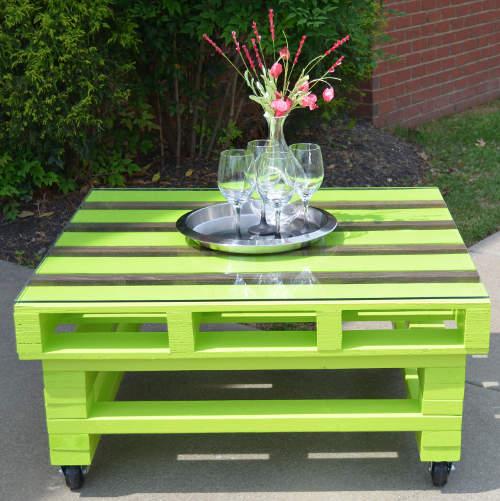
This is a very stylish and original table that can be used both in the garden and in country interior... Costs are minimal, because it is based on a pallet from under bricks.
You will need:
- pallet from under bricks;
- swivel wheels a diameter of about 10-12 cm;
- antiseptic stain for wood of the color you need;
- sandpaper;
- screwdriver;
- ordinary screws;
- screws for metal tiles;
- brushes.
The procedure for making furniture and detailed instructions on how to make a garden table with your own hands.


Sand the pallet well: first with a coarse-grained sandpaper, then with a fine-grained sandpaper. You can also use a grinder with a grinding wheel.
Attach the swivel wheels to the underside of the pallet. To do this, use ordinary screws, on which put on the washers removed from the screws for metal roofing (since on the bases of the wheels large holes). You can directly attach the wheels with metal tile screws, but then you need a special screwdriver attachment.
Cover the table with a wood stain antiseptic, which is best containing wax. In this case, the table can be tinted under walnut, rosewood, oak, pine, larch, or use a transparent antiseptic to only highlight the structure of the tree without changing its color.
Please Note: Not all pallets are the same! They are different sizes and with different gaps between the slats. Choose the pallet that suits you best.
Round garden tables made of wood and their photos
If you have an old round garden table, take your time to throw it away! Of course, it has absolutely no look and is broken, but for your garden this is a real find. In a new guise, he will decorate not only a relaxation corner in the garden, but also a country house.

Wood garden tables will go well with many styles as their decor is versatile.
Look at the photo of the garden tables with similar options design solutions:


You will need:
- old wooden table;
- putty for wood;
- old tile different colors or a tile break;
- white facade paint;
- tile adhesive;
- white grout;
- priming;
- copper and gold outlines for glass;
- putty knife;
- sponge.
Manufacturing procedure


Fill cracks and gouges and sand the table with fine sandpaper, then prime everything except the table top. Paint the table with white paint (except for the countertop).
Wrap up tile into a piece of drape or other thick, soft cloth and break it with a hammer. On top of the countertop, apply an even layer of tile glue and on it lay the surface of the countertop with shards of tile. Trim the edges with a trowel. When your mosaic is a little dry, wipe the surface with a sponge soaked in water to remove any traces of glue from the surface.
After the glue is completely dry, grout the joints between the tiles with white grout.
Paint the sides of the tabletop with white paint, and then decorate them, as well as the legs of the table, with an ornament using gold and copper outline on the glass.
Plastic garden table
 Usually garden furniture is made of plastic, wood, rattan, presented in soft natural colors.
However, if a bright multicolored "character" appears in the garden, especially from colored glass, then all attention is immediately riveted to him.
And it is made of old broken flower stand, covers from metal barrel and regular round glass.
However, all these elements can be replaced by scraps of colored plastic.
So, let's take a closer look at how to make a plastic dining table do it yourself.
You will need:
- a metal piece from a flower stand;
- cover from a metal garden barrel;
- round glass with a diameter of 50-60 cm;
- a piece of sealing rubber for windows;
- paper;
- pencil;
- copper loop for glass;
- copper acrylic paint;
- white paint on rust;
- acrylic primer;
- a means for obtaining a patina;
- paints for painting glass.
Manufacturing procedure


On a piece of paper, draw a circular pattern in moroccan style... Then use a photocopier to enlarge the pattern to the desired size. Place the pattern under the glass and trace around it with a copper outline. Allow the circuit to dry properly for the time recommended by the manufacturer (usually 8 to 24 hours).
Paint the inner parts of the ornament with bright stained glass paints. It is important that the paints you use are evenly distributed within the area enclosed by the outline, so before painting the countertop, practice on a small piece of glass, determining the right amount of paint for the fragments. Dry the finished painting well.
If desired, add additional decorative elements copper contour.
Paint the barrel lid white over rust. Now we will focus on the main part of the countertop.
Prime the stand part and paint it with copper acrylic paint then apply patina cleaner in some areas.
When the "foot" of the table is dry, glue the parts that will be in contact with the table top, small pieces of window seal. This will allow her to hold on well.
Assemble the table: put the painted glass on the barrel lid, and put this “tabletop” on the foot.
Ideas for a garden and a summer residence from scrap materials with your own hands: photo and description

Further on this page you can see ideas for giving from scrap materials and a photo of the process of their implementation in practice. We without fail accompany all ideas for a garden and giving with our own hands photos from various angles so that you can clearly see the whole process of creativity.
Folding garden table
 Try to make a universal folding garden table for your utility block. It looks nice and saves space. And most importantly, it is very convenient and will help you keep a small utility block in perfect order: everything is in sight, and nothing is lost.
You will need:
- a piece of edged pine board measuring approximately 60 X 20 cm;
- two ready wooden fasteners for the shelf;
- light yellow facade paint;
- red acrylic paint;
- small glass jars with screw lids;
- screws;
- screwdriver or screwdriver.
Manufacturing procedure


Sand the board and paint it light yellow.
Decorate the ends of the board with a simple ornament using red paint.
Paint the lids of the cans with red paint.
Attach the jar lids to the board at regular intervals using small screws.
Hang the finished shelf on the wall of the utility block or workshop using ready-made fasteners (with the covers on the underside of the shelf).
Fill the jars with screws, nails, small fasteners, staples, nuts and other small things necessary for the household and screw the jars to the lids.
You can decorate the jars with simple painting, applique, and in any other way.
Interesting ideas for a summer residence, a house, a garden and a kitchen garden with your own hands with a photo
 And now we offer interesting ideas for a summer residence and a garden with our own hands in relation to other interior items necessary for the household.
This will be a comfortable seat where you can relax after gardening. All our interesting ideas for a summer cottage and garden house are accompanied by a photo and can be implemented using various materials at hand.
Make a garden ottoman out of old car tires. There are practically no costs, and the effect will surpass all expectations. This ottoman is not simple, but a chest ottoman. In it you can store your garden stuff. Nobody will have this!
You will need:
- two old car tires one diameter;
- thick plywood;
- beautiful textiles of your choice;
- facade paint that matches your fabric in color;
- white spray facade paint;
- "Liquid nails" or silicone sealant;
- construction stapler;
- jigsaw.
Manufacturing procedure


Cover both tires with white spray paint and dry. Then paint both tires with light green paint, in a thicker layer, and dry.
Lay the tires one on top of the other, fastening them with "liquid" nails or silicone sealant... To do this, apply "dotted" small portions of any of the products in a circle on the surface of the lower tire.
Saw a circle out of plywood that is slightly smaller in diameter than the diameter of the tire. Cover it with a cloth and secure the cloth with a stapler.
Place a cloth-covered circle on the tire base. Now you're done! The seat is removable, therefore inner part The ottoman can be used as a place to store small things.
The color of the tire paint and the color of the seat can be any, depending on the style of your garden and the color of other garden furniture. In any case, the ottoman will look spectacular.
Garden furniture: tables and benches
 Garden tables and benches are indispensable attributes of a cozy and comfortable country life, in which it is possible to exercise privacy in a shady corner of the garden.
How is it done garden furniture tables, you could already fully recognize their examples published above. And now we propose to do it yourself exclusive design garden bench.
A garden bench is not just a necessary thing, but a very necessary thing.
It is so convenient to care for plantings and weed, not kneeling, but sitting on a bench, especially as beautiful as this one. Even if she just stands there, she is already garden decoration, no worse than any figurine.
Add green paint to the pictures: finish painting the branches and leaves.
Add accents with gold paint: make picturesque strokes in the drawings, emphasizing lines and details.

When the bench is dry, cover it all, along with the pasted pictures, with a clear or slightly tinted wood preservative.
If desired, the bench can be slightly tinted with blue-gray acrylic paint, creating the effect of an old tree.