Often modern masters began to use plaster for the manufacture of the finishing layer. In this case, the surface must be subjected to special treatment in order to give it a good appearance or the required texture.
This process is called plastering, and it is performed both when the material is applied and after it has set.
Types of work and their execution
First you need to say that professional masters belong to this stage works very responsibly. The fact is that it cannot be drawn along certain guides or focusing on the markup. All work is carried out in visual control with correctly selected lighting.

Smooth surface
- Conventional grouting involves creating a perfectly smooth surface to which you can apply paint or varnish. Also, similar techniques are used when choosing wallpaper as a top coat.
- It must be said that gypsum mixes are best rubbed due to their viscosity. Cement mortars at the same time, they can crumble strongly and in order to eliminate this phenomenon, professional masters recommend adding a small amount of plasticizer to the solution when mixing it.

- The question of how to rub the plaster deserves special attention, since it causes a lot of controversy among the masters. However, the answer to it is quite simple, especially if you are faced with such a job every day.
- The fact is that in order to apply evenly a layer that will already be perfectly smooth by itself, it is best to use a metal float. At the same time, to work with a solidified surface, it is worth using a polyurethane tool. It is strong enough not to wear off in one go, and will not damage the plaster as it is malleable.

- This work is performed when the surface of the plaster begins to harden. In this case, you can slightly moisten the grater with water and proceed with vertical and horizontal movements, the purpose of which is to smooth out small particles, distributing them evenly over the entire area.
- Professional craftsmen recommend instead of water. It will serve as an excellent binder and create a kind of film. At the same time, the installation instructions say that in this case, the surface must be completely processed so that there are no dry spots left.
Advice!
Special attention should be paid to the corners.
When working in their location, it is better to use measuring instruments in the form of corners.
Otherwise, even a small defect will be visible in this area.

Decorative surface
- If everything is clear with a flat and smooth surface, then it is rather difficult to answer the question of how to grind the plaster when creating decorative systems. This is due to the fact that there are a huge number of different types similar materials that have their own unique way installation. Also, some masters use when grouting homemade tool which creates unique coatings.

- Considering this feature, for example, it is worth considering the process of installing plaster of the "bark beetle" type in order to understand the principle of manufacture.
- It should be noted right away that such a surface is very easy to create with your own hands, which is why craftsmen so often use such compositions.

- First, using a metal float, apply the composition to the wall. It should be said that it contains rather large inclusions of auxiliary elements that begin to scratch the layer. Therefore, the work is done in small jerks so as not to get solid lines.
- As a result, such scratches very much resemble traces in wood from a bark beetle. However, the surface itself remains rough and is not suitable for indoor installation. Therefore, it is necessary.

- It is worth noting that a special tool is needed for such a wall. Its price is not very high, since in fact it is sandpaper or a net for grouting putty. However, it is best to purchase special device for holding replaceable abrasive segments.
- This work should be done only after the surface has completely hardened, so as not to damage the previously created pattern.

- After that, it is passed over its surface with a brush or brush to remove all debris and dust from the furrows.
- At the final stage, professional craftsmen advise processing with a primer in order to fix the relief, protecting it from shedding of small particles. Also, such an action will significantly reduce the level of absorbency of the material, which will significantly reduce the consumption of dyes or glue during the subsequent stages of installation.
Advice!
Get started with decorative species coatings are best from places that are not conspicuous or will not be visible.
So you can practice applying and grouting.
Output
By watching the video in this article, you can get more detailed information on how such a procedure is performed, and find out all its features. Also, based on the text that is presented above, it should be concluded that there are several options for the work of this work, which directly depend on the appearance of the final product.
Plastering is an important stage in home decoration, which allows you to give the walls aesthetic appearance, after the construction work is completed. Also, we must not forget about the effect of insulation that such a finish has. Thanks to her, the house becomes much warmer.
But what to do after the plastering of the walls is finished? Is this the final stage of finishing work? Of course not. In fact, there is whole line additional procedures that allow the walls to give a beautiful appearance, among them:
- grout,
- alignment,
- painting,
- putty.
Of course, the plaster itself allows the leveling of the walls after the main structure of the building has been erected. But in most cases, you have to do alignment and all subsequent layers.
What to do after plastering
Ideally, after you have applied the plaster, you need to wait at least a month for the composition to gain strength. Otherwise, the work you are doing may harm the previously applied layer.
Attention ! For drying to be as effective as possible, it is necessary that the room is well ventilated. In this case, the temperature should be room temperature.
If you want to get the walls ready after plastering as quickly as possible, then you can use special equipment. An air dryer is used for these purposes.
Summer is considered the best time to apply plaster. In this case, you can simply open windows and doors to achieve the desired result after all the work has been done. At the same time, temperature extremes should be avoided, as they can lead to the appearance of cracks.
Under no circumstances should the plaster be allowed to freeze. Drying too quickly is also not the best way... As you can see, drying out the finish is not an easy process. To get at the end good result, you need to monitor the temperature regime.
Lighthouses

To get quality plaster, you needed beacons. After all the work is completed, you need to take care of these elements. The fact is that they are made of metal and therefore corrode. This can lead to cracks and even complete destruction of the plaster layer.
Advice ! It is best to remove the beacons immediately. Strobes can be easily dealt with with putty.
In some cases, when plastering walls, galvanized beacons are used, unfortunately, this does not give a full guarantee that corrosion will not appear. Therefore, after the completion of the work, they are also dismantled.
Beacons are removed not after the plaster has dried, but before it dries completely. Thus, the risk of damaging the walls is significantly reduced. Be careful when doing this.
Of course, chips will certainly appear during the extraction process. You can't do without them. But the scale of the destruction depends solely on your accuracy. Subsequently, this will save time on restoration work.
Leveling and priming
The alignment goes immediately after the extraction of the beacons. You need to take coarse sandpaper and grout. You can also use metal mesh to level the walls after plastering.
Attention ! To check the evenness of the wall, just look at it along. But it's better to use the rule anyway. This tool will allow you to achieve more accurate results.
When you have eliminated all the flaws and the walls are perfectly flat, you can start priming. The layer of primer you apply will provide additional adhesion to the paint or wallpaper. Moreover, it will not let the fungus appear.
The primer does not dry for long. Usually a few hours are enough, and you can proceed to the next stage. Although it must be admitted that the drying period is largely dependent on the indoor temperature. Sometimes it can take about a day.
Putty

Puttying the walls after plastering is a serious area of work, so it is better to highlight it in a separate section. Before you start making the topcoat, you need to choose the type of material that is ideal for your conditions. There are three types of mixture in total.
Cement
This material is used for work after plastering and has the following advantages:
- resistance to temperature changes,
- moisture resistance,
- ease of use,
- affordable price.
All these advantages have led to the fact that such a mixture is often used after applying the plaster in order to make the final layer. The main reason that the material did not receive an overwhelming advantage in the market is a number of disadvantages, including:
- the possibility of cracking due to shrinkage;
- long drying period;
- low adhesion.
Cement putty is used when it is necessary to do work in rooms with high humidity. Moreover, it perfectly tolerates harmful environments. It is also often used when, after building a house, you need to finish the facade.
Gypsum

Gypsum putty is also used quite often when you need to do work after plastering the walls. It has the following advantages:
- no shrinkage,
- low probability of cracking,
- high plasticity,
- ease of application,
- high adhesion,
This material is easy to apply. Moreover, it is easy to level it after the completion of the main work on plastering the walls. But, of course, there were some drawbacks:
- Gypsum is afraid of moisture. Therefore, do any manipulations with it in a room with high humidity not worth it.
- Gypsum hardens quickly. On the one hand, this is a plus, but on the other hand, you should not make too large volumes of the solution, otherwise you will not have time to work it out all.
- To get a quality finish, you will have to do at least two layers.
If you decide to make plaster putty, then you should take into account that you need to wash such walls extremely carefully, otherwise you will have to make a new putty, and, possibly, plaster.
Attention ! External work cannot be done with plaster.
Polymer

V last years all more companies decide to make putty on the basis of polymers. Such a solution is easily explained by a number of advantages that this material gives to builders after the walls have been treated with plaster and primer, namely:
- The mixture can be used to make the coating in rooms with water.
- It is allowed for craftsmen to make only one layer of putty.
- High adhesion should also be noted.
- The substance dries quickly, it is inert to temperature fluctuations and does not absorb odors.
Polymer putty, with the help of which the final layer of wall decoration is made after plastering, has a long service life. Moreover, it has high plasticity, it does not crack or dry out.
Despite all the visible advantages, before you start making putty on the walls with gypsum, you need to learn about negative sides of this substance. Fortunately, there are only two of them. it high price and the difficulty in applying.
Most often, polymer mixtures are used when it is necessary to putty the walls inside the room. Some varieties are used even when carrying out external works... Such widespread use is explained by high quality substances.
Packaging
To start making walls, you need not only to choose the type of putty, but also the form of packaging. The fact is that there are dry mixes on sale. After purchasing, you only need to dilute them with water.
You can also buy the substance in buckets. In this case, you don't have to do anything else. The putty can be applied directly to walls that already have plaster on them. The first option is best for professional builders and the second for beginners.
Application
In order for everything to go as it should, all operations must be done in the exact sequence. First apply a starter coat to the walls. This is best done with a thick trowel. Movements come from the corners. You can work in any direction convenient for you.
When the mixture is dry, it is time to check the evenness of the coating. You will also need to sand the surface again. For this, a fine grain skin is best suited. After that comes finishing layer... Now you can safely glue the wallpaper or paint the walls.
Outcomes
As you can see, plastering the walls is not all. You also need to make alignment, remove beacons, prime the surface and much more, in order to end up with a perfectly flat surface with beautiful pattern pleasing to the eye.
The most practical and reliable way leveling the walls - plastering them. The process for a beginner is not easy physically and technically. But having learned the theoretical basics and reinforced them with practice, it is easy to learn how to plaster yourself, choosing a material that is convenient to work with.
Plaster solutions - how to select the right material?
Plaster mixes are decorative and basic. We will not touch on the first ones - this is a completely different story. It will be about solutions intended for leveling surfaces, in our case - wall. Walls are of varying degrees of curvature, built from building materials with different characteristics... They are plastered inside and out at various temperature conditions... All these factors are taken into account when choosing suitable solution and its characteristics (ratio of components, consistency).
To work inside a heated room, any of the existing materials for. The choice of the mixture depends on the intended purpose of this room. In living rooms it is better to use "warm" gypsum solutions, the mixtures for the preparation of which are sold in packaged form (usually 30 kg bags). If you want to save money and work a little more, you can start cooking for these purposes lime mortar... This material is slightly inferior to gypsum in thermal insulation capabilities, but much stronger and ultimately cheaper. If there is a significant consumption of material, the use of lime mortar will give tangible savings.
Inside the dwelling there are premises with a humid microclimate - a bathroom, a toilet, and partly a kitchen. Here the walls are traditionally faced tiles(it is possible that there is only an apron in the kitchen). To, a flawless wall surface is required, which is quite realistic to make with plaster mortar. But there is a nuance. Gypsum plaster is not suitable for laying tiles. It has low strength (the complex tile plus tile adhesive has a decent weight). The second factor is "against" - the components of the gypsum mixture and the tile adhesive are poorly "friends", after some time the polymer-cement material will begin to peel off. Exit - we plaster the walls for laying the tiles with a clean cement-sand mortar.
The classic mortar, prepared on the basis of sand and cement, is quite applicable in living rooms. Previously, they tried not to do so - such plaster does not retain heat, and there were no technologies for external insulation of buildings at that time. If the house has sufficient facade thermal insulation, which prevents the walls from freezing in winter and warming up in summer, nothing prevents the use of an ordinary cement-sand mortar for plastering walls throughout the house. What's the point of this? First, the savings. Secondly, a solid wall on which a boiler is hung without problems, a boiler per hundred liters, the top kitchen set etc.
About external plastering. Now this method of leveling is used less and less, mainly for technical and outbuildings. Plaster for walls, more advanced technologies are being replaced, combining insulation and decoration at the same time, it is easy to work with them with your own hands. If there is a need to align the wall from the street, the choice of materials is small. Only cement-sand plaster will withstand all weather tests at any temperature without any addition of gypsum, lime or clay.
In addition, when working outdoors, it is important to choose the right weather... It is necessary to work with a solution based on sand and cement in temperature ranges of 10-20 degrees, so the optimal period is the off-season. We are not talking about winter, in summer the solution will quickly lose moisture, which will lead to cracking and local delamination from base surface... The result is low strength and a greatly reduced service life of the plaster layer.
Properties of working surfaces - rules for their preparation
You can plaster a wall made of any building material, even a wooden one, but for this the base must be properly prepared. The degree and nature of the surface preparation depends on the solution used. Sometimes what is good for a gypsum mixture is bad for a cement-sand mixture, and vice versa. Consider the preparation of several options for complexes of building material / plaster mortar.

Ideal surface for cement-sand and lime mortar. If this is a new building, and there were no previous plaster layers on the surface, before plastering, they only moisten the surface abundantly so that the hygroscopic brick does not absorb moisture so intensively. The wall cannot be primed. Heavy mixtures based on sand and cement will not stick to such a surface - they will simply slide off after the cape. If on brick wall there is old plaster, it must be removed. The process of removing old layers is laborious and unpleasant, but there is no way without it. A perforator with a "chisel" nozzle will help in this matter. After cleaning the wall, everything is simple - we sweep the dust, moisten and plaster. For mortar, the preparation is the same.
When using gypsum mixtures on a brick wall preparatory activities about the same, with the difference that here the surface will need to be thoroughly primed, soaking deeply and abundantly. Gypsum mortars lose moisture much faster than cement-based mixtures. If the base absorbs water abundantly, it will not stick, and if this happens, then not for long.
The concrete wall is not the most best surface for plastering, especially if it is smooth. Light plasters will stick better when properly prepared for concrete. It can be problematic to "stick" a heavy cement-sand mortar. But anything is possible after competent preparation... Before applying the plaster mortar, the concrete wall is primed with a special compound Concrete contact... To reliably adhere and hold the heavy plaster for a long time, the concrete surface needs to be "spoiled" a little - with the help of a perforator, notches are made on the wall. The more of them, the better - the solution will go into the recesses, and this will significantly increase its adhesion to concrete. The second measure that will improve the adhesion of the mixture to concrete is surface treatment with a solid liquid saturated solution of cement (you can add a little fine sand).
Another equally problematic surface is wood. Once upon a time wooden walls and there were many more piers, and they were all plastered. What did they do for this? They stuffed shingles on a wooden surface - thin slats made of the same material, which lay crosswise, and created a kind of reinforcement. Moreover, even the ceilings were plastered on this basis. Nowadays, plastering on wooden surfaces is less and less necessary - technologies have gone ahead. But if necessary, shingles will help solve the problem.
Porous concrete (aerated concrete, foam blocks) is becoming more and more popular as a building material for the construction of walls. Building with lightweight blocks is a pleasure. When trying to plaster such a wall, many people have difficulties - the solutions do not stick. How to get out of the situation? Let's make a reservation right away - heavy sand / cement mixtures will not work here. In order for gypsum mortars to adhere and securely adhere, the surface of the porous wall must first be completely putty on the "sdir" (thinly and with effort) with some polymer-cement glue. A tiled or one that was laid on will do aerated concrete blocks- does not matter. Then, when the glue sets, the surface is primed, and everything is ready - the gypsum plaster will stick no worse than to a brick.
We prepare mixtures and tools - so that everything is at hand
Aligning walls with plaster solutions involves the use of a certain set of tools. One of the main devices, without which plastering with any material can not do, is the rule - a long trapezoidal aluminum strip at the end. The rules are issued in various lengths from 1.5 to 3 m. When leveling wall surfaces, a one and a half meter strip is used, a maximum of two meters if plastering is performed using light gypsum solutions.

Then there are the differences. When working with lime and cement-sand mixtures use a trowel that is needed to cover the material. A plastering trowel differs from a masonry trowel - the tool has a more extensive working part of a semicircular shape with sharp end... Rub the plastered surface with a float. Previously, wooden floats were used, now - a tool made of hard polystyrene. Other tools when working with such plastering compounds Not needed.
To work with gypsum solutions, in addition to the rule, you will need a set of spatulas - the main one, 100 mm wide, and the auxiliary one with a working blade about half a meter. When covering the material, for convenience, use a smaller auxiliary tool (30-35 cm). A trowel is not used for working with gypsum plaster - it is extremely inconvenient to apply the material with its help.
Now about the tool for preparing solutions. WITH gypsum mixtures everything is simple - the solution is mixed in a bucket (it is convenient to use plastic container freed from water-based paint, ) construction mixer... It could be specialized tool or a drill with an appropriate attachment. For small volumes, a drill is sufficient. It is better to mix sand / cement solutions in a concrete mixer. If this device is not available, you will have to prepare the material by hand. A rectangular bucket with low sides is used as a container. To mix the components of the mixture, use a shovel or ordinary hoe.
Hand kneading requires a significant expenditure of energy and physical strength. Plastering with heavy mortars is also laborious, so it is advisable to attract an assistant - it will be difficult to cope alone.
About the preparation of solutions. Here again, no problem with ready-made gypsum mixes. You read the instructions on the packaging and do as it says - you don't need to invent anything. Preparation of cement-sand and lime plastering materials requires proportions. The sand / cement mortar has simple formula: the ratio of the binder to the filler is 1: 3. Water is added gradually as you stir (if the mixture is prepared by hand). As a result, a semi-liquid mass should be obtained, which is kept on a trowel without flowing off.
Lime mortar has a more complex composition and preparation. The classic formula of such a mixture looks like this: cement - 1, slaked lime - 2, sand - 6 (in volume parts). The solution is prepared as follows. Sand and cement are mixed. Lime paste diluted to a liquid consistency is added to the resulting mixture. All components are thoroughly mixed until a homogeneous mass with the consistency of sour cream is obtained. The sand used for the preparation of plastering materials must be sieved (sieve mesh - up to 7 mm).
The quality of the trains - with or without beacons
Is it possible to properly plaster a wall without installing guides? It is possible, but it all depends on the quality requirements, the skills of the performer and the material used. Prepare a not very curved wall for wallpapering gypsum solution possible without beacons. You do not need to mount the guides if the wall is plastered from the inside in a barn or other outbuilding (beauty does not play a role here). Again, an experienced craftsman with a good eye and muscle sensation will plaster without guides no worse than beacons. If you need high-quality plaster (vertical and with an allowable curvature), but you don't have the proper skill, it is better to start installing beacons, along which it is much easier to align the wall.

Plaster beacons are sold in building stores... These are metal galvanized strips with at the end T-shape... The protrusion of the product can be 0.5 and 1 cm high. The choice of the protrusion height depends on the minimum plaster layer. The step of the guides (depends on this required amount beacons) depends on the material used and the width of the rule. For heavy mortars, the step is made less - 0.8 -1 m.When plastering with light lime and gypsum mixtures, the distance is increased to 1.3 when using a rule of 1.5 m in length. Experienced craftsmen, which work with a two-meter rule, increase the spacing of the beacons to 1.7 m.
The installation scheme of the guides on a solid wall surface (without window and door openings) is as follows. The extreme planks are mounted 20 cm from adjacent walls. Between them - the rest, evenly, with a given step. If there are openings, along their edges are installed additional elements, regardless of the location of the other lighthouses.
There are several ways to install plaster guides. Some are more difficult, but more precisely, others are easier to execute, but allow for errors. Whatever technology of installation of beacons is carried out, they strive for such an end result - the guide strips are installed vertically, firmly fixed, are in the same plane, which indicates the minimum plaster layer in the places of the greatest protrusion of the base surface. Planks are fixed on solutions: gypsum is more often used plaster mix, less often - polymer-cement adhesives, for example - tile. The easiest way is to set up beacons in this way (you need to work with an assistant):
- 1. With the help of the rule and the bubble construction level, we "probe" the surface - we determine the areas of the greatest curvature, the most significant protrusions of the relief. This allows you to put a picture in your head, which will help determine how far the beacons protrude relative to the base wall.
- 2. Install the extreme beacons. A solution is prepared and applied vertically with slides 20 cm from the adjacent wall. We also do it from the opposite side.
- 3. The planks under the control of the level and the rules are gradually pressed into the applied solution. Remove the excess mixture that is squeezed out with a spatula. As the beacons are planted on both sides, together with an assistant, pull the thread between the guides, determining the minimum layer of plaster in the places of maximum protrusion of the relief. Having reached the required position of the planks, let the solution grab.
- 4. When the extreme beacons are sufficiently fixed with the seized mixture, we tighten the landmarks (strong thread or fishing line) between the guides below and above, according to which we mount the intermediate guides using the same technology.
When the mortar fixing strips seizes, proceed directly to the plastering.
We plaster ourselves - the process has begun
If the surface does not differ in significant curvature (up to 3 cm), plastering is done in one pass. When there are significant indentations, you first need to fill them with a solution - make a cape. This is true for all types of mixtures. Such a layer is poured so that then there is an opportunity to plaster the whole one.

The technique of applying the material to the surface varies. For heavy mixtures, you need to develop a skill - the solution is thrown onto the surface with a specific movement using a trowel. The hand should move up and slightly to the wall, while at the end of the movement the solution flies off the tool and sticks to the surface tangentially from bottom to top. The application of the mortar starts from the very bottom and gradually moves towards the top. In this case, it is important that the piles of solution lay down as tightly as possible, but do not fall on each other - if this happens, the material falls off the wall, sometimes pulling other areas of the applied material behind it. If the skill is acquired, and the solution can be hoisted to the surface, we proceed directly to the plaster.
- 1. We fill the gap between the beacons by about a meter from the floor, tighten the solution with the rule - set the tool on the planks at the very bottom and gradually raise it. In this case, we do not tear off the rule from the beacons, making quick movements with the tool to the left / right.
- 2. If the solution is thick, it is advisable to do the previous movement again in order to thoroughly remove excess material. Having passed the section with the rule, you will see that the solution did not lay down solid - they will remain of various shapes and the size of the depression. We additionally fill them with a solution and again remove the excess with the rule. We do this until there are depressions on the surface no more than 1.5-2 cm in diameter - we will fill them when grouting the plaster coating.
- 3. We continue to throw the solution further, repeating the manipulations described above, until the gap between the beacons is completely filled with the mixture used. We set the rule aside or give it to the assistant for a wash.
- 4. Take a grater and begin to grind the plaster. We start again from the bottom, where the solution has tightened. We make circular movements, holding the grater on the surface with the entire area - you cannot tilt. In the process of grouting, the bumps are erased and the pits are filled. The result is a smooth, uniform surface suitable for any subsequent finishing.
Gypsum mixtures are plastered in about the same way, with the difference that a spatula is used to apply the solution, and the surface after setting is not rubbed. Instead of grouting, the plastered surface is passed again with a thin layer of gypsum plaster using a wide spatula.
By doing overhaul apartment, office or home, you will surely face the need for plastering work. This process is very time consuming and requires professional skills. Therefore, it would be better to entrust this work to specialists. But if, in order to save the repair budget, you decided to finish the walls yourself, then before kneading the solution, read the information given in our article, complete guidance on the plaster of the walls with your own hands.
Plastering the walls takes place in several ways.
- In a plane, using a rule (no beacons). This option will do, if the walls as a whole are fairly flat, without drops and strong deviations.
- Aligning the walls with the lighthouses. The second method is suitable if the walls have significant deviations and irregularities.
- With simple plaster, vertical deviations of no more than 3 mm per 1 m are permissible, but no more than 15 mm for the entire height of the room. Thus, the maximum deflection of the wall with ceilings of 2.5 m is 7.5 mm. Smooth irregularities are acceptable, for every 4 sq. m. - no more than 3 pieces. Their height or depth should not exceed 5 mm. Horizontally, the maximum deviation is 3 mm per 1 m.
- SNIP for improved plaster requires stricter adherence to tolerances. Vertically - no more than 2 mm per 1 m, but no more than 10 mm for the entire height of the room. The presence of smooth irregularities is permissible - no more than 2 pcs. by 4 sq. m., less than 3 mm deep. For each meter horizontally, a deviation of no more than 2 mm is permissible.
- The most stringent requirements in SNIP are indicated for high quality plaster. Vertical deviations should be less than 1 mm per 1 m, but not more than 5 mm per room height. The maximum allowed is the presence of 2 irregularities per 4 sq. m., less than 2 mm deep. At 1 m horizontally, a deviation of no more than 1 mm is permissible.
Requirements for plaster
The main requirements for the quality of the plastering work carried out are set out in SNiP III-21-73. It is especially important to know them if you decide to do the work not on your own, but to hire workers. The quality of work is divided into 3 parts: for simple, improved and high quality plaster.
Aligning walls with beacons

It is in this way that significant irregularities in the wall can be removed. Beacon profiles will serve as a limiter so that the work is performed perfectly even with a tolerance of 1 mm / sq.
Cost of work
Price for plastering work is from 600 rubles. per sq. m. Let's calculate how much you can save if you do not hire workers.
First of all, you need to buy a hammer drill and a bubble level 2 m long. All the rest expendable materials will be indicated below. For all these accessories, 6000 rubles will be enough, so you will save money after leveling one wall with an area of 15 sq. m.
If you want to align walls with an area of 90 sq. m., then the savings will be at least 30,000 rubles! The whole tool will remain with you forever, and if you already have it, then it's a sin not to use it. If we plaster the walls ourselves, then we will definitely be sure of their quality.
Choosing a mixture for plaster
To better understand the wall leveling process, see the following on plaster:

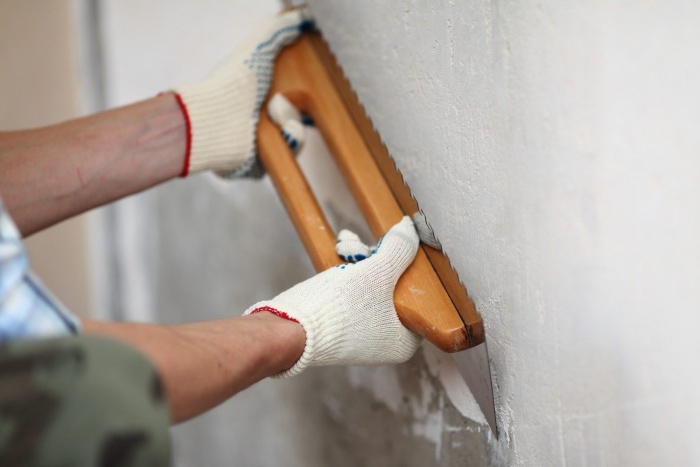
- The last stage is plastering. To make this easier to do, it is better to start grouting before the grout dries. To do this, you need to dilute the plaster in small portions in a more liquid consistency. Moisten before grouting small area walls about 1 square meter.
- Apply the solution to the bevel and spread it with a thin layer. Then flatten this square with a small 45 degree angle, with strong pressure.
- Continue smoothing the square until the solution ceases to accumulate on the bevel, while removing its excess. The surface should be flat and smooth.
- Repeat these steps, but smooth each new square overlapping the previous one. Try to work without interruption, distracted only by mixing the solution.
Note! If you are producing for tiling, the minimum plaster layer should be 10 mm. In addition, it is not necessary to grout, since for the greatest adhesion of the tile to the wall, it will be necessary to create artificial irregularities.
The result of the work is shown in the photo:
Facade plastering
The plastering of external walls (facades) according to the technology is almost the same as inside the premises. The main thing here is to observe temperature regime... The temperature outside should be above freezing.
For facades, a mixture based on cement and sand is usually used. For greater durability, a metal mesh can be attached to the facade and plastered over it. It is especially important to use mesh if the walls of the house are made of sand-lime bricks.
We have examined in detail how to properly plaster walls using lighthouses. Now you can easily do these works with your own hands. Do not be discouraged if you do not succeed in this business the first time, everything goes with experience, and you will definitely learn how to make the walls perfectly even. We also recommend that you read our article about.
Grouting the walls after plastering is mandatory. In order to start painting the wall, it must first be leveled. There are two types of surface leveling, namely: plaster, that is, a rougher finish and putty - a fine finish.
Today we will tell you how to trowel the plaster and it will be already last work before wallpapering or painting. You can look at some points in the video in this article and photos and this will help to avoid mistakes.
Experienced craftsmen know: the more thoroughly the plastering of the wall, the easier it will be to carry out the finishing. By doing everything with your own hands, it is quite possible to do everything efficiently.
In their work, they usually use wide spatulas, because even if the material is applied very carefully, small irregularities and sagging will remain on the surface, like traces of sharp corners of a spatula blade.
Attention: One more rule - before starting polishing, for the best result, the wall must be thoroughly dried for at least one day.
Choosing the right tool
After they are dried, but even before priming, they are grouting or grinding. This is a mechanical work and therefore it is necessary to carefully select a tool for grouting plaster, because the quality of the work will depend on this. Let's take a closer look at how to rub the plaster.
The right choice will save you energy and time:
- In the case when the wall surface is small, it makes sense to use a sanding bar.
- If the wall area is significant, surface grinding can be used. electric car, but, in this case, you will have to handle the corners manually.
- Perhaps the wall has a large area and, at the same time, a complex surface with protrusions or bends. A powerful eccentric sander works best here.
Note: The surface of any grouting tool must be completely smooth. Even small scratches are not allowed.
It is a base, equipped with a handle with clamps, where sandpaper or sanding mesh is fixed. Before starting work, make sure that you have a small supply of sandpaper, because worn-out sheets require urgent replacement. The mesh should be replaced when its canvas is worn out.
How to find out? When, grinding the surface, you feel that the previous effect is gone, most likely this moment has come.

So:
- The greatest preference in work is given to the sanding mesh, because it does not wear out as quickly as paper, and it is not so afraid of putty dust. When sanding, dust does not get trapped in the mesh holes. Therefore, despite the higher price, it is recommended to use it. Before selling, the mesh is cut to the size of the bar, and therefore, when going to the store, determine what size of the sanding mesh you need.
- Sandpaper needs to be changed frequently, so the savings will be small... When shopping, choose paper in rolls or large sheets so that you can cut it yourself to fit your sanding block.
Note: Remember to always leave a few millimeters under the bar clamps.
- What kind of sandpaper do you need? Find out experimentally by trying small pieces of different grain sizes on the wall. Paper that is too smooth will break down immediately, and paper that is too rough will not the right quality processing.
- Depending on what you plan to cover the walls with in the future, the quality of grinding its surface can be different. If it is being prepared for painting, then it must be polished several times. First, polish roughly with 60 grit sandpaper. Such paper should remove the most noticeable particles from the surface to be treated. After that, paper or a sanding mesh with a grain size of 100 to 120 is taken. These will help to give the surface a perfect smoothness.
Attention: If you plan to wallpaper the wall, you can skip the second sanding.
Using a sander
Has its undeniable advantage in terms of saving time and effort. The quality of the treated surface cannot be compared, it is incomparably better.
And one more advantage: no dust. Modern machines have a special holder design that allows you to work long time without feeling tired.

- And there are machines with a retractable work surface. They allow you to work on remote sections of the wall.
- They are also different in their power. The instruction also speaks about it. The higher this indicator, the more it can work without overheating.
You can make a special device yourself that will allow you to make fine processing complex surfaces such as corners or niches. To do this, you need a piece of plastic that is about 7 centimeters wide.

Then you will need to cut a piece plastic profile appropriate size. Now you need to glue on its back side double-sided tape sandpaper (different grain sizes) and cut the corners so as to give this "mini - grater" device the shape of a pencil. It is necessary to work with a corner, cutting (sharpening) it as it wears out.
How to protect your apartment from dust
Before you start Finishing work take measures to ensure that fine dust, which inevitably forms when sanding the walls, does not penetrate into the rest of the apartment.
- To do this, purchase a protective plastic wrap for furniture and carefully wrap up everything that is left in the room, be sure to secure the film with tape. Hang the window openings with the same film, securing it along the entire length and width.
- On front door hang a towel moistened with water, put the same towel under the threshold, and close the door slot with one more.
- Take care of yourself: work with special glasses and a mask. Shake work clothes thoroughly before washing.
How to sand the walls after putty
After the preparation is completed, you can start working. Grouting the video will show you the sequence of the work. Make a plan first. To do this, use lighting: illuminate the surface of the wall with a powerful flashlight.
All irregularities will be noticeable, because they will cast long shadows on the surface. Circle them in order to notice which areas need to be especially carefully worked on.
Grinding is usually done from top to bottom. Starting from the corner, spiral movements are carried out, with slight pressure. A significant effort can be harmful and disrupt the fresh putty. They work, starting and ending always with sandpaper or a sanding mesh of the same grain size.
All the small grooves seen are leveled later, after the surface of the wall has been primed (see). They are carefully putty using a soft rubber spatula.
How to check the quality of the work done:
- At first using lighting by directing the light of the lamp along the wall.
- Secondly by applying to the surface building level to determine if there are any uneven areas. All flaws are eliminated using the same sanding bar.
But the work is not over yet. After sanding, the entire treated surface will be covered fine dust, which you must get rid of before painting or wallpapering. How to do it?
If you have an old, outdated vacuum cleaner that you don't mind clogging up with grinding dust, you can use it. Or you can brush off the dust with a soft brush and carefully, fearing to blur the putty, wipe it several times with a slightly damp cloth, waiting for the surface to dry out after the previous time.
Note: Remember that putty is a very soft and docile material. Therefore, it is safe to say that by following the advice in this article, you will undoubtedly enjoy doing fine surface finishing work.
You already know how to properly trowel the plaster. Good graters you can do everything quickly and efficiently. Their price is slightly higher, but they are durable in work. And the plane does not deteriorate. So don't skimp on this.