Today there are many options for finishing the ceiling. The choice of finishing materials depends only on the taste of the owner and the amount of funds allocated for repairs. If planned a budget option finishes, then gluing foam tiles is the best choice. Firstly, the material itself is inexpensive, and secondly, it is quite possible to carry out the installation yourself, thereby saving on paying for the services of builders.
Made of expanded polystyrene, this is an excellent option for finishing the ceiling. Modern manufacturers offer various options tiles - with embossed pattern and smooth, white or tinted, regular or special, allowing you to create seamless coatings. An important advantage of this finishing material is its simple installation. Consider how to properly stick tiles on the ceiling without resorting to the services of professional builders.
Selection of materials and preparation of tools
When buying materials, it is important to pay attention not only to the appearance of the tile, but also to its quality.
We buy quality material
Here are the signs of a good ceiling tile:
- Each tile has clear geometric dimensions and even right angles.. If the corners are dented or rounded, then it will be impossible to achieve a normal fit.
- If you examine the side sections of the tile, then there should be no signs of shedding. High-quality tiles have small, identical grains of expanded polystyrene.
- If the tile has a relief, then it should be even and clear over the entire area..
In addition to tiles, you will need to purchase more and, best of all, choose one that is designed specifically for polystyrene foam boards.
Calculation of the number of tiles

At the initial stage of solving the problem, it is necessary to determine the amount of material.
To do this is quite simple.
- We measure the length and width of the room.
- We multiply the obtained values, resulting in the area of \u200b\u200bthe ceiling.
- We look at the factory packaging with tiles, for what area of coverage it is designed.
- We divide the area of the ceiling by the area of \u200b\u200bthe tiles contained in one package, we get the required number of packages that will need to be purchased.
Advice! Since when solving the problem it is unlikely that it will be possible to do without the need to cut the tiles, therefore, the calculated value should be increased by 10%.
Tool preparation
To carry out work, prepare:
- Convenient stepladder.
- Level.
- Pencil.
- Square.
- Meter ruler.
- Leg-split.
- Construction or clerical knife with breaking blades.
Installation
Consider how to properly stick the tiles, breaking the work into several stages.
Ceiling preparation

Before sticking tiles on the ceiling, you should prepare the surface.
- If there is an old coating on the ceiling, it must be removed.
Advice! If the ceiling was previously finished with the same finishing material, then the question may arise how to properly tear off ceiling tiles? Needless to say, the withdrawal process old tiles simple, but rather time-consuming, the old coating should be removed by prying the tile with a spatula and cleaning the glue remaining on the ceiling.
- Next, you should inspect the surface freed from coatings for items to detect defects. If there are cracks, potholes and other irregularities on the ceilings, then they should be puttied.
- The leveled surface is treated with a primer suitable for the floor material. This operation will provide better adhesion of the adhesive to the ceiling slab.
Advice! It is especially important to prime wooden floors or plywood ceiling. Otherwise, the tile will hold much worse.
markup
Before laying the tiles, mark the ceiling.
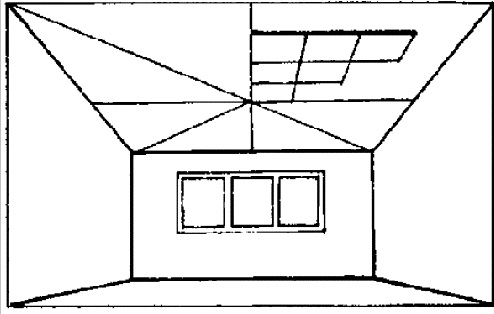
First you need to decide on the method of arranging the tiles, you can lay them both parallel to the wall (direct method) and diagonally (see). Laying begins, as a rule, either from the center of the room, or from the location of the chandelier.
Twine is required for marking.
- The end of the twine is fixed with tape in the far corner of the room.
- The second end of this cord is fixed at the opposite end of the room.
- In the same way, the second piece of twine is fixed, as a result, the room is divided diagonally. In this case, a right angle should form at the intersection of the cords.
- Marking is applied along the fixed cords with a pencil, the intersection of the lines will become the place for gluing the first tiles.
Advice! Most often, the chandelier is not located exactly in the center of the room, so the layout has to be done a little differently. To do this, two lines are drawn through the attachment point of the chandelier, parallel to the walls and perpendicular to each other. In the right angles formed by these lines, we build bisectors (that is, we divide them in half) and draw these lines until they intersect with the walls. Thus, we got the markup, according to which the tiles will be glued.
gluing tiles

Consider how to properly stick the tiles according to the markup.
The work is done like this:
- Glue is applied to the back of the tile with dots.
Advice! The adhesive composition should be applied around the perimeter of the tile and in its center.
- The first tile is laid at the intersection of the marking lines so that its edges exactly coincide with the marked lines.
- Further from the first tile, we begin to form two perpendicular rows, combining the edges of the tiles with the marking lines.
- The next rows of tiles are glued, starting from the first, when performing work, you should monitor the alignment of the sides.
- At the joints of the ceiling with the wall, cut tiles often have to be glued, since the dimensions of the rooms are not always a multiple of the size of the tiles.
Let's consider how to lay the tiles correctly if the diagonal sticker method is chosen.
The markup with this method is similar, but the placement of the first tile will be different. In this case, when installing tiles with marking lines, it is necessary to combine not the edges, but the corners. Of course, such a ceiling tile sticker is a more complex option and requires a certain skill.

- On the tiles that allow you to create seamless coatings, special markings with arrows are made on the back side triangular shape. They indicate the orientation of the tiles relative to each other. In this case, the sticker of the tiles on the ceiling must be made so that all the arrows are directed in one direction.
- Often the sticker on the ceiling of the tile is made from the installation site of the chandelier. In order to lay the tiles at the fasteners, it is necessary to cut the corners of the four adjoining tiles. Subsequently, the cut point will be covered with a chandelier cap.
- Before applying glue to tiles, you should read the instructions for it. The fact is that some adhesive compositions require exposure after application, this requirement cannot be neglected.
- The final touch when installing ceiling tiles is gluing skirting boards around the perimeter of the room and installing a socket for a chandelier. After that, the ceiling decoration will be completely finished.
conclusions
So, polystyrene ceiling tiles are practical option ceiling decoration, which is quite easy to do with your own hands. You can see how to lay tiles on the ceiling on construction sites, where the layout of the tiles is presented and tips are given on how to complete the work.
A beautiful and elegant ceiling not only decorates any room, but creates a cozy atmosphere in the house. Ceiling tiles are a way out for those who are fed up with the ideal evenness of the ceiling. Ornate patterns, imitation of stone or wood, a variety of colors help to enliven the interior of any room. Easy installation and budget added pluses to the popularity of this finish.
Types of ceiling tiles
Before choosing suitable option, you need to figure out what happens pvc tiles for the ceiling.

Today manufacturers present it decorative coating ceiling in three types:
- Pressed. This is the cheapest type of finish, the product is created by stamping. Thickness in finished form - from 6 to 8 mm. A seamless tile ceiling, imitating a solid coating, is most often represented by stamping.
- extruded. Produced by pressing. Its surface is perfectly smooth, no graininess, as the product is painted or coated with a film. The thickness of the finished product is from 2.5 to 3 mm. This type of ceiling finish is distinguished by special strength and durability. It is this coating that perfectly imitates natural materials. If you need a wood effect ceiling tile, it will be extruded.
- Injection. During its production, very high temperatures are used. Sintering attached finished product increased strength. Thickness - 9-14 mm.
To save the budget, use pressed - its range is quite wide and varied. For creating exclusive design extruded with a wide range of decorative properties is more suitable.
Wall marking rules
To create a work of art on your ceiling, it is not enough to buy a coating with an intricate pattern. Before you glue the ceiling tiles with your own hands, you need to decide how the coating will be installed. Stylish interior create using multi-colored tiles, which are glued in a checkerboard pattern or in the form of a snake. The usual options are diagonal and straight.
Before you properly start gluing the ceiling tiles, you need to mark the ceiling. The scheme of future work will avoid trouble in the form of noticeable seams or violations of the pattern.
Markup from the center
The essence of the method is simple: connect the opposite corners of the room with a regular thread. The intersection of the lines is the center of the ceiling, from which the installation begins.

If you intend to glue the tiles to the ceiling diagonally, then no additional action is needed. The threads connecting the corners will serve as markings. The corner of the first square is placed in the designated center of the room. The rest are mounted relative to it.
For mounting in a straight line, you need to draw two more lines. Threads to determine the center divided the ceiling into four parts, forming triangles. For marking, you need to draw lines perpendicular to each other. The new lines pass through the vertex of each triangle at a 45 degree angle. Removing the threads with which we searched for the center of the ceiling, we get two lines of direct marking. The squares of the coating are laid relative to these lines.
Marking from the chandelier
Not always markup from the center will be a good option. The difficulty lies in the fact that the chandelier rarely hangs clearly in the geometric center of the ceiling. Due to the displacement of the light source, installation becomes more complicated - you will have to cut a hole for the lamp cable.
Where to start gluing ceiling tiles in this case? Experts advise gluing not from the geometric center of the ceiling, but from the chandelier. And the installation is easier, and the harmony in the interior is not broken.

The marking technology is the same, but you do not need to look for the center of the ceiling. Lines (straight or diagonal) are drawn through the chandelier hole.
Marking from the corner
Mounting from a corner is the most straightforward way to mark up. It simply won't be needed. The corner of the first square is mounted in the corner of the ceiling. If suitable option stickers in a straight line, the whole square is glued first.

Algorithm for mounting diagonally:
- Cut the square in half diagonally;
- Glue the resulting triangle into a corner;
- Glue the whole square with the second, connecting the side with the cut side of the glued one;
- Mount the remaining squares of the cover, respectively, the first two.
In order to hide the unevenness of the ceiling, use multi-colored tiles. It can be laid out in the form of a chessboard or a snake.
How to choose glue
If you decide to update the ceiling in a room or in the kitchen, then you will probably wonder what kind of adhesive is best for gluing ceiling tiles. A small overview of popular adhesives will help you make the right choice.

Before deciding what to glue the ceiling tiles on, you need to understand what requirements to apply to the candidate:
- The glue should dry quickly. The strength of the coating and the speed of work depends on this.
- The adhesive must be sufficiently viscous to hold the coating (even such a light one) on the ceiling.
- The adhesive must be white or transparent so as not to spoil the appearance of the finished ceiling.
- The glue must be universal in order to glue different surfaces.
So what is the best adhesive for ceiling tiles?
Glue Titanium for ceiling tiles has a high viscosity. This means you don't have to press it against the ceiling while waiting for the adhesive to set. Titanium is a popular adhesive for pvc tiles because of its affordable cost and versatility. It is suitable for bonding various materials, so the remaining glue will always come in handy on the farm.
Clay Master for ceiling tiles has a too strong smell. You will have to work with it with an open window, and temperature changes will negatively affect the installation. TO negative qualities This glue can be safely attributed to the duration of drying. Even after several hours, the finish is easily moved.
Dragon Polymer All-Purpose Adhesive also has an unpleasant, persistent odor and a drying time.
Acrylic putty is usually used for finishing finishing works before painting or wallpapering. But its qualities - density and good tenacity - allow it to be used for finishing the ceiling.
When choosing how to glue the tiles, you need to pay attention to the convenience of packaging. Tile glue in tubes is much more convenient to use than in cans.
Installation of tiles on the ceiling
Installation of a new ceiling coating is carried out after surface preparation. In this case, the old coating can be left in place.
If you still do not know what to glue first: wallpaper or ceiling tiles? To this tricky question, experts say there is no difference in the order in which the work is done. After all, one does not interfere with the other. And all the irregularities at the meeting point of two perpendicular planes can be hidden with skirting boards.
It is allowed to glue ceiling tiles on whitewash. The main rule in this case is the surface primer. Contrary to popular belief, the coating will hold firmly and long enough. Especially if you still clean those places where the whitewash is cracking and moving away from the ceiling.
If everything is simple with whitewashed ceilings and wallpaper, then gluing ceiling tiles on old ceiling tiles is definitely not worth it. This will affect the quality of the installation and appearance ceiling. Old finish noticeably translucent, and such a coating is held very poorly.
If you decide to prepare the ceiling carefully, then the video tutorial below will help you:
The classic installation method is the answer to the question of how to properly glue ceiling tiles. This coating method involves cleaning the ceiling, leveling its surface, priming, preparing all the tools, and then decorative finishing.

Installation steps in pictures:


Answers to the most popular questions will help you quickly and competently update the ceiling:
- How to apply adhesive to ceiling tiles? Special compounds are applied dotted around the entire perimeter and in the center for strength. Acrylic putty should be applied in an even strip around the entire perimeter.
- How to glue ceiling tiles on an uneven ceiling? In this case, the glue must be applied around the perimeter in an even layer. If the ceiling is too uneven, then no finish will save the situation. Visually correct the irregularities will not work, as well as glue the coating with high quality. The ceiling in this case is better to align.
- How to clean ceiling tiles? Care must be taken during installation. But if the glue still got on the front side, it is better to immediately remove it with a dry cloth.
- How to clean the ceiling from tile adhesive? When removing the old coating, you need to remove all traces of its presence, including glue. Effective method – mechanical removal using a special power tool Sander) or an ordinary spatula and chisel. Less labor-intensive use of solvents.
- Can ceiling tiles be glued to wallpaper? Oddly enough, you can. Recommendations, as in the first case: remove the wallpaper in those places where they already move away from the ceiling. In this case, it is important to take into account that bright wallpaper shine through the white coating. It is allowed to glue wallpaper on the ceiling tiles, of course, if its surface is without relief.
We wish you good luck with your tasks when repairing the ceiling!
Ceiling tiles are lightweight material made of polystyrene, which has been popular for many years. After all, with its help you can hide defects in the surface of the ceiling and decorate it with tiles. different shades and with different designs. It is easy to work with tiles, it is glued easily and quickly. Even a beginner can handle this, provided that he knows how to glue the ceiling tiles correctly. We will talk about this in detail in this article.
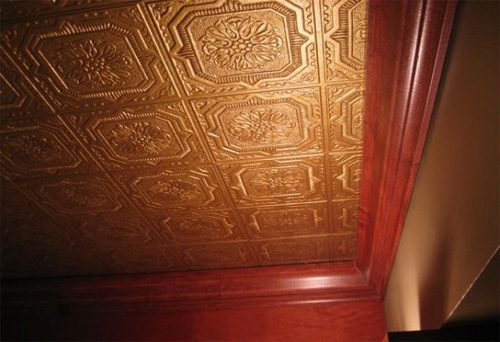
Textured tiles on the ceiling create an atmosphere of aristocratic luxury in the room.
Ceiling tiles can be glued horizontally and diagonally. It is believed that tiles glued diagonally better mask the curvature of the surface. The material serves for a long time, without requiring any special conditions for care. A damaged element can always be replaced (in the kitchen it is often necessary to change the tiles located above the stove).
How to glue ceiling tiles: video instruction
How to glue tiles on the ceiling
The first thing to do is prepare all the materials and tools that will be used. They must be at hand during work. Then you do not have to be distracted and annoyed by trifles. You will need a minimum number of tools. cook sharp knife stationery, large scissors for cutting tiles, paint cord for marking the ceiling (if not, take chalk). You will also need glue and the actual ceiling tile, the choice of which we will discuss separately.

Ceiling tiles in the kitchen do not have to be frilly, but they should be easy to clean.
For preparatory work, you will need a sharp narrow spatula, a deep penetration primer, a roller, brushes, rags and a simple pure water. If you decide to paint the glued tiles, you will need water-based paint. Most often, ceiling tiles are painted white, but you can paint the surface any color you like, or even use several colors. It all depends on your design idea.
Choosing tiles and adhesives
Depending on the production method, there are such types of ceiling tiles:
- pressed (6-8 mm thick), this is the simplest and cheapest tile, you will not achieve a wide variety of decors, but you can hide minor defects in the ceiling;
- injection (9-14 mm), which is considered more than a tile High Quality;
- extruded tiles are the highest quality, they are low-grained, smooth, but more expensive than other types of ceiling tiles.

Tiles of different colors and textures from different manufacturers presented on the market building materials
When choosing ceiling tiles, pay attention to the correctness of shapes and dimensional accuracy. If you decide to buy the cheapest pressed tiles, remember that sizes may not match even within the same batch. The discrepancy seems insignificant, but on the ceiling it will be noticeable, you will not be able to achieve a perfect fit. The corner should be straight, not rounded. Only by choosing high-quality tiles, you can make the seams even. In addition, it will be easy and pleasant for you to work. Try not to skimp on the material. Also evaluate the evenness of the edges and graininess of the tile. The edges should be even, not crumble. Another sign of a quality ceiling tile is the same size of polystyrene grains on it.
Ceiling tiles can be suture and seamless. Seamless tiles have jagged edges that match with each other (they fit like a key to a lock). In this case, the seams on the ceiling are invisible. The seam tile has smooth edges and the seams in the ceiling are visible. So think about which tile better fit to room design.

Seamless ceiling tiles - good choice for perfectionists
An important criterion for choosing a tile is the pattern on it. Polystyrene ceiling tiles can be simple and smooth, or they can be decorated with intricate patterns. If you opted for a tile with a complex pattern, in the process of pasting the ceiling, a situation may arise, as when pasting wallpaper with a pattern - it will have to be customized. And this means that the tile must be taken with a margin. To help you on reverse side tile manufacturers show the direction of the pattern with arrows. Tiles with a simple pattern that does not require adjustment are glued either side to any side.
The main requirements that consumers place on glue are good adhesive properties and the absence of solvents hazardous to humans. Hardware stores offer a huge number of brands of glue from domestic and foreign manufacturers, designed for products made of polystyrene foam. It is, of course, difficult for the consumer to right choice.
For pasting the ceiling, glue "Eco-bears", "Titan", "Moment" is often used. The first two adhesives from Polish manufacturers. Both adhesives have good adhesive properties. But when installing ceiling tiles, the elements must be pressed against the ceiling until the adhesive has set. "Moment" in this regard has an advantage over Polish adhesives, since it seizes instantly. But much more of this glue will be required, which will affect costs. In addition, you will need a special gun for sealants.

Glue and mounting gun — necessary tools for mounting ceiling tiles

Eco-naset glue for ceiling tiles is chosen by those who appreciate the safety of building materials
But these three types of glue are only a small part of what is offered in construction stores. In principle, everything glues well. Therefore, decide which glue to glue the ceiling tiles with, based on your financial capabilities.

Manufacturers offer many different types adhesive for ceiling tiles
Glue for ceiling tiles can also serve as mastic for adhesive ceilings, and even ordinary putty. Many experts and do-it-yourself repair enthusiasts recommend making glue on their own, mixing gypsum, putty and PVA glue in equal amounts. But remember that gypsum dries very quickly, so do not dilute too much adhesive, make it enough to work out in 10 minutes.
Surface preparation
Before gluing tiles to the ceiling, you should carry out preparatory work. Thoroughly clean and, if necessary, level the surface of the ceiling. If the ceilings are sheathed with plywood or chipboard, prime the surface. Before starting work, the ceiling must be clean, degreased and dry. Glue is applied pointwise to the tile, since the weight of the elements is small. Apply glue from a can or bottle directly to the surface.

In order for the tile to lay flat and hold securely, it is worth taking care of high-quality pre-preparation of the surface.
Many, when pasting the ceiling with tiles, have difficulties with electrical wires for lamps. If the chandelier is located in the center of the room, it is better to start pasting from here. Arrange the four tiles around the wire so that there is a gap between them. Cut off the ends of the corners of the tile that are in contact with the wire. Do not worry that it will be noticeable, everything will be covered with a glass of a chandelier.
If you decide to glue the ceiling from the wall, and not from the center, then on the tile that covers the exit point of the electrical wire, you need to make a hole for the wire. In this case, you need to glue the tiles row by row, starting from the wall, and when you reach the location of the chandelier, measure the distance from the beginning of the tile to the wire exit point, make a hole in the tile, turn off the power to the apartment and pull the wires into the hole. Even if the hole turned out to be a little larger, it will also be closed with a chandelier glass.
How beautiful to stick tiles on the ceiling: finishing options
Decide how exactly you want to place the tiles on the ceiling. There are many options for pasting the ceiling with tiles. It all depends on the characteristics of the room and your imagination. In any case, a small amount of adhesive is applied pointwise to the tile, the element is pressed against the ceiling surface, and held for several minutes. During this time, the adhesive sets to the surface and the tile is securely held on the ceiling.
Diagonally, if the chandelier is hanging in the center of the ceiling
This happens quite rarely. But if this is exactly your case, markup is easy to do. Stretch two threads diagonally, mark the point of their intersection. This will be the center, which should coincide with the exit point of the wire for the chandelier. Through the center, draw two lines perpendicular to each other. Thus, the surface of the ceiling is divided into 4 equal parts. The first square is glued in such a way that one of its corners is exactly in the designated center of the room. Let's move on to the drawing. Glue the tiles on the ceiling closely, without leaving gaps and seams, wipe off the remaining glue with a dry cloth.

Pasting the ceiling with tiles starts from the center of the room - it's easier to avoid overlaps and mismatches
And if the chandelier is not in the center of the room
The tile is glued similarly to the first case, but the markup is done a little differently. Two perpendicular lines are drawn through the point where the chandelier hangs. These lines should be parallel to the walls of the room. In the resulting right angles, we draw lines at an angle of 45 degrees. Next, we glue the ceiling tiles in the same way as in the first version.
How to stick a ceiling tile with a snake
This will require a ceiling tile of two colors. It is important to choose two colors that go well with each other. Mark the surface of the ceiling, as in the first or second option. The tile is glued from the center according to the drawing.

"Snake" - one of the most common ways of laying ceiling tiles
How to glue tiles on the ceiling in a checkerboard pattern
You should also start from the center of the room, which we find by drawing diagonals. It is very important to arrange the elements so that they are strictly parallel to the walls, otherwise general form the ceiling will be damaged. There are times when gluing ceiling tiles from the center of the room is impractical. For example, if the room is small, when pasting the ceiling with tiles from the center, there will be a significant overrun of the tile. Or in cases where the room is narrow and long (corridor, for example), it can be difficult to properly mark the ceiling and glue the tiles in the center parallel to the walls. In this case, it is better to glue the ceiling tiles, moving from the edges to the center.

Tiles stacked in a checkerboard pattern always produce the desired decorative effect
Possible difficulties when working with ceiling tiles
Difficulties may arise due to a mismatch in the size of the tiles. These errors in size, at first glance, are imperceptible, but with a strict fit of the pattern, they are striking. Therefore, do not glue the tile until you are sure that its dimensions match the dimensions of the previous tile. In case of discrepancies, cut off the excess tiles with a paper cutter or a mounting knife. You should cut along the ruler, then the cut will be even. Experts recommend cutting ceiling tiles by laying them on a sheet of corrugated cardboard. Perfectly suitable cardboard from packages for household appliances.
Another problem that often occurs when pasting the ceiling with tiles is the gaps between the tiles and the wall. This is due to the unevenness of the walls. If this distance does not exceed 15 mm, you don’t have to worry about it - everything will be covered with ceiling plinths (fillets), which are glued around the entire perimeter of the ceiling.
To date, there are a large number of finishing materials for the ceiling. Most affordable option are ceiling tiles, which are square panels of polystyrene. They have a wide variety of textures and a wide range of colors. This makes them a great option for creating beautiful and practical interior at minimal cost. The article will tell you not only how to glue the ceiling tiles, but also how to care for it in the future.
Advantages and disadvantages of ceiling tiles
The polystyrene from which the boards are made is light and eco-friendly material with good soundproof properties. Products from it are easily cut with a simple clerical knife and quickly mounted.

It belongs to flame-retardant materials, but can be melted and deformed by a powerful light bulb. Therefore, it is recommended to place chandeliers at a distance of at least 20 cm from the tiles.
With the help of foam tiles, a smooth surface is easily and quickly created without significant financial costs. But, with all the advantages, the adhesive ceiling is not very durable, subject to negative influence moisture and ultraviolet.
Calculation of the required amount of material
The sizes of ceiling tiles can be different, but in most cases they are produced in square 50x50 cm. Also produced rectangular tiles 100x16.5 cm in size, but they are extremely rare on sale.
After the final choice of plates is made, it is necessary to calculate required amount. by the most simple option will be the length and width of the ceiling divided by the length of the side of the slab. For example: the ceiling has a size of 300 cm by 600 cm, and the width of the tile is 50 cm. It turns out that 6 tiles fit in width and 12 in length. Multiply 6 by 12 and get 72 - this is the required number of ceiling tiles.
In the event that the ceiling is not a multiple of 50, you can draw the location of the panels on paper, observing the exact proportions of the ceiling.
Tip: you need to purchase 15% more material. This is done in case of breakage, deformation or incorrect cutting.
Ceiling surface preparation
Before you start gluing the ceiling tiles, you need to clean the ceiling from the old coating and dust. If necessary, it should be leveled with putty. If the irregularities exceed 1.5 cm, then plastering is performed first and only then finishing putty. When it dries, a primer is applied to the entire surface.
The next step is to apply markings for laying tiles. Only evenly distributed panels will give the room the necessary aesthetics. To do this, two diagonal lines are drawn on it, the center is located at the point of their intersection. Then, perpendicular lines are drawn through the resulting point, dividing the ceiling into 4 equal parts.
How to glue ceiling tiles
Panels made of polystyrene can be glued to almost any surface. For kitchen fit laminated tiles, and for the bathroom - extruded.
But you need to know how to properly glue ceiling tiles, because even the simplest workflow requires compliance with the technology.
First of all, you need to decide on the glue. For these purposes, a large number of special formulations are sold. But you can also use PVA or Moment. It is applied in a zigzag pattern on the reverse side.

The tile reacts to temperature changes and changes in humidity, which leads to deformation after installation. To avoid this, it should be left unpacked for several hours in the room where it will be installed. The quality of the tiles will also affect the aesthetics of the glued ceiling. It must have consistent geometric dimensions and even cuts.
The first tile is installed so that one of its corners is located at the center point of the ceiling. If there are wires in this place, they are de-energized, and the corner of the panel is cut (later it will be closed with a glass of a chandelier or a decorative ceiling rosette). Align it along the lines drawn in advance on the ceiling. When sticking, the tile must be pressed firmly, but so that no dents remain on it, and hold for several seconds.

All subsequent rows are arranged in parallel, without gaps between the tiles. The triangular arrows on the reverse side serve as a guide - they must point in the same direction.
Tiles in the last rows, in most cases, have to be cut to the required size. Therefore, you first need to try them on and only then apply glue. The remaining gap between the wall and the extreme rows of panels will close ceiling plinth.
Tip: Remove all adhesive residue immediately with a sponge.
The effect of a seamless ceiling is created using silicone sealant. They fill all the seams and level with a trowel. Excess is easily removed with a damp cloth.
The final stage of the installation of the plates will be the installation of a ceiling outlet around the hole for the chandelier and the plinth. Also, the finished ceiling can be coated with any water-based paint.
After completion of work, the doors and windows in the room are tightly closed to prevent air movement.
Tips to help you properly glue the ceiling tiles
Pressing the plate is best wooden block, not by hand. This will prevent possible appearance there are dents on it.
If the ceiling has an uneven geometry and the gaps between the tiles are too large, it is recommended to use acrylic sealant which, after drying, can be painted. But this method is only suitable for white, non-laminated tiles.
If the gap between the extreme rows of plates and the wall is less than 1.5 cm, in the future it will be decorated with a ceiling plinth. But if it is larger, then they close it with a strip of the panel, cut not only in size, but also taking into account the pattern.
Glue the boards from the center to the edges in small rooms impractical. As a result, they will not create the effect of a continuous surface, but will only increase material consumption. The best way is to install the tiles from the corner to the center.
Ceiling tile care
- non-laminated tiles are cleaned with a dry cloth or very carefully with a vacuum cleaner;
- the laminated panel should be wiped with a damp sponge;
- small dirt is removed with a regular eraser;
- from direct exposure to rays, polystyrene tiles turn yellow over time;
- complex pollution, from plates white color can be cleaned with alcohol. But the use of turpentine, acetone or gasoline is unacceptable.
Ceiling tiles in the interior
Very often it is associated with simple white slabs that have a simple pattern. But today their design has become more perfect, and they are already able not only to finish the ceiling of the room on a budget, but also to add luxury to the interior.

Ceiling tiles are the best choice cladding when you need a quick and inexpensive repair. Properly selected ceiling tiles can be glued to different types mixtures. The main condition is the absence in the composition of components that deform finishing material. Consider the types of adhesives, select the best compositions and at the same time talk about how to mount the cladding on a pre-prepared base.
The opinion that the most best glue- the most expensive, completely wrong in relation to the foam decor. Of course, the component composition will not smell, but is it as good as it seems? When choosing how to fix the ceiling tiles, it is important to pay attention to the following characteristics of the composition:
- Adhesion. The higher the level of adhesion, the more firmly the tiles will be fixed on the ceiling. Grip does not always depend on the viscosity of the composition, but it is better to pay attention to this quality.
- Drying time. Too fast drying compounds are just as bad as long drying mixtures. The former will not allow you to move the element if it accidentally moves from the desired point, the latter may simply not grab and the tile will fall off the ceiling. Proper glue dries within 2-3 minutes. At the same time, it seizes almost immediately, which means that it is enough to hold the tile against the ceiling for a short time, pressing it a little so that it normally “adheres” to the base.
- Smell. If the smell does not disappear for a long time, while you have not yet started working with glue, imagine what kind of aroma will be in the finished room.
Important! The adhesive for foam tiles should not contain solvents (white spirit, acetone, toluene). Components deform, burn elements. Also, you can not take colored mixtures for thin lamellas - glue spots will definitely begin to shine through the elements.
The best types of adhesive mixtures:
- Titanium.
- Silicone (Compound).
- Universal.
- Acrylic putty.
- Liquid Nails.
Preparing the ceiling surface for gluing
In order for the foam ceiling tiles to lie evenly on the base and stick tightly, the ceiling preparation process is preliminarily carried out.

The work algorithm is as follows:
- Take off all old decor. The whitewash is washed away, removing especially resistant pieces with a spatula. The wallpaper can be wetted with water, and when it swells, it can also be removed with a spatula. Remove the paint with a special solvent. Break off the tiles, remove the adhesive tracks with a spatula.
- Dry the surface, prime with a mixture of deep impregnation. It is good if the primer is with antiseptic additives. It is necessary to primer twice, but first let the first layer dry, and then apply the second and dry it too.
If the ceiling is even, the preparatory work is completed. There are defects, back to work:
- repair all chips, cracks, cavities with a starting putty;
- sand the dried putty with a grater with a mesh;
- primed again to increase adhesion.
Advice! If mold spots have formed on the ceiling, they must be removed. Solution applied blue vitriol or antiseptic. First, clean off the mold, then treat the surface, carefully smearing all areas.
Tools and materials for work
To perform the work, the master will need the following set:
- ladder;
- roulette;
- a pencil with a ruler;
- chopping paint cord;
- primer (you can immediately with antiseptic components);
- primer roller;
- set of spatulas: with a wide serrated edge, regular;
- sharp knife;
- adhesive composition;
- ceiling tiles;
- ceiling plinths;
- seam sealer.
Tiling schemes
When thinking about how to glue tiles to the ceiling, first decide on the layout scheme.

There are several options:
- Parallel. The easiest way to glue ceiling tiles. The option is suitable for walls that are even along the length in a room of standard geometry. Start work from wall panel located opposite the window, door. The layout starts from the center, then goes into the corners - it’s easier to mount solid elements first, and trim the extreme ones. But you can start laying out from the corner, trimming in this case requires only one (extreme) element.
- Diamonds. Good way how to glue foam ceiling tiles in rooms with incorrect geometric shapes. The option is complicated, but the result is beautiful. First, find the center of the room from it, set aside the required number of squares (4-8), then the diagonal pasting of the ceiling begins. The result should be a pattern in which the corner of the element looks exactly at the center of the room, and one side of the lamella coincides with the diagonal line on the ceiling. The rhombus in this case is created by 4 elements. This option allows you to use different color solutions, highlight tiles with pattern, interesting texture.
- Diagonal. Here you have to figure out how to fix it - the technology is simple, in which the center of the room is first located, from where the decor will be installed. A thread or cord will come in handy, which must be pulled diagonally from the corners of the room where they intersect - there is the center. Set aside 4 elements from the center, joining the corners, lay out from them. If the room is of normal geometry, then the center of the room is where the hook from the chandelier is.
Advice! If you have a simple ceiling tile, you know how to glue it in different ways, but you don’t want to - laying out with a seam offset will come in handy. This is a simple option: each next pattern is shifted with an end seam by half of the tile of the previous row. Patterned decor is not laid out in such a way that it does not ripple from a mismatch in the pattern.
Ceiling markings
In order for the rows to lie flat, regardless of the choice of gluing method, you first need to mark the ceiling. In addition to ease of installation, the markup makes it possible to pre-prepare trimmed decor fragments so that they are not distracted during work.

Usually, the installation of decor starts from the center of the ceiling or the location of the chandelier (sometimes this is the same point). Twine, thread, chopping paint cord are useful for marking. Fasten one end of the rope in the corner, the other - stretch diagonally to the opposite corner. Do the same with a couple of other corners. Where the threads intersect, there is a center and a right angle is formed. Mounting zones are marked along the cords (with a pencil), and the first elements are laid out at the intersection. So the easiest way to start the installation according to the rhombus scheme.
If the chandelier is not located in the center of the room, the markings must be done differently.
The work algorithm is as follows:
- through the hook for the chandelier, draw 2 lines perpendicular to each other parallel to the walls;
- right angles are obtained;
- divide the corners in half, bring the line through the division point to the point of junction with the walls;
- you will get one point of the beginning of the installation of tiles.
It remains only to choose how to stick the tiles on the ceiling and you can start finishing.
Tile sticking
Having decided on the layout scheme, you should prepare all the tools and materials. And now to evaluate the degree of viscosity and the type of adhesive composition, the method of applying the adhesive depends on this. If it is putty or cement mortar, the mixture is applied in a thin layer or pointwise so as not to weigh down the elements. When using other mixtures, liquid nails, glue is laid out along the perimeter of the lamella, in the center or crosswise. After application, you can spread the glue with a spatula over the entire wrong side of the element.
How to stick tiles on the ceiling correctly:
- Prepare room for work. Close doors and windows so that there are no drafts that interfere with the natural drying of the composition.
- Apply glue to the lamella, wait 1-2 minutes for the composition to thicken and attach the tile to the place of gluing.
- Press the element to the ceiling, hold a little, release. The following piece samples are laid out in the same way. In the process of applying, pressing, you can have time to correct the tile if it lay unevenly.
The extreme slats will be trimmed, it is important to lay out the cut edge to the junction with the wall - this area will be closed by the ceiling plinth, so uneven edges will not be visible. Skirting boards are mounted on the same adhesive composition as the tiles. But before installing the moldings, you need to go through the tile seams with a sealant. The seal is made quickly, the mixture is smeared with a finger so that no bumps and lumps stand out.
Knowing how to properly glue the ceiling tiles, there will be no problems with work. It is only important to prepare all the materials, tools and you can get to work. But as for determining the number of elements, the formula is useful here: divide the area of \u200b\u200bthe ceiling by the area of one tile. The final figure plus 10% will be the desired amount. The stock is necessary for trimming the lamellas, replacing them in case of defects.