We buy a house, and we see rooms in it that are not planned out the way we want. The area of the combined rooms is not the same, the partition is not there. Inconvenient ...
What should we demolish the existing internal brick wall and build another?
We are hindered local conditions... It is impossible to build masonry in a new place, on a wooden floor, for this you need to remove the floor and lay out supports - concrete or brick pedestals that will carry a serious load from a brick wall.
The way out is the construction of a less massive, but no less functional wooden partition. Additional supports are not needed for it.
Initial data
We broke the existing partition into one brick
and we got such a huge space, which we will have to divide in our own way: 
View from here 
View from there
The technology of self-erection of a wooden partition
Nothing complicated, this is the simplest construction set that adults love to play. The most important thing is to determine the vertical of the wall, and the second most important thing is to set the lower and upper guides.
Guides
We attach a central block vertically to the wall, which we fiercely control the level several times:

In order not to immediately "cut", you need to hammer (not completely) into the wall just one nail or wrap one long screw - approximately in the middle of the bar. On it, you will rotate and adjust the bar according to the level. After each hammered nail, apply a level, checking if the vertical has shifted:

As a result, the bar is fixed firmly to the wall, the distance between the fasteners should be no more than 600 mm. From each edge of the bar, respectively - no more than 300 mm.
Further, strictly observing the vertical, the lower and upper guides from a bar of the same section are installed in the same way. Nail a block to wooden floor and the wooden ceiling will not be difficult, therefore, there is no need to paint events.
If you have such an opportunity that the floor is with a screed (which is unlikely in the living room) and the ceiling is made of concrete ceilings - well, then use a puncher and dowel-nails.
And then the choice of material depends on the desired wall thickness. I decided that 100 mm would be very enough for me, so I put another small bar of 25 mm on each side on a 50 mm bar, and I already installed the plates on them.
The boards are used polished chipboard. You can take unpolished chipboard, plywood, OSB and any other materials of your choice. Just think - is it worth it to pay so much for a similar quality?
Do not be afraid of wood in terms of great sound transmission. We chose this technology in order to deprive the wooden structure of this great negative quality. It will be clear further.
Further actions
As you wish!
He will still be inside, he is not visible. Whatever they write and say about typical frame forms, this is your hut. For example, I was reluctant to maintain strict squares and spend extra energy on it on sawing bars and extra bars, in fact. Money needs to be saved, although there is a lot of it.
There is no need to achieve super monolithicity and incredible strength of the frame itself from the bars. Bolted to it wood slab will significantly strengthen the connection, serving as an additional plane and a very strong stiffener. And the second slab, on the other hand, will firmly secure the future partition.
Having assembled a timber frame of an arbitrary non-square shape, we attach one lower plate to it:

This is the "inside" view of the wall. Pay attention to the location of the guides: inside the wall near the frame, the vertical is not only not observed, but even maliciously violated. That does not prevent the wall itself from remaining flat and vertical, but it allows you to seriously save on expensive bars.
And here is the view from the other side:

There are horizontal main guides in the frame, they are located in the middle - to give stability and the ability to "tie" to them, mounting auxiliary ones.
It's a whole slab, I haven't even cut or trimmed around the edges. Fortunately, you have the strength to carry it yourself, without helpers. If you are working alone as a construction hermit, it is recommended that you either calculate forces or saw slabs to make it easier and more comfortable to carry. But in this case, you need to prepare the frame accordingly - so that each plate is sufficiently fixed at the ends. And for this you need to take into account the dimension of the workpieces.
Don't forget to check your vertical!
After that, we fix the second solid slab:

Inside view"
Outside view
 There is very little left from above - here you cannot do without measurements and trimming. As well as at the end of the wall, where you will need to cut out additional elements.
In total, the wall will take 2 whole slabs on each side, 2 "halves" on each side (sawn strictly in half), plus one for all additional ones.
A total of seven on a wall 4 meters long with a ceiling height of 2.75 m, plan when calculating the cost of materials.
Soundproofing
There is nothing better when someone cares about you. For example, manufacturers of high-quality mineral wool insulation, which are also soundproofing material.
Such heaters-sound insulators are made taking into account the performance of several functions, therefore, there is no need to look for sound insulation separately. The question is in additional convenience - materials sold in rolls are not as convenient to mount as tiled forms. They need to be unwound, cut, while it is not always possible to observe the thickness of the mineral wool - it delaminates.
Plates of a specific size are easier to cut and easy to assemble as a whole.
Inside the finished frame, trying to tightly press the material against the already mounted plates, we put heat and sound insulation:

Then we repeat the operations with chipboard on the other side of the wall, and we get an almost complete structure:

When asked about the method of fastening and the number of hardware on chipboard sheet I answer:
1. Fasten with self-tapping screws for wood with a length of at least 35 mm.
2. Be sure to fix the board around the edges.
3. The step along the edges must be at least 600 mm.
4. In the center, fix the slabs so that they are firmly in place. There is no need to look for non-existent technologies, especially since we have already violated them when we mounted a non-standard frame.
Joints and mates
Is everyone on this?
WITH wooden structure- Yes. Everything is clear there, but I won't even talk about how to measure and saw. Measure with a tape measure, saw with a saw. Or an electric saw.
But there is one caveat: it is better to process the joints of chipboards right away, more precisely, to putty. So that moisture, which does exist in the air, does not penetrate into the cuts and does not force them to be saturated and swell. When you will finally finish the partition is still unknown, and you do not need "swollen" joints at all.
In order to qualitatively and evenly fill the joints and interfaces of the plates with the walls, you need to use such simple materials as self-adhesive mesh and corners, plastic or aluminum.


Putty mesh
At the end of the work, when the mesh has dried and fixed, I preferred the entire wall, which I highly recommend to you:

As you can see, the joints are almost imperceptible - they are one solid surface.
Has the following structural device:
- Device timber frame from bars or boards, while the width of the frame material depends on the expected thickness of the sound insulation of the interior partitions.
- Wooden frame cladding edged boards with a thickness of 25 ... 50 mm, the thickness of the material of the walls of the frame partition depends on the expected load on the walls of the partition.
- Simultaneously with the installation of the walls of the partition, the installation of a sound-proof layer is carried out (if necessary).
- After installing the walls, the partition is sheathed on both sides with slab finishing materials - fiberboard, plywood or gypsum plasterboard, for rooms with high humidity(bathroom, shower) it is recommended to use gypsum plasterboard.
The device of the walls of such a partition can be made without primary sheathing with edged boards, but this significantly reduces the applicability of wall finishing materials and the ability of the walls to withstand loads of more than 25 kg per linear meter.
In this case, thin tile materials for wall decoration, for example, such as fiberboard with a thickness of 2.5 ... 8 mm, are no longer recommended to be used. Further in the article, we will consider the more common device of interior partitions with a wooden frame with primary cladding made of boards (hereinafter referred to as wooden frame partitions).
For an example of the device of a wooden frame partition, we take the given example of such a partition from a review article (partition A, partition thickness 105 mm).
Technical conditions
For example, you need to divide the area into wooden house for three rooms with two wooden frame partitions 105 mm thick and 3000 mm high.
As can be seen from the proposed floor plan, it is necessary to install two wooden frame partitions (A and A1) perpendicular to each other.
Before proceeding with the construction of a wooden frame partition, it is necessary to display its plan on the diagram with the arrangement of racks (B) and guides (A), mark the places doorways(if necessary), as well as work out in advance and display the nodes (DP - doorway) and the node (C - the place and method of joining the partitions) on the diagram.

Note:The sizes are not indicated, since in this case they do not matter, the main thing for us is to study optimal way devices of such partitions. At the same time, I would like to note that the recommended distance between drains is 600 ... 1200 mm.
Based technical conditions, for the device of wooden frame partitions we need the following materials:
- Bar 50x50x6000 mm - the device of the upper and lower guides.
- Bar 50x50x3000 mm - the device of vertical racks and horizontal jumpers.
- Edged board 50x100x3000 mm - a stand at the junction of the partitions.
- Steel connecting corner - for connecting the frame racks with guides and jumpers.
- Edged board 25x100x6000 mm - primary sheathing of the frame of partitions (wall sheet).
- Plate insulation with a thickness of 40-50 mm - a device for internal sound insulation.
- Fiberboard with a thickness of at least 2.5 mm - wall cladding of partitions.
- Hardware (screws and nails).
In order to ensure the parallelism of the bars of the upper and lower guides, it is first recommended to mark at the place of their installation. Instead of the unknown X, it should be the distance you want.)

Installation of the wooden frame of the partition
Installation of the frame begins with the installation of guide bars - upper (C and D) and lower (B1 and G1). Along the marking line, guide bars (C and D) are attached to the ceiling. After that, the guide bars (B1 and G1) are attached to the floor. The fixing of the bars can be carried out using self-tapping screws.

Note:The upper and lower bars must be opposite each other, the parallelism of the bars is indicated by a dashed line.
Before installing the bars of the upper and lower guides, it is necessary to make cuts at both ends, the cuts of the same dimensions must be made at the ends of the bars of the side racks of the frame.
The connection of the guides can be done using self-tapping screws or dowels. Before installing the self-tapping screws, it is necessary to drill through holes of a smaller diameter so that when the self-tapping screw is screwed in, the bar does not crack.
After installing the bars of the upper and lower guides, the bars (D and D1) are installed - the side racks of the frame and are attached to the wall. Installation is carried out by cuts at the ends of the racks into the cuts in the guides (node 1). Next, a stand (D2) is installed from a board with a width of at least 100 mm (50x100 mm). The rack (D2) is attached to the upper and lower strapping using steel corners (node 2):

Now, when the frame strapping is ready, it is the turn of the installation of the vertical frame struts (E) and horizontal lintels (G) and the device of the DP assembly (doorway).

Installation of frame racks
The height of the racks should ensure their installation between the rails with a slight interference. For example, the distance between the guides is 2900 mm, which means the length of the bars from which the racks are made should be 2895 ... 2900 mm. There are two options for attaching the racks to the guide bars:

- Option 1 - mount the rack with four steel corners.
- Option 2 - fastening the racks to the cuttings, when using this option, before installing the guide bars, it is necessary to make cuttings in them.
The device of the doorway in the frame partition
When installing the racks (E) in the places of the passage between the rooms, it is necessary to immediately carry out the work on the assembly of the unit (DP - doorway). To do this, when installing the struts (E), the upper fastening can be performed in the following way - the connection of the struts (E and E1) with the jumper (G) is carried out using self-tapping screws or steel corners.

The lower part of the struts (E) is attached to the lower rail of the guide in two ways:
- Option 1 - connection of the drain and the “thorn-groove” guide with additional fastening with a steel angle (fig on the left).
- Option 2 - connection of the rack and the lower rail with the device at the end of the notch rack (in a quarter) with fastening to the end of the rail with two self-tapping screws, additional mount using a steel angle (fig on the right).
When installing a doorway, it is necessary to cut out a part of the bar of the lower guide, which is located between the pillars (E), this will allow the installation of doors without a threshold.
Fastening horizontal lintels
The fastening of horizontal lintels to the frame racks can be done in several ways. For example, the fastening of the jumpers (Ж1) to the frame racks (E) and the extreme racks (D) can be performed using steel corners or combined - the jumper is attached to the rack (D) with steel corners, and to the rack (E) with self-tapping screws.
Jumpers (G) can be attached to the frame racks (E) using steel corners, self-tapping screws, or fastened to cuttings. All mounting options are shown in the figure:

The distance between the jumpers (G) can be done in any way, but it is not advisable to exceed a distance of more than 1000 mm, as this will reduce the rigidity of the installation of the vertical struts of the frame and, accordingly, the entire structure as a whole.
Frame sheathing
The primary sheathing of the finished frame with edged boards is carried out first from one side. With the help of self-tapping screws or nails, the boards are attached to the vertical posts of the frame. It is recommended to leave a gap of 5 ... 10 mm between the finishing board and the ceiling slab, this gap will protect the wall linen from possible load on it by the ceiling slab during off-season movements of the house or when it shrinks.

The final planking of the frame with boards (second side) is carried out as follows. First, several boards (4 ... 6 pieces) are attached to the frame and the resulting space between the walls of the frame is filled with various soundproof materials (the most effective is the use of soft insulation).
After laying the sound insulating material continue sheathing the frame with boards to the level of the laid soundproof material, 4 ... 6 more boards are added along the height and the soundproofing material is laid again. Sheathing of the second side of the frame is carried out in this way until the entire side of the frame is covered with boards.

Note:Do not forget to leave a gap between the finish board and the ceiling slab, as was done when sheathing the first side of the frame.
Secondary cladding of a wooden frame partition is performed using fiberboard (or gypsum board) sheets. Fiberboard sheets are attached to the boards with nails (roofing nails), if gypsum board is used as a cladding material, then it is attached to the boards using self-tapping screws.

Note:The distance between the nails when attaching fiberboard sheets to the frame sheathing boards depends on their thickness and hardness.
If the frame partitions are sheathed with fiberboard and decorative trim the walls will be carried out by gluing wallpaper, then in this case it is advisable to glue the joints of the fiberboard sheets with paper tape. It is also necessary to glue the nail heads with paper tape, and only after that you can proceed to finishing walls of a wooden frame partition.
This type of partition is used if redevelopment or division of the common space into zones is needed in a wooden house. Frame partitions have the advantage that thermal insulation can be significantly improved with a relatively low weight and thickness (up to 200 mm). At the same time, sound insulation is also created. Additional communications can also be carried out inside the frame, for example, plumbing or electrical wiring.
The device of frame partitions includes racks, sheathing and strapping. Racks (frame) are made of a metal profile, a softwood frame or planks. Plywood, drywall and other smooth surfaces are used for cladding. The inner space is insulated various materials... They also provide sound insulation. Strapping is done with slats or boards. The interesting thing is that any interior walls you can install it yourself.
Varieties and algorithm for installing frame partitions
Interior frame partitions are installed after the log shrinkage, like windows and doors. If the load-bearing walls are permanent and supporting, then the device of partitions allows them to be removed or redone at any time. Although such a structure is considered light, it must withstand the natural stress in living quarters.
Such a wall is used, as a rule, in a wooden house, for example, in a log frame. There are interior partitions with and without a frame.
Frame-panel board
Photo # 1
Such partitions are prefabricated and are considered the most economical. Their device makes it very easy to build a wall with your own hands. The frame can be made from boards of any tree 50 mm wide and about 100 mm long, which are installed vertically and tied with a horizontal bar. They can be two-layer and three-layer. Frame-panel structures are made from various cut boards. It is best to use boards up to 40 mm wide and up to 150 mm long.
When performing two-layer partitions, the boards are placed vertically in 2 layers. And in three-layer panel board partitions, the middle boards (usually they are thinner) can be located horizontally. Frame-panel structures are assembled into grooves made on the floor and ceiling. The material is fastened with nails. The seams between the planks should be overlapped by the planks of the next layer.
Sound insulation of such partitions is ensured by laying roofing material, cardboard, mineral wool, polystyrene and other insulating material between the boards. It is necessary to protect the structure from excess steam. vapor barrier film... And cover the surface itself gypsum plaster or sheathed with plywood or fiberboard. Double plastering is done on top of the boards.
Solid partitions
You can make solid ones in a wooden house from a bar. The beam is going to the thorns. The structure is attached to the surface of the floor and ceiling with triangular bars. The surface of the structure is sheathed with plasterboard, plywood, chipboard. You can also knock out a groove in the load-bearing wall and install a partition into it. This method is well used in a wooden house that has not yet shrunk. To avoid warping the surface wide boards it is necessary to split it with an ax, and insert wedges into the resulting punctures to form small cracks.
A solid frame partition can also be made in two layers. To do this, it is necessary to vertically install boards with a thickness of 35 mm and revet them with a layer of thinner boards (up to 25 mm) at an angle of 45 °. So that in the future the surface can be plastered, you need to use non-planed boards.
Joinery (paneled structures)
Such partitions do not have heat and sound insulation. The device carries only the function of dividing the room into zones and may not even reach the ceiling. Executed from wooden planks required size, and tied with separate slats and panels. The surface is covered with varnish, paint or sheathed with precious woods or plywood.
Installation of frame partitions
In order to make a fence, you need to know the structure of the floor in a wooden house. If the floor is on beams, then the frame can be installed on one of these beams. The strapping must be carried out at a small - from 10 cm - distance from the flooring and ceiling. If the floor is located on logs on the ground, then the partition should be placed on separate beams with gaps of 1 cm on all sides.Do not place the structure on a clean floor - this complicates the repair and deteriorates sound insulation.

Photo # 2
Before installing the frame partition, you need to measure the room, make markings on the floor and on the walls. Bars and grooves for the future wall will be placed along the marking lines. According to the measurements, the racks are cut out and the frame is assembled from them. If it is planned to install a door in the wall, then its box is placed at the strapping stage. Additional racks are placed along the edges of the box and connect them to the frame.
Video: installation and use of materials for laying in a frame
When assembling the frame with your own hands, you can use two methods.
In the first case, it can be assembled and installed as a whole, like a frame. Or you can assemble shields and elements separately (where frame-shield structures are used). The assembled frame is placed vertically and wedged, reinforcing with screws. The extreme racks are attached to the wall. The bottom rail is also attached to the floor with screws. The screw heads are recessed for subsequent sealing.
For the stability of the intermediate racks, bars and boards are attached across them. Before installing them, the angle at which the bars will be attached is measured. It must be straight.
Outside, the timber is nailed directly with one nail through the rack, and from the inside - with two nails offset at an angle. The head of the nail must be deepened.

Photo # 3
Heat-insulating, steam-conducting material is laid inside the structure, which improves sound insulation. Previously, brick or dry slag was used for this. Now for these purposes, synthetic filler is used, for example, mineral plates. It is laid and secured after the sheathing is done on one side. Together with the filling materials, the necessary communications are carried out.

Photo # 4
To save time and insulating material, it is better to use frame cells of 500 x 500 mm or 500 x 1000 mm. Thermal insulation boards are mainly produced in this size. Therefore, it is precisely such a device that allows the slab to be cut in half or to use the entire material, respectively.
External finishing of the structure
Various materials using self-tapping screws. All screws and nails are covered with putty. When it dries, all surfaces are cleaned and the joints of the panels and the corners adjacent to the load-bearing walls and ceiling are sealed. For this, vertical strips of various profiles, fiberglass tape or putty are used. The finished partition is pasted over with wallpaper, covered with paint and other finishing materials.

Photo # 5
You should not assign functions to interior partitions made in a log frame load-bearing walls, support of roofs or upper floors. In places where accommodation is possible lighting fixtures or household appliances, it is necessary to make reinforcement with the help of bars.
Those who decide to make a frame partition with their own hands need to decide on its type, material and their financial capabilities. It is also worth considering the ability to work with wood and other materials.
There are many designs of interior partitions, they can be used regardless of the materials from which the house is built. It is important to make partitions technologically correct and ensure their compliance with exactly the requirements that are necessary for certain premises.
Among the vertical structures inside the house, load-bearing walls and partitions are distinguished. Ceilings and roof structures are supported on the first, they themselves must rest on the foundation, and on the second floor - on the lower wall. The position of the bearing walls on the plan of the house is rigidly fixed.
Interior partitions are not load-bearing structures. They only divide into separate rooms inner space houses, bounded by capital walls. Therefore, they can be made both from heavy massive materials (for example, brick) and from lightweight materials (for example, drywall, wood). Sound insulation, environmental friendliness, aesthetics, the possibility of redeveloping the space depend on the material and quality of the partitions.

Requirements for interior partitions
All interior partitions in the house must:
- be strong and stable so as not to endanger the occupants;
- withstand required time service, in some cases equal to the life of the house itself;
- do not have gaps on the surface and in places of abutment to other structures (so as not to become a haven for insects, rodents and moisture accumulator).
In addition, there are special requirements:
- for partitions of bathrooms and laundry rooms, resistance to moisture and steam is important. It is desirable to make them from waterproof materials, but the main thing is to prevent moisture from entering the structure. This problem is solved by a cladding made of waterproof material;
- for partitions of second floors and attics in houses with ceilings along wooden beams low weight is important, since they can withstand less load than reinforced concrete;
- if you need to illuminate a room in the back of the house, then it is better to use a translucent partition - made of glass blocks or structures with glass inserts;
- for laying engineering communications(electrical wiring, chimneys, water pipes etc.) a stationary partition of increased thickness is suitable;
- a partition separating zones with different temperature regime, must be massive and guarantee high thermal insulation.
In most cases, the systems should provide soundproofing of the premises. Massive structures cope well with this task, and in light partitions, soundproofing material between the skins is used for this purpose.
Sound protection level
Airborne noise insulation index for interior partitions between rooms, a room and a kitchen, a room and a bathroom by regulatory requirements should be at least 43 dB. The higher this indicator, the better design prevents the spread of household noise - from colloquial speech, radio, TV. However, it does not take into account the isolation of low-frequency sounds from home theaters or operating engineering equipment (ventilation, pumping). With equal indices of airborne noise insulation, a massive partition is much better at restraining low-frequency sounds than a light frame one. It is also important to take into account that the holes in the partition (for example, slots in doorway) significantly reduce the level of sound insulation. There are many nuances in acoustics, and if for some reason it is important to perfectly soundproof the room, you should contact an acoustic engineer.
Traditional types of interior partitions provide a comfortable level of sound insulation. Structures made of massive and at the same time porous materials - ceramics, aerated concrete, gypsum concrete, shell rock - well absorb and reflect sounds of any frequency. Such partitions with a thickness of about 10 cm provide an acoustic insulation index of 35-40 dB, with a thickness of 15 cm - up to 50 dB. In order, if necessary, to improve the sound insulation of systems made of these materials, arrange an air gap between two rows of masonry or additionally cover the wall with plasterboard.
Multilayer structures are also effective, in which external hard layers that reflect sound (for example, gypsum plasterboard) are combined with soft layers that absorb it. In frame partitions, basalt fiber mats or slabs are used as soft layers, which are placed between the cladding. At the same time, the level of sound insulation frame systems the higher, the greater the mass and rigidity of the lining layers, the wider the gap between them and the better the insulating properties of the soft material. Therefore, the absorption of noise will significantly improve the use of a double layer of cladding and special sound - rather than heat-insulating materials.
To achieve the same soundproofing effect, sometimes you have to choose between thick monolithic and narrow multilayer partitions. The latter is able to save the useful area of the house.
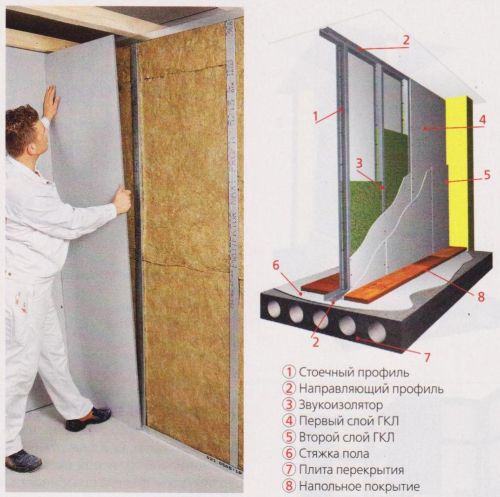
 |
The attachment points of the frames to rigid structures, as well as the joints with the floor and ceiling must be insulated with elastic pads |
 |
A material with a thickness of 100 mm or more (fiberglass, mineral wool, cellulose insulation), for cladding - GKL or GVL (12 mm) |
 |
Concerned about safety, electrical cables laid in, and the freon tubes of the air conditioner are thermally insulated |
Massive partitions are made of ceramic materials, shell rock, aerated concrete, sand-lime brick.
Application area
Such structures are used in houses made of appropriate materials with reinforced concrete floors... It is undesirable to use aerated concrete partitions in rooms with high humidity.
Materials and constructions
Brick partitions are made of building ceramic or silicate bricks of at least M25 grade. A sufficient thickness of a single-layer system is 12 cm (half a brick), if the partition is small - 6.5 cm (from a brick laid on an edge). To improve sound insulation, structures can be made three-layer - mineral wool (5 cm) is placed between two walls with a thickness of 6.5 cm, or an air gap is left.
If in a brick partition (or part of it) they are satisfied ventilation ducts or they hide pipelines, its thickness reaches 38 cm. Such systems are already too heavy for installation on a ceiling. On the first floor, they are supported on the foundation, on the second, on the wall of the lower floor. The traditional finish of a brick partition is 1-2 cm plaster.
In a house, partitions from ceramic blocks can be partially or completely made of the same material, namely from one layer of blocks 10-12 cm thick. For aerated concrete structures, blocks 8-12 cm thick in one layer are used. Partitions made of these materials are lighter than brick ones, they are advantageous to use if it is necessary to reduce the load on the floor, in addition, they are easier to finish.
Mounting
The installation of massive partitions begins after the installation of the supporting structures of the building. The base is leveled cement-sand mortar... To ensure accuracy when laying the corners, a wooden (from shields) or metal template is used, the verticality of the masonry is checked with a plumb line. To connect the partitions to the walls, when laying the latter, grooves (grooves) with a depth of 5-6 cm are left in the places of abutment of the partitions. Bricks are made into them when installing the system. If the grooves are not left, the partition and the wall are connected with metal rods. In the gap between the top of the partition and the ceiling, they hammer wooden wedges, the gap is filled gypsum solution.
At the same time, the peculiarity of the installation of structures made of ceramic blocks and aerated concrete is that the large and precise dimensions of the blocks allow the bricklayer to work without templates. To ensure straight lines, the partitions are fixed on the floor and on the wall at the junction wooden slats along which blocks are laid out.
Zones of control
- When constructing partitions made of aerated concrete, place waterproofing material(two layers of roofing material).
- If the length of a 12 cm thick brick made of brick exceeds 5 m or a height of more than 3 m, then the masonry is reinforced with mesh or wire rods, laying them in a solution every 4-5 rows, and connecting the ends of the reinforcement with the vertical and horizontal supporting structures of the building. Brick partitions with a thickness of 6.5 cm are reinforced at any length and thickness.
- Aerated concrete blocks and ceramic blocks must be cut to ensure the dressing of the seams (two vertical seams should not be on top of each other).

On the basis of gypsum and various fillers, prefabricated large-sized slabs are produced for partitions.
Application area
Structures made of gypsum concrete slabs are used in houses with reinforced concrete and wooden floors. For rooms with high humidity, moisture-resistant plates treated with a water repellent are used.
Material and construction
Gypsum concrete slabs can have dimensions of 30-50 x 80-125 cm and a thickness of 6, 8, 10 cm. Usually grooves and protrusions are made along the edges of the slab, which ensure quick and strong assembly. The material is easy to cut and slit for laying utility lines in it. Partitions made of gypsum concrete are three times lighter than brick ones, have a smooth and even surface. The thickness of the structure of one layer of slabs is 6-10 cm. If it is necessary to improve the sound insulation of the room or lay pipelines in the partition, it is made double.
Mounting
The system is installed on a ceiling leveled with a cement-sand mortar, waterproofing from roofing material is placed under the lower blocks. The template is made of two posts with a movable rail. Plates are placed on top of each other, as a rule, with the long side horizontally, with bandaging of the seams. A plaster solution is used. Reinforcement is laid in the horizontal seams and fixed in the walls that limit the partition. The gap between the ceiling and the partition is sealed with plaster mortar. It is not necessary to plaster the slabs, it is enough to putty.
Zones of control
- Gypsum mortar should be prepared just before use as it hardens quickly.
- Metal rods that are laid between the rows of slabs must be treated with bituminous varnish.
General installation rules
- In new buildings, before installing partitions, it is advisable to wait several months after the erection of the supporting structures of the building for them to shrink.
- Partitions are installed before making the floor screed. Performing further screed or roughing wood flooring, between the floor and the wall of the partition, make a gasket of sound-insulating material with a thickness of 2 cm.
- The installation of the systems begins by marking their position with lines on the floor, walls and ceiling.
- Structures are rigidly connected to the floor at the base and adjacent walls (or other partitions).

Video guide for the installation of partitions and non-load-bearing walls made of gypsum concrete slabs:
Basically, two types of partitions are used with the use of wood - solid and frame.
Application area
Wooden partitions can be used in houses made of any materials, even without reinforcement. wooden floors, they are ideal for second floors of buildings and attics. Structures made of this material are easy to disassemble, so they are appropriate if redevelopment is possible in the future. In rooms with high humidity wooden partitions must be protected with a waterproof finish.
Materials and constructions
Solid wooden partitions are made of vertically standing boards with a length to a floor height and a thickness of 4-6 cm. To improve sound insulation, boards are installed in two rows, placing a sound-proof material or an air gap between them. Lack of design - high material consumption and, accordingly, cost, as well as heavy weight compared to frame partitions. Systems based on a wooden frame are made of racks - beams with a section of 50-60 x 90-100 mm and upper and lower straps (horizontal beams that frame the frame) of the same section. Soundproof boards are placed between the frame posts. The cladding is made of lining, plywood, OSB or gypsum board. For a partition of two rows of the frame with an air gap separating them or with a two-layer cladding, the sound insulation index is significantly increased. This structure has a thickness of 15-18 cm; engineering communications can be mounted inside.
Mounting
At the base of the partition, a strapping bar is laid, which must firmly rest on the floor beams. The easiest way is to place it directly along the beam, and when placing the partition parallel or perpendicular to the beams, as well as diagonally, the beam is installed on a crossbar resting on adjacent beams. To create a continuous structure, two horizontal guides are fixed on the harness, between which the boards are vertically installed, connecting them in the upper part with a fastening bar. When installing a frame partition, racks are placed on the strapping bar with a pitch of 40-60 cm (it is desirable that it coincides with the size of the cladding plates), combining them with an upper strapping. The frame elements are fastened together with nails or self-tapping screws, using metal corners... On one side, the cladding is mounted, and then the space between the beams is filled with sound insulation. Frame structures are attached to the walls with metal crutches, to the sheathing - with self-tapping screws.
Zones of control
- At the junction of the partition with adjacent structures, it is necessary to fix a metal mesh. This will prevent cracking.
- In a wooden house frame structures must be installed one year after the construction of the building (after its shrinkage). The distance between the top of the partition and the ceiling should be at least 10 cm. It is filled with tow and covered with triangular bars.

A special system for the installation of frame partitions made of (GKL), in which all the necessary elements are provided, allows you to perform work especially quickly.
Application area
Lightweight gypsum plasterboard partitions can be used in houses made of any structures and materials and in any premises, even with high humidity (special moisture-resistant sheets are provided for such objects).
Materials and constructions
The system includes metal profiles frame - horizontal guides and vertical rack (section 50-100 * 50 mm), as well as gypsum board sheathing 1.25 cm thick and 120 x 200-300 cm in size and soundproof material. Designs are used with one-, two- and three-layer plating, as well as on double metal frame(with space for utilities). The level of soundproofing of the partition depends on the number of sheathing sheets, the thickness of the internal soundproofing layer, and the presence of an air gap. Depending on this, the thickness of a partition with a single skin can be from 7.5-12.5 (single) to 17.5-22.5 cm (double), and with a double skin and an air gap - respectively more.
Mounting
Structures are installed during finishing works before laying floor coverings, on a screed or overlap. A polyurethane or foam rubber soundproof tape is glued to the horizontal profiles, and they are fixed to the floor and ceiling using dowels and screws (with a step of about 1 m). Rack profiles are installed in increments of 30, 40 or 60 cm. The frame sheathing on one side is fixed with self-tapping screws, sound-proof material is placed between the profiles. Then the cladding is mounted on the other side of the partition. Irregularities in the cladding and screw heads are sealed with putty.
Zones of control
- To improve sound insulation, partitions are mounted to supporting structures ceiling and only then install drywall.
- The seams between the plasterboard should be putty in two steps.
- To protect against cracks, the joints of the gypsum board between themselves and adjacent structures should be putty, laying a reinforcing tape.
This video guide clearly demonstrates all the stages of building interior partitions from drywall sheets small size(small format):
To create partitions, glass blocks are produced, which differ in a wide palette of colors, an assortment of surface textures and sizes.
Application area
Glass partitions are used so as not to block the access of natural light to rooms located at the back of the house.
Constructions and materials
Glass blocks are hollow "bricks" with walls made of transparent or colored glass. Due to the presence of air inside, they have good sound insulating properties and transmit 50-80% of the light. As a rule, they are square in shape with dimensions of 19 x 19 cm or 24 x 24 cm and a thickness of 7.5 - 10 cm.
Mounting
Glass blocks are laid at the stage fine finishing premises after screed and plastering of walls, but before finishing the floor and finishing the walls and ceiling. Glass blocks can be stacked on cement screed... The process of laying them in the wall is the same brickwork, however, the sutures are not bandaged. The thickness of the seam is about 1 cm. A cement or cement-lime mortar is used, which is applied to the horizontal and vertical surfaces of the block itself before laying. From the point of view of aesthetics, high-quality jointing is required.
Zones of control
- The abutment of the glass block partition to the ceiling must be elastic, using cork gaskets, since glass is fragile material, and when deformed, the wall may crack.
- It is better to lay glass blocks on white or colored cement, then the seams will look more aesthetically pleasing.

Prices
The final cost of the partition depends on many factors. Moisture-resistant and fire-resistant materials are more expensive than conventional materials, the price is increased by the quantity and quality of finishing, frame and soundproofing material. The installation of the partition is 30 - 40% of the cost of the material, and its delivery and unloading, especially in the case of heavy materials, can be equal to their cost.
When choosing the structures of a house, it is important to take into account the material for the manufacture of its walls and other supporting elements, since it is they who will transfer the load to the base soil. For example, for a light frame house, they are not suitable concrete floors and heavy brick partitions. To understand what partitions are needed in a wooden house, you need to familiarize yourself with their varieties and features.
What is the difference between partitions and walls
Before starting work, you need to master the theory. Often among non-professionals such concepts as walls and partitions are confused (especially when the question comes about redevelopment).
To be clear, the following definitions can be given:
- Load-bearing walls- house structures that take the load from floors and roofs and transfer it to the foundation. These walls perform a very important function, therefore, they must be calculated according to the bearing capacity. The wall extends to the full height of the floor (from floor to floor of the next one), that is, as if it cuts the floor disc.
- Curtain walls- structures that, as in the previous case, are laid out to the entire height of the floor, but transfer the load to the foundation only from their own weight (ceilings or roofs do not rest on them).
- Partitions laid out at the height of the room (from floor to ceiling of one floor). Unlike walls, they do not rely on the foundation, but on the floor. They do not perform a bearing function, they serve only as enclosing structures.
The partitions are presented fewer requirements than walls, so they can be thinner and less durable.
Features of partitions in a wooden building
Unlike walls, partitions rest on the floor, not the foundation, and are laid out at the height of the room.To make interior partitions with your own hands in a house from a log, bar or frame building, you need to remember about the mass and strength of the wall material. V brick houses partitions are often mounted from the same material as wall structures... But it is important to remember that a ceramic element with a height of 2.7 m and a thickness of 1.2 m will weigh approximately 600 kg per linear meter. This is about 100 kg more than the mass. outer wall from a bar, 300 mm thick (optimal for heating technology). That is, the wall will have more weight than its own, and if you add more floors and a roof, the picture is not happy. That is why it is important to remember one thing: the density of the material for the partitions should not exceed the density of the load-bearing walls.

Next tip you can give about the time of the beginning of the installation with your own hands. Interior enclosing structures should be installed only after the walls of the house have shrunk. If you do this earlier, then the following situation will arise:
- Walls that are loaded with the weight of floors and roofs begin to dry out and sink.
- At the same time, the partitions shrink (if they are made of wood), but since the load on them is less than on the wall railing, the process is slower.
- The difference leads to the fact that the floors resting on wall structures put pressure on the interior fences and lead to their deviation from the vertical, uplift and bending.
To prevent this phenomenon, you need to wait a while after assembling a house from a bar or rounded log with your own hands. Shield and frame houses practically do not shrink, so install interior elements you can immediately after assembly.
Types of partitions and their manufacturing technology
Partitions in a wooden house made of timber or rounded logs, as well as frame buildings, can be of the following types:
- frame and frame-panel board;
- panel board and carpentry;
- frameless.
All of the above types refer to timber structures. As additional options you can make fences from plasterboard or tongue-and-groove. They also have a fairly low weight and are easy to install.
 Plasterboard partitions assembly diagram
 To understand how to make interior elements for a house from a bar or rounded log with your own hands, you need to consider each type separately.
Partitions on the frame
Such partitions in a wooden house made of timber or logs can be used at the request of the future owner, and for frame buildings they will be the most optimal option.
Manufacturing technology is as follows:

- Measurements of the room and marking on the floor where the interior structures will be located.
- Bars of the lower strapping are made, guided by the obtained dimensions. The elements are fastened to the floor with screws or self-tapping screws.
- Next, the racks and transverse elements of the frame are cut out according to the measurements. Do-it-yourself installation of them in the design position can be carried out in two ways: separately or the installation of the frame after assembling it on the floor. Fasteners are made with screws or self-tapping screws. The end posts are fixed directly to the wall.
- The frame is wedged at the top and fixed with fasteners.
- After that, a heater is laid between the elements of the frame (if it is needed for sound insulation) and sheathing is performed. You can sheathe with plasterboard or clapboard. In this case, the sheets and sheathing elements are cut so that their joint falls in the middle of the frame post.
Panel and joinery
To make this type of interior fences with your own hands for a house made of a bar or log, you need to be guided by the following procedure:
 Plank partitions in the house
 - Room measurements and markings.
- Manufacturing of board boards (solid) from boards with a thickness of 20-40 mm.
- Bars are nailed to the surface of the floor and ceiling, which form grooves for installing shields. The shield can be two-layer or three-layer. In the manufacture of a three-layer structure, boards of lesser thickness are used for the inner layer.
- Collect a partition from shields in height. By inserting them into the grooves formed by the bars.
- Soundproofing material can be placed between the layers.
The dimensions of the joinery partitions depend on the purpose. They are like door leaves, can be deaf or glazed.
They are made both for the entire height of the room, and with a gap of 30-50 cm from the top edge to the ceiling.
Frameless
When making the simplest structures of this type with your own hands, work is done in the following order:

- Room measurements and markings.
- Securing the bottom harness.
- Making a groove strapping on a bar by nailing two bars. The groove should be equal to the thickness of the partition boards.
- The timber is attached to the ceiling triangular... It will happen part of slot for top mounting, so the location must match the bottom mount.
- Install vertical boards, starting with the one located against the wall. It is squeezed and nailed to the triangular bar from above.
- Install all the boards in turn. The space between the individual elements is filled with tow, polyurethane foam or an insulating cord.
- After completing the installation of the boards, the second triangular groove element is nailed to the ceiling.
- The sheathing of the partition is carried out.
Instead of bars for fixing to the floor and ceiling, metal corners can be used.
To competently make partitions for a house from a bar or other wooden elements do it yourself, you need to choose the right type of them, mount them without deviations vertically and horizontally and securely fasten the parts of the structure together. For manufacturing, it is recommended to choose wood of the first or second grade. conifers... All wood is necessarily treated with antiseptics to prevent rotting. If desired, the elements can be treated with fire retardants to increase fire resistance.