Unity with nature has become a necessity during the time of accelerated technical progress. Summer cuisine in a private house is an excellent solution for leisure activities with close people. So nice to fresh air In the courtyard of a private house on weekends or vacation days to fry a kebab, drink a glass of homemade wine, admire the flowering garden, while communicating with relatives and friends. Another option is also no less attractive. Tired of the city bustle, in the proud loneliness to enjoy the noise of foliage and singing birds, go fishing at sunrise and prepare excellent ear. Then call the neighbors or call close people and arrange a wonderful holiday of unity with nature.

Summer version of the kitchen has become the necessary extra room in the capital private house, and in the country. Her presence in a private house greatly facilitates life, because There is no need for a permanent cleaning of a private house, air ventilation, additional landing and sleeping places for guests appear and the ability to continue to be in the fresh air. And the construction, made by your own hands, will seem to be more mile, because It is invested in labor, efforts and love.
Summer cuisine options
There are two types of summer kitchen construction: a private house-standing in the courtyard and attached directly to the house. Numerous photos of private houses with similar kitchens in large quantities can be considered on the site.
- Autonomous. Such a summer kitchen is separate standing building For a private house and is built on all the rules of autonomous premises. This is a laying of the foundation, the construction of walls, roofing, electricity, the necessary communications in the form of water, drain Jama, Gas stove with centralized or balloon gas, stoves. This option is very convenient for the owner of a private house, which has a need for an additional room in the presence of a large family, as well as a winter holiday with a fireplace and a bath or year-round residence. Budget this construction is impossible to name for a private house, because It requires a project and even coordination with the relevant architectural bodies.
- Combined. Such an option is more acceptable for those who have a more modest budget and want to create their own hands and comfort for a country private house. In this case, summer kitchens are attached to the main building, representing its continuation. When planning this type of extension to a private house, you must consider the entrance to the kitchen and to the house. At a minimum, there should be two: separate in the kitchen and combined with a private house. In the optimal version, the input should be three: in each room and input that binds them between themselves. Also worth paying attention to the wall to which the kitchen is adjacent. The windows of the private house in no way should go to the veranda, because The room will be doomed to the eternal darkness. If planned to be placed in the kitchen plate, sink and other communications, it is recommended to choose the most close location of the sources of water supply, gas and sewage taps in the house. This will reduce the length of the pipes and the number of metal-plastic and welding connections and save construction costs.


Types planning summer kitchens
Summer cuisines are represented by such types of layouts as open, closed and combined. All of them are present in the photo of specialized sites. In order to decide on the most suitable optionIt is worth assessing the functional destination of the construction and material possibilities of the host of the private house. It is no secret that the kitchens built by their own hands will cost half a cheaper.
Open
Such a layout is the most budget simplified version of the additional premises for the private house. It is necessary in the country or in a private house as a gazebo or simply not burdened with the functions of the construction for leisure, preparation of barbecue and other dishes that do not require special technical equipment. To make an open kitchen with your own hands, you need to make the site of the desired size, to install the support poles around the perimeter, build the roof, build a stove or organize a barbecue area, you can also put gas stove With a cylinder for preserving.

Benefits open kitchens
- The main plus of open kitchen is affordable price Construction and low cost of the project itself. This allows B. as soon as possible organize work and get at the exit pretty decent option For a private house. If planned simplified summer project Without summarizing the gas and communications to lead water, and the documentary confirmation of the construction for a good reason will not be issued, then if necessary, the sale of the plot, the kitchen can be dismantled.
- Also, an important factor is simplicity in construction. The open kitchen can be made with your own hands without the use of complex technologies, expensive modern materials and special skills in construction. Enough to read useful tips experienced masters and see photos of the proposed options. It will be very reasonable to decide to independently come up with options for protection against wind or rain, it is originally supplemented by the construction of a private home by the decor, thus making the kitchen unique in its kind.
- Even the absence of expensive modern technology and automatic devices is the most important advantage. In the conditions of accelerated rhythms of life, when each cooking process becomes machine, calm contemplation of nature, dishes from the stove and chims of the fire will become excellent relaxation. This will allow to reset the burden of urban worries, tune in to a calm rhythm, to chat with relatives and friends. This is the essence of the existence of a cottage or private house outside the city, or in a picturesque corner of its outskirts.


Disadvantages of open kitchens
- The main disadvantage of such a building is its insecurity. Open space does not allow to accommodate the necessary components of a full-fledged working areaWhat makes it difficult to cook, besides the stove or fire. Such a kitchen is an additional auxiliary space for leisure. No other full features are provided in this option.
- Open space is open to everyone, so the presence of insects, birds and even animals are also likely on the summer kitchen. Sometimes this circumstance makes almost unbearable to leisure outdoors. Of course, you can take care of the necessary means of protection, but this is not enough. Leave for night products are not recommended, because In the morning they can be simply not found.
- Most chief flaw It is that the open kitchen is absolutely not adapted for the pastime during the cold time. Even rain or wind can prevent, not to mention the late autumn, early spring or cold Winter. This exceptionally lightweight option does not provide for the night for guests and cannot be an additional housing. Summer open kitchen attached to the private house is more convenient in the preparation plan, but according to its functional qualities, it is just a veranda and operated only in the warm season.

Closed
This type of planning of summer kitchen involves the presence of a project with documentary resolution of the relevant authorities, because It is considered a full-fledged structure in the site. It is not recommended to ignore this moment because it will entail the presence of fines and prohibitions for sale. The closed kitchen is a small house, built on the foundation, with elevated walls and windows adjacent to the main house. Often combines the bath, serves to leisure, prepare blanks for the winter and additional housing.
Advantages of closed kitchens
- The most important advantage of closed summer kitchens is to protect against all types of weather visiting at any time of the year and day. If free time falls out, you can safely go beyond the city, knowing that there will always be possible to relax, not afraid of insects, birds and animals.
- Conduct time at the cottage or in a private house with the presence of a summer kitchen, provides an opportunity to lead a household economy in terms of garden or breeding birds or animals. Conditions for preserving and just cooking are presented in full, because Closed kitchen allows you to install the stove, sink, fold the stove, fireplace, etc. It is also important for the presence of a cellar that will help preserve the workpieces to future spring.
- Availability closed kitchen Allows you to enjoy the rest fully, because In addition to his family, gives you the opportunity to communicate with a large number of guests you can leave for the night or settle for rest at more for a long time. Summer kitchen equipped with everything necessary can serve to increase the living space in education new family or its replenishment.

Arrangement of closed summer kitchens can not differ at all from the usual kitchen space.

Disadvantages of closed kitchens
- The essential disadvantage of closed summer kitchens is the need to create a full-fledged project with thinking to the smallest detail of all processes, ranging from laying the foundation to the leading of water, connecting electricity, gas sources, etc. It is also recommended to legitimize this project that requires additional time and effort.
- Another big minus is enough high price This construction, because consumption of expensive materials in combination with construction work, poured into a significant amount. But if there is such a financial opportunity, you should not doubt. Additional summer kitchen will significantly improve life and increase the mood.

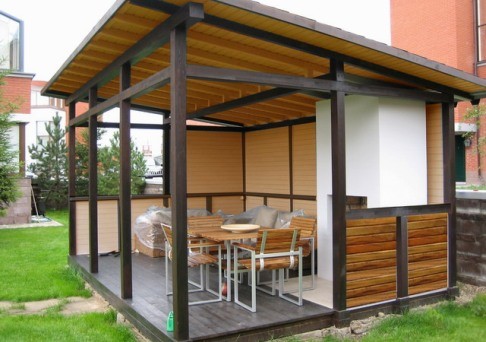
Combined
This layout is universal on functionality and comfort and middle budget. It is the most sought-after, because It makes it possible to choose the best option with the placement and choose the relevant materials to your liking and financial capabilities. There are no cons of combinable cuisine because it is simply created from the advantages, which you can make sure I reviewed the photo on the site.

The advantages of the combination type summer site include the arbitrary location of the furniture. The room itself is built in such a way that the basis is the deaf wall, and the rest of the walls are either missing, or are built on half of the width, or glazed with huge windows, which are fully moving on demand. Economic unit with stove, stove, sink, etc. It is a working area, the rest of the area is occupied by a recreation area with a table, chairs or armchairs, swing, brazier and all the necessary owners for a comfortable stay in nature. The working area and dining room can be placed how much more like the hostess. It is recommended to adhere to the rule that the Hozblok will be more convenient to function in a closed part of the room, and you can take food on open terrace. But these are only tips that can not follow.
Summer cuisine is the corner where you can cook in the open air, and rest at the wall and vice versa. Create the necessary comfort will help photos on the site. And fill the cherished construction of native people and admiring guests to warm and love.
Photo: Summer kitchens on a private house


In the warm season, especially during the preservation period, the presence of summer kitchen substantially facilitates the cooking process and makes it more pleasant. For construction, it is not necessary to hire specialists - all steps can be performed independently. If you correctly pick up materials, the summer kitchen will cost it too expensive, which is important for the economical owner.

Summer cuisines can have a closed and open design. Both types are widely used on country and country areas. To decide on what kind of types to stop the choice, all the advantages and disadvantages of such buildings should be studied.
Kitchen closed type

This kitchen has windows, doors and roof, like a full-fledged house. There are options combined with a bath or summer shower, cellar, workshop, with a attached veranda For eating and rest. Usually, for construction, lightweight materials choose and do not insulate the construction, so it is not used in winter. At the same time, there are kitchens from bricks and foam blocks, which are characterized by greater strength and can be insulated if necessary.

Advantages of closed structures:

- closed kitchen requires more materials, so it costs more;
- there will be additional calculations for the project;
- the construction process is more time-consuming and long.
This option is more suitable for country houseswhere the owners live constantly. But in the country that is empty in winter, the construction of a closed kitchen is not always justified.


Open kitchens are built according to the principle: concrete or tiled base, reference poles around the perimeter, roof-canopy. Under the canopy, the oven, a kitchen table, shops. Sometimes the kitchen do without a canopy if they use it exclusively for cooking on vacation days. Building material For the open kitchen, the tree, brick, natural stone, most often serves.

Summer kitchen - barbecue project
Benefits:

- it is impossible to use the room in the cold period;
- no protection against wind and insects;
- weak protection against rain and dampness;
- it is impossible to leave products.
- all furniture that will be there is needed to hide for the winter in closed dry rooms, otherwise it quickly rotates.
Where to build

The location of the kitchen is of great importance. Hozdvor, I. cesspools Must be as far as possible, but communication, on the contrary, closer. You will have to bring water into the kitchen, connect the electricity, so it is best to connect if the construction site is near the house. It is impossible to choose a place in the lowland, otherwise the floor will dance. The closed kitchen can be attached to the house, and open it is better to arrange in the garden or at the pond, away from the road.
Construction of open kitchen

The construction options for open kitchen are set, but the main stages are always the same: markup and preparation of the place, the foundation device, installation of supporting supports, installation of the roof and the internal arrangement of the room.

To work, you will need:
- level;
- shovel;
- pegs and twine;
- roulette; sand and crushed stone;
- cement mortar;
- pieces of fittings;
- bar 150x150 mm;
- circular Saw;
- drill;
- screwdriver;
- hammer and nails;
- metal squares;
- self-tapping screw;
- 25 mm thick boards;
- primer.
Step 1. Marking
The selected plot is cleaned from all over and remove the turf. They define one of the corners of the construction and drive into the ground peg, and then the width and the length of the area under the kitchen are measured. Each of the corners are beacon-pegs and stretch between them. Check the correctness of the markup on the diagonals - they must be the same length. After that, inside the markup, the soil is chosen at a depth of 15-20 cm, but rummage and tamper.
Step 2. Filling the foundation


The bottom of the pit is falling asleep with a smooth layer of sand, roll up, well condensed. If necessary, the communication pipes are paved along the bottom, rubble falls from above. The reinforcing mesh is placed in the corners of the site inserted metal rods with a height of 20 cm, installed on the perimeter formwork from the boards. The height of the formwork above the surface of the soil should be about 10 cm; with the level of inner side The formworks mark the fill line to make the site to be smooth. We knew and pour it into the formwork, focusing on the markup. Communication pipes are closed with plugs, otherwise the solution can get inside. The surface is resurrected by the rule, after which they leave the foundation until complete drying.
Also, the foundation for the kitchen can be barbed type using bricks. The markup is performed similarly to the monolithic foundation, after which the square shape of the pocket is digging up to 50 cm. The bottom of the holes falling asleep and tamper, then the metal bar is inserted around which brickwork. The height of the foundation columns is checked by the level. If necessary, the columns are aligned with an additional cement layer.


The bottom strapping from the bar will be attached to the reinforcement of the reinforcement, which is joined by the method "in the paw". The bar is placed on the rubberoid, pre-glued bitumen to each column. On the bottom strapping are mounted vagine gear edged board.
Step 3. Installing supporting supports


In the lower ends of the bar drill holes for reinforcement bars protruding from the foundation. The front racks make 20 cm above the rear to make it easier to mount a canopy. Install bars at the corners of the site, set up the level, and then fix them to the base with metal plates on anchor bolts. Upon the upper edge of the pillar is connected by the strapping from the bar, and at an altitude of 70-80 cm from the floor, the horizontal jumpers are mounted.


Table. Roof slope depending on the coating
| Roof material | Mass sq. m (without reason), kg | Approximate durability, years | The bias of the roof, hail. |
|---|---|---|---|
| Sheet black steel | 3-5 | 20-25 | 16-30 |
| Cink Steel | 3,5-6 | 30-40 | 16-30 |
| Ruberoid | 4-13 | 13-15 | 4-27 |
| Tile | 40-50 | 60 or more | 30-45 |
| Asbestocent | 14-20 | 40-45 | 27-50 |
Step 4. Mounting a canopy
To the upper strapping, processed by the primer boards on the width of the design every 50 cm. Internal joints are necessarily strengthened with metal coal, so that the canopy does not break with strong wind. On top of the boards, waterproofing material are filling, thin rails are stuffed and slate sheets or

Step 5. Paul
Most. optimal decision There will be facing tiles. It is not afraid of moisture, it is easily cleaned by contaminants, easily endures the temperature differences. The wooden flooring in the open kitchen quickly comes in disrepair under the influence of atmospheric moisture, breathing from the Sun, damages insects, so requires regular care. So, take the tile, tile glue, the toothed spatula and begin the floor cladding. Put the tile from the angle: they apply a little solution to the back surface, applied to the floor and flatter.

In the photo - tile porcelain stoneware for the street
So that the seams were as even as possible, apply special plastic crosses that are inserted at the joints. The laying is constantly controlled by the level, otherwise the coating will be uneven. If installing or mangala is planned in the kitchen, the floor is not necessary under them. After completion of the seams, the seams are cleaned of dust and residues of the solution, and then rub in a special mixture.
Step 6. Kitchen arrangement
For a larger cozy, the space between the floor and horizontal jumpers can be seen by boards or close with wooden curled lattices, leaving a free doorway. Install the stove, benches and table, supply electricity and water. In conclusion wooden surfaces Covered by a verse and varnish or stain protecting wood from environmental exposure.

Prices for various types of building boards
Building boards
Construction of closed kitchen
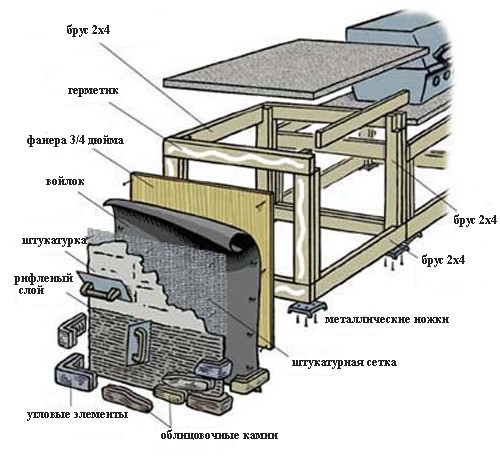
Closed kitchens are also very diverse, but the most comfortable and easy to perform is frame design From Brousa foundation Foundation. For the trim, it is recommended to use the wall paneling or OSB slab.
During the work, you will need:
- circular Saw;
- electrolovik;
- drill and screwdriver;
- building level;
- shovel;
- a hammer;
- roulette;
- dry planed beam 100x100 mm;
- 25 mm thick boards;
- long cord and pegs for beacons;
- ruberoid;
- cement mortar;
- studies;
- testing;
- nails and selflessness;
- sand.
Step 1. Marking of the site

The selected area needs to be prepared: to challenge hills, remove high grass, stones, garbage. Now you need to determine where the facade line will be located, and put 2 beaches on it. The distance between the waists is equal to the length of the facade. Perpendicular to this line are measured from each beacon the length of the side walls and also put tags. Between the beacons stretch the cord, and in the resulting rectangle make measurements of diagonals. If they are equal, the markup is performed correctly. In the center of each side of the future cuisine and at the intersection of diagonals, it is also necessary to drive the pegs - these are labels for intermediate posts.
Step 2. Foundation Preparing

The shovel dig holes in places marked with a depth of 40 cm; The sizes of the pits should correspond to two laid shlaklocks. The walls and bottom of the holes are equalized, fall asleep with a layer of sand 10 cm and trambet. On the sand, 2 lower cloakes are placed on the sand, they are covered with a solution, the construction stud is inserted into the center so that it rises above the surface of the soil by about 25-30 cm. Then the second row of the slag block across the first, again the solution and the third row. Finished pillars must have the same height and place at one level.
Step 3. Installation of the bottom strapping

The lower strapping consists of two rows of timber bounded with each other. All the bars are abundantly wicked by spent oil, special attention is paid to cuts, and then dried. In the beams of the lower row, it is necessary to make holes for the heels, and in the top cut the grooves under the floor crossbar. The depth of the grooves corresponds to half the thickness of the bar, and the width is equal to the thickness of the crossbar.
From above on the poles put pieces of rubberoid, putting them straight on the studs. Lower bars Applied to the pillars, the arrangement of the stud, the holes of the corresponding diameter are drilled. Next laid them on the foundation, the studs in the holes are tightened and tightened nuts. End of the studs should not perform above the surface of the bar, on the contrary, better when they are slightly recessed into the tree. Check the strapping by the level throughout the perimeter to avoid distortion. Now you need to put the top row of beams, nail them, insert the bars of floor overlap into the grooves. For greater reliability, the inner joints better strengthen with metal plates with screws.
Step 4. Summer Kitchen - Conduct
Such a summer kitchen is distinguished by an excellent appearance, eco-friendly and well maintains heat indoors. However, it is extremely important to treat the material with flame-proof impregnation to eliminate the possibility of damage to wood insects.
It is worth remembering that the log house will give a shrinkage for several years, so it is not recommended to sneak the walls of summer kitchen.
So that inside the walls of the wall were smooth, each log over the entire length is reheated by a planer or a grinder. At the ends of the logs, the grooves for docking (method "in the paw") are cut down. This method is not chosen by chance. First, the logs will be used without a residue, secondly, even if gusset It will have a small gap, then the functionality and convenience of summer kitchen does not affect.


To build a mortgage crown, put two logs opposite each other. They are perpendicular to lay two more. This square is adjusted for a single plane so that it is clearly horizontally lay down on the lower strapping of the future summer kitchen. Next, markup, cutting down and laying the following logs, between which we deposit the insulation, for example, moss or felt.

Operactions under the door and windows of summer kitchens will be cut down in the future. The glass windows themselves and the entrance door along with the components will be installed after the completion of the roof mounting process. We bring to your attention a photo report for the construction of summer kitchen 7x3 m.

Video - Cutting "in the paw"


Step 5. Roof mounting


From the board, the 150x50 mm cross section is knocked down farms for the roof, strengthen them inside with spacers and mount to the upper strapping. Ends should be per perimeter of walls by 10-15 cm. The distance between the farms is approximately 1.5 m. The fastening of the roof elements to the strapping is performed using metal plates and bolts. After installing the rafter, the horse is stuffed along the farms, and then we are cutting the roof frame. Foreckers, slate or other roofing material are laid on the crate.
How incorrectly installed windows


| Summer kitchen 7x3 m | Project |
|---|---|
| Kitchen height | Height from floor to ceiling: 2.15 m. (+ -5 cm). Skate height: 1.5 m. (+ -5 cm) |
| Supported blocks (one table size 400x400x4000 mm. It consists of four cement blocks with a size of 200x200x400, interconnected by a sandy cement mixture). | |
| Base strapping | Unbreakable timing with a cross section of 100x150mm. The strapping laid in 1 row on the edge. |
| File lags | Unstroited timber 40x150 mm. With a step of laying 700 mm. |
| Log | Profiled timing segment 90x140 mm, natural humidity |
| Build Srub | The log house is assembled on metal brazen (nails 200 mm). |
| Assembling corners of a sruba | Build an angle in "in the warm corner" |
| Interventonian insulation | Between the crowns ladded linen |
| Partitions | Space Bar 90x140 natural humidity. |
| Floor | Paul double: black floor: cutting board 20 mm.; Clean gender: pinned floor board 36 mm. ( chamber drying). It is insulated with mineral wool "Knauf" 50 mm., Ondutis isolation in 2 layers. |
| Ceiling beams | Unstroked Bar 40x100 mm. With a step of laying 700 mm. |
| Ceiling | The ceiling is laid by clapboard coniferous rocks (chamber drying). The ceiling is insulated with a mineral wool "Knauf" 50 mm., ONDUTIS isolation. |
| Stropil design | Bar 40x100 mm. with laying step 1000 mm. |
| Roof lamp | The lamp is performed from a cutting board of 20 mm. (through the board). |
| Terrace | |
| According to the kitchen project - double. | |
| Frontons | Cover with clapboard conifers (chamber drying). Ventilation grilles are installed in the frontones of the kitchen (condensate prevents formation). |
| Covenate and eaves (skes of roofs) | Sew on clapboard coniferous rocks (chamber drying). Switch width: 350 - 450 mm (4 lining). |
| Roofing material | Ondulin, color to choose from: red, brown, green. |
| Window | Wooden with double glazing are installed according to the project. The size of the window blocks is 1x1.2 m. Pocks are installed in the openings (roasters). |
| Doors | Pilencated. Pocks are installed at the opening bars (roasters). |
| Finishing of the room | All corners and joints in the kitchen are closed with a plinth; Window, doorways are applied by a platband. |
| Terrace | The reference pillars with compensation elevators (jacks) under shrinkage are installed. The trim of the terrace: railing - carved, balusters - accurate. The entrance is installed steps. |
Step 6. Kitchen arrangement
When the main processes are made, it follows close to do internal arrangement Kitchen. The walls can be sewn or, because the frame-linked frame looks not very aesthetic. Then they install the furnace, sink, plug in electricity and water, arrange kitchen furniture. On this construction of a closed kitchen can be considered complete.
Prices for plasterboard and sheet materials
Plasterboard and leafy materials
Video - Summer kitchen with your own hands
Cooking is a process that should be enjoyed. But here a lot depends on the conditions you prepare. The situation must inspire and have the creation of delicious and useful dishesfilled with your good energy. In the summer, in a stuff and tea of \u200b\u200bthe closed space of the kitchen, you can hardly be easily tune in to a pleasant cooking process. But if you have a cottage and a couple of skillful hands, you can solve this problem. Having built a summer kitchen in the country, you will not only save your main room from extra evaporations and heat stove, but also get the opportunity to prepare in the fresh air in a pleasant atmosphere, surrounded by green plantings and breeched by the breeze. In addition, the open summer kitchen can be equipped with a brazier, barbecue or fireplace and arrange cozy picnics surrounded by a lovely people.
Where to begin
Planning the construction of summer cuisine for the cottage, first of all, it is worth finding answers to a row important issuesthat will determine your further actions:
- Purpose. Will you use the summer kitchen only in the warm season or round year? Do you want to cook on it often and a lot or will it become a place for periodic gatherings with friends and loved ones?
- Dimensions. Will the summer kitchen space workplace for the hostess for the period of closing home blanks and cooking or will it be organized in the form of a kitchen-dining room designed for a certain number of people?
- Accommodation. Will the kitchen be implemented as an extension to the main premises of your summer cottage or will it be a separate house? How will your structure be located in relation to the sun, the wind, green plant, the means of communication and the carriageway?
- Project budget. The materials that you choose for the summer kitchen and the design of the room and the costs of time for the realization of your ideas will largely depend on it.
Tip! Examine the finished projects of summer kitchens for the cottage offered by construction firms, and independently pon them under your scale and requests.
By analyzing all the meaningful moments, you will need to accurately establish the following for yourself:
- Open or closed type suits you;
- Will you build a furnace or limit the installation of the stove, do you plan to use the brave and grill;
- As in your project will be organized water supply, sewage, electricity;
- What makes you plan to implement.
Open summer kitchen
An open type of summer kitchen usually has from one to three walls, canopy as a roof, and in its appearance, it resembles a gazebo.

Benefits open type Summer kitchens:
- Such construction open type Summer cuisine can be built pretty quickly and without much effort.
- It is economical in terms of costs for creating.
- Pretending to be open airYou will not suffer from stuffing, evaporation and gary characteristic of the closed room.
However, attention should be paid to a number of significant flaws:
- At open summer kitchen, you can prepare and relax only while on the street warm;
- Leave food on it can not;
- Kitchen furniture for the winter must be removed into the house so that it does not deteriorate from dampness;
- The room is weakly protected from drafts, shower and insects.
Open summer kitchen on the veranda
You can organize an open type of summer kitchen on the veranda of your country house.

Tip! To open the summer kitchen looked good, try to equip it in a single style with your cottage.
First of all, you will need to lay the foundation. Its depth must coincide with the depth of the foundation of the house. Next, you form the framework of the walls, perform their skin and build a roof. Better if the roof is one for home and veranda. It looks good open summer kitchen, front or side wall which is glazed.
Open Summer Kitchen-Extension
An open summer kitchen can be organized in the form of an extension and connected to the cottage or with any economic room, for example, with a bath.

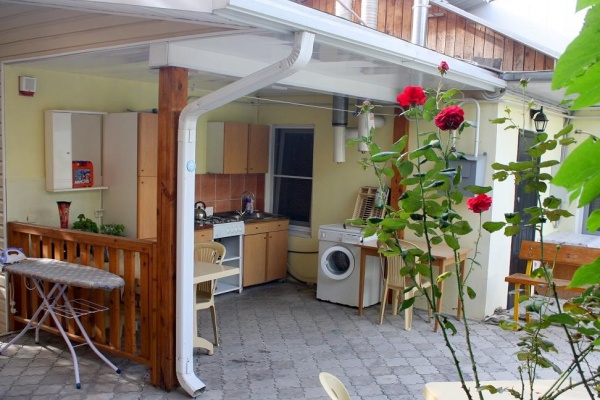
Such an extension is created by expanding the porch and is a kind of terrace with all the necessary kitchen attributes: a gas or electric stove, furniture, washing, etc. In the process of construction along the villa wall, the support structures are mounted on which the canopy is attached. The floor can be lowered by paving slabs right on the ground, having previously racing it. This is possible if the water on this site is not going after the rain. You can protect the open summer kitchen from bad weather using sliding or removable side partitions, tarpaulin, roller. Walls can be used by plants that will delight the eyes and create coolness in the heat.
This project of open summer cuisine is cheaper and easier in implementation than the option with the foundation, but it is less reliable, because when the soil is dedicated, the kitchen can begin to roll.
Open Summer Cuisine-Arbor
Such a project of open summer cuisine is especially good when you want to install a fireplace, barbecue in the kitchen and use it for a pleasant pastime in the company of friends and loved ones. Still in such a gazebo it will be convenient to handle the harvest assembled at the cottage.
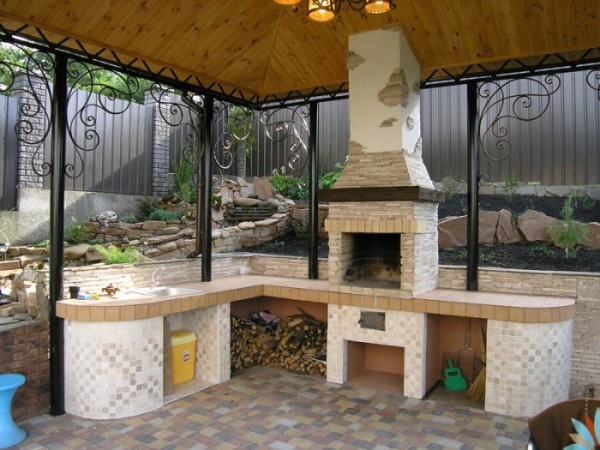

Decide what foundation for open kitchen-arbor - Ribbon or column - suitable for you more. The roof is recommended to do from bitumen or ondulin. When creating a carcass, such materials are usually used as: stone, brick, timber. Some wall can be made closed to place a kitchen headset along it and other necessary attributes. Leave the rest of the openings open to breathe fresh air to freely. If necessary, they can be drained to tissue curtains and rollers, reorganize with lattice panels, lucked plants or organize various partitions.
Closed summer kitchen
Closed summer kitchen is a full-fledged house, standing separately or attached to another building: cottage house, bath, utility room. This option is well suited for the terrain, where the climate is characterized by strong winds, rains, early frosts. You may like this design if you like to relax in the country in the winter and prefer to prepare in a separate room. It takes more capital investments for it, a serious approach to design, it is more complicated in the construction. But in the end, you can build a house with comfortable conditions, including the presence of heating, water supply, sewer and electricity. Often closed kitchens in the country are equipped with a cellar, fireplace, utility rooms.

Tip! When it is impossible to carry electricity to the summer kitchen, you can buy a dacha diesel generator and feed all the kitchen appliances from it.

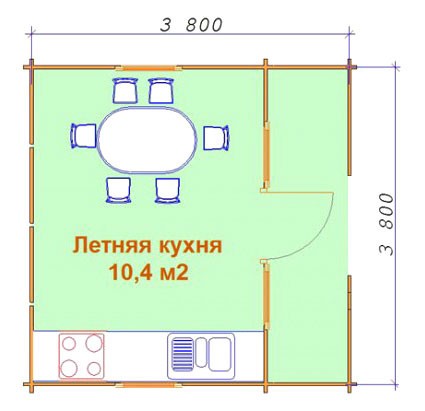
In this project of a closed summer kitchen: 1 - kitchen itself, 2 - dining area. Rooms 3, 4 and 5 are marked stools, a table and an angular bench in the dining room. The kitchen room is equipped with a wardrobe (6), a stove (7), washing (11), water tank (12). Also here is provided: chimney (8), ventilation channel (9), window (10).
Kitchen-house with terrace
The closed option can be organized as a separate house with a terrace. In the house you will prepare, so it should be equipped accordingly, and on the terrace under a canopy you can organize a dining area where the table and chairs will be located.
Such a project is quite labor, because it requires the laying of a monolithic foundation, the construction of walls, installation of windows and doors.

When the walls of the walls should take into account the strength of the wind in a given area so that they can adequately withstand the entire possible load. For a closed summer kitchen, a double roof is recommended, reliably protecting from rain and snow.

You can also consider the design of the kitchen-house with the cellar. Then, before starting the premises, you will need to dug the pit, and the cellar walls will serve as a foundation for the top of the building.
How to build a summer kitchen with your own hands
There are several main stages of the process of implementing any kitchen project for giving:
- Select the location of the building.
- Prepare a foundation.
- Build walls.
- Build a roof.
- Perform an internal decoration of the room.

Select location
Successfully placed kitchen should:
- It is convenient to be placed on the entrance to the house. On the one hand, it is not desirable that Gar from the stove fall into your main home. On the other hand, the kitchen from home will lead to the fact that in bad weather, ready to go to the house will be carried quite difficult.
- Be away from places publishing unpleasant odors, eg, cottage toilet, Pets, cesspools, etc.
- Being enough removed from the roadway to exhaust gases and the noise of the road did not interfere with you to cook and breathe fresh air.
- To be available for connecting communications: water supply, sewage, heating, electricity.
- For open summer kitchen, we should take into account the imparency of the wind, the heating of the solar rays, the presence of the greenery around.
- Carefully treat the level groundwater, as well as the terrain terrain on which the cottage will be built.
Attention ! The country house and the summer kitchen room must be at a distance of at least 15 meters from the cesspool, toilet and aviary for livestock.
Preparing foundation
What the foundation you will lay out depends on the chosen kitchen design for the cottage. It is possible for a construction option and without a foundation, for example, when you concrete a suitable scale of the pad and reinforce it with a metal mesh. It will be appropriate for open summer kitchen with an easy canopy. For closed brick or stone summer kitchens, usually prepare ribbon foundation. Packed supports are suitable for open kitchens or wood houses.
The foundation formation algorithm is as follows:
- On the perimeter of the kitchen being created, select the soil or dug small pits to scale 30x30 cm and depth - 70-80 cm.
- Create a pillow of rubble and sand with a thickness of 20 cm and thoroughly sink it.
- Fill the foundation, platform or pillars. Concrete can harden from 7 days to month.
- If there is a need to fill the floor, follows after removing the soil layer from the platform under the kitchen, pour sand with a thickness of 15 cm, top-crushed stone and pour the cushion with a cement solution. If you plan to lay out tile floors, the surface must be pre-dissolved using grinding or cement screed option.
Attention ! For open summer kitchen, the floor should be lifted above the level of soil at a height of five to seven centimeters so that the raindic water does not flood the room.
We erect the wall
Your kitchen project may imply the presence of walls or their absence, but the reference pillars on which the roof will be kept either canopy, mount, most likely. Materials for the construction of walls can be:
- Stone, for example, marble, limestone, granite, slate, concrete. The advantage of the stone in its reliability and durability, but prices are quite high. Wall thickness will depend on temperature mode The environment in which is planned operation. You can have enough thickness in one brick. For use in the cold season, additional insulation may be required.
- Wood. This material is cheaper than stone and easier to operate. The construction of it looks elegantly and is popular with dacnis. However, it should be considered: so that the tree does not deteriorate over time, it must be subjected to special processing. Outdoor casing can be performed from boards or siding, for internal - use lining, plasterboard. To create fixtures used metal corners or screws.
We build a roof
You can choose such roof options:
- Flat or single one. It is a simple in the construction and inexpensive roof.
- Double. More reliable, durable and popular.

Attention ! A long visor will protect the walls during the rain and will prolong the service life of your kitchen.
We are engaged in interior decoration
Often, the floors of the floors are performed using linoleum, parquet, laminate, decong or ceramic tiles.
In the case of wood walls and ceilings, they can be covered with a protective layer of olifa, which will prevent negative impact damp and time to this material.
The kitchen interior must please the eye, create comfort and comfort, so do the kitchen so that you are nice there to be there and, of course, consider your financial opportunities.

For the picture to be finished, do not forget about the aesthetics of the site where the kitchen room will be located. You can surround it with flowers and shrubs, put the tracks beautifully and even create a fountain.
Life away from a noisy megapolis is increasingly attracting urban residents tired of the bustle and gray working days. After purchasing cottages or country cottage First of all, you should think about the arrangement of summer kitchen. This is the main place for cooking, as well as a cozy corner where a big one is going to at the same table. friendly family And numerous friends. It is very important to ensure a comfortable stay in any weather so that guests can enjoy the meal, and the hostess was conveniently engaged in cooking and preservation. On how to build a summer kitchen, and experienced specialists will tell about the design features of the design.

Varieties of summer kitchens
Before making a summer kitchen, you should define its main purpose and functions that it will perform. This building can serve:
- dining room and lounge zone for recreation and communicating with households and guests;
- place for cooking. Including, the hostess can be engaged in conservation and billets for the winter outdoors;
- the guest area with additional bedrooms to be able to leave for the night of relatives or friends who arrived at the weekend;
- laundry.
Mostly summer cuisine performs two first functions, however, if the area of \u200b\u200bthe plot and the family budget allows, more advanced options can be considered. The type of construction of the kitchen is divided into open and closed, and by location relative to the main house - on autonomous and adjacent. Each construction has its own distinctive featureswhich should be paid attention to. Consider the main of them.

Open, closed and combined kitchens
A simple summer kitchen under a canopy is a regular veranda. This is the best and simple option available to the owners of small areas, where each meter of free space should be saved. For such a building, it is not necessary to sacrifice the garden, and the house is in close proximity. Open-type frame summer kitchens also include barbecue gazes, terraces, patio. There are no walls in such buildings, and sometimes there is no roof, so it is possible to prepare food in the fresh air.
In the arbors often put ovens and mangals, sometimes even remove the kitchen set. Of the minuses, unprotected can be distinguished, since it is almost impossible to be in such a kitchen for a long time in the fall or in winter. It's rather country option For those who do not live in the house year-round. In addition, even in the summer there is a danger of attacking mosquitoes. Left at summer kitchen, food can also be destroyed by wild or stray animals. When determining the location of the structure, the direction of the wind should be taken into account so that the smoke from the mangala does not get into the dining room on guests.

Kitchen summer closed type - This is either a separate building, or a glazed veranda. Its main difference from the open design is the possibility of year-round stay. Inside the room can be prepared in any bad weather, leave guests for the night. There is also an opportunity to equip the guest zone: put TV, sofas, chairs. Such a winter kitchen is a great place to meet Christmas or New Year, when you can feel the real festive magic in unity with nature. However, there are its cons. Firstly, expensive constructionAnd secondly, in the summer there will be no opportunity to breathe fresh air in a closed room. Yes, and kebabs are much more pleasant to fry and eat on the street.

Most. optimal option Summer cuisine is a combination of combined type. It can be a kitchen combined with a bath or an autonomous kitchen-living room. In the latter case, the design may be the most diverse. Most often, the structure consists of three or one wall and glazing on the sides. Very stylish looks brick wall With a large stove and equipped working area and adjacent French windows. Such a kitchen in the fresh air will be decorated with any site. Like a closed-type building, such a design is difficult to build on its own, and a plan and design project are also worth a lot.

Autonomous and adjacent kitchen house
The kitchen is in the fresh air - the dream of any urban resident, since the lion's part of the time is held here. Of course, I want to make it large and multifunctional, but the area of \u200b\u200bthe site does not always allow to give a fantasy space. In this case, it will be appropriate to make an extension or to equip the veranda. This will save space for growing vegetables and root.
The adjacent kitchen is good and the fact that the elongation of communications will not need. In addition, you can make a cellar for storing products and conservation. It should be remembered that it should be 3.5 m from the foundation, otherwise the house can be tamed. When choosing a place for summer kitchens, it is necessary to take into account the location relative to the parties of the world, so that there is no dark and damp indoors. Of the disadvantages, you can also allocate the distribution of foreign smells in residential premises.

Autonomous kitchen in the fresh air is the perfect option for sites with a large area. Dimensions buildings can be the most diverse, depending on the purpose and number of free space. According to the rules fire safetyThe structure with a brazier or furnace should be at a minimum of 7 meters from the nearest buildings so as not to provoke a fire. Also, the kitchen cannot be located in the immediate vicinity of the roadway, toilet, chicken coop, compost yama. For comfortable arrangement, you will need to elongate communications: drainage, sewage, electricity, sometimes gas.
If there is a swimming pool or a small pond (lake, pond), it is recommended to build a building here. This is a great place to equip a comfortable lounge zone. The playground should be placed so that it is in the field of view of parents who are sitting in a gazebo. It is desirable that garden path Connected these structures along with the main home. The construction of a summer kitchen, autonomously standing, besides a closed type, should begin with the arrangement of the project of the future building. Otherwise, problems arise when selling or transferred to inheritance. This will require additional cash investments, but the result will exceed all the expectations.

Choosing materials
In the summer kitchen, the design should be combined with the main home or other buildings to harmoniously fit into the overall concept. For example, if the fence is brick - then the additional building let it be brick. If it is adjacent to the house, it is advisable to make it in a similar design as a corresponding continuation. Most often, the kitchen is erected from bricks, wood, polycarbonate or metal structures.
- Wood- Environmentally friendly material that fills energy and gives strength. Summer kitchen from a bar looks very attractive and colorful, besides easy to install, therefore enjoys the greatest demand. However, the special properties of wood should be taken into account: it is prone to deformation due to moisture and unfavorable weather conditionsmay lose color due to the long exposure to direct sunlight, besides, is the favorite delicacy of pests. Even when proper care The summer kitchen from the log needs to be restored every 5-6 years, otherwise the material will be unusable. To do this, be treated with its special protective solution. Lacation will prevent water from entering and protecting from ultraviolet.
- Brick - wear-resistant, durable, and therefore expensive material. Unlike wood, the summer kitchen from the brick does not need constant repair and has a longer service life. The material is characterized by good thermal insulation, which means that indoors will be cool in the heat and heat in cold weather. During construction, it is necessary to lay the foundation of a tape type, one of the most durable, otherwise the design will be in the ground. It is impossible to cope with this without certain skills, so the help of specialists will be required.
- Polycarbonate - inexpensive and budget option for the construction of closed-type structures. The material is very durable, resistant to mechanical damage. Due to the special substance that is in the composition, it is able to absorb ultra-violet rays and resistant to temperature drop. Summer kitchen from polycarbonate retains heat and has good noise insulation. In addition, polycarbonate itself is very light weight and convenient in the installation. For minuses include non-environmental material.
- Metal. Metal structures are usually used as reference elements or frames. This can look like a kitchen in the fresh air of an open type with a roof of wrought-iron elements. Metal is well harmonized with wood, stone and brick. So that the gazebo does not lose an attractive appearance, the surface should be processed by anti-corrosion solution.


Finish
The internal decoration of the summer kitchen can be represented by clay, wall panels, plywood depending on the selected room type. As for closed structures, for additional insulation Usually used mineral WatAnd then we are cut on both sides. Even wallpapers and wallpapers are greatly attached to the walls of the foam block. decorative plasterSo the choice depends on the host itself. Photo of summer kitchens can be found on the site and choose an interesting option of interior decoration.

Flooring
Usually, when designing a summer kitchen, a boardwalk is used, which fits well into a common village concept. However, it is necessary to remember the properties of the wood to deform and undergo an attack of insects and pests. To this end, the boards are impregnated with a special solution in the form of special oils or wax, which are intended for external work. Specialists do not recommend using varnish as a cover, as it quickly bursts and cracks, which will determine the overall interior of summer kitchen.
Relatively expensive, but practical and durable option - Polymer composite (DPK). The life of the material is several decades, while it is not distinguished from the wood to the touch, and externally too. This is a unique combination of polymers and natural tree It is one of the newest inventions of the construction industry.

As outdoor coating can choose paving slab or stone, however, such options require the laying of a durable foundation. This is enough expensive ideas For summer kitchen, but by spending money once, you can long years Forget about repair. In closed rooms it is recommended to use outdoor tiles, laminate or porcelain stoneware.
Roof
Slate and tile firmly pushed out a metal roof, which quickly heats up in the sun and also becomes ice winter. These materials are practical, externally attractive, easy to install. It is advisable to choose single roofto sediments natural way Locked not the land. To do this, it is necessary to install different beams over the height opposite each other and attach the coating. You can also use polycarbonate sheets as a canopy for summer kitchen. The material is very flexible and plastic, so the design configurations can be the most diverse.

Arrangement of summer cuisine
Furniture for summer kitchens should be selected with special care, since it must withstand the temperature differences, differ in practicality and durability. About wooden headsets and laminated MDF or DSP better forget, as well as about the upholstery of leather and fabric. It is better to stay on the Rattan furniture, a wicker vine that will emphasize the village interior. For arbors, plastic tables and chairs or wrought outdoor furniture will be suitable (for open-type structures with metal carcasy). Stainless steel headset will be useful to those who do not plan to remove furniture in the house for the winter. Foldable mobile designs will be appropriate that do not occupy a lot of space and are easily transferred to the room.


The kitchen in the fresh air suggests the presence of a dining and working area. The hostess should be placed in such a way as to maintain the principle of an ergonomic triangle. This visual combination of washing, plates and refrigerators will allow spending much less time on the cooking process. M-shaped headset in this case will be very appropriate. If a barbell or oven is a little bit, then a direct compact headset with a mini-fridge and a sink can be installed on the contrary.
The perfect distance from the plate (oven, grill, mangala) to the dining table should be 3 meters. If the digit is less, the heat from the fire will interfere with the guests to trape.

Particular attention should be paid to the lighting, because without additional light sources in the kitchen will be unsafe. For the convenience of cooking, the work area should be lit apart with a bright light. It can be suspended lights, lamps, tracks, sides, built into the headset lighting. If you restrict ourselves to one light bulb in the center of the room, then the shadow will hide the entire working surface. In open kitchens special attention should be given to beams and lampshaps with additional protection from precipitation. They can be made of plastic, metal, polycarbonate.
Beautifully look at the lamps of rattan or braided tree. Dining area You can also select garden lamps, suspended and rotary lamps. In closed rooms you can install wall scaves, flooring. As a decor in the site, it is advisable to install lights on solar panels. Having charged the day, they automatically turn on when he darkens on the street. In cloudy weather, they do not work at all, so this option is more suitable for giving, where they spend summer vacation. But such lanterns do not consume electricity, which means that are beneficial from an economic point of view.

What can be better than spacious and multifunctional summer kitchen, which can be seen on the site? Draw inspiration from photographs and tips for making masters in arrangement - and create a room that will become a corner of a homely hearth and comfort.
Photo: Summer kitchen arrangement ideas

What elements should summer kitchen consist of?
If you set up a summer kitchen correctly, then in the summer, there will be a solid pleasure. Cook there is not hot, preserve - comfortable, floor in the house is not dumping dirty shoes, And it is pleasant to dine outdoors.
But, if you incorrectly choose the location, then instead of convenience, you will get an extra headache and unnecessary vanity: the transfer of dishes, the cans for a long distance, the runway there is here.

Therefore, let's immediately decide that it will certainly be attended by summer kitchen:
- Stove for cooking
- Mangal
- Washing for dishes
- Cooking table
- Cumbers for dishes and cans
- Shelves or mounted boxes for dishes
- Dining table and chairs
This is all - the main elements without which the room will not be very comfortable, and they should be in any case. And there are still auxiliary, without which it is possible to do well, but if they are present, it will not be worse, only better.
- Cellar adjacent to summer kitchen
- Small Warrovnik
- Sofa
- Television
- Swing

As you can see, add and these modules, then the summer kitchen will be multifunctional, cozy and can be carried out almost all day in the fresh air.
Where do you need to have a summer kitchen?
But not only success depends on the choice of elements. The main thing is the location! Previously, it was customary to build a summer kitchen as a separate house without heating, away from the main building.
Now it does not seem convenient, since it is hard to bring communication and the structure itself looks not very harmonious in the middle of the courtyard.

The best solution is the location of the summer kitchen - with an adjuncing to the main house, and in such a way that you can go to it from there. Or from the main door, or from the side entrance. Also, good options were considered in the article ".
Also, choose the right wall to which summer kitchen will be adjusted. If you attach it to the one where the main windows of the room are located, then the house will become dark and damp, from what does not fall sunlight. It is better that it was a deaf wall with a side outlet.

If you want to equip a cellar, adjacent to the summer kitchen, do not forget important thing: A large pit can not be digging alongside the foundation of the house, since in this case the reservoir of the Earth can also give the structure. Therefore, it is necessary to dig it at least 3.5 meters further from the foundation.
Yet important moment: What type of room you will have. Outdoor area or full-fledged extension in the form of a veranda. Let's wonder this in more detail, since hasty savings at the planning stage can then turn into many years annoying and regrets.
Open Summer Kitchens
They have their own advantages, the main of which is budget. In order to organize such a zone, a lot of costs are not needed, there is no need to fill the foundation, put the windows, build the walls. The only thing you need is:
- Concreting platform for kitchen
- Construction of support pillars under the canopy
- Roof flooring
- Building oven and mangala
- Organization of the working area and washing

That is, at least two times the flow is reduced. But in addition to the budget, there is still a plus: the space is open, on which one pleasure is.
True, only in good weather. But for bad weather there are main kitchen in the house! And does it make sense to equip one more? Let's clarify this moment.
Summer Kitchens Closed Type
Why did it earlier the summer kitchens separately from the house, in the form of separate houses? Mainly because used stove heating And in the conservation season, during cooking, the walls of summer cuisine were very warm up. And if it would take the main house so much, it was just impossible to sleep in it. Lay out the street furnaces, like the "Finnis", then did not guessed, apparently.
Also, the summer kitchen was used as a guest house, in case of arrival of guests. There were a sofa, a wardrobe, and also made a separate household block for storing boxes, glass cans, grids for drying fruit, herbs and other inventory for the billets, which was a lot.

And besides this, there were food for animals, interfered and crushed grain, but oil, etc. Therefore, the room should have been closed, so that in case of bad weather did not damage the mass of provisions.
Now, few people are engaged in growing livestock and the initial purpose of the closed kitchen lost its rationality. Yes, and the guest house is not always needed, because for these purposes anyone can use any extensive room in the House.
So, now there is no special need for a capital building in the construction, but it is also not an option to do a summer kitchen. The best thing - combined type And below you will learn why it is.
Summer Kitchen Combined Type
You can combine differently. You can zone with a furnace, work desk and a small hozblock to make in a closed room, and dinner table Leave under the canopy, but on the contrary. Some really like to prepare outdoors.
But the best option is to make the Hozblock in the form of a closed room adjacent to the terrace, and the furnace, the desktop and dining leave just under the canopy, but with a small amendment: under the roof, fasten the sliding rollers that can be closed in case of bad weather. Or, immediately make glazed frames, some of them are moved by forming an open area.

But the Hozblok should be with the walls, as during long rains the vegetables that are stored there can be damed. If you have a cellar instead of a hozblock, then even better!
What is better to make a roof?
Of course, it was not bad if the roof of the summer kitchen was combined with the main coating of the house. Especially if the summer kitchen is adjacent to it.

But it does not always take out only for one reason: now there are no rare metal roofs, such as metal tiles. And if on the main house they are insulated from the bottom, are trimmed with wood, which guarantees some noble insulation, then there is no need for summer kitchen in such things.

And if there is a canopy from the metal, then you just can not be on the rainy time. The knock will be so strong, peculiar and unpleasant that the whole charm of food in the fresh air will be reduced to "no" and you will have to urgently relate to the house.
Therefore, the main thing: Choose such a roof that does not knock even without additional noise insulation: slate, tile, bituminous tile.
What floor should be on the summer kitchen?
Do not forget that summer kitchen is designed to make you comfortably use it in summer. And in the summer, as a rule, all owners of private houses spend a lot of time in the garden, and then, dirty feet Going on the summer kitchen.

Therefore, no about any wooden layers And there can be no speech, it is simply impractical. The best way – tile For the street. It can be depleted three times, and then wash with ease even from the hose (provided, of course, that you have an open area and without large sides).
Summer kitchen oven
Options here are many. The easiest of them is the installation of an ordinary gas furnace and a cylinder. But still, it is better to spend a little more effort initially and lay a real, wood-burning oven. It is much more economical in the conservation season, while it is not so difficult to build it as home. And it looks like a cozy, no matter how cool.

You can make a very budget "finge", and you can a whole complex, including a brazier, a place for cooking, built-in cauldron, a place under firewood. Everything here depends on your imagination and financial limit.
Brick chimney, which when building a home furnace is more expensive than the surface for cooking, in summertime It can be replaced by an inexpensive tube of galvanized.
Summer cellar
Believe it, it is a very, very convenient solution! If you still have no cellar, then better place It is difficult to come up with it.
And most importantly, do not save on its square inside and the convenience of descent. Dug a small hole so that then go down wooden stairsstanding vertically - stupid. Then you regret ten times about the hasty decision.

It is better to make the cellar large, wide and with a gentle descent. Let it be initially more expensive and more difficult, but then he will delight all his life.
The optimal depth of the cellar is 3 meters down. It is not necessary to do less, otherwise it will always be damp and there will be no stable temperature.
Width - about three three meters. For descent - about 1.5 meters, while the input should be top, as a separate entrance. That is, the pit rushes, and on the place of the descent, the walls are formed, which are gradually going to "no".
Be sure to consider the location of groundwater on the site. If they are close, the cellar is not to dig at all, since with a small depth in it there is no particular sense.
Sink on summer kitchen
Without her - nowhere! Run into the house or to the well - uncomfortable. Try to put a double washing at once, since there are always few outdoors in the open air.

Also, be sure to put a small water heater over it. And even better, to put a 100 liter tank on the roof for warming up the sun, or bring the sink to the summer shower tank.
Desktop in summer kitchen
Here it is necessary to do not only a worktop, but also stands with shelves. Without them, it will be difficult to accommodate with comfort. Moreover, if you do not do this, then in case of bad weather or hail, you will have to immediately make all the dishes and the house inventory that will deliver a lot of trouble.

Also, if there are no shelves and cabinets, you will have to endure the necessary fittings for cooking, and if there are convenient storage spaces, they can be there all season.
Dining area in summer kitchen
Here you can say one thing: always count on the maximum number of people who can accommodate you at the table, and not only on everyday days, but also on holidays.
Do not make this place too narrow. The minimum width should be 3 meters, and the length is already at your discretion, but about the same 3 meters.
Here are examples of the successful location of the tables on the summer kitchen:

Swing on summer kitchen
Very unusual solution, while adding comfort. In America, the swing is made to hang on the terrace, and we can easily place them on the summer kitchen, especially if it is an open type. Look at how wonderful it looks in the interior:

They can be placed in any comfortable corner of summer kitchen. The main thing is that they do not interfere with the table and cook.
Summer kitchen design in a private house
The most important thing, namely, functionality - we discussed. And now let's talk about beauty, which is equally important. The design of summer cuisine in a private house may be so interesting and unusual, which will force all passersby to stop and consider your building.

Here are examples of interesting summer kitchen options that you can take the basis when planning:


In conclusion, I would like to say that the summer kitchen in a private house is the thing you need and if you have a question, whether it needs it at all, then we can answer: Needless!